Set Up Multi-platforms Credentials
Overview
AccelByte Cloud's Multi-platform Credentials allow you to build your game with different AccelByte credentials for each platform, eliminating the need to change credentials every time the build setting is changed to other platforms. This feature currently supports PS4, Xbox, Stadia, and Steam.
Unreal Engine
To get started with Multi-platform Credentials, you will need to install our Unreal Engine SDK.
First, create a folder and a file under the [YourProject]/Config directory. Use the following format for the file naming:
[Platform]/[Platform]Engine.ini
For example, if you want to create a specific config for Windows, you will need to use the following name:
Windows/WindowsEngine.ini
Your Config folder should then look like this:

NOTE
You can find the list of available platforms in Engine/Config/BaseEngine.ini under the InstalledPlatforms subfolder.
Input the following config into the file you just created, similar to the format inside the DefaultEngine.ini file:
[/Script/AccelByteUe4Sdk.AccelByteServerSettings]
ClientId=<My Server OAuth Client Id>
ClientSecret=<My Server OAuth Client Secret>
Namespace=<My Namespace>
BaseUrl="https://demo.accelbyte.io"

[/Script/AccelByteUe4Sdk.AccelByteServerSettingsDev]
ClientId=<Dev Server OAuth Client Id>
ClientSecret=<Dev Server OAuth Client Secret>
Namespace=<Dev Namespace>
BaseUrl="https://dev.accelbyte.io"

[/Script/AccelByteUe4Sdk.AccelByteServerSettingsCert]
ClientId=<Cert Server OAuth Client Id>
ClientSecret=<Cert Server OAuth Client Secret>
Namespace=<Cert Namespace>
BaseUrl="https://cert.accelbyte.io"

[/Script/AccelByteUe4Sdk.AccelByteServerSettingsProd]
ClientId=<Prod Server OAuth Client Id>
ClientSecret=<Prod Server OAuth Client Secret>
Namespace=<Prod Namespace>
BaseUrl="https://prod.accelbyte.io"

[/Script/AccelByteUe4Sdk.AccelByteSettings]
ClientId=<My OAuth Client Id>
ClientSecret=<My OAuth Client Secret>
Namespace=<My Namespace>
BaseUrl="https://demo.accelbyte.io"

[/Script/AccelByteUe4Sdk.AccelByteSettingsDev]
ClientId=<Dev OAuth Client Id>
ClientSecret=<Dev OAuth Client Secret>
Namespace=<Dev Namespace>
BaseUrl="https://dev.accelbyte.io"

[/Script/AccelByteUe4Sdk.AccelByteSettingsCert]
ClientId=<Cert OAuth Client Id>
ClientSecret=<Cert OAuth Client Secret>
Namespace=<Cert Namespace>
BaseUrl="https://cert.accelbyte.io"

[/Script/AccelByteUe4Sdk.AccelByteSettingsProd]
ClientId=<Prod OAuth Client Id>
ClientSecret=<Prod OAuth Client Secret>
Namespace=<Prod Namespace>
BaseUrl="https://prod.accelbyte.io"
[/Script/AccelByteUe4Sdk.AccelByteServerSettings]
ClientId=<Windows Server OAuth Client Id>
ClientSecret=<Windows Server OAuth Client Secret>

[/Script/AccelByteUe4Sdk.AccelByteServerSettingsDev]
ClientId=<Windows Dev Server OAuth Client Id>
ClientSecret=<Windows Dev Server OAuth Client Secret>

[/Script/AccelByteUe4Sdk.AccelByteServerSettingsCert]
ClientId=<Windows Cert Server OAuth Client Id>
ClientSecret=<Windows Cert Server OAuth Client Secret>

[/Script/AccelByteUe4Sdk.AccelByteServerSettingsProd]
ClientId=<Windows Prod Server OAuth Client Id>
ClientSecret=<Windows Prod Server OAuth Client Secret>

[/Script/AccelByteUe4Sdk.AccelByteSettings]
ClientId=<Windows OAuth Client Id>
ClientSecret=<Windows OAuth Client Secret>

[/Script/AccelByteUe4Sdk.AccelByteSettingsDev]
ClientId=<Windows Dev OAuth Client Id>
ClientSecret=<Windows Dev OAuth Client Secret>

[/Script/AccelByteUe4Sdk.AccelByteSettingsCert]
ClientId=<Windows Cert OAuth Client Id>
ClientSecret=<Windows Cert OAuth Client Secret>

[/Script/AccelByteUe4Sdk.AccelByteSettingsProd]
ClientId=<Windows Prod  OAuth Client Id>
ClientSecret=<Windows Prod OAuth Client Secret>
NOTE
You can either input part or all of the config into your file. For example, you can input only the ClientId and ClientSecret for the specific environment if desired.
Unity
To get started with Multi-platform Credentials, you will need to install our Unity SDK.
First, create a specific OAuthConfig for your desired platform with the following naming format for the Client-side SDK:
AccelByteSDKOAuthConfig<PlatformName>.json
Use the following naming format for the Server-side SDK:
AccelByteServerSDKOAuthConfig<PlatformName>.json
Our supported platforms include:
- Steam (Windows/Linux build)
- Epic Games (Windows/Linux build)
- Apple
- iOS
- Android
- PS4
- PS5
- Live (Xbox build)
- Nintendo
- Stadia
NOTE
We recommend you only use either Steam or Epic Games. When these two platforms exist in the same directory, the Steam config will be prioritized.
Once completed, you can edit or generate the Client-side SDK config from the Unity Editor. You can do this by navigating to the Accelbyte > Edit Settings.

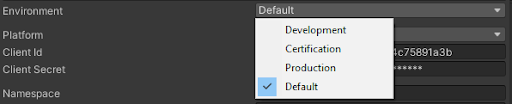
Choose the platform and environment you want to edit.
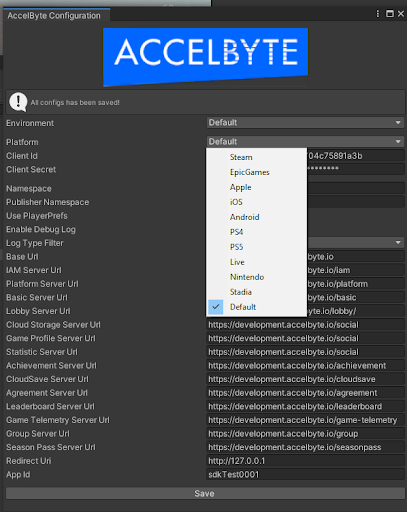
Edit the config and click Save to confirm your changes.
For game implementation, please refer to the Change Environments section.