Unreal Engine SDK Getting Started Guide
You can use AccelByte Cloud's Unreal SDK to implement AccelByte Cloud services into your game. The SDK acts as a bridge between your game and our services. Our SDK supports both UE4 and UE5.
Tutorial
Follow the tutorial below to learn how to set up our Unreal Engine SDK.
Download and install the Unreal SDK Plugin
Open your project with the Unreal Editor.
Copy the plugin folder Plugins/AccelByteUe4Sdk and paste it into your game's plugins folder.
Add the following plugin to your [MyAwesomeGame].uproject file.
"Plugins": [
...
{
    "Name": "AccelByteUe4Sdk",
    "Enabled": true
},
...
Add the following plugin to your /Source/[MyAwesomeGame].Target.cs file.
ExtraModuleNames.AddRange(new string[]
{
    ...
    "AccelByteUe4Sdk",
    ...
}
Add the following plugin to your /Source/[MyAwesomeGame]Editor.Target.cs file.
ExtraModuleNames.AddRange(new string[]
{
    ...
    "AccelByteUe4Sdk",
    ...
}
Add the plugin to your /Source/MyAwesomeGame/[MyAwesomeGame].Build.cs file.
PublicDependencyModuleNames.AddRange(
new string[] {
    ...
    "AccelByteUe4Sdk",
    ...
}
Configure the AccelByte Cloud Client
Before using the SDK, you will need to configure the AccelByte Cloud SDK Configuration in the Unreal Editor or input the .JSON content into DefaultEngine.ini.
Input the AccelByte Cloud Configuration in Unreal Editor
Open your project with the Unreal Editor.
Ensure that you have configured the plugin in your project.
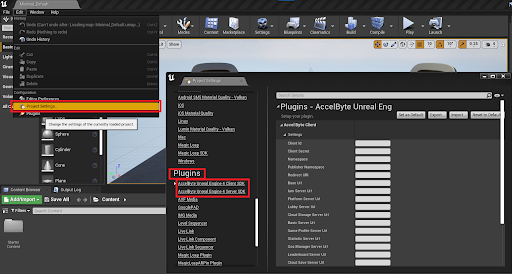
In the top menu bar, go to Edit > Project Settings.
In Project Settings, scroll down to the Plugins section and select AccelByte Unreal Engine 4 Client SDK.
Fill in Client Id, Client Secret, Namespace, Publisher Namespace, Redirect Uri, Base Url, and App Id. Leave the remaining input fields empty.
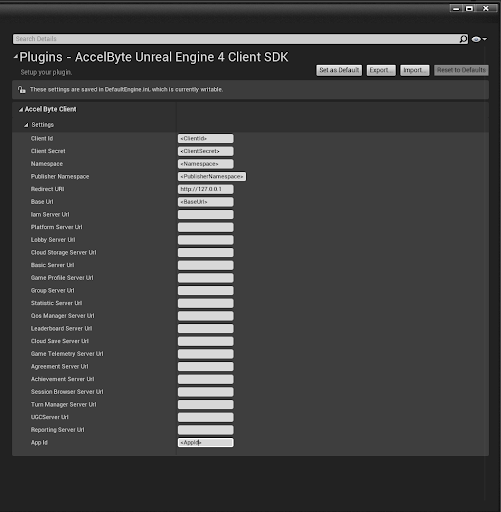
Click Set as Default to save your configuration.
Input JSON Content into DefaultEngine.ini
In the /Config folder, open DefaultEngine.ini.
Input your information into the file using the following format:
[/Script/AccelByteUe4Sdk.AccelByteSettings]
ClientId=<client_id>
ClientSecret=<client_secret>
Namespace=<namespace>
PublisherNamespace=<publisher_namespace>
RedirectURI="http://127.0.0.1"
BaseUrl=<base_url>
AppId=<app_id>
tip
Pay attention to PublisherNamespace, ClientId, ClientSecret (if applicable), Namespace, AppId, BaseURL, and RedirectUri.You can find your ClientId, ClientSecret, and Namespace settings in the AccelByte Admin Portal, or read about IAM Clients. Contact support or your Account Manager if you are unsure of your API URLs.
Configure the AccelByte Cloud Server
If you plan to use AccelByte Cloud's Server, you will need to configure the AccelByte Cloud Server SDK using the Unreal Editor, or directly through DefaultEngine.ini.
Input AccelByte Cloud Server Configuration into Unreal Editor
Open your project with the Unreal Editor.
Ensure that you have configured the plugin in your project.
In the top menu bar, go to Edit > Project Settings.
In Project Settings, scroll down to the Plugins section and select AccelByte Unreal Engine 4 Server SDK.

Fill in Client Id, Client Secret, Namespace, Publisher Namespace, Redirect Uri, Base Url, and App Id. Leave the remaining input fields empty.
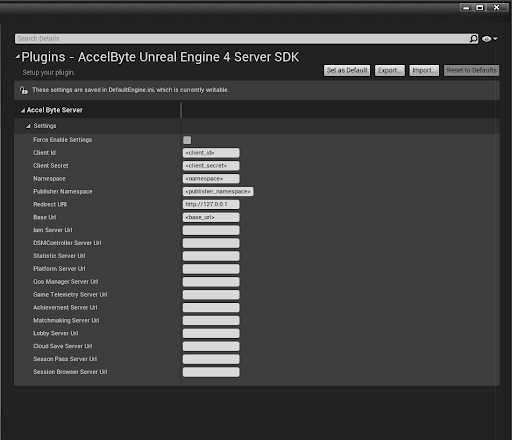
Click Set as Default to save your configuration.
Input JSON Content into DefaultEngine.ini
Open DefaultEngine.ini in the /Config folder.
Input your information into the file using the following format:
[/Script/AccelByteUe4Sdk.AccelByteServerSettings]
ClientId=<client_id>
ClientSecret=<client_secret>
Namespace=<namespace>
PublisherNamespace=<publisher_namespace>
RedirectURI="http://127.0.0.1"
BaseUrl=<base_url>
tip
Pay attention to PublisherNamespace, ClientId, ClientSecret (if applicable), Namespace, AppId, BaseURL, and RedirectUri.You can find your ClientId, ClientSecret, and Namespace settings in the AccelByte Admin Portal, or read about IAM Clients. Contact support or your Account Manager if you are unsure of your API URLs.
Additional Features
AccelByte Cloud now supports additional features that you can enable in [/Script/AccelByteUe4Sdk.AccelByteSettings].
Client-Side Data Caching (In-Memory): you can now cache static data/files in the memory to reduce HTTP calls. To activate this feature, ensure that the service that will send the response can provide HTTP Cache Control headers.
[/Script/AccelByteUe4Sdk.AccelByteSettings]
...
bEnableHttpCache=true
Quality of Service (QoS) Scheduled Latencies Updater: we have created a scheduler that runs in the background to update the latencies on all specified areas. This will help game developers to implement matchmaking in multiple regions.
You can specify the given time interval for the scheduler. Polling is initialized at the authentication level since the latencies need to be updated before matchmaking to eliminate bottlenecks when matchmaking starts. Players may also want to know their region latencies (ping) before they begin matchmaking.
[/Script/AccelByteUe4Sdk.AccelByteSettings]
...
QosLatencyPollIntervalSecs=0
QosServerLatencyPollIntervalSecs=0
The default value for both parameters is 0.
To enable the scheduler, set QosLatencyPollIntervalSecs to a value greater than 0. The minimum polling interval, when active, is 10 minutes (600 seconds).
To enable the scheduler for other regions, set QosServerLatencyPollIntervalSecs to a value greater than 0.
You can also configure the plugin in the Editor by clicking Edit on the menu bar and selecting Project Settings. Scroll down to the AccelByte SDK category and fill in your game client credentials and the fields found in the .ini file. Any remaining fields can be left blank. For more information, see AccelByte's Client Management documentation.
