Build Your Own Matchmaking Service with AccelByte Cloud's Python SDK in AWS Lambda
Overview
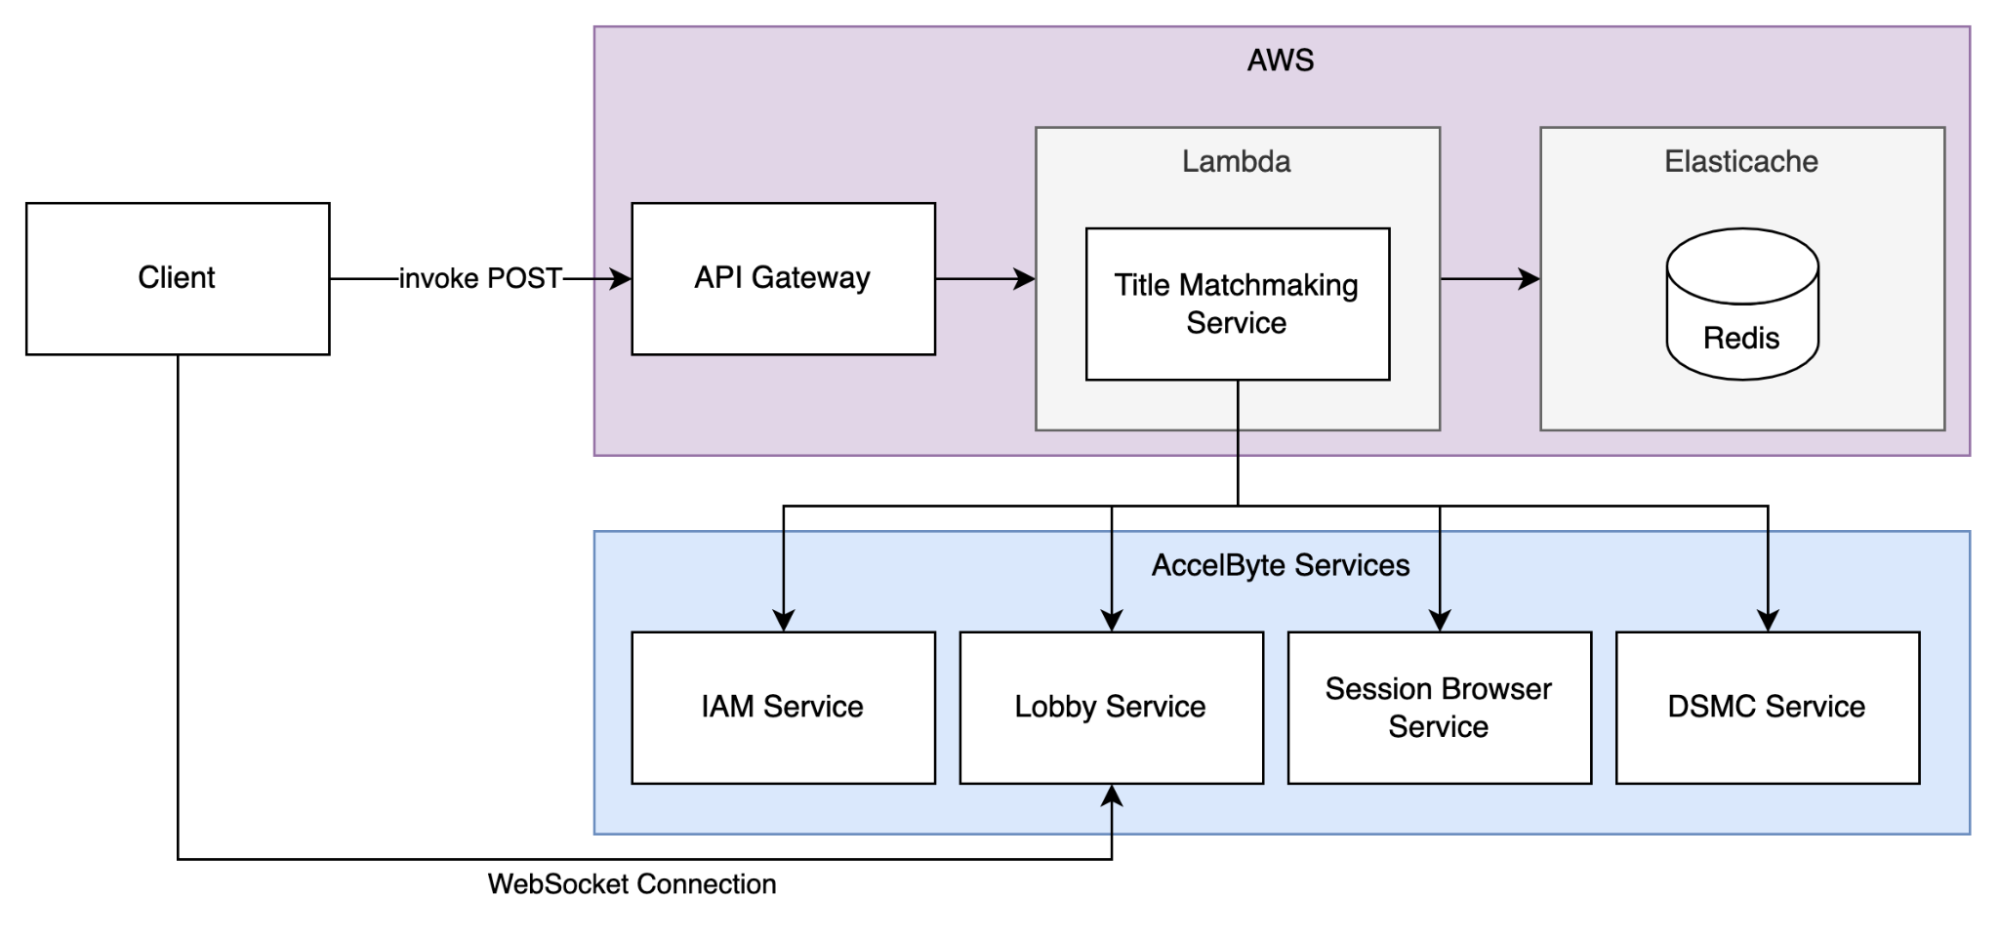
In this tutorial, you will learn how to build and customize your own Matchmaking service using AccelByte Cloud's Python SDK. This guide will show you how to create a Matchmaking service where two players can play together. The implementation covered in this guide will flow as follows:.
Prerequisites
Ensure that you have followed the prerequisites when creating the AWS .yaml script
Your .yaml script is configured
You have a clone of the latest AccelByte Cloud's Python SDK repository
IMPORTANT
We recommend using the specific latest version of the AccelByte Cloud's Python SDK when starting a new project, instead of the command "latest" to avoid issues when the latest SDK version is updated.Once you have cloned the AccelByte Cloud's Python SDK repository, go to the samples/title-matchmaking-app folder. You will use the following files:
File Usage samples/ title-matchmaking-app/title_matchmaking/app.py The code of the Title Matchmaking samples/title-matchmaking-app/client. py This file will be used when testing your matchmaking later in this tutorial
Configure the repository by following Accelbyte Cloud's Python SDK Getting Started Guide.
Initial Setup
Authorization
Authorize access to AccelByte Cloud's API using the following steps: a. Ensure that you have created a User and a Game Client in the Admin Portal.
b. Open the IAM Swagger page from the OAuth2 authorize API: /iam/v3/OAuth/authorize. A Request ID will be generated.
c. Log in using the user_name and password from the Authentication API: /iam/v3/authenticate. Input the Request ID generated in the previous step. If the request succeeds, you will receive an authorization code which will be used in the next step.
d. Generate the user token using the authorization code from the OAuth2 Access Token Generation: /iam/v3/oauth/token. If the request succeeds, you will receive a user token which will be used in Step 2.
e. Generate an OAuth Client token using client_credentials from the OAuth2 Access Token Generation: /iam/v3/oauth/token. If the request succeeds, you will receive an OAuth Client token which will be used when implementing functions related to the DSMC.
Validate the user's request by extracting the authorization header value Bearer Auth Token from the user's request.
# 02. Extract the Bearer Auth Token from the Authorization header.
authorization = str(event.get("headers").get("Authorization"))
bearer_auth_token, error = extract_bearer_auth_token(authorization)
if error:
    return error
log_done("extract Bearer Auth Token")
Convert the Bearer Auth Token you obtained into an instance of OauthmodelTokenResponseV3.
# 03. Convert Bearer Auth Token into an OAuth Token object.
    oauth_token, error = convert_bearer_auth_token_to_oauth_token(bearer_auth_token)
    if error:
        return error
    log_done("convert Bearer Auth Token")
Create a Redis client to connect to the Elasticache for Redis to store matchmaking requests.
# 04. Create Redis Client.
    redis_client = create_redis_client(env.redis_host, env.redis_port)
    log_done(f"create redis client ({redact(f'{env.redis_host}:{env.redis_port}')})")
Create an instance of an IAM Client of the IAM-Python-SDK and use it to validate the OAuth Token and its Permissions and Claims.
# 05. Create IAM Client.
    iam_client = create_iam_client(env.iam_base_url, env.iam_client_id, env.iam_client_secret)
    log_done("create IAM client")

    # 06. Validate IAM Client locally.
    error = validate_iam_client_locally(iam_client)
    if error:
        return error
    log_done("validate IAM Client locally")

    # 07. Grant IAM Client an Access Token.
    error = grant_iam_client_access_token(iam_client)
    if error:
        return error
    log_done("grant IAM Client an Access Token")

    # 08. Validate Access Token.
    error = validate_access_token(iam_client, bearer_auth_token)
    if error:
        return error
    log_done("validate Access Token")

    # 09. Validate permissions.
    error = validate_permissions(iam_client, bearer_auth_token, oauth_token)
    if error:
        return error
    log_done("validate permissions")

    # 10. Parse and validate claims.
    claims, error = validate_claims(iam_client, bearer_auth_token)
    if error:
        return error
    log_done("parse and validate claims")

    user_id = claims.Sub
    namespace = claims.Namespace
Initialize the AccelByte Python SDK and use it to store the OAuth Token.
# 11. Initialize the AccelByte Python SDK.
accelbyte_py_sdk.initialize()

# 11.a. Create IAM ConfigRepository and TokenRepository
iam_config_repo = MyConfigRepository(env.iam_base_url, env.iam_client_id, env.iam_client_secret)
iam_token_repo = MyTokenRepository(oauth_token)
iam_token_repo.store_token(oauth_token)

# 11.b. Create Game ConfigRepository and TokenRepository
game_config_repo = MyConfigRepository(env.game_base_url, env.game_client_id, env.game_client_secret, env.game_namespace)
game_token_repo = MyTokenRepository(None)

# 11.c. Store the 2 different pairs of repositories
global IAM_REPO, GAME_REPO
IAM_REPO = iam_config_repo, iam_token_repo
GAME_REPO = game_config_repo, game_token_repo
Tutorials
Create a Matchmaking Request
Using your previously generated User ID, create a matchmaking request that contains a new channel and party.
# 13. Create matchmaking request
error = create_matchmaking_request(redis_client, namespace, env.game_mode, user_id)
if error:
    return error
log_done("create matchmaking request")
Set Up Search Notifications
Set up a function to send a match search notification to the player via WebSockets. Players will receive this notification while waiting for a match.
# 14. Send search for match notification to user
error = send_notif_match_searching(namespace, user_id)
if error:
    return error
log_done(f"send free form notification (match searching) to  player ({user_id})")
Set Waiting Time
Set the maximum time the service will wait for another player while matchmaking.
# 15. Wait for another user.
elapsed_time = 0.0
active_matchmaking_requests_summary = None
other_matchmaking_request = None
while elapsed_time < FIND_OTHER_USER_MAX_DURATION:
    active_matchmaking_requests_summary, error = get_active_matchmaking_requests_summary(
        redis_client,
        namespace,
        env.game_mode
    )
    if error:
        return error
    other_matchmaking_request = active_matchmaking_requests_summary.get_other_matchmaking_request(user_id)
    if other_matchmaking_request:
        break
    time.sleep(FIND_OTHER_USER_CHECK_INTERVAL)
    elapsed_time += FIND_OTHER_USER_CHECK_INTERVAL
    log_wait(f"waiting for other players.. {elapsed_time:.2f}/{FIND_OTHER_USER_MAX_DURATION:.2f}s")
if not other_matchmaking_request:
    return create_response(408, "Timed out! Not enough players.")
log_done(f"find other user ({other_matchmaking_request['user_id']})")

party_id = other_matchmaking_request["party_id"]
user_ids = list(active_matchmaking_requests_summary.unique_user_ids)
other_user_ids = list(active_matchmaking_requests_summary.get_other_user_ids(user_id))
Manage Game Session
Create a Game Session in the Session Browser
In this section, we will be registering the game session to the session browser. This step will also check whether there are enough players in the database. When the game has enough players, the game session will be registered in the session browser and a Session ID will be created. This ID will be used to register the session in the DSMC.
# 16. Create session
sb_session, error = create_session(
    env.game_namespace,
    env.session_browser_game_version,
    env.session_browser_map_name,
    env.session_browser_mode,
    env.session_browser_password,
    env.session_browser_type,
    env.session_browser_username
)
if error:
    return error
log_done(f"create session on session browser")

sb_session_id = sb_session.
Register a Game Session to DSMC
Once you have successfully created a session, register it to the DSMC.
# 17. Register session on DSMC
    _, error = register_session_on_dsmc(
        sb_session_id,
        env.dsmc_deployment,
        env.game_mode,
        env.game_namespace,
        party_id=party_id,
        user_ids=user_ids
    )
    if error:
        return error
    log_done(f"create session on dsmc")

    # 17.a. Wait for DSMC to register the session
    time.sleep(5.0)
Claim a Game Server
This function is used to claim a game server from the DSMC service.
   # 18. Claim server
    _, error = claim_server(
        env.game_namespace,
        sb_session_id
    )
    if error:
        return error
    log_done(f"claim server from dsmc")
Add Players to the Game Session
This function adds players to the server in the Session browser.
   # 20. Add players to server in Session Browser

   for idx, uid in enumerate(user_ids):

       _, error = add_player_to_sb_sesion(env.game_namespace, sb_session_id, uid)

       if error:

           return error

       log_done(f"add player ({uid}) to session [{(idx + 1):02d}/{len(user_ids):02d}]")
Get Session Update
After adding players to the Matchmaking session, create a function to obtain the latest session information and to check if the session is now able to be joined.
    # 21. Get session update from Session Browser
    sb_session, error = get_session_from_session_browser(
        env.game_namespace,
        sb_session_id
    )

    # 22. Check if session is joinable
    if not sb_session.joinable:
        return create_response(400, "Unable to join the session.")
Set Up Matching Notification
This function sends a notification to all players that a match has been found and displays the server IP and port.
    # 23. Send notification to all users
    for idx, uid in enumerate(user_ids):
        error = send_notif_match_found(namespace, server_ip, server_port, uid)
        if error:
            log_warn(f"failed to send free form notification (match found) to player ({uid}) [{(idx + 1):02d}/{len(user_ids):02d}]")
        else:
            log_done(f"send free form notification (match found) to  player ({uid}) [{(idx + 1):02d}/{len(user_ids):02d}]")

    response = {
        "message": f"successfully matchmade "
                   f"server:(ip:{server_ip}|port:{server_port})|"
                   f"session:(id:{sb_session_id})|"
                   f"users:({user_id},{other_user_ids})",
        "server": {
            "ip": server_ip,
            "port": server_port,
        },
        "session": {
            "id": sb_session_id
        },
        "users": [
            user_id,
            other_user_ids
        ]
    }
Testing the Matchmaking
In this section, you will learn how to run and test your Matchmaking service locally. You can test your service with your client.py files. When client.py is running, it will prompt the player to enter their username and password. Once authorized, client.py sends a a matchmaking request invokes the Lambda function. When a match is found, client.py listens to the notification service and sends a notification.
    r = rq.post(
        url=mm_uri,
        headers={
            "Authorization": f"Bearer {access_token}"
        }
    )
    print(f"[done]: sent matchmaking request")
def print_wsm(message: str, tag: str, indent="| ", prefix="\n", suffix="\n"):
        message = "\n".join([f"{indent}{line}" for line in message.rstrip().splitlines(keepends=False)])
        print(f"[{tag}]:{prefix}{message}{suffix}")

    async def on_message(message: str):
        print_wsm(message, "recv")

    scheme, uri = base_url.split("://")
    ws_uri = f"wss://{uri}/lobby"

    ws_client = Websockets2WSClient(
        uri=ws_uri,
        username=username,
        password=password,
        access_token=access_token
    )

    ws_client.listeners.append(on_message)

    await ws_client.connect()
    print("[done]: connect to websocket")
Now you can test your Matchmaking service. In the Python terminal, run the client.py script and enter the player's email and password. Once authorized, matchmaking will begin..

Deploying the Matchmaking Function into AWS Lambda
To upload the Matchmaking function that you created to AWS Lambda, first ensure that you have filled in all of the required fields in the AWS SAM Template and have tested the SAM locally both in AWS SAM and Client.
In your terminal, go to the root directory of aws-lambda.
Run the build using the following function:
sam build --use-containerYou can find more detailed information about Deploying using the AWS SAM CLI in AWS's Documentation.
Deploy the application to the AWS Cloud using the following function:
sam deploy --guidedFollow the on-screen prompts. You can find more detailed information about Deploying serverless applications in AWS's Documentation.