Armada
Overview
What is Armada?
Armada is a dynamic game server manager that utilizes a mixture of bare metal and cloud services to help reduce hosting costs for you, while still maintaining the best performance and experience for your players. Armada allows you to have multiple fleets of servers, which can be spread across different regions, providers, or infrastructure types.
Advantages of Armada
Armada allows you to take advantage of several features designed to ensure your players have the best gaming experience possible.
Provider-agnostic approach Armada allows you to choose between multiple providers, depending on your hardware requirements. You can decide to have 100% of your servers in AWS cloud if you have free credits, or you can choose to have 90% of your game servers hosted using dedicated bare metal with the last 10% being scaled into cloud if you wish to bring your costs down. Armada allows you to pick and choose exactly what hardware you want, from whoever you want without any limitations!
Cost-aware scaling Armada ensures that hosting costs are taken into account when scaling up or down. When scaling up, Armada will prioritize filling bare metal machines before bursting into the cloud. When scaling down, Armada looks for opportunities to reduce the load on the cloud machines without impacting performance or player experience.
Multi-region hosting Armada has been designed for greater global coverage and better game performance across more regions. With Armada you aren't tied to one hosting solution, which means you can make sure that your hosting providers cover each other's blind spots. Mix and match providers, hardware types, and regions based on your player demands.
Integrated matchmaking and lobby Armada connects directly with AccelByte Cloud's Matchmaking and Lobby services to provide geolocation support, so that you can match players in the same region for optimal player experience. If you already have a matchmaking and lobby service you prefer, we can help you integrate Armada with that instead of using AccelByte Cloud's.
Unsure what hardware to use? If you are unsure what dedicated bare metal provider to use, what regions you want or you have only ever used cloud, the Armada team is here to help! We can advise on everything from specific hardware types to use, how your game servers will perform, and which regions will be best to support all your players. We have partnered with a number of dedicated hardware providers who already cover the majority of popular regions across the globe.
Get Started with Armada
Before we can get you set up with Armada, our team will need some information about your game and players. This will help us accurately price out the hardware you'll need, as well as make sure your hosting covers the right locations to give your players the best experience possible.
Player counts For us to provide the best experience possible, we need to know some information about your players. First, we need to know the maximum number of players that can connect to your game server. We also need to know what your estimated average number of players will be over the course of a month, as well as the estimated peak number of players. With these player numbers, we can ensure that you have enough bare metal to cover the average player count, as well as ensuring that you can scale effectively into cloud to meet peak demand when things get busy.
Player locations With Armada, you can host your game server sessions pretty much anywhere in the world. While this is a great achievement, we are also aware that some games are more popular in different parts of the world than they are elsewhere. It is important for us to know where the majority of your players are based, so that we can deploy bare metal and cloud instances as close to them as possible. The closer the hardware, the better the performance. Your players deserve the best possible experience every time they play your game!
Game server resource requirements Every game server that you deploy will have some form of CPU and RAM usage. In order to provide the best possible performance for your players, Armada needs to know what the worst case scenario is in terms of resource usage requirements. To do this, you will need to run a session with the maximum number of players connected, using the most resource intensive map and game mode possible. During this session, you should record the CPU, RAM and network usage over a full match.
Once you have this data, the Armada team can then run it through our calculator. This will tell us exactly how many game server sessions we can safely fit on your bare metal and cloud server instances without impacting the game server performance. More importantly, it will also allow us to calculate the best distribution of bare metal and cloud to ensure you always have capacity for your players as well as lowering the cost for hosting.
Glossary
Here are some common terms in the Armada documentation, and their definitions:
- Armada AccelByte's product. A suite of tools, services, and SDKs used to enable multiplayer for a game
- DSM / DSMC / Dedicated Server Manager One of Armada's components that acts as the brain of Armada. This service stores deployment configurations that are defined from the Admin Portal and communicates with Nomad to deploy dedicated servers to be used in matchmaking.
- DS / Dedicated Server / Game server / Authoritative server A counterpart for game clients in multiplayer architecture. Game clients connect to the game server during play sessions and have the server run all the game logic. In Armada, the traditional game server binary is containerized and deployed as a Docker container in a Nomad cluster. This running DS container is sometimes referred to as a pod.
- DS Logs Logs generated by a running dedicated server. Game developers can download full DS logs from the Admin Portal.
- DS Uploader A tool for game developers to upload the dedicated server binary to Armada. Upon upload, Armada's services will containerize the server and store it in a Docker image repository.
- Game Session An active play session where a game client is connected to a game server. In Armada, a game session can be created through matchmaking.
- Nomad A container orchestration suite that is used by Armada to deploy game server containers. In a nutshell, the main components of Nomad are:
- Nomad Server The brain of the cluster, which the DSMC communicates with directly.
- Nomad Agent/Client The worker of the cluster, which spreads to the machines the actual DS containers are running in.
- Armada configuration/Dedicated server configuration Settings where game developers specify how the game's dedicated servers will be deployed. \
The configuration consists of:
- Image Uploaded DS binaries that are already containerized and stored in an image repository. Armada uses the image version to uniquely identify which DS to deploy.
- Pod Configuration Settings that will affect running DS containers, such as CPU and Memory allocation, and which port that the game server listens to.
- Deployment Settings that tell Armada which image to run in a specific region, using which pod configuration. You can also define how many warm servers should be run to anticipate incoming players.
- QOS/Quality Of Service A set of services that are deployed in each of the regions where Armada can spawn dedicated servers. Using the SDK, game clients can call the QOS in each region to measure network latency and determine the nearest region to ensure that matchmaking pairs players that are near each other.
Permissions
Make sure you're authorized to use our services and have the following permissions before you use Armada:
| Usage | Permissions | Action |
|---|---|---|
| Register a New Game Session | NAMESPACE:{namespace}:DSM:SESSION | Create |
| Claim a DS for a Game Session | NAMESPACE:{namespace}:DSM:SESSION | Update |
| Retrieve terminated servers in a specific namespace | ADMIN:NAMESPACE:{namespace}:DSAM:SERVER | Read |
| Download the DS Artifact file. | ADMIN:NAMESPACE:{namespace}:DSAM:ARTIFACT | Read |
| Check DS Artifact's existence before downloading the file. | ADMIN:NAMESPACE:{namespace}:DSAM:ARTIFACT | Read |
| Retrieve terminated servers in all namespace | ADMIN:NAMESPACE:{namespace}:DSAM:SERVER | Read |
Permissions work slightly differently depending on whether they are assigned to IAM Clients or Roles assigned to users. For more information, read the Authentication and Authorization documentation.
How It Works
The Basics of Server Management
For each multiplayer game that you wish to host using Armada, you will need a fleet of bare metal servers as well as access to some virtual cloud instances. This will ensure that you have the capacity needed to service your players.
As Armada is completely provider agnostic, you can source hardware from different providers depending on your needs, as well as utilize any and all cloud providers. What's more, if you are unsure what providers to use or do not have the ability to organize your own hardware, the Armada team can source and deploy this for you using our recommended providers.
Each bare metal server and virtual cloud instance will have your multiplayer game server deployed to it so that when players make a matchmaking request, Armada will be able to start an instance based on the required location and instance priority.
Armada has a powerful priority system that allows you to specify what hardware or instance types should be used first to service your players. You may have a large fleet of bare metal servers, and also a bunch of credits provided to you from one of the many cloud providers. With Armada, you can choose if you want to burn through your credits first, or place your players on the bare metal capacity until the point where they are completely full and then burst into the cloud. The choice is entirely yours!
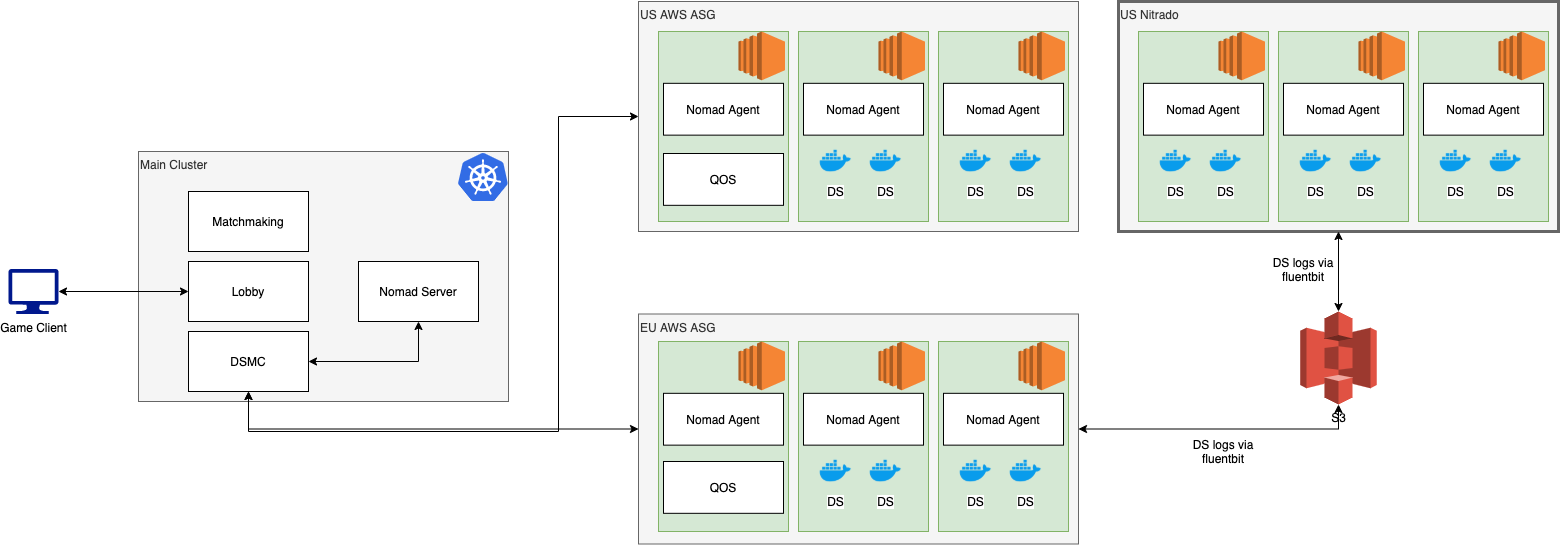
Armada works by connecting dedicated servers from different providers. The diagram below shows the flow and different services involved in connecting these servers. Any dedicated servers required are hosted directly on bare metal or cloud infrastructure that is specific to your game.
How Our Matchmaking Service Uses Armada
Below is a diagram of how Armada can work with our Cloud Matchmaking service.
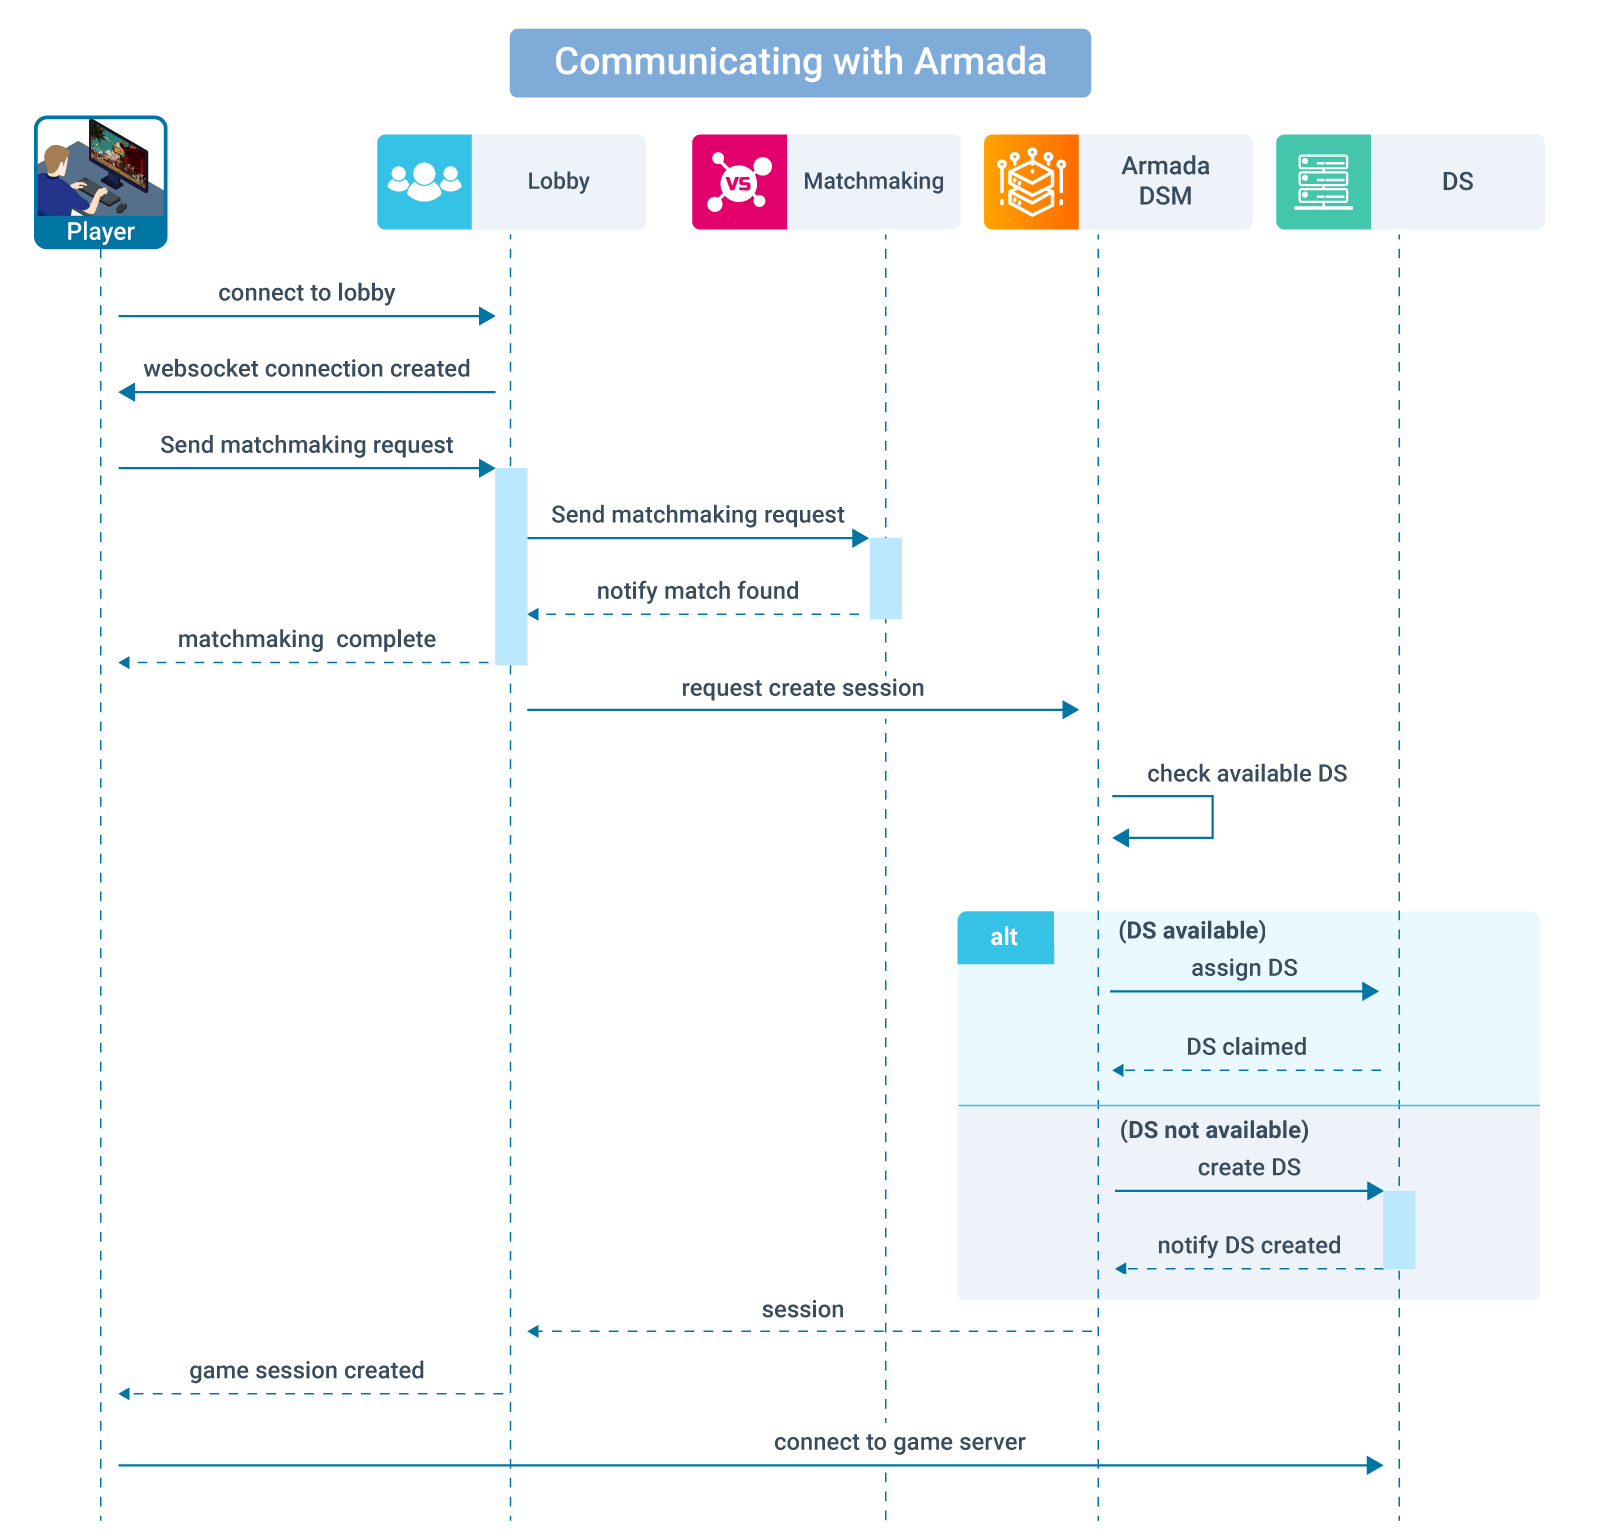
The player connects to the Lobby service through a websocket connection.
The player sends a matchmaking request to the Lobby service.
The Lobby service will act as a proxy and forward the incoming message to the Matchmaking service.
When a match is found, the Matchmaking service will notify the Lobby service.
The Lobby service will send a request to the DSM to create a new game session with the match details.
The DSM will check whether a DS pod is available.
If there's an idle pod available, the DSM will assign the available DS pod.
If there are no idle pods available, the DSM will spawn a new DS pod.
The DSM claims the pod and assigns the game to it.
After the process is complete, the DSM notifies the Lobby service that the session has been created, and sends the DS details.
The Lobby service forwards the DS details to the game client.
Then the game client can connect to the server using those DS details.
Deployment Override
Deployment override is a feature that enables you to override an existing deployment's configurations if part of that deployment turns out to be unstable, so you can re-enable the previous working version. You can also use deployment override if you want to test a certain feature that has a different game version from your current deployment.
For example, to run the game you need to have a matching Game Client and Game Server. When you override a deployment, if you have 3 different game versions on 3 different development stages, you don't have to create 3 different deployments for each Game Version. You only need to create one Deployment Server that you can override based on the Game Version.
The diagram below outlines how this feature works:
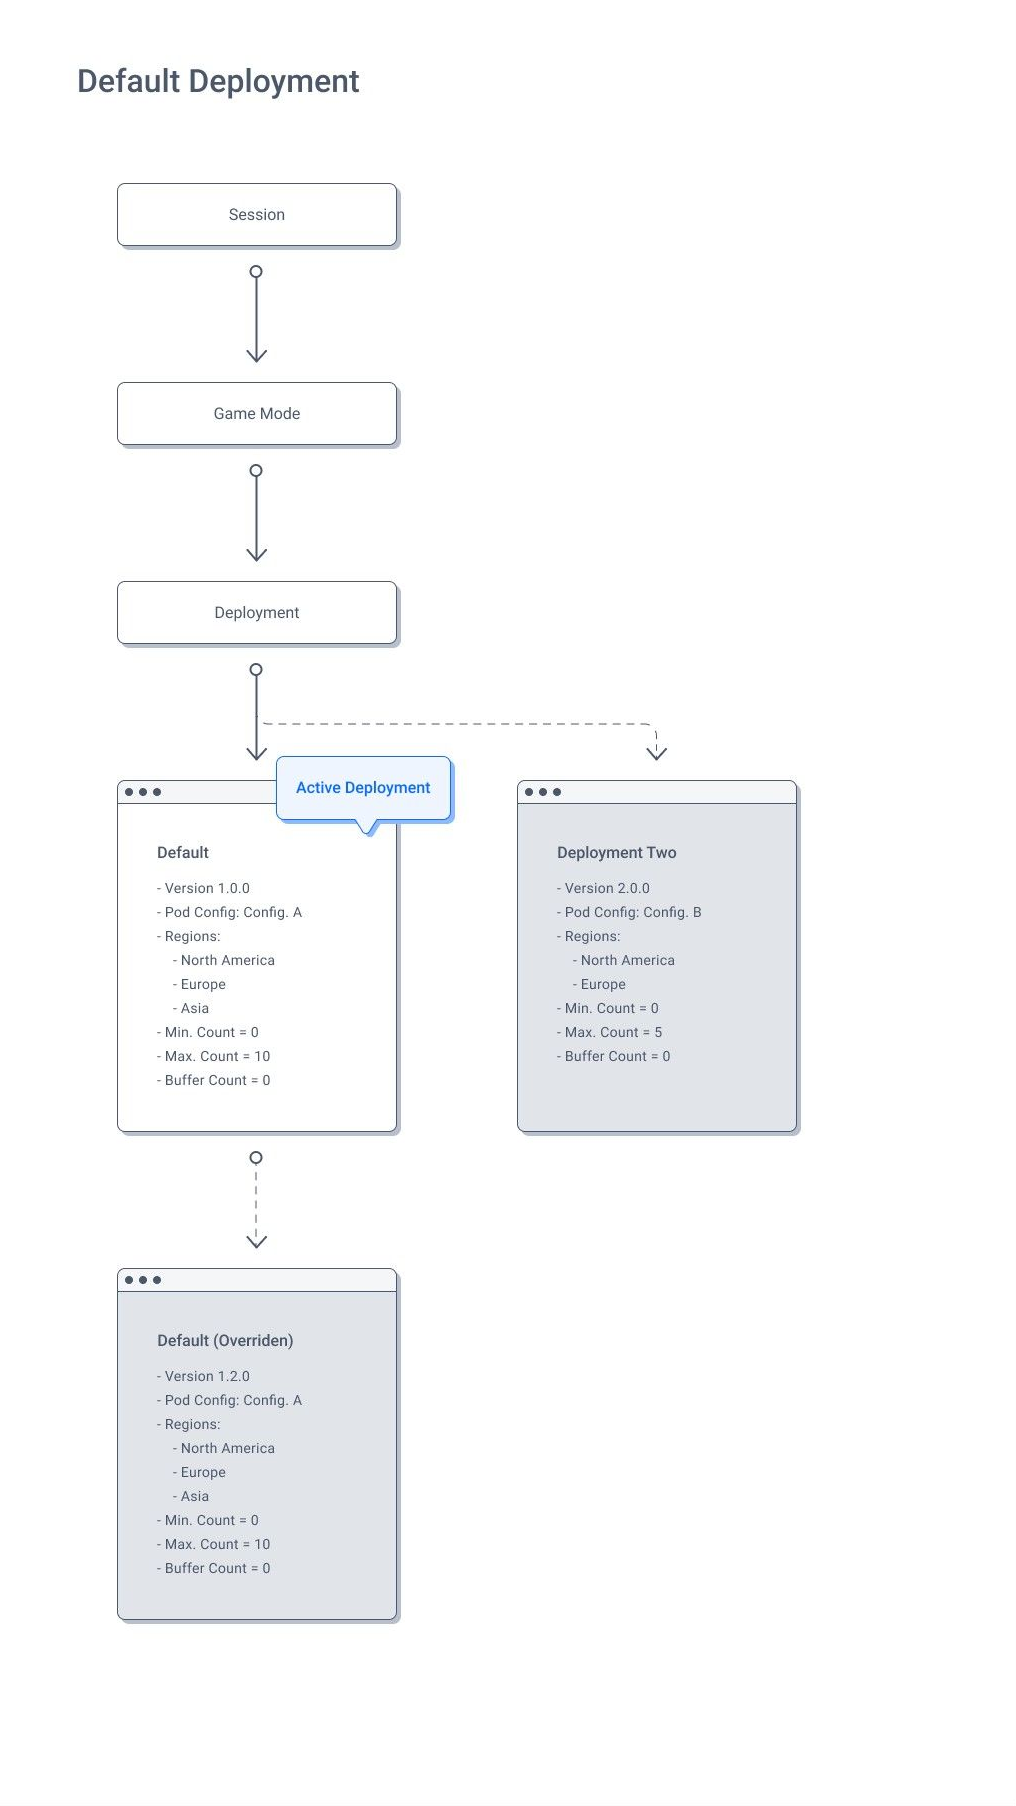
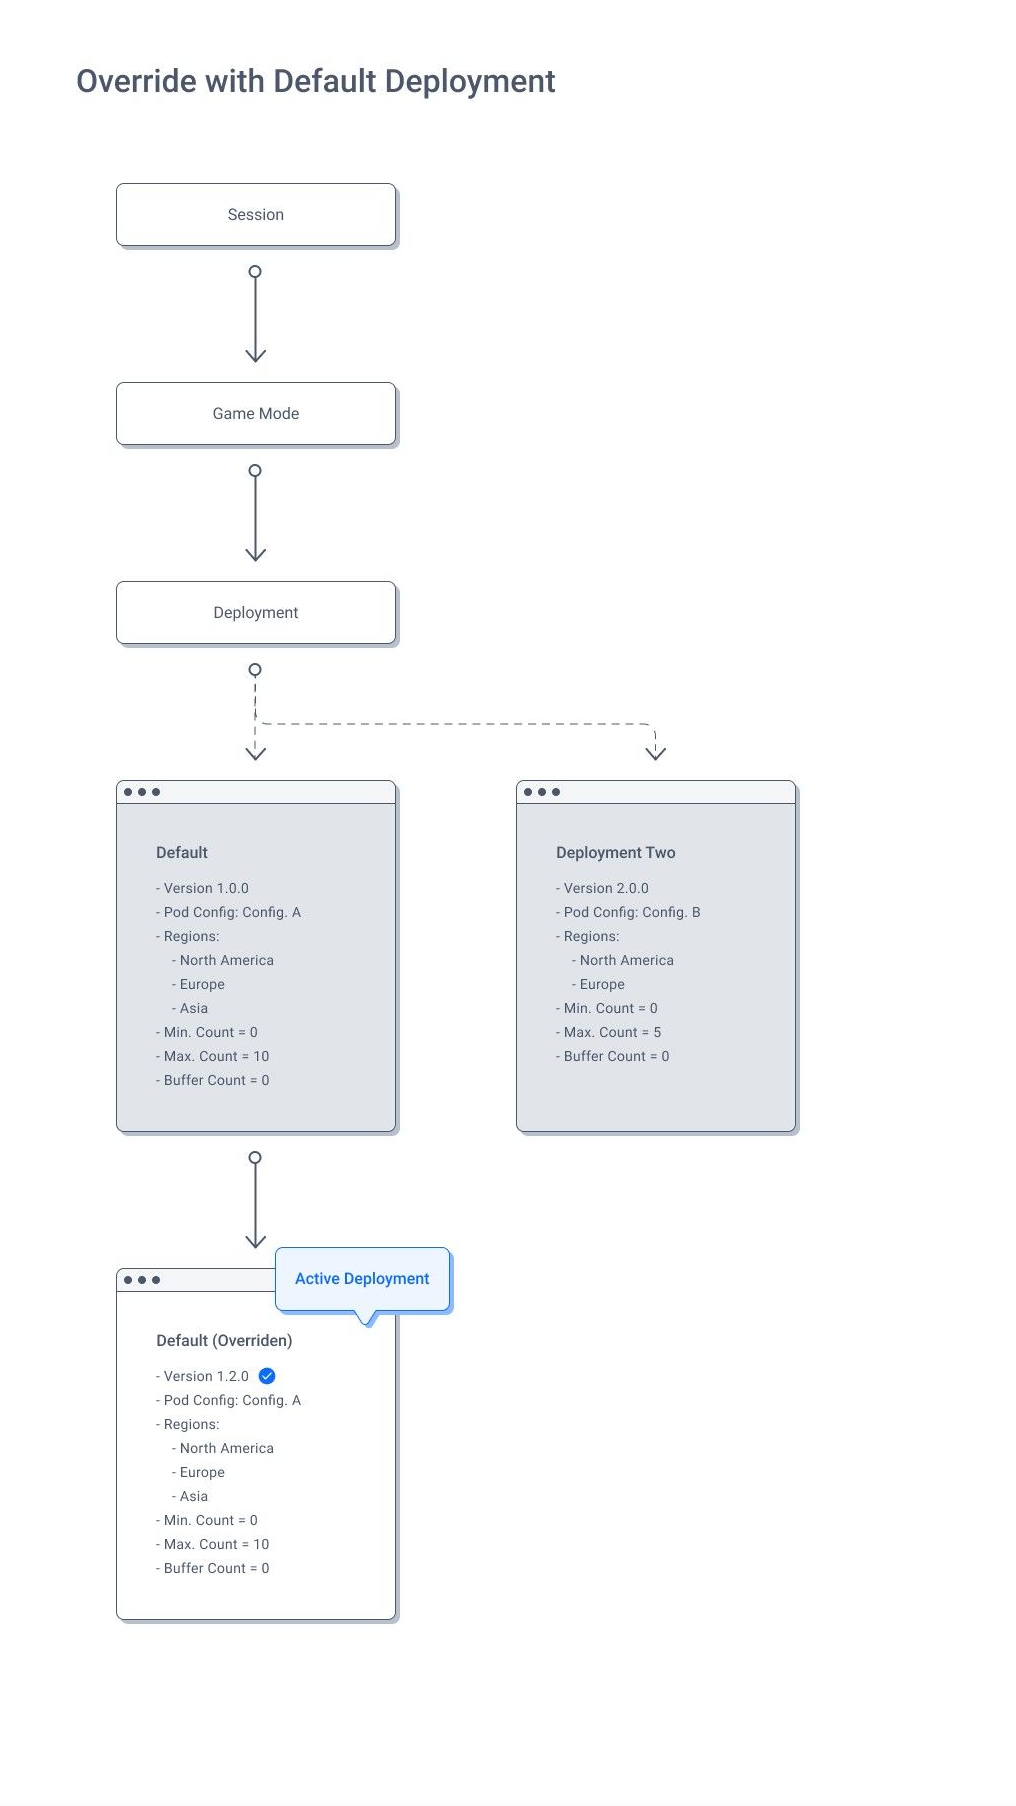
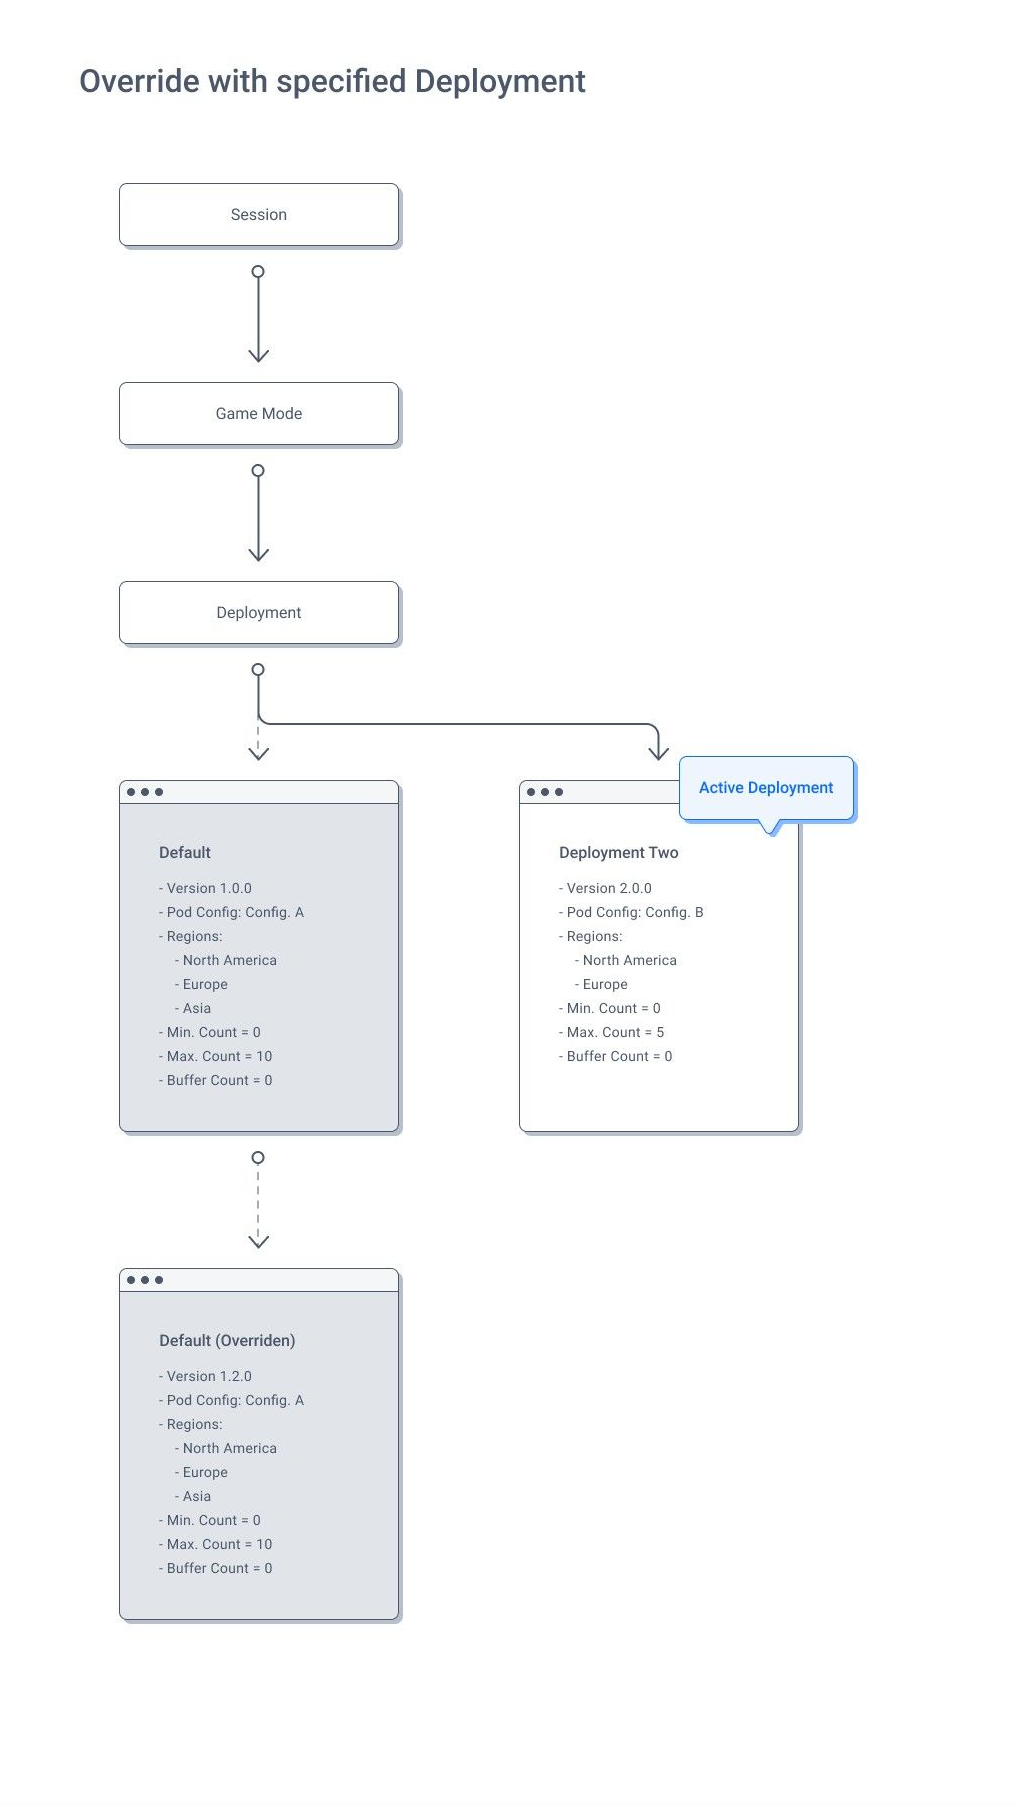
As seen in the diagram above, the override will be activated depending on the version requested by the game client.
- Default Deployment refers to the deployment that will be used if no errors occur.
- Override with Default Deployment allows you to override a non-default deployment version with the default deployment, so if the default version is 1.0.0 and you have deployed 1.0.1, the deployment will be overridden with 1.0.0 should the server have any issues with 1.0.1.
- Override with Specified Deployment enables you to define a deployment version to revert to should the server have any issues with the default deployment. For example, if only a certain version of your game includes support for matchmaking servers in Asia, this version will need to be deployed when players in Asia access your game.
Manage Your Game Servers in the Admin Portal
Create a New Dedicated Server Configuration
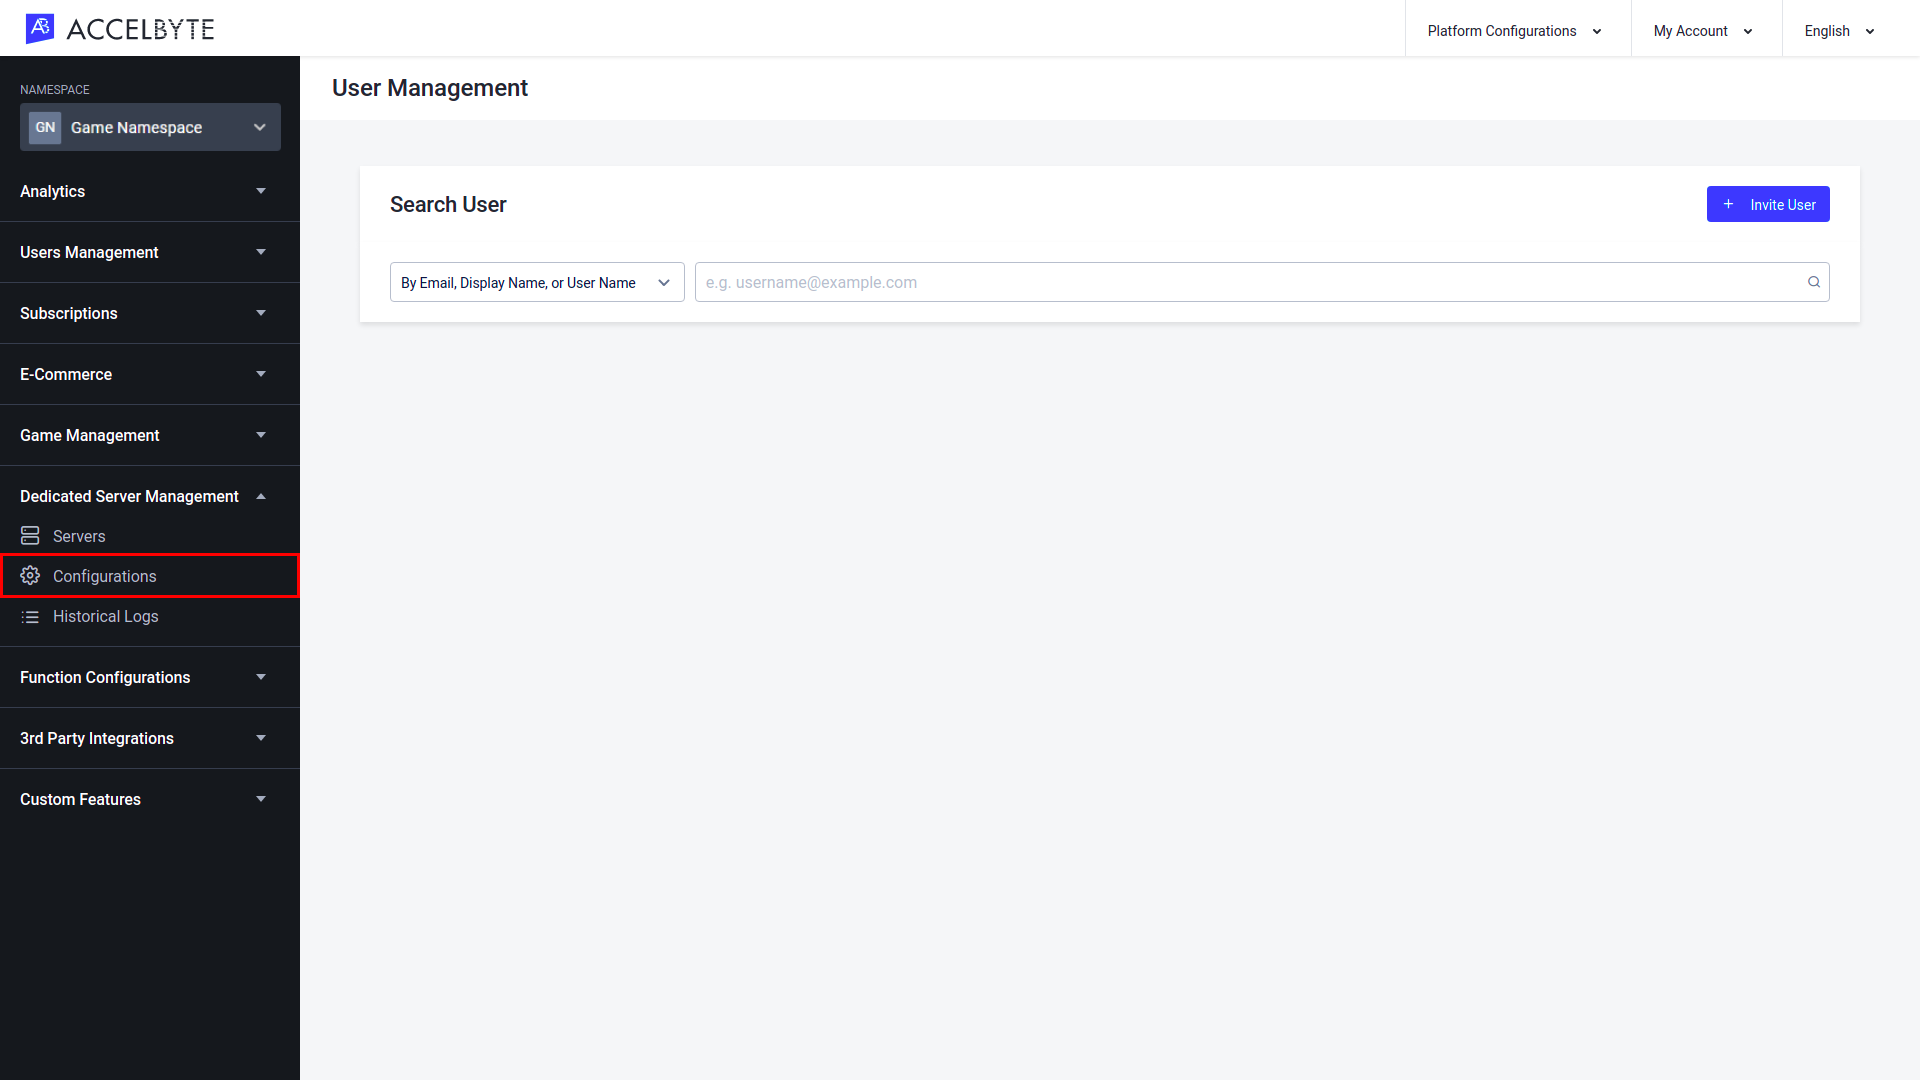
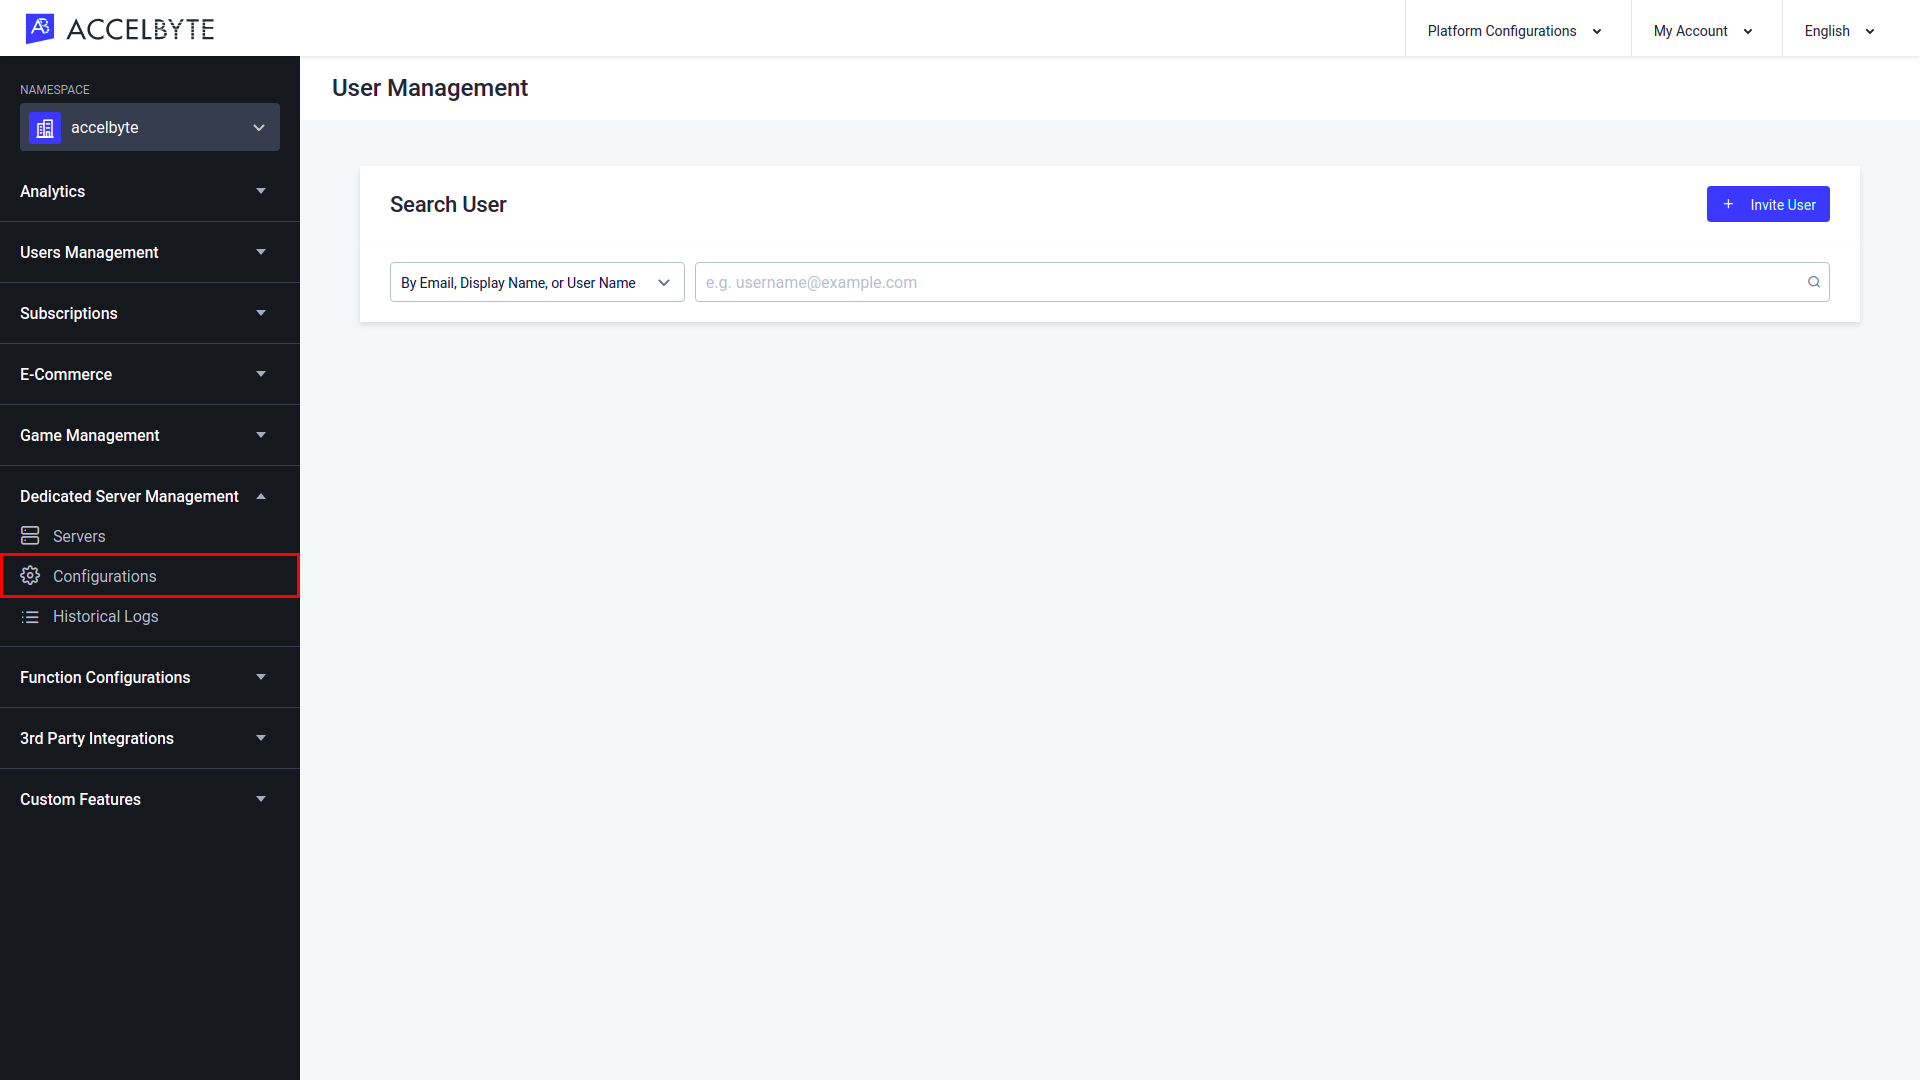
Go to the Dedicated Server Management section and open the Configurations menu.
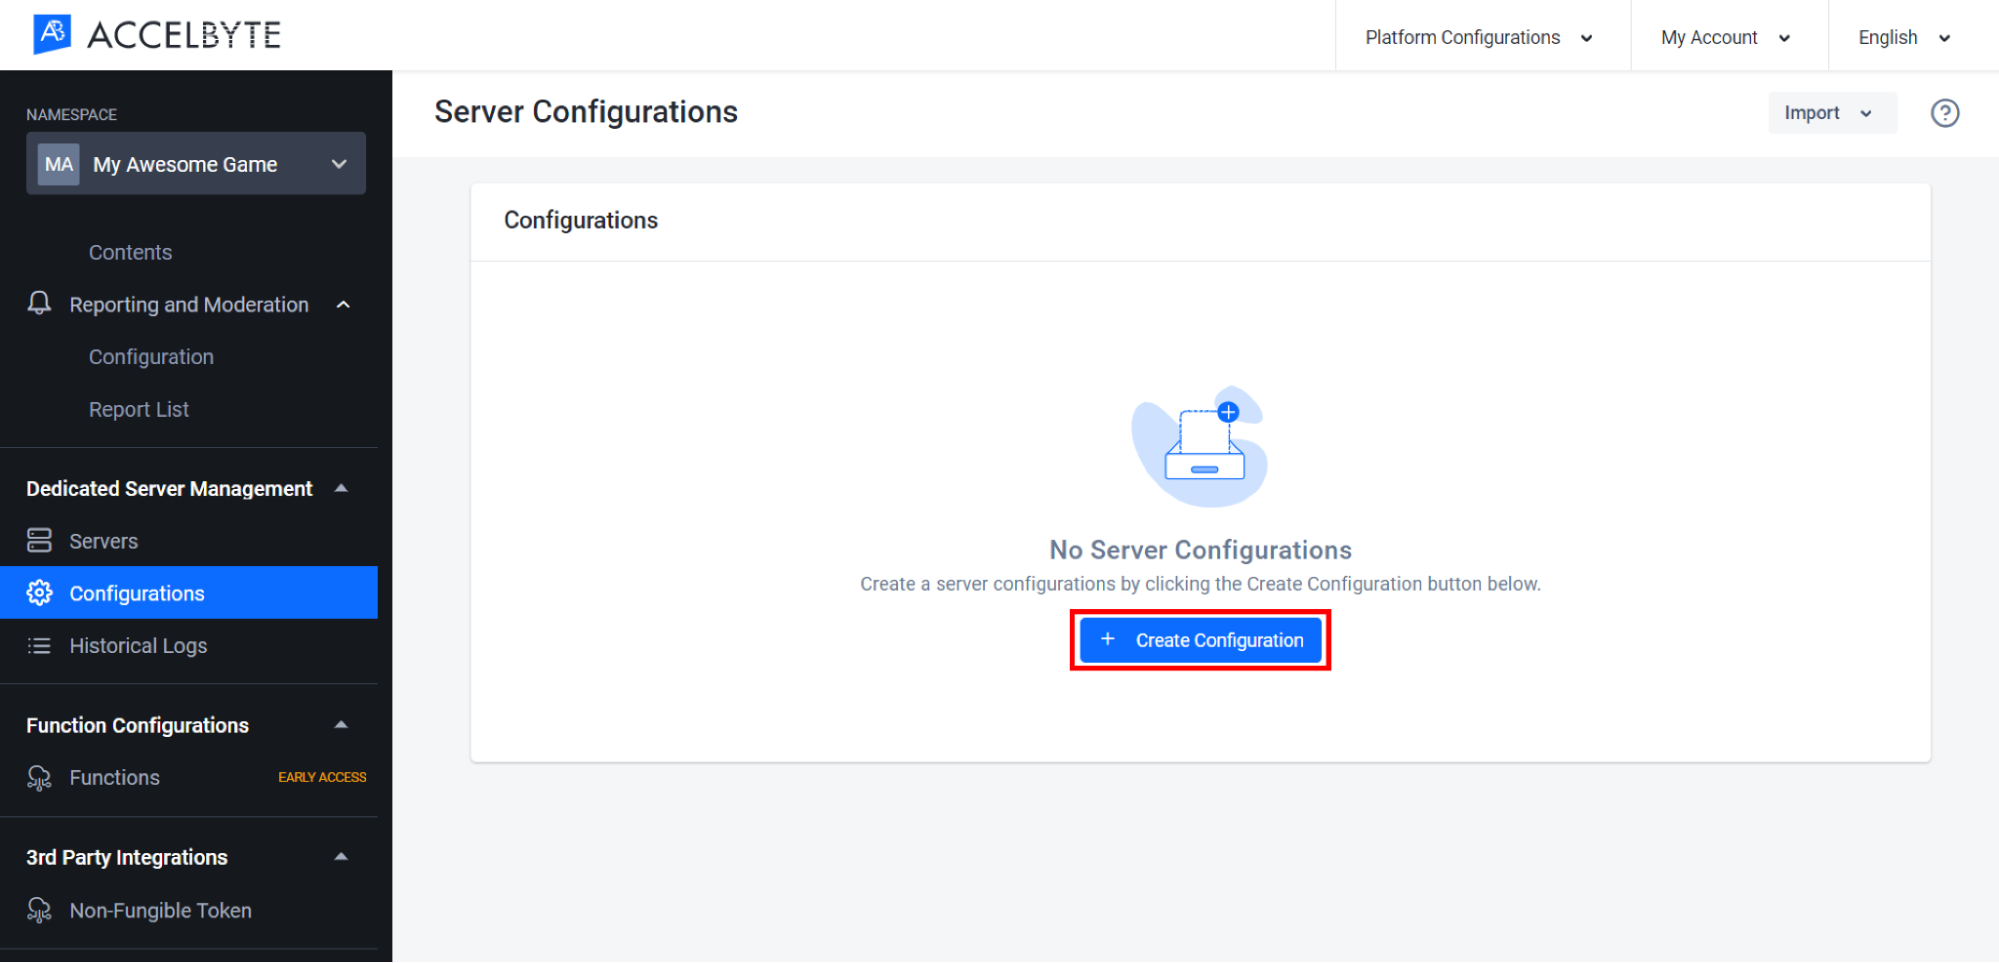
In the Server Configurations menu, click Create Configuration.
After the Create Server Configuration form appears, you will see the first step to create the configuration is about the Timeout configuration. Fill it in with the required information.
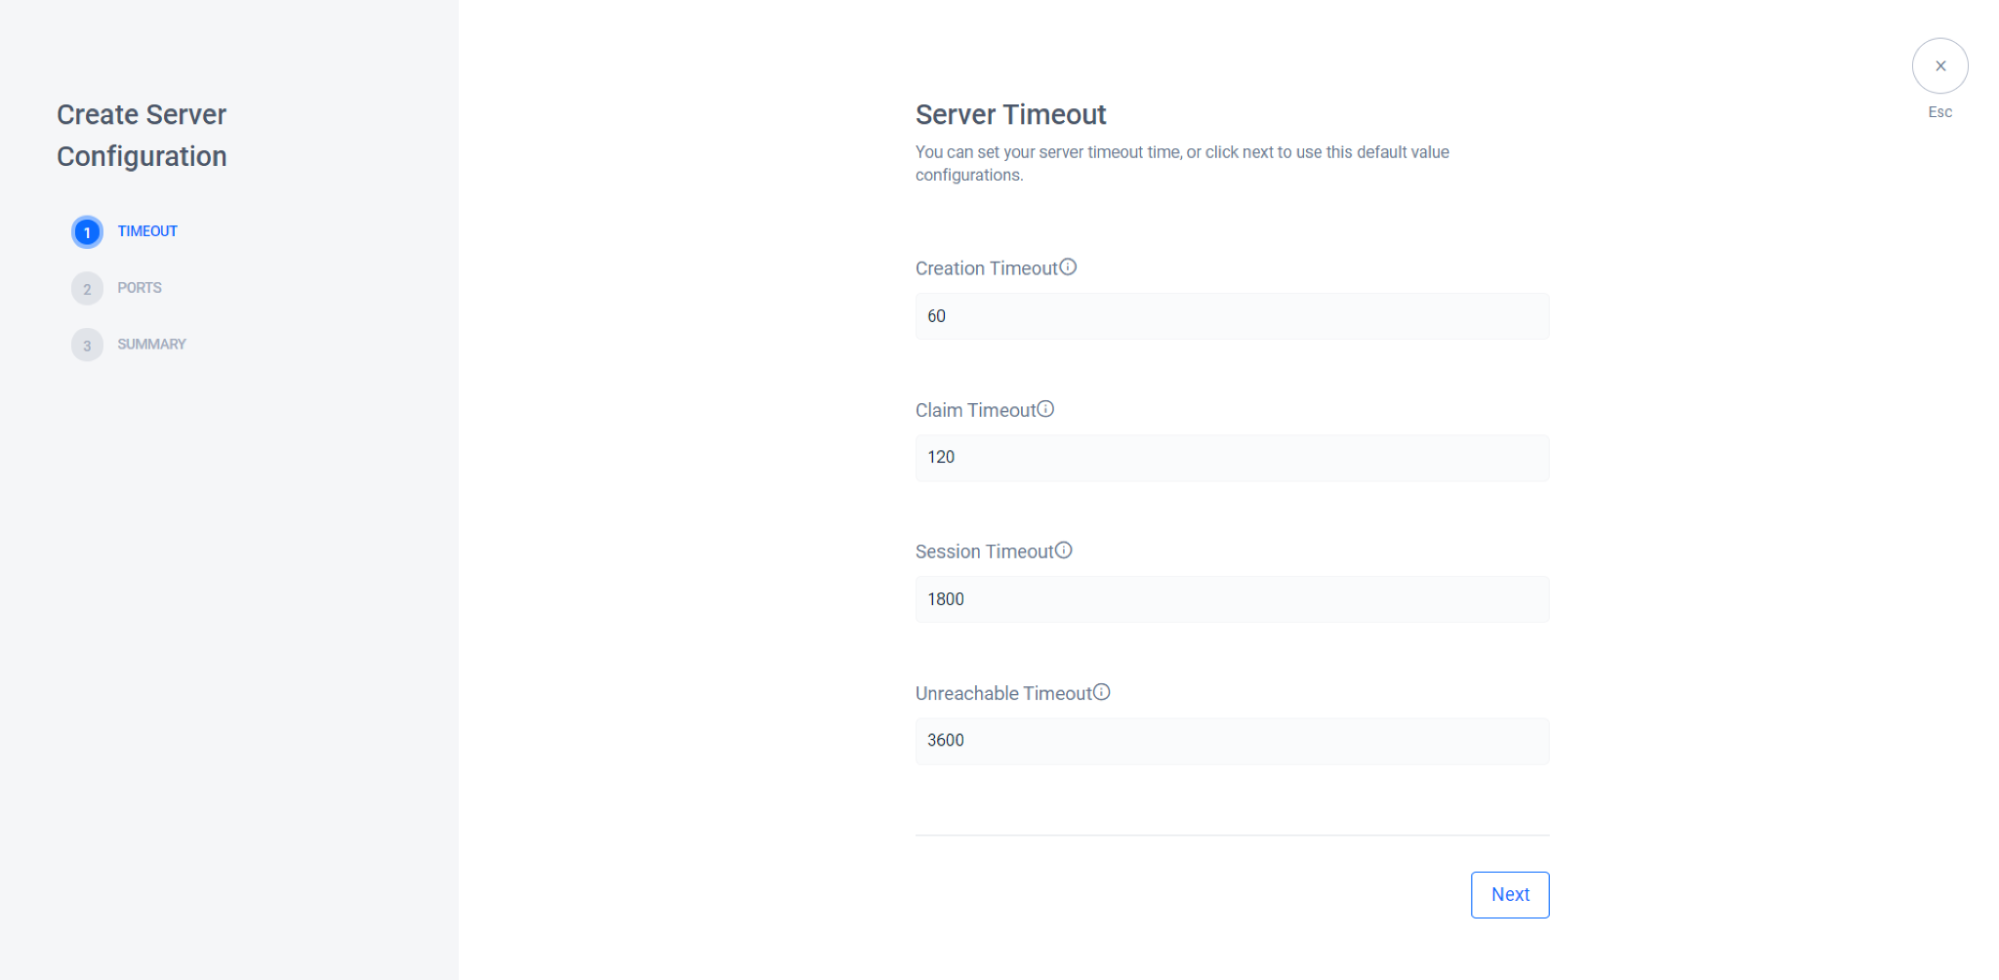
- Creation Timeout, Time limit in seconds for a dedicated server to register itself to the Lobby service after being spawned. If this time limit is exceeded, the DSM will remove the dedicated server.
- Claim Timeout, Time limit in seconds for the Lobby service to claim a dedicated server after it's requested. If this time limit is exceeded, the DSM will remove the dedicated server.
- Session Timeout, Time limit in seconds for an active session to finish. If this time limit is exceeded, the DSM will remove the dedicated server.
- Unreachable Timeout, Time limit in seconds for an unreachable dedicated server to call the heartbeat endpoint. If this time limit is exceeded, the DSM will remove the dedicated server.
Click Nextto go to the next step.
Now you will see the Ports configuration panel here. Please input ports where your dedicated server is listening to the configuration.
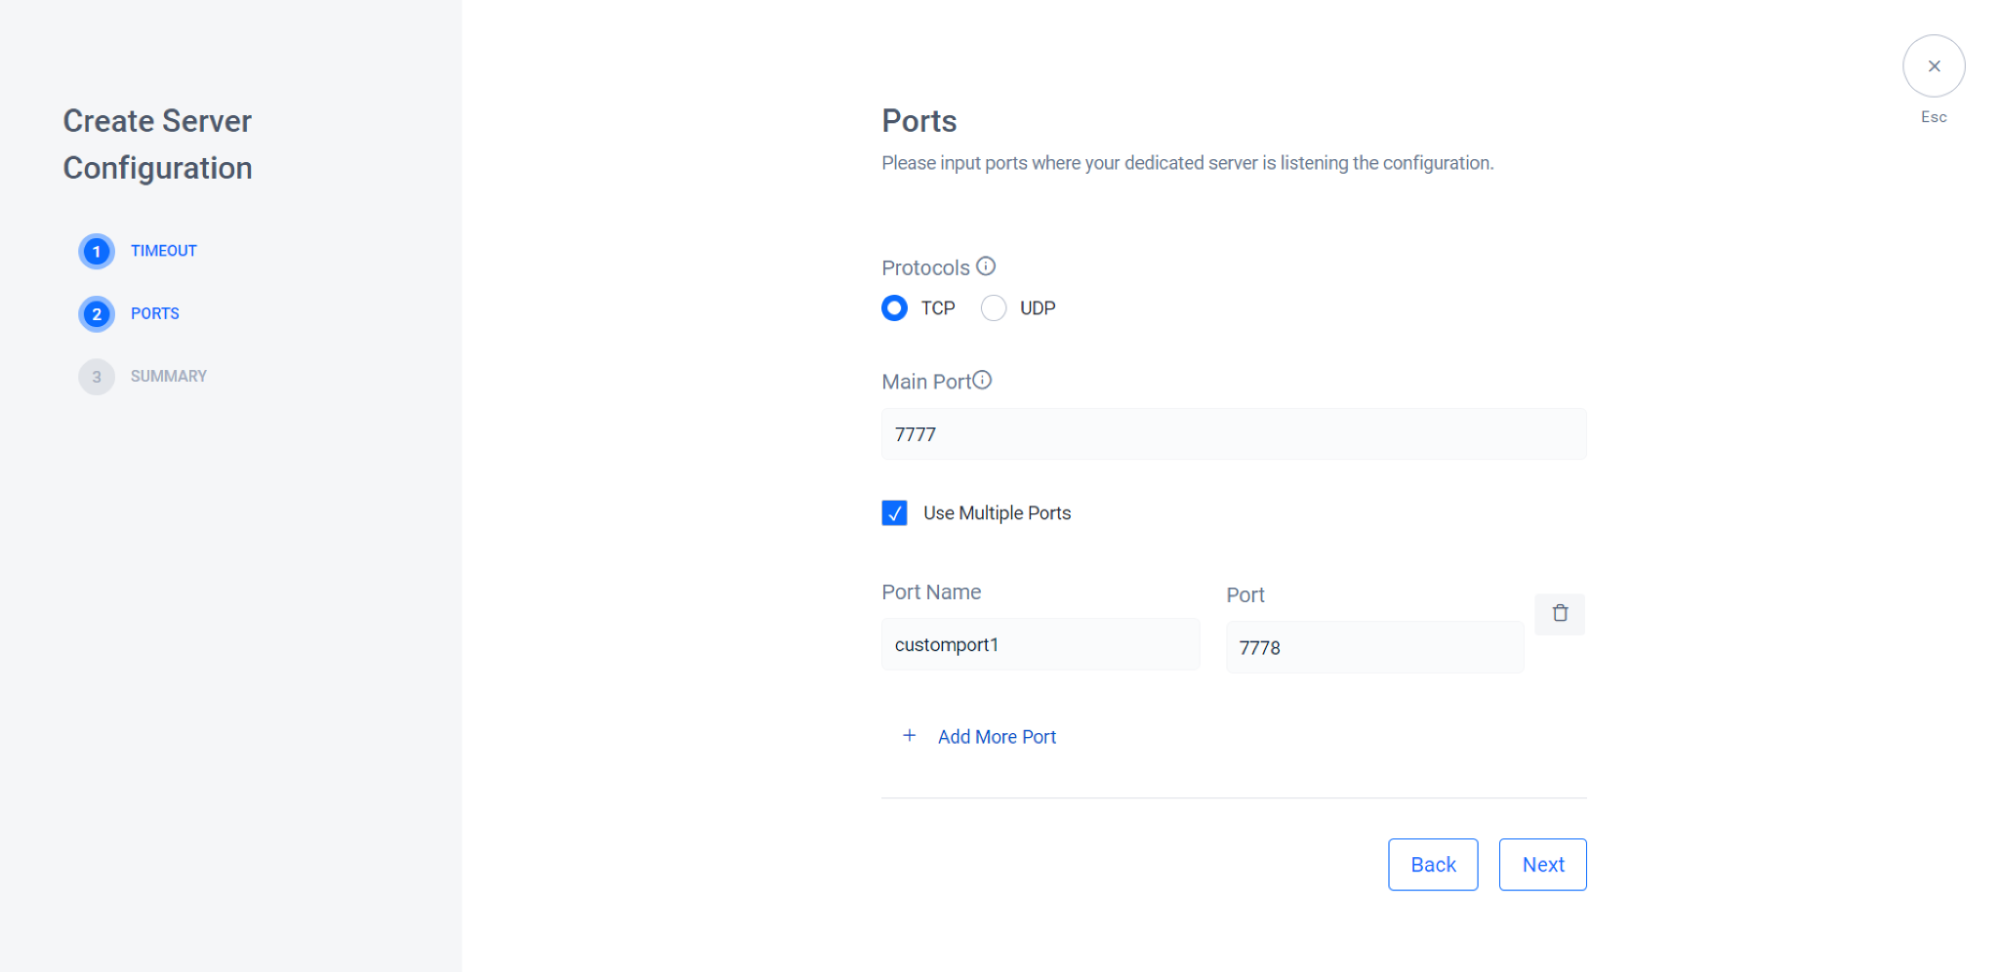
- Protocols, You can specify the transport behaviour using TCP to provides reliable streams, or UDP to provide datagram transport facilities (ideal for real-time multiplayer games).
- Main Port, Port where your dedicated server is listening for connection.
- Use Multiple Ports, you can add more new ports whenever you need a multiple instance of port. You can click Add More Port to add multiple ports.
Click Next to go to the next panel.
Now you will see the Summary Panel. This is all information related to the configuration that you have made.
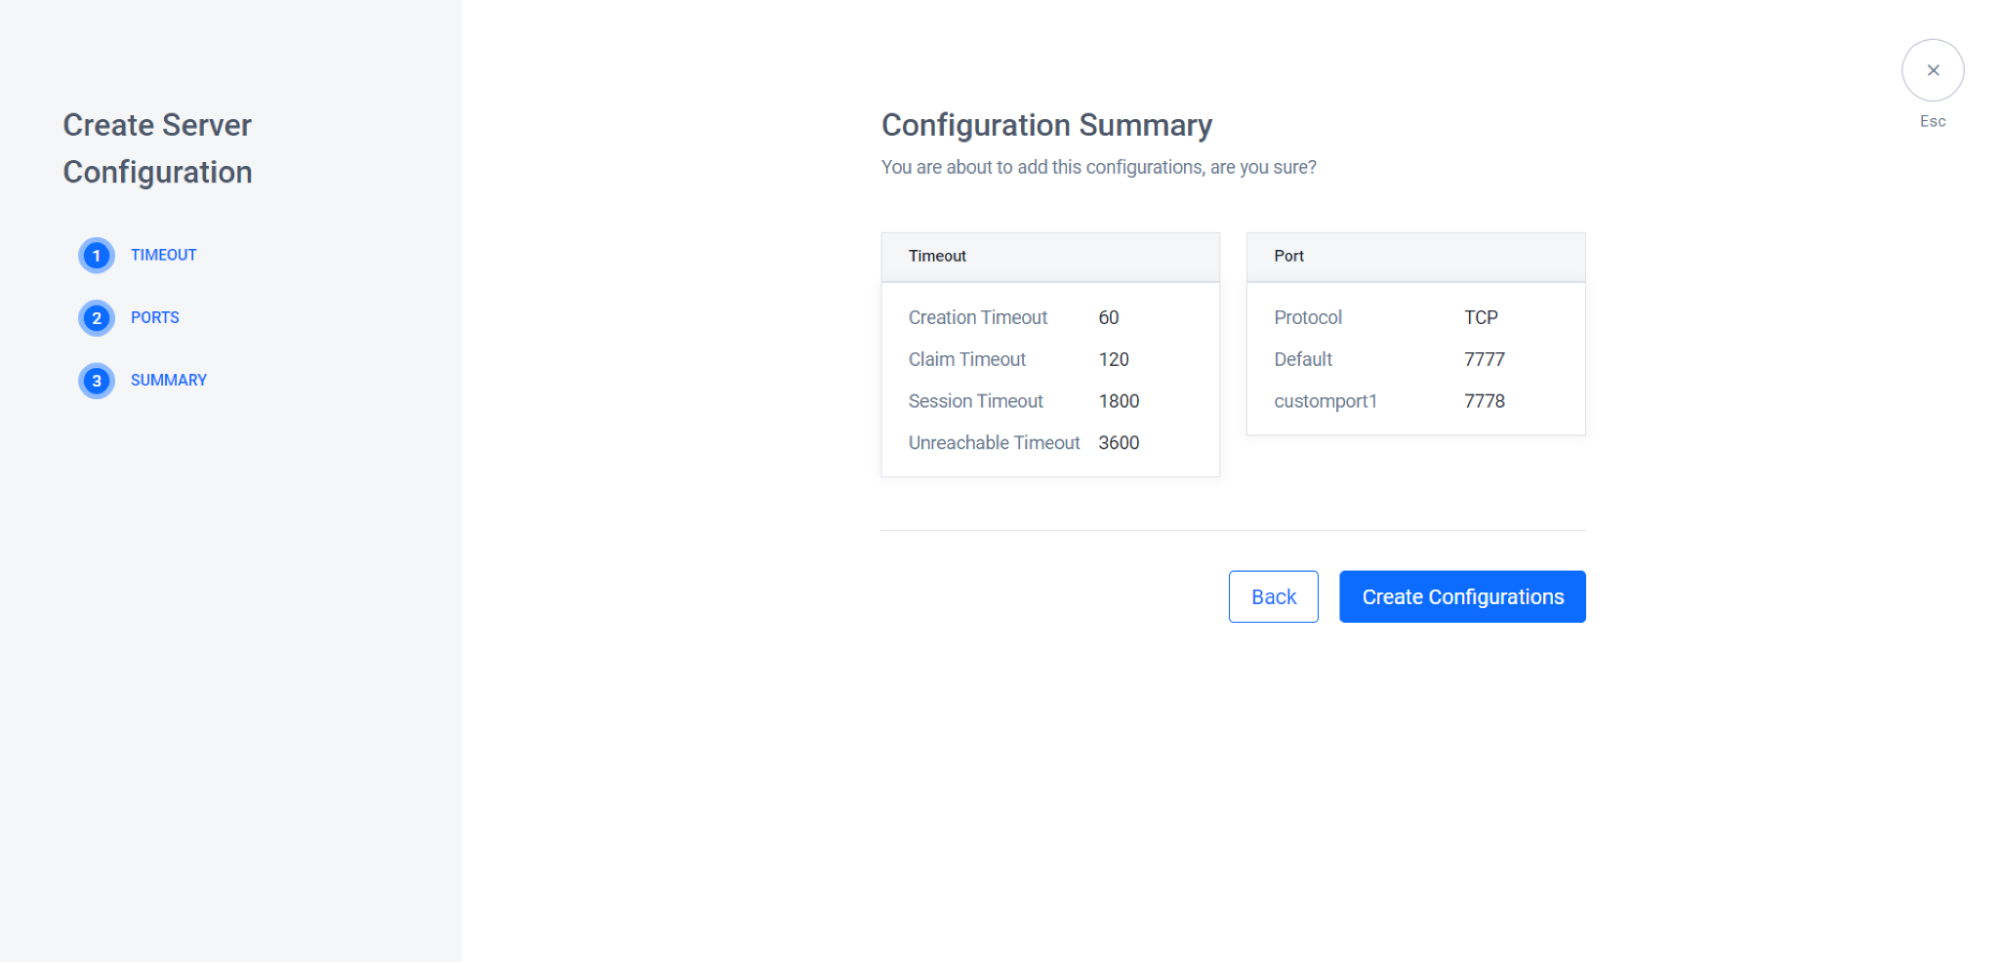
Click Create Configuration to create your new configuration.
Differentiate DS Deployments
You can create multiple, distinct DS deployments for your game that needs more than one DS build. For example, if your game has several different maps that players can choose from you need to differentiate the DS deployments so that each configuration of your game will have a different DS build.
You can differentiate your DS configurations by their Image Version, Pod Configuration, and the Region of the DS in deployment. See the tutorials below to add differentiation for each parameter in the Admin Portal.
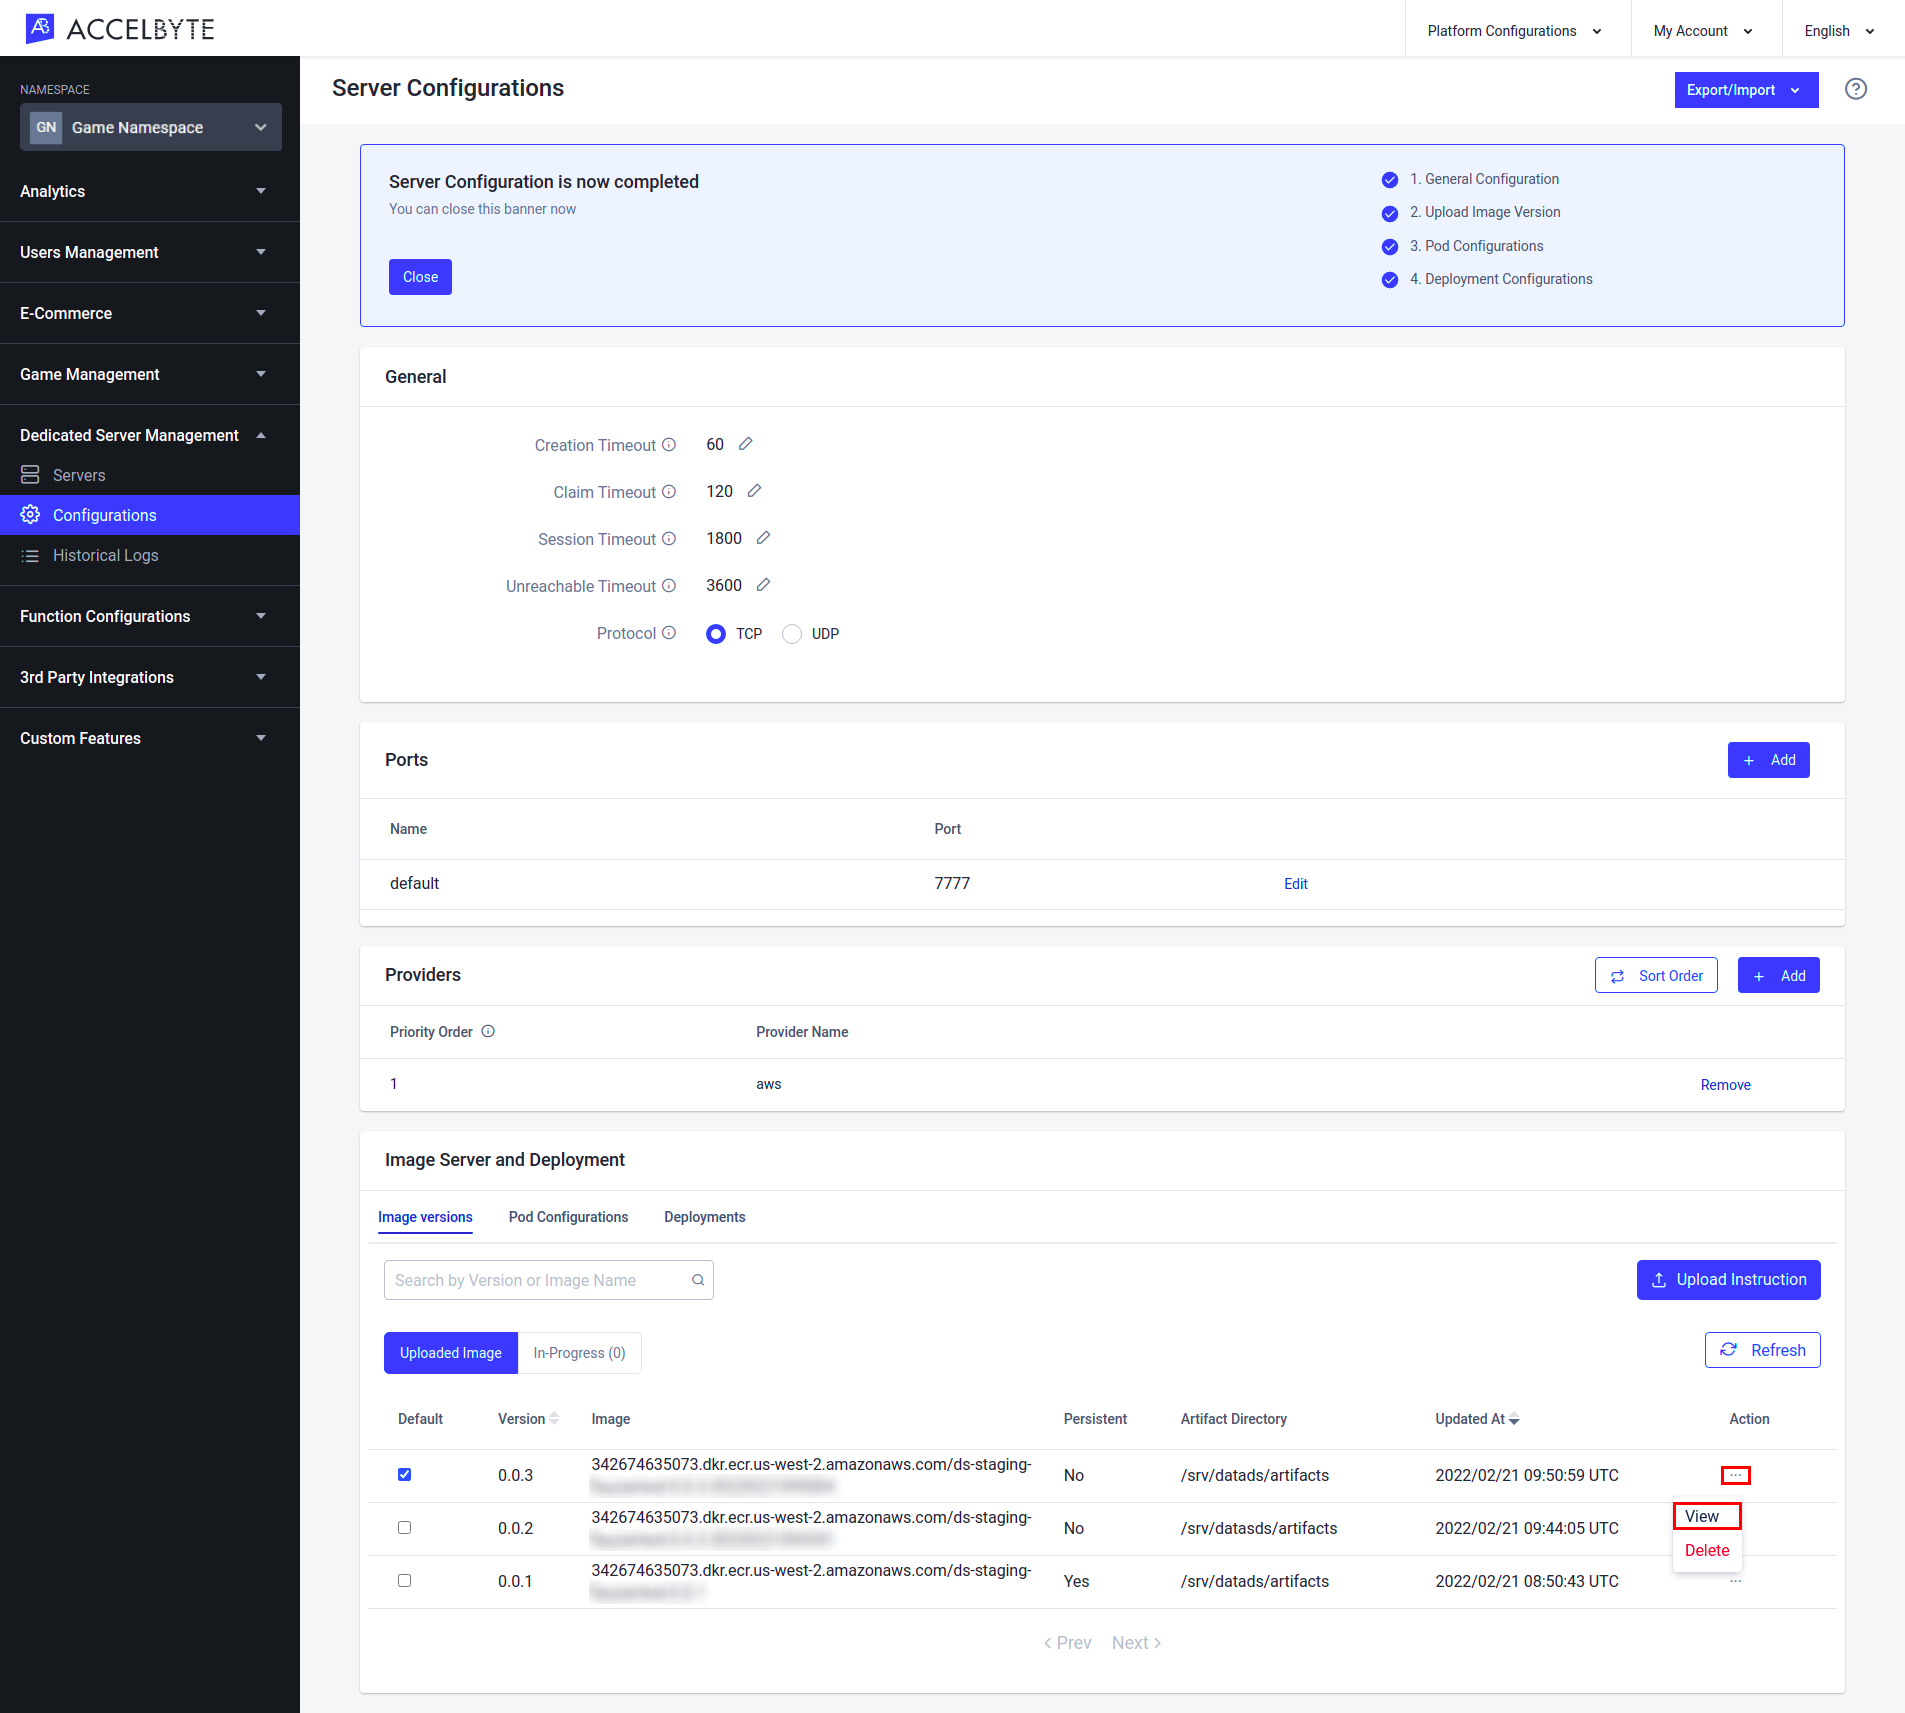
Configure the Image Versions
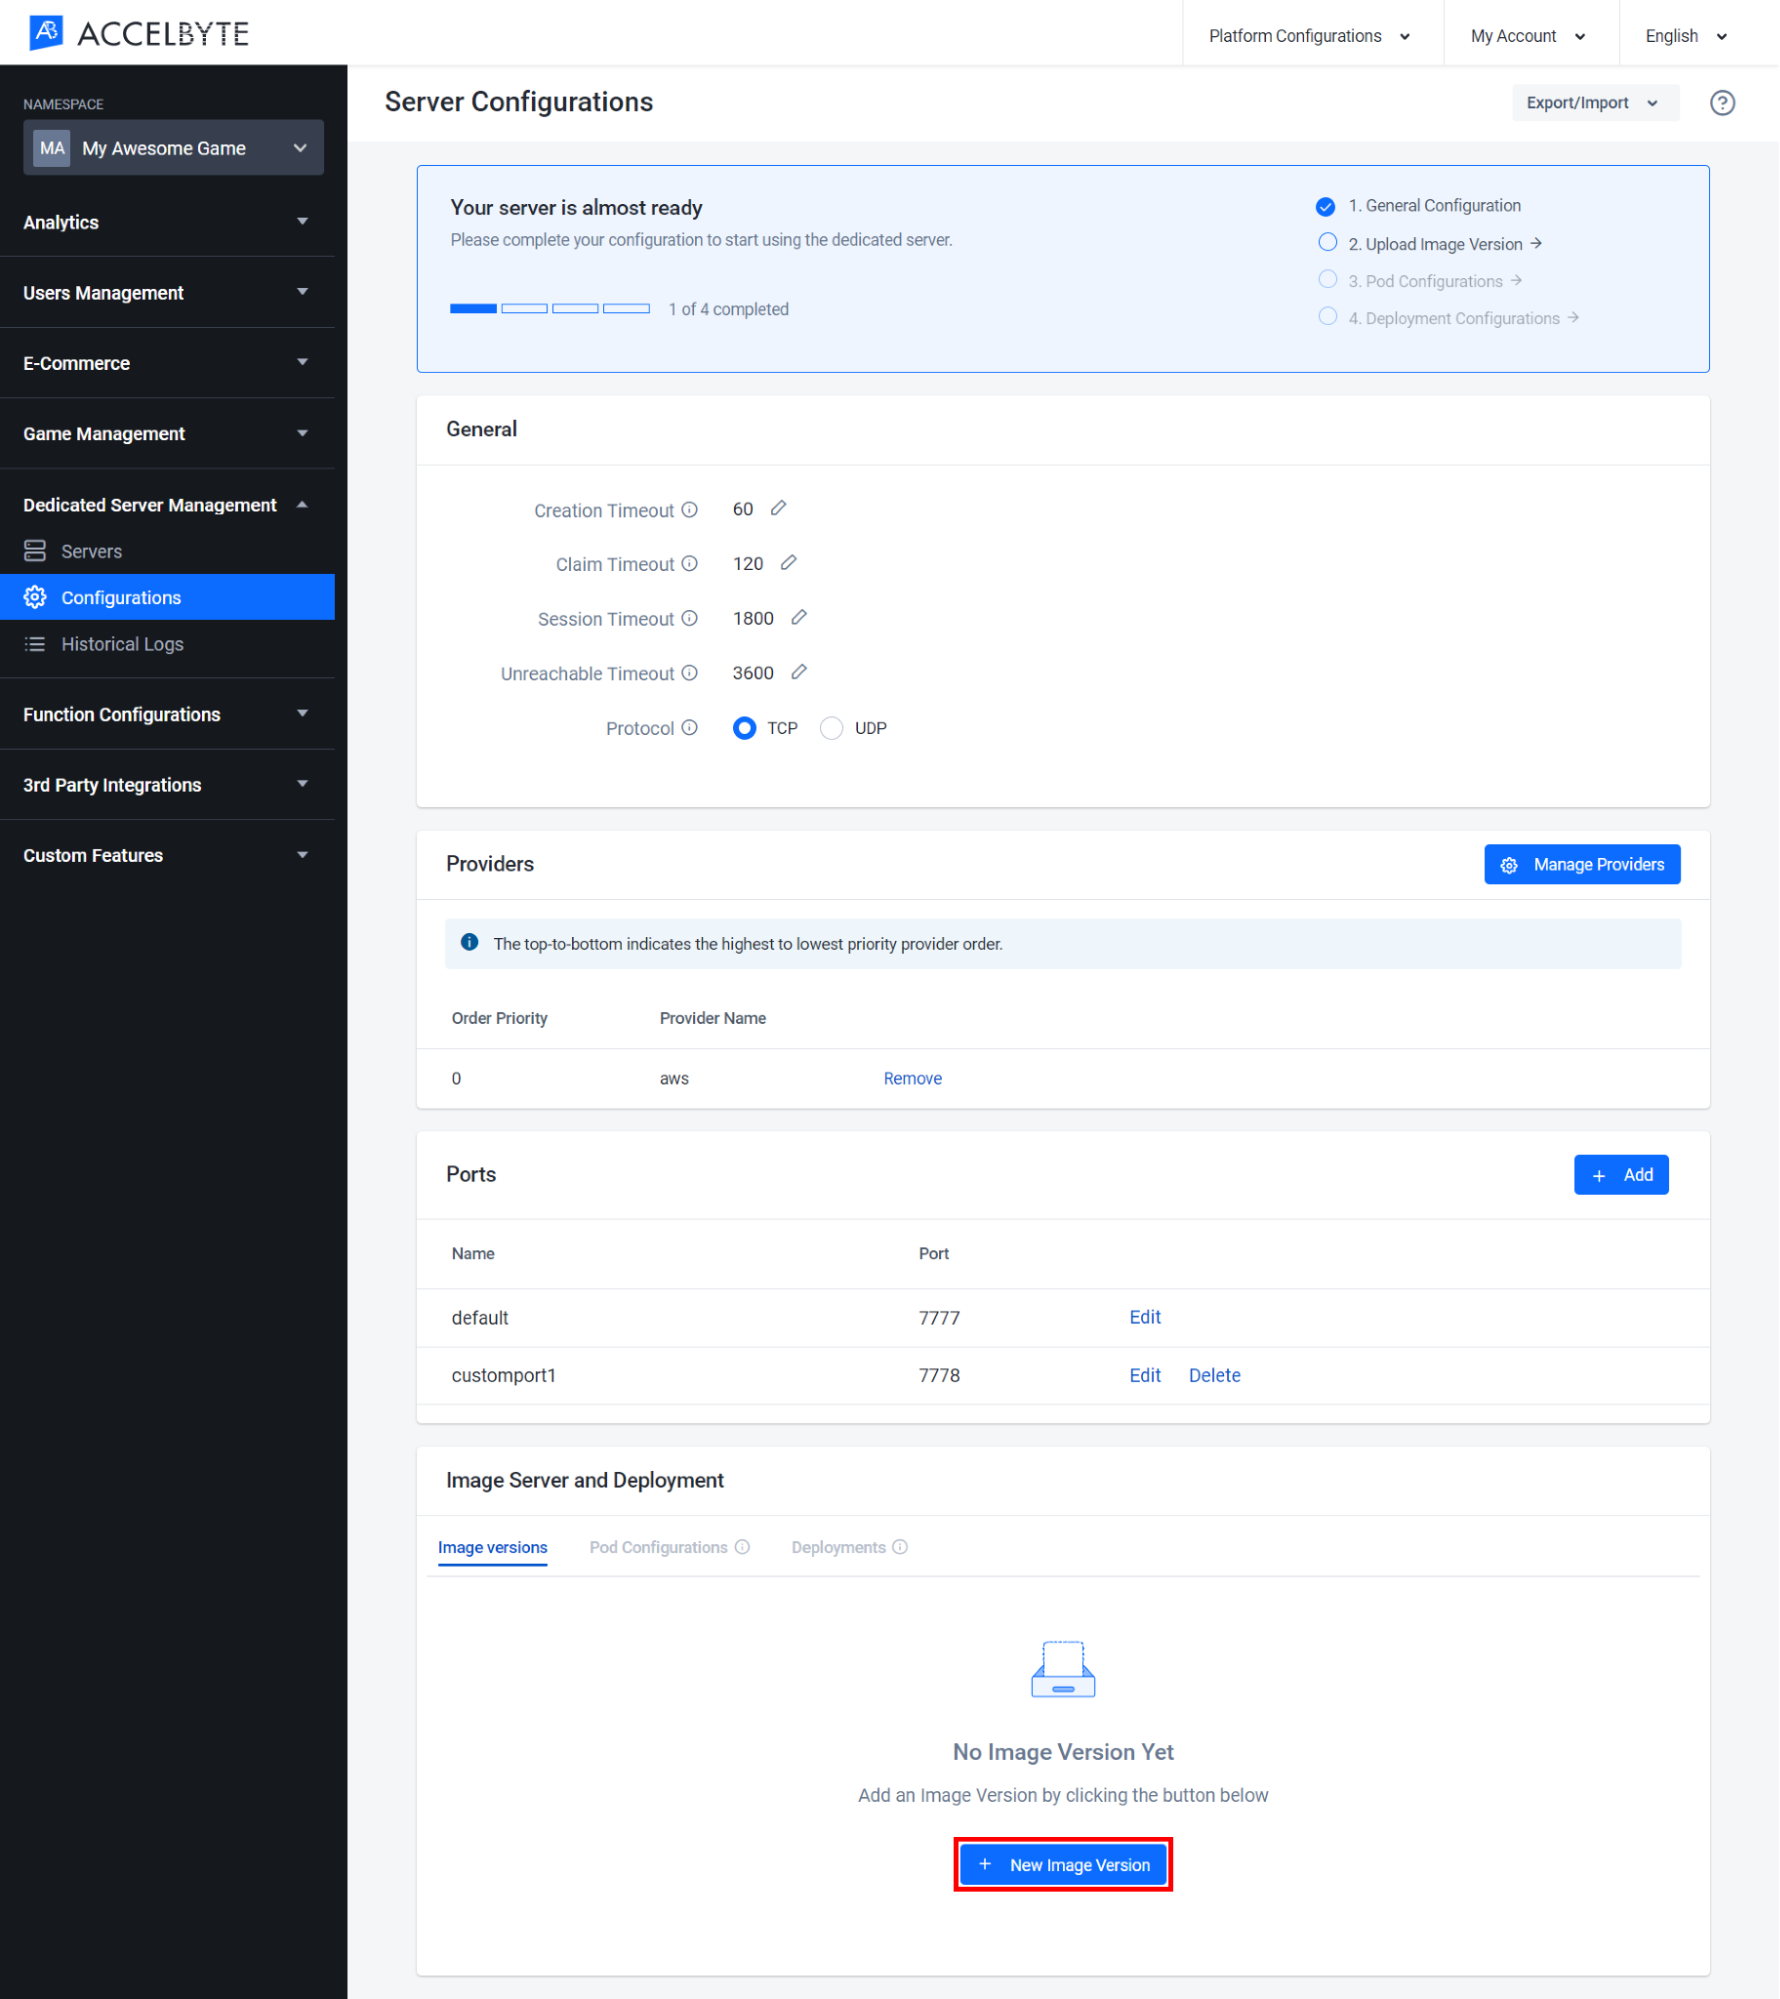
You learned how to add the Image Versions when you configured the Dedicated Server. Here you'll learn how to add more Image Versions.
In the Admin Portal, click Configurations in the left navigation bar and you will be directed to the Configuration Details. Click New Image Version to add a new Image Version.
Fill in the form that appears.
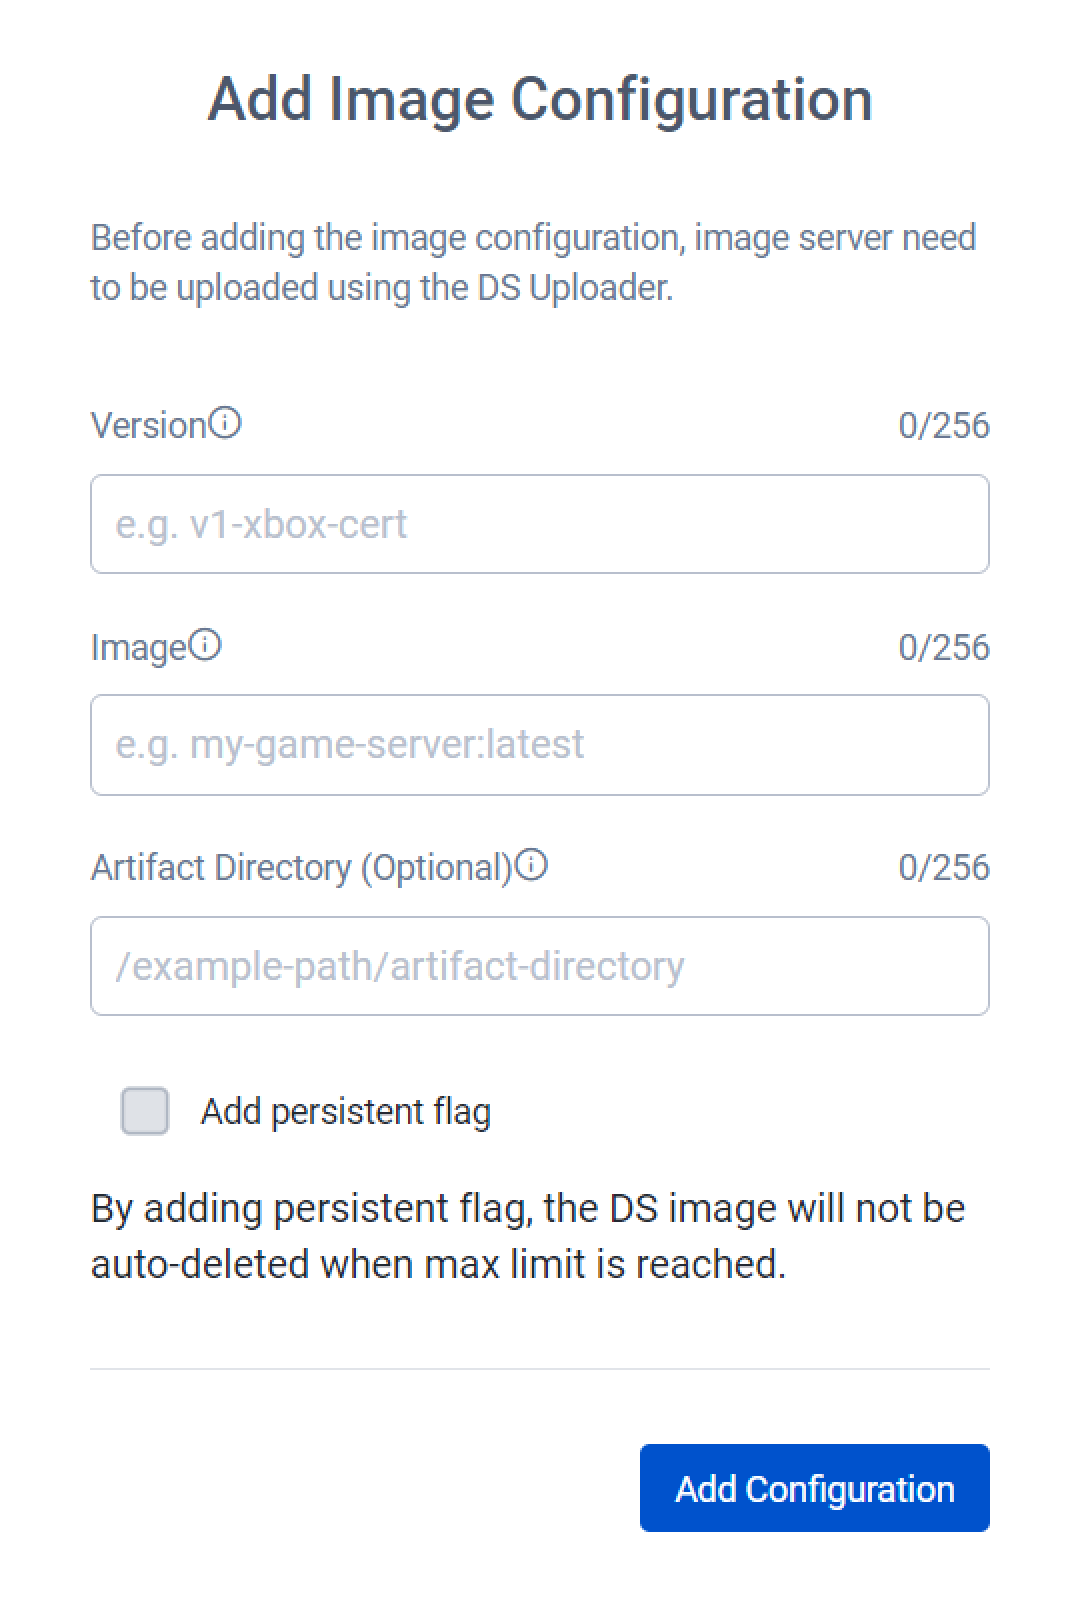
- Input the Version of your dedicated server build with the appropriate format shown in the image above.
- Input the Image with the dedicated server image that you received after uploading your build.
- Input the Artifact Directory path where artifact files will be stored
- Add Persistent Flagif set to true the current DS Image will not be deleted if the max limit is reached.
Click Add Configuration to add a new image version.
After you've created your new image version, it will appear in the Image Versions list in the Image Server and Deployment panel at the bottom of the page. You can sort the list of images by their version or last update.
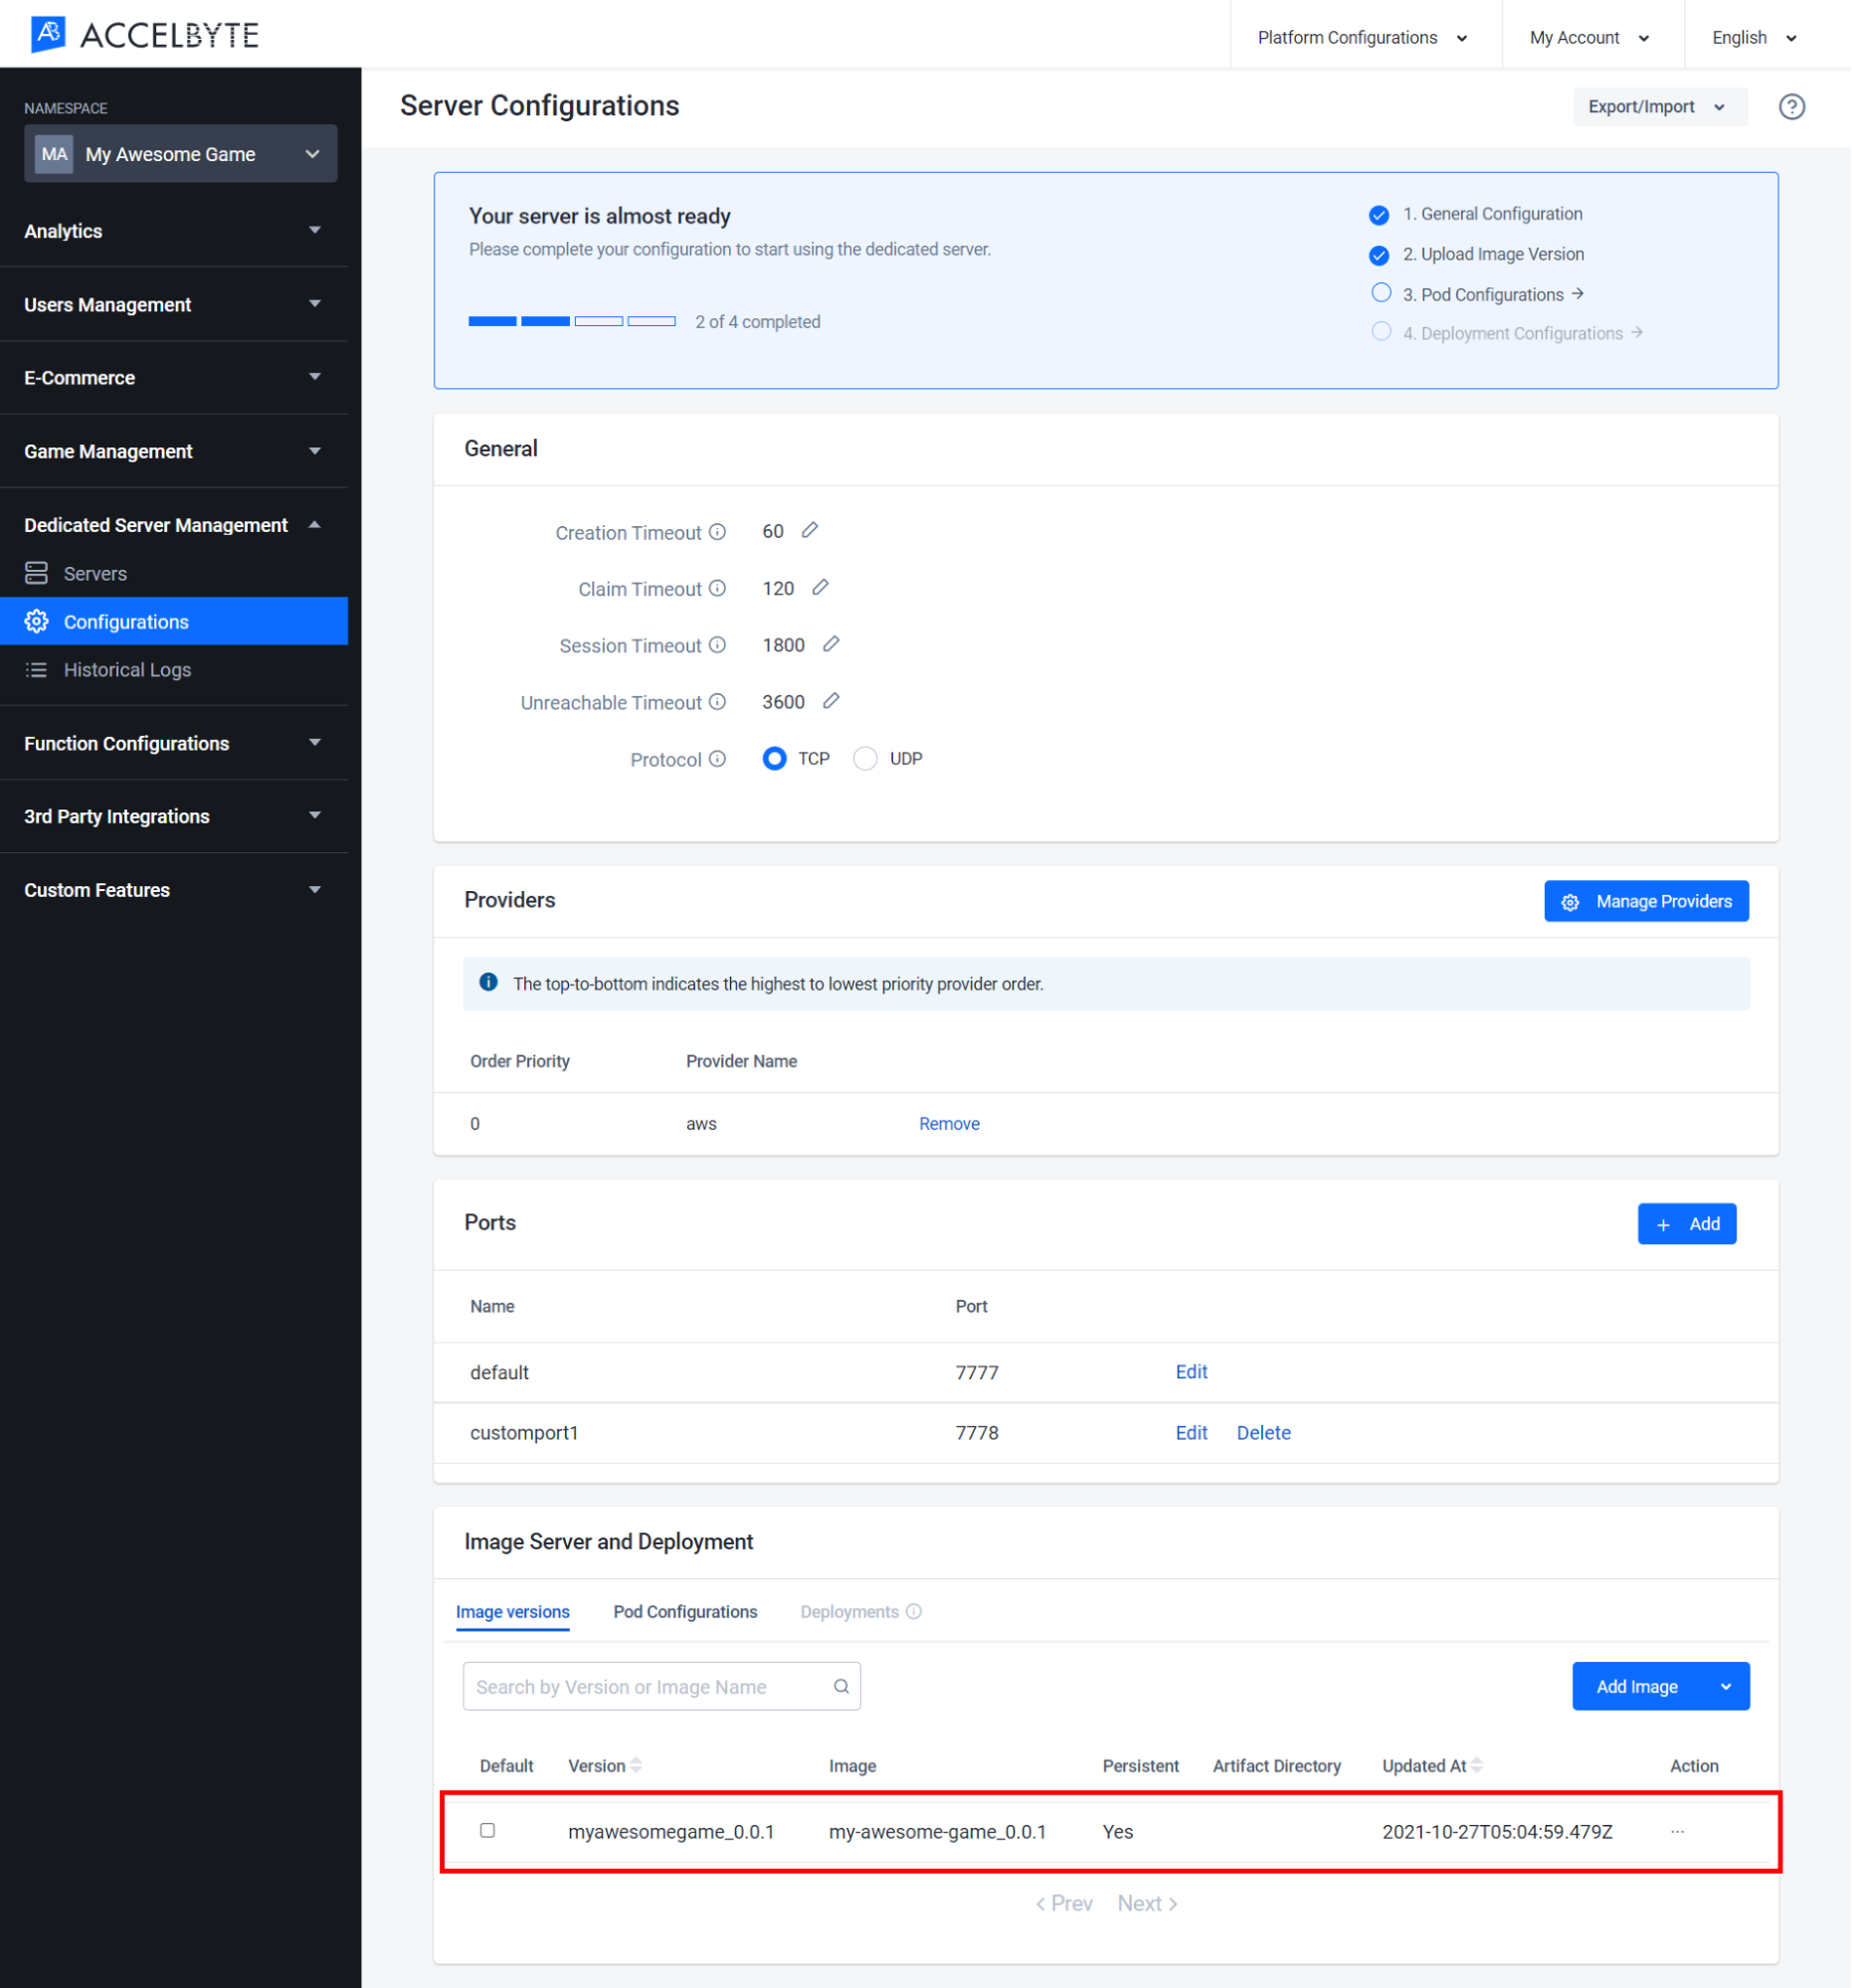
You can also click the Action button on the right of the list of the panel and then you can View or Delete your configuration. You can also edit all your configuration inside your View Configuration.
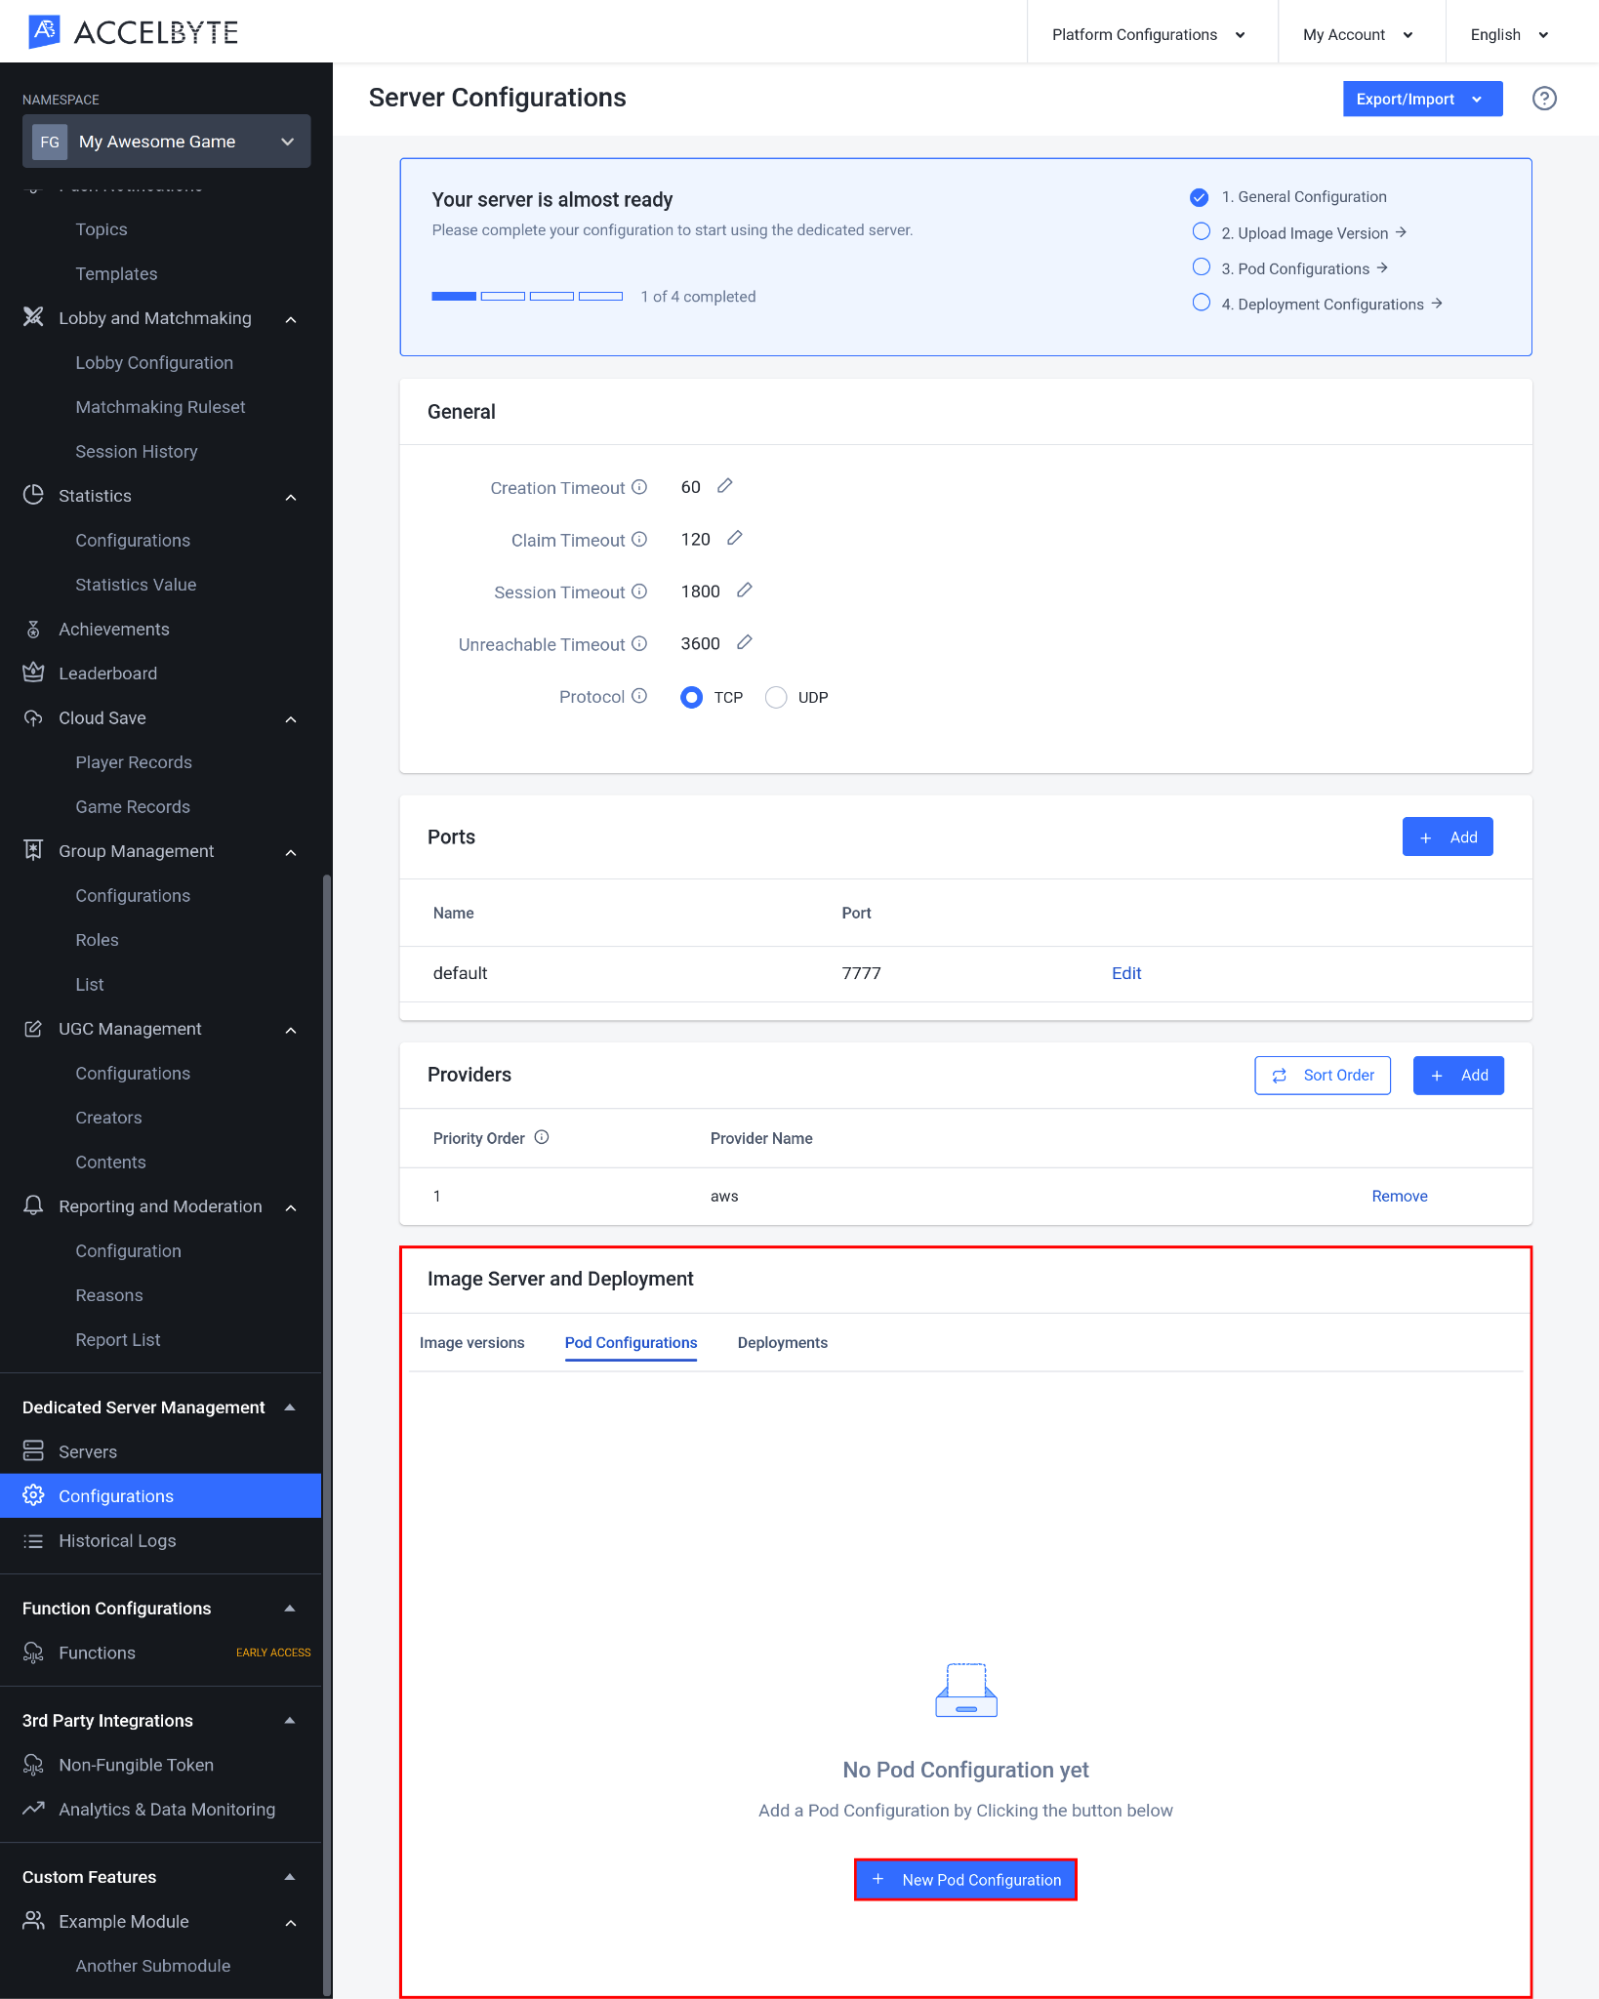
Configure the Pod Configuration
New pod configurations can have different CPU, Memory Requests, and also different Parameter arguments. Follow these steps to add a new Pod Configuration.
In the Configuration Details window of the Admin Portal, go to the Pod Configurations tab and click the New Pod Configuration button.
After the configuration form appears, input the fields with the appropriate format.
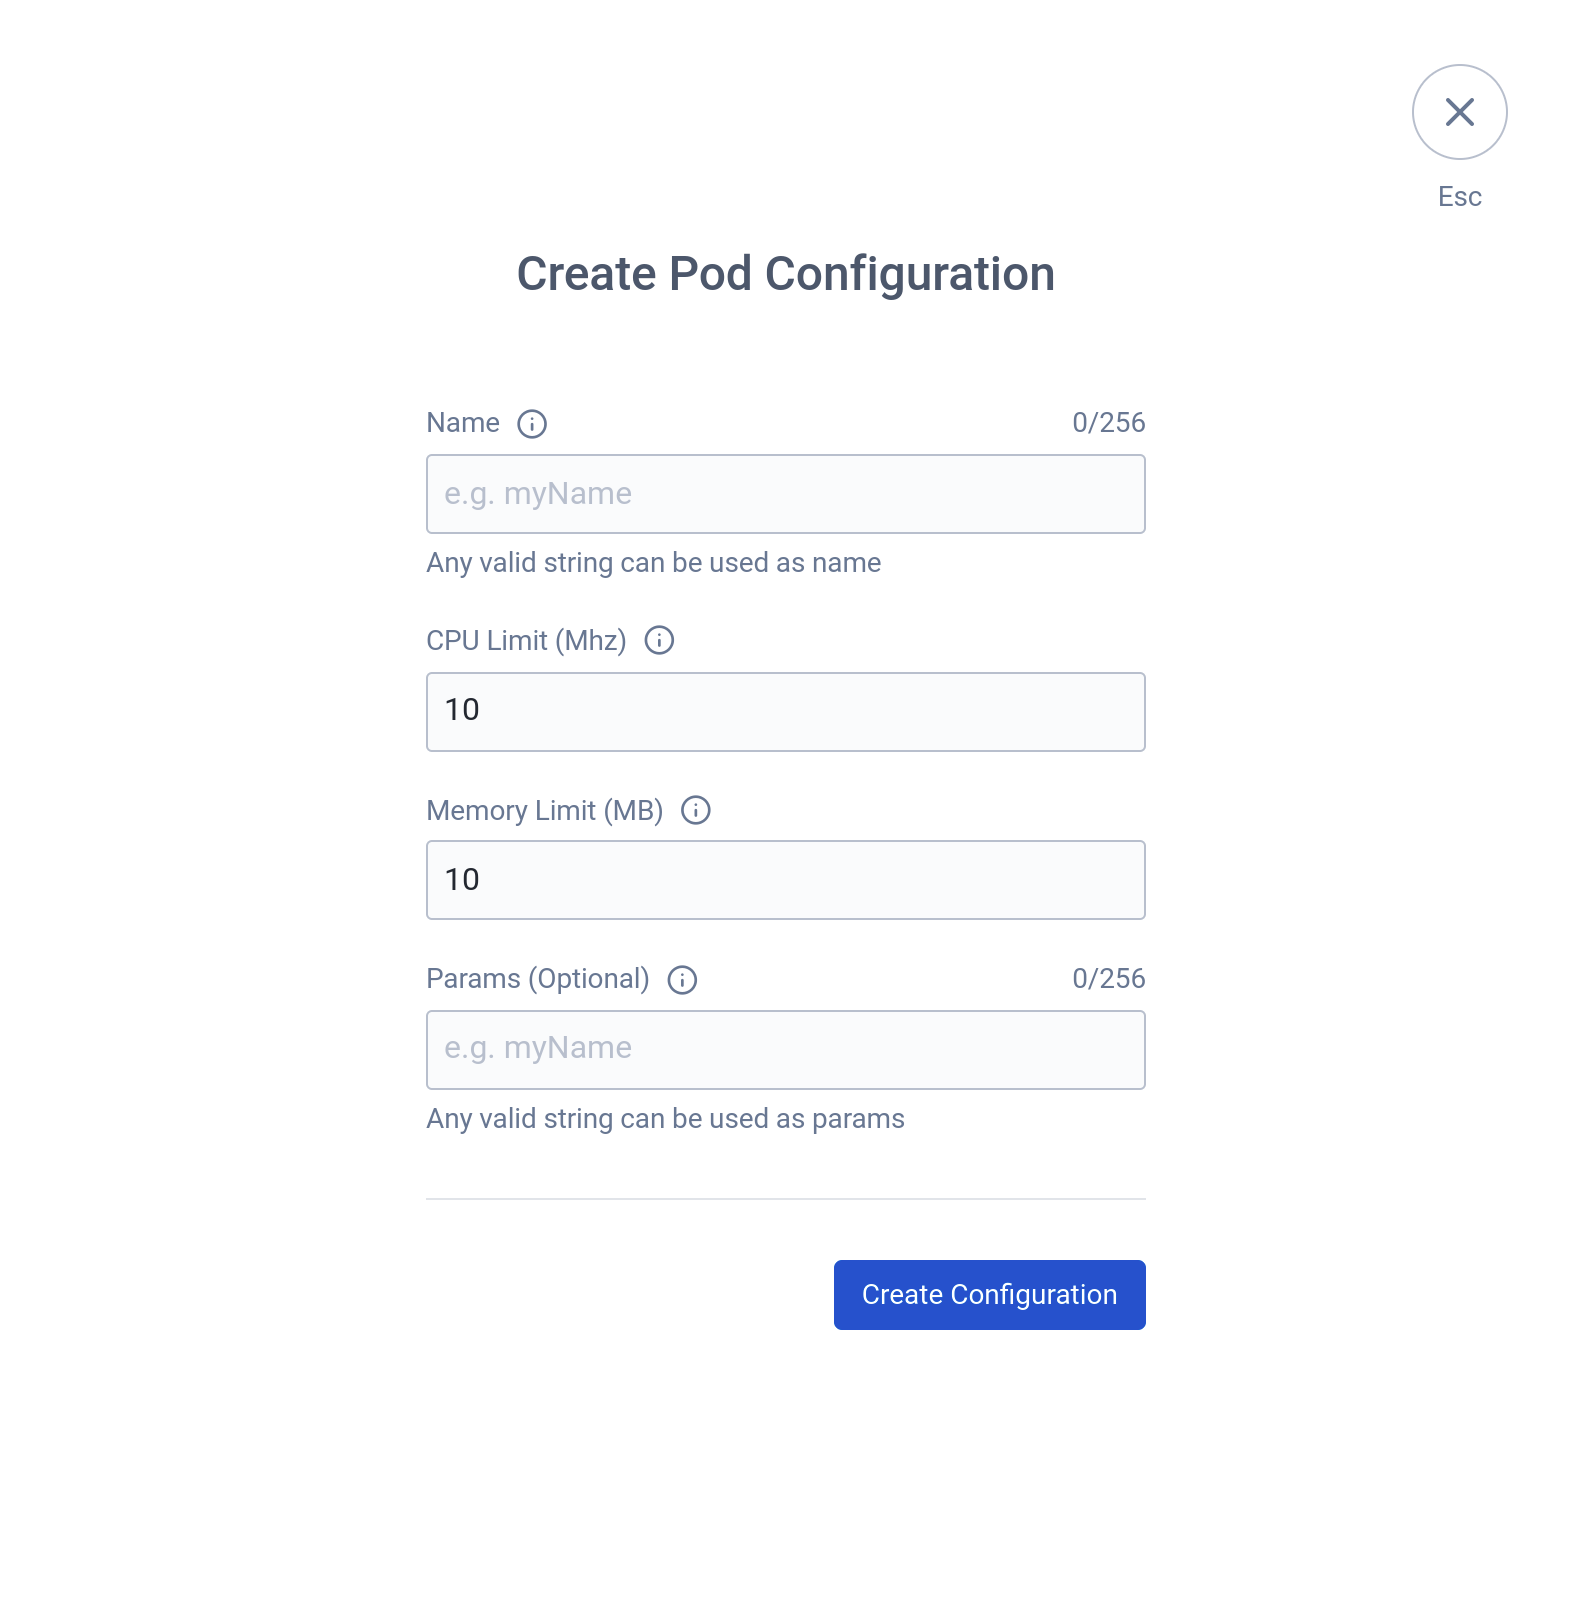
Input the CPU Limit with the maximum number of cores that can be used by the dedicated server.
Input the Memory Limit with the maximum amount of memory that can be used.
Input the Params argument if you want to apply any custom parameters to your game. Leave this field empty if you don't want to add any parameters.
NOTE
The values for CPU Limit, and Memory Limit must be formatted in Kubernetes, e.g., CPU of 1000 MHz is equivalent to 1GHz and Memory of 1 Megabit is equivalent to 0.125 Megabytes.
Click Create Configuration to create new Pod Configuration.
Once you create a new pod configuration, you will have your detail list here in the bottom of the page of the panel.
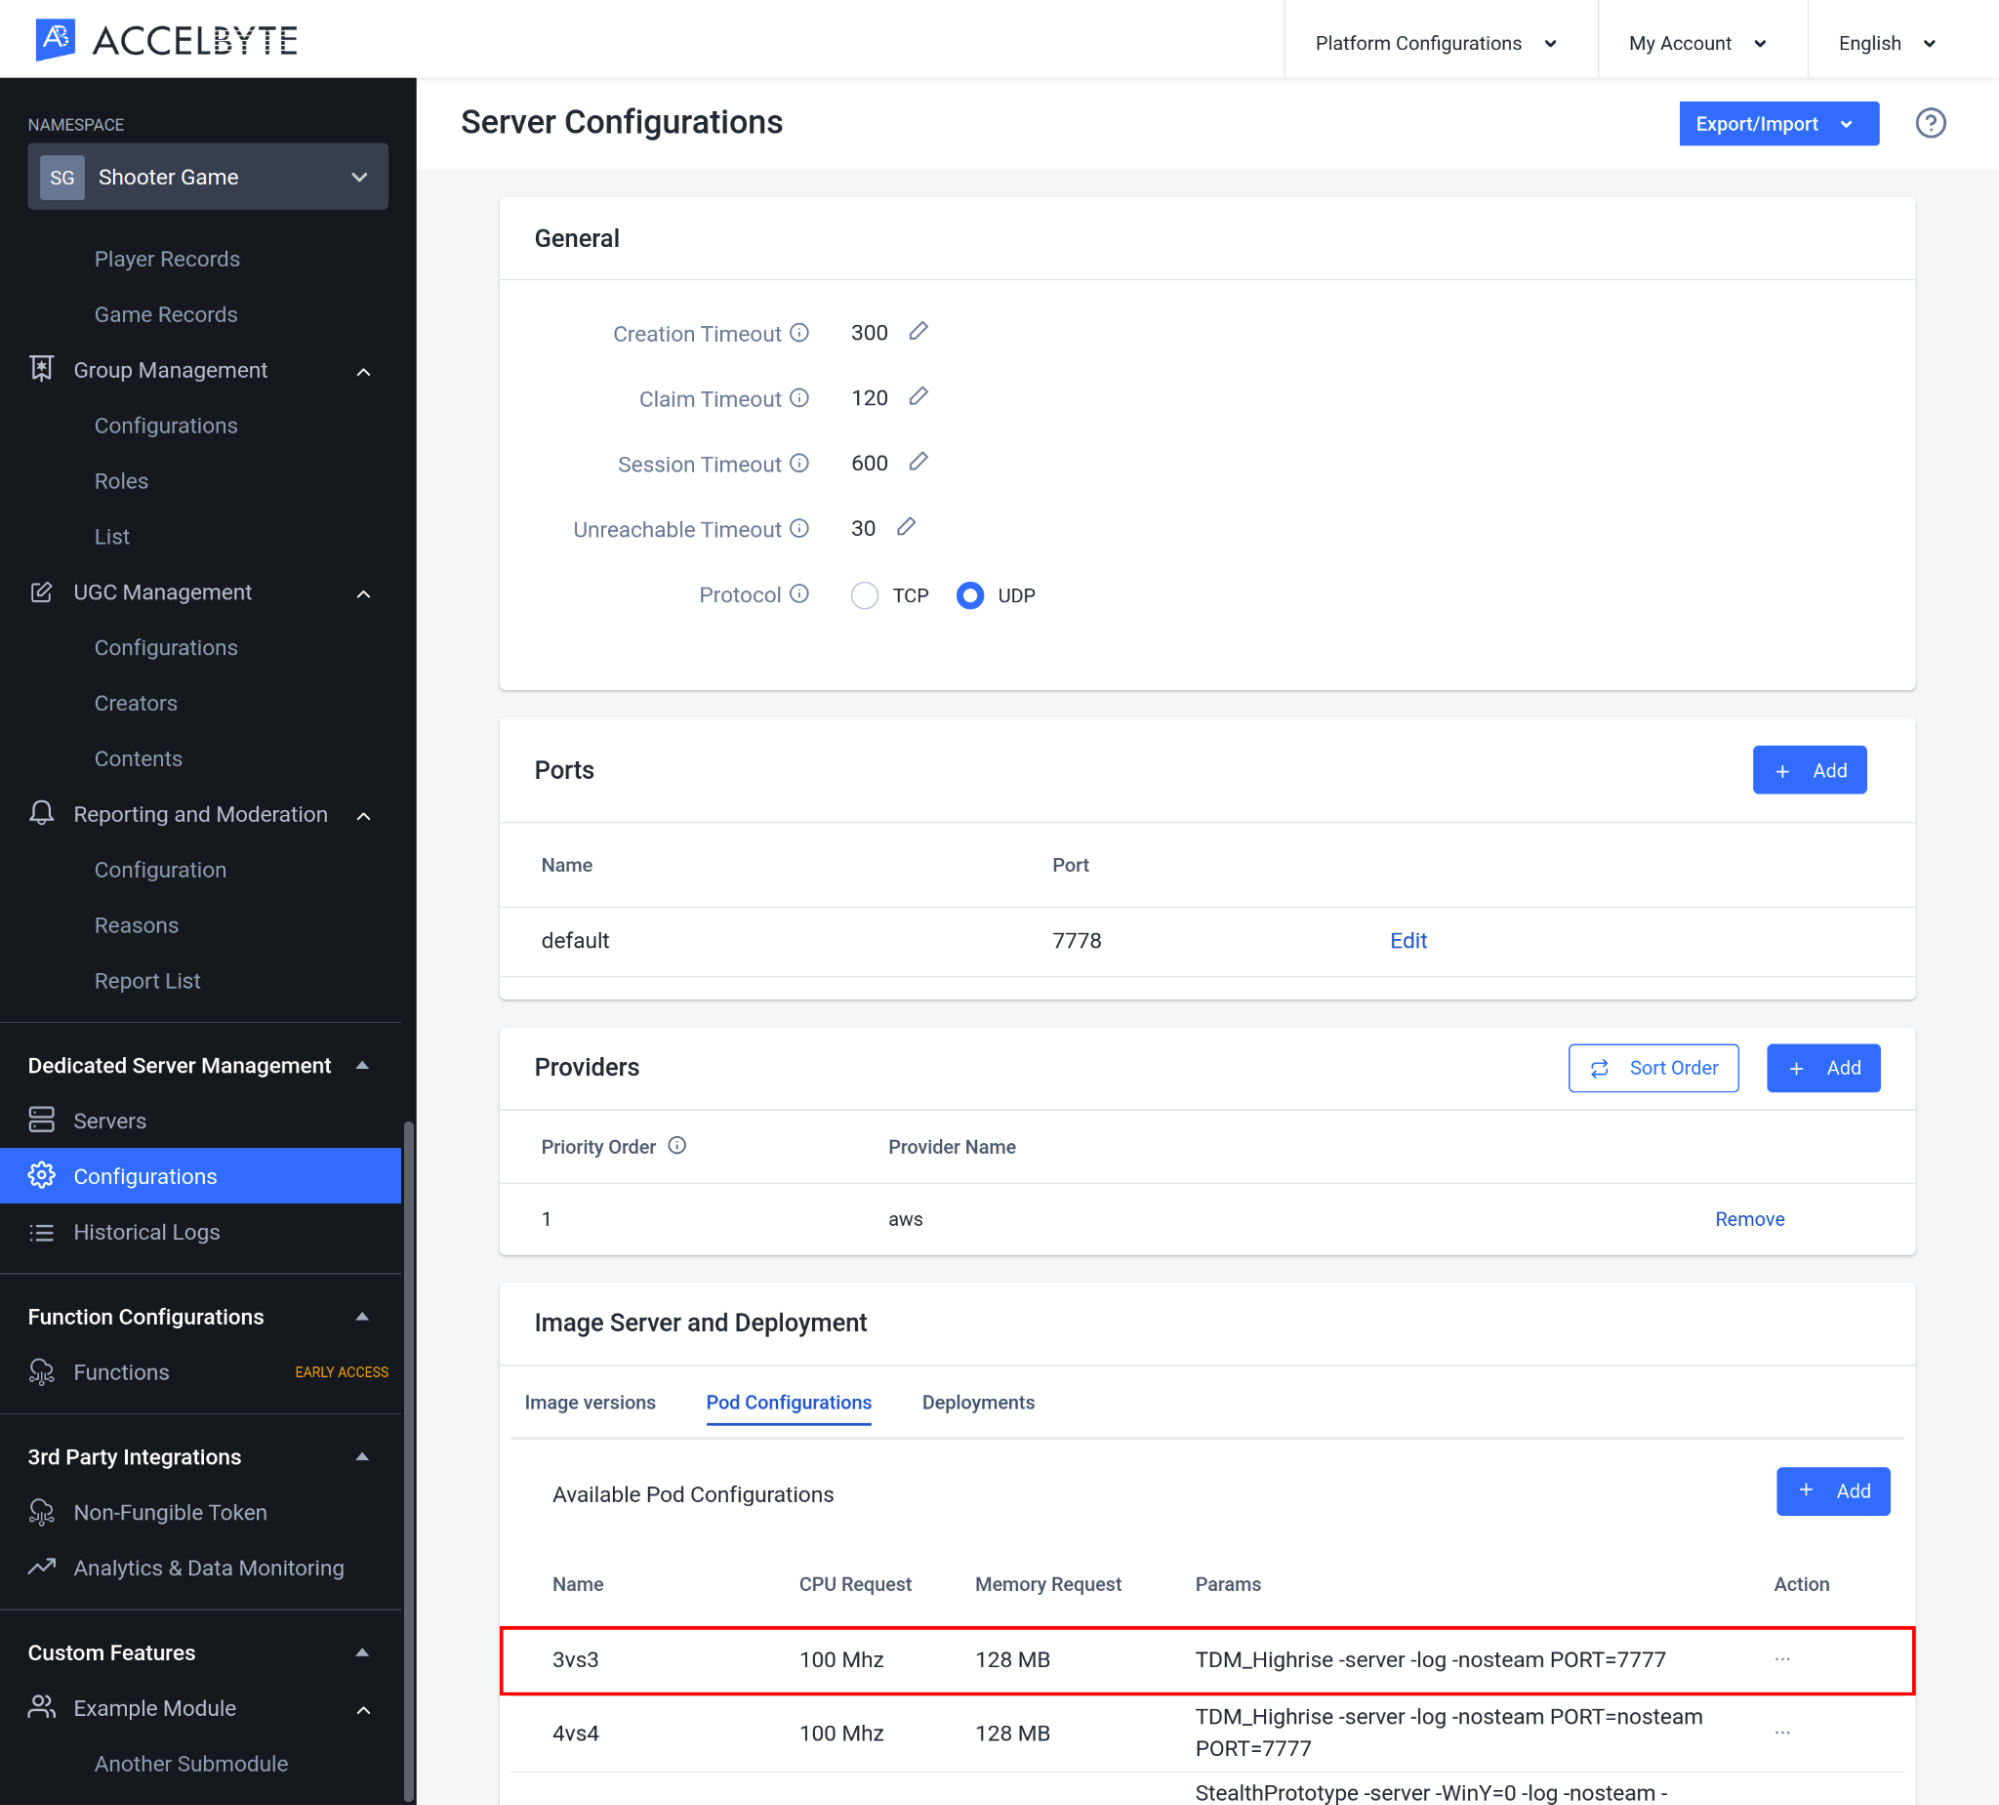
You can also click the Action button on the right of the list of the panel and then you can View or Delete your configuration. You can also edit all your configuration inside your View Configuration.
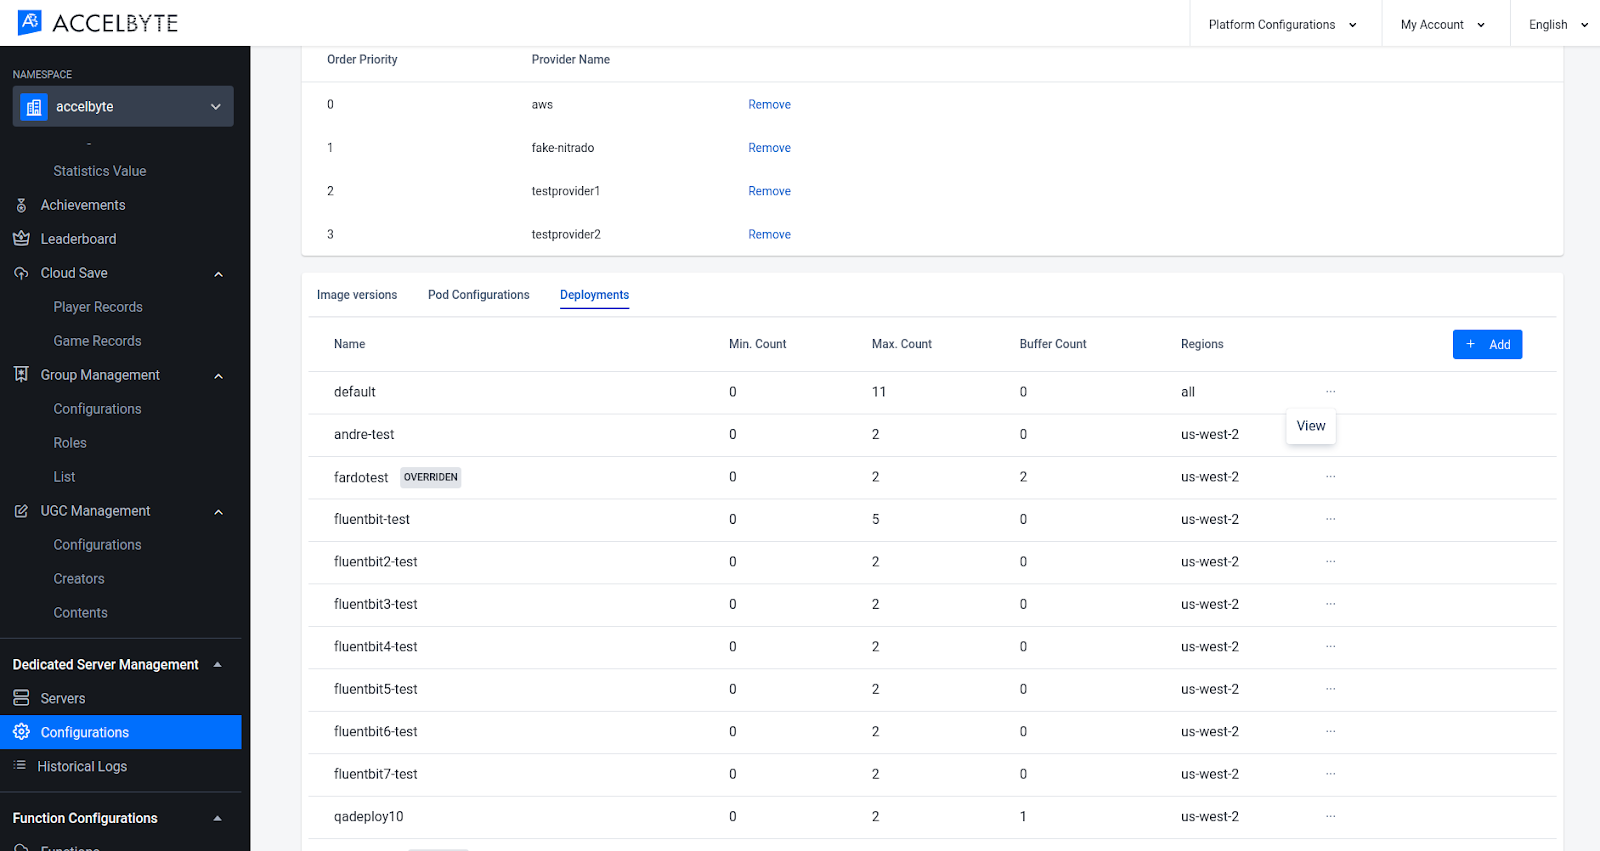
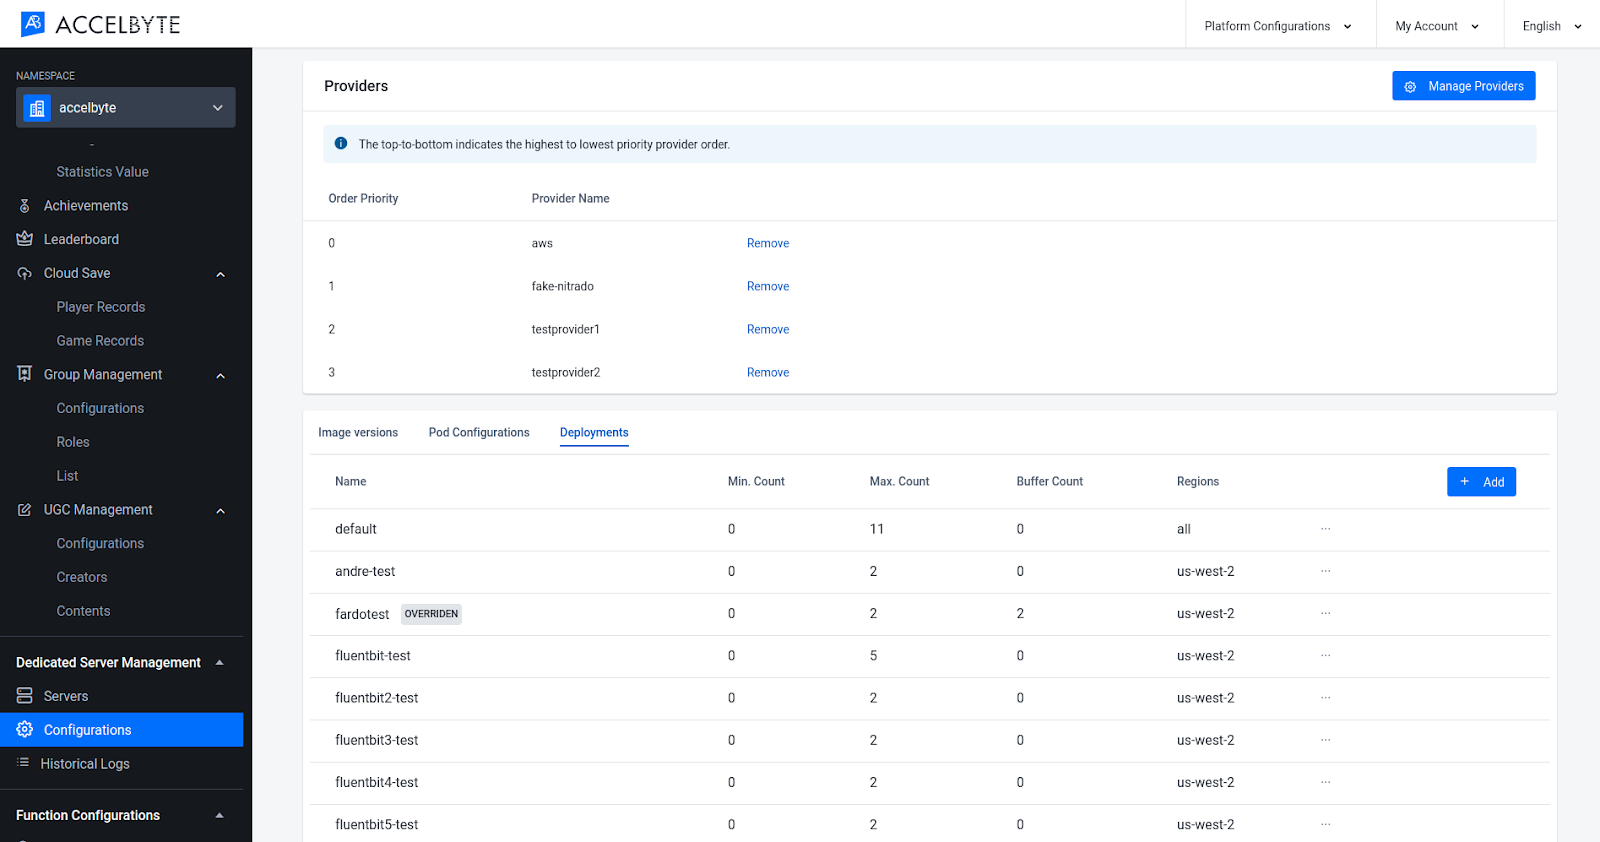
Configure the Deployments
After you have configured a different Image Version and Pod Configuration, next you can configure the Deployment. You can add another deployment with a different pod, version, and server region. Follow the steps below to add a new pod configuration.
In the Configuration Details window of the Admin Portal, go to the Deployments tab and click the New Deployment Configuration button.
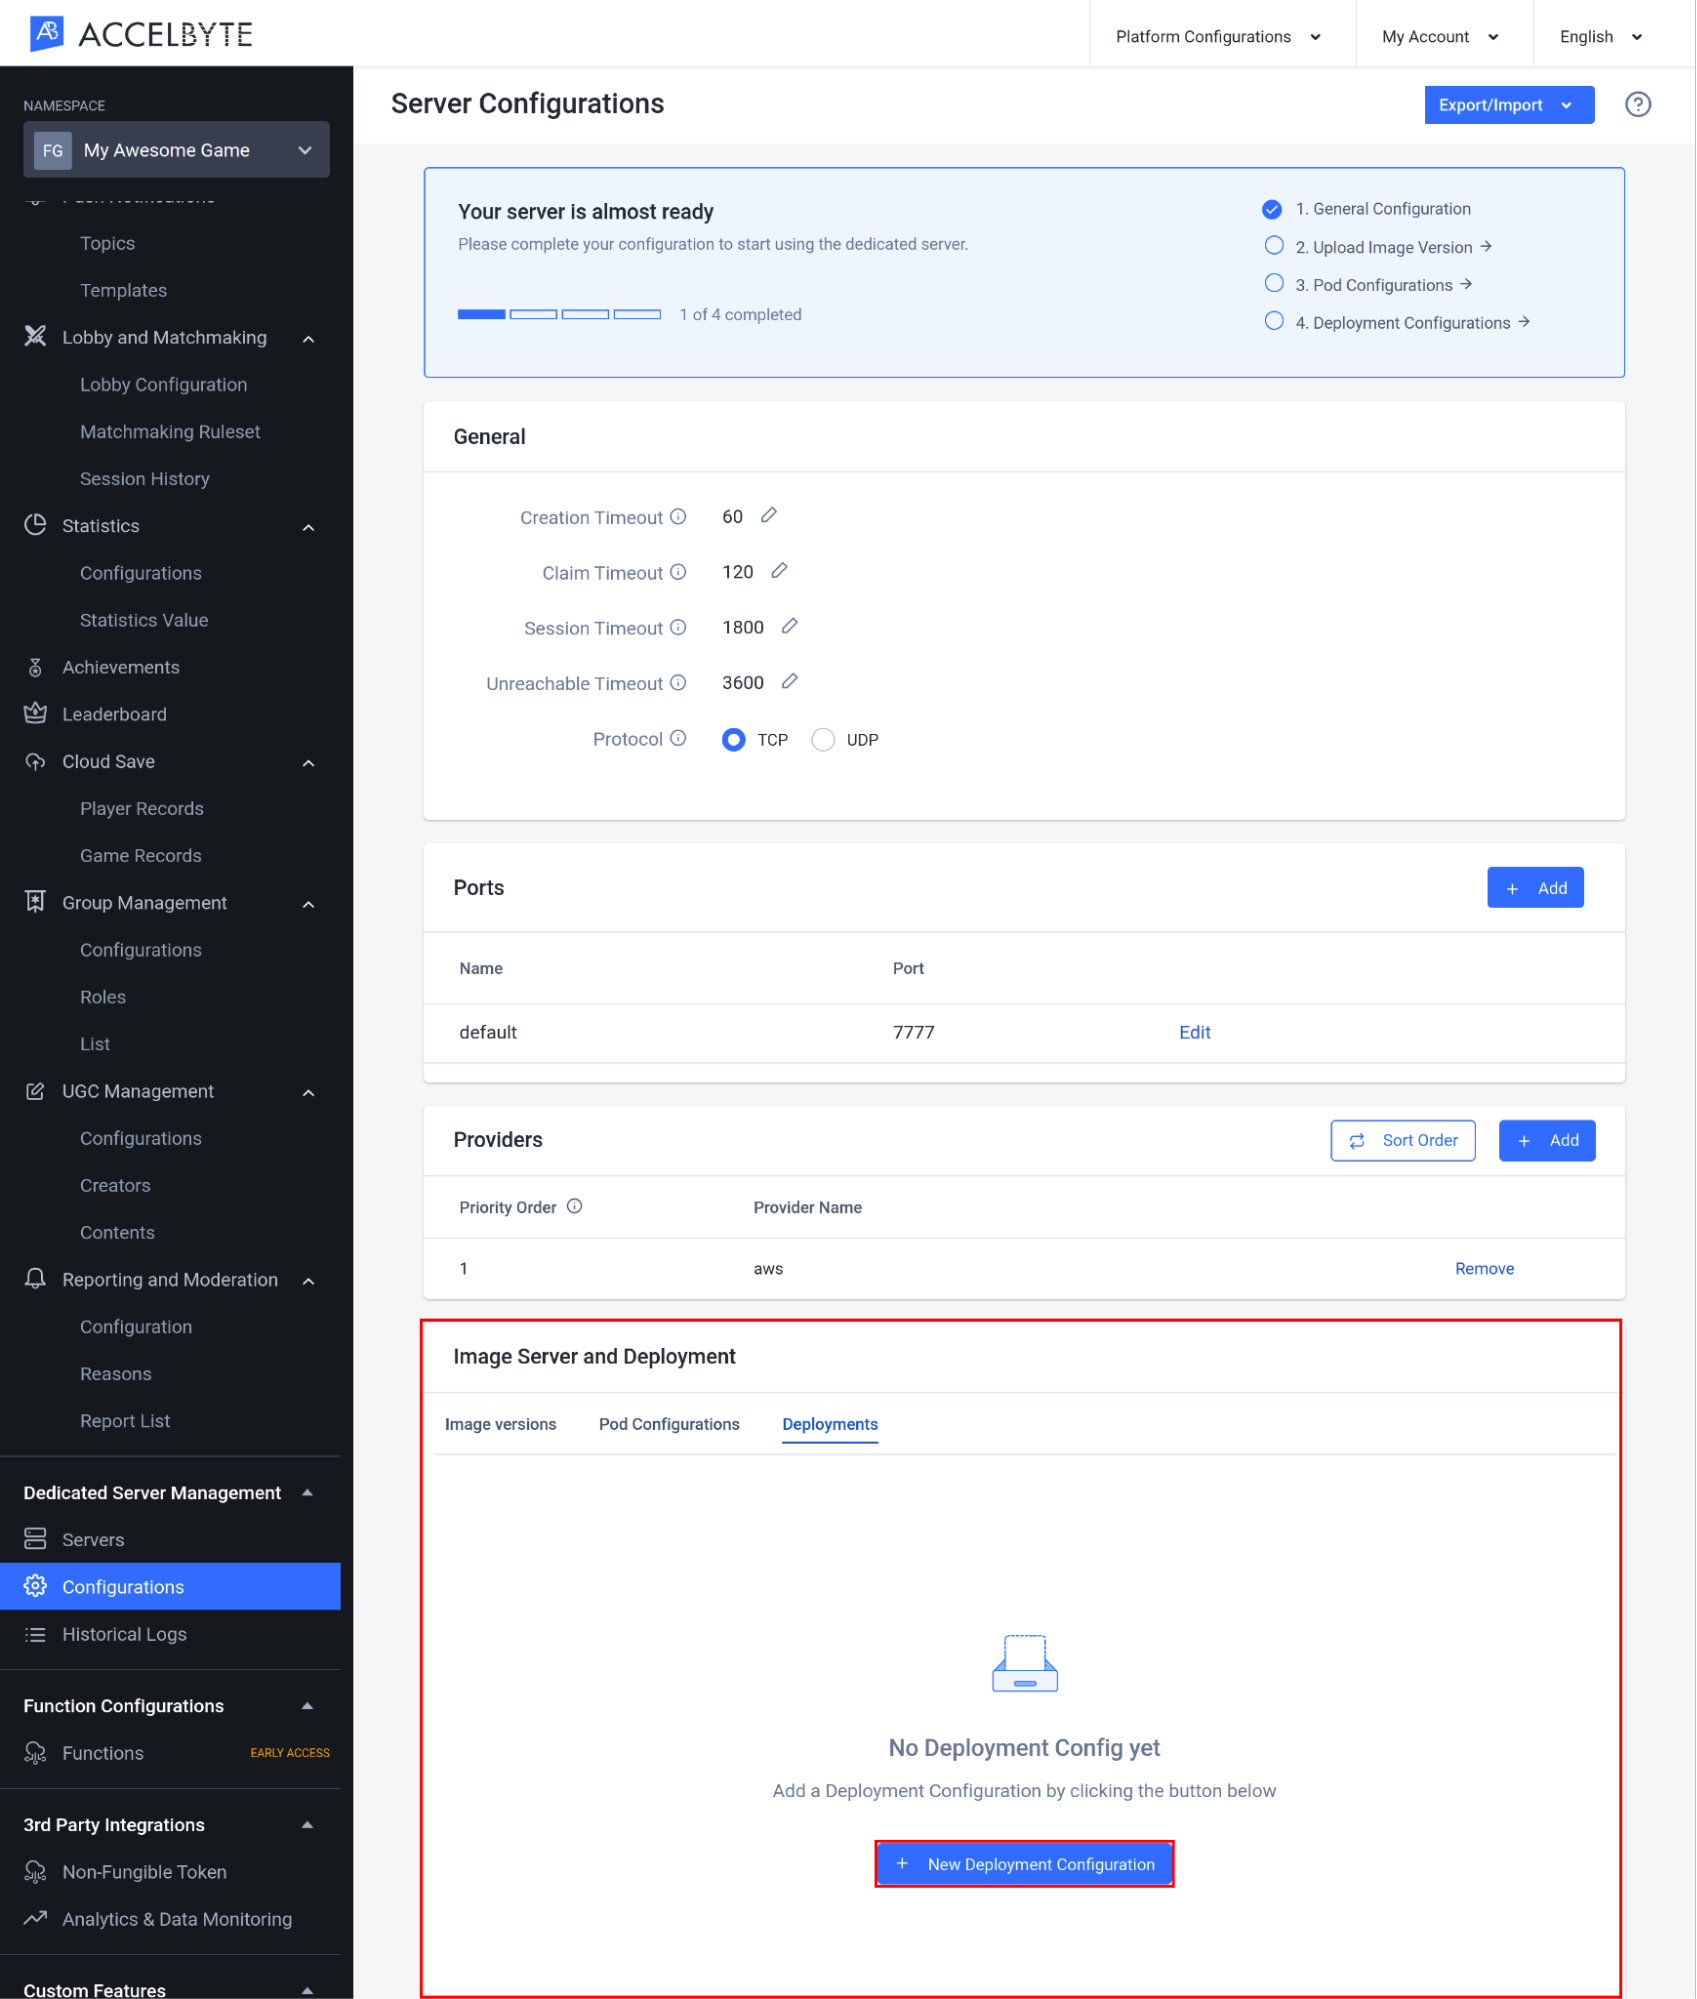
After the configuration form appears, you will see Server Count configuration first that will count the amount of servers that will be spawned.

Input the Min. Count with the minimum number of DS spawned, whether active or idle.
Input the Max. Count with the maximum number of the DS allowed to spawn.
Buffer Type. You can set it to Static or Dynamic based on what you are going to set up on your server configuration buffer. If you choose Static, you can immediately set the amount of servers that are ready to use. But if you choose Dynamic, it will be set up by dynamic percentage of how many servers are gonna be spawned based on busy servers.
CAUTION
If you set the Buffer type of Static to 0 or Dynamic buffer to 0%, there will not be spawned any server by default. Be sure to input Min, Max, and Buffer counts according to your game's needs. Idle servers will still incur cost, while having no buffer will cause players to wait for servers to start.
Click the Next button to go to the next step.
Here you will see the Image and Pod Configuration that are going to be deployed by the server.
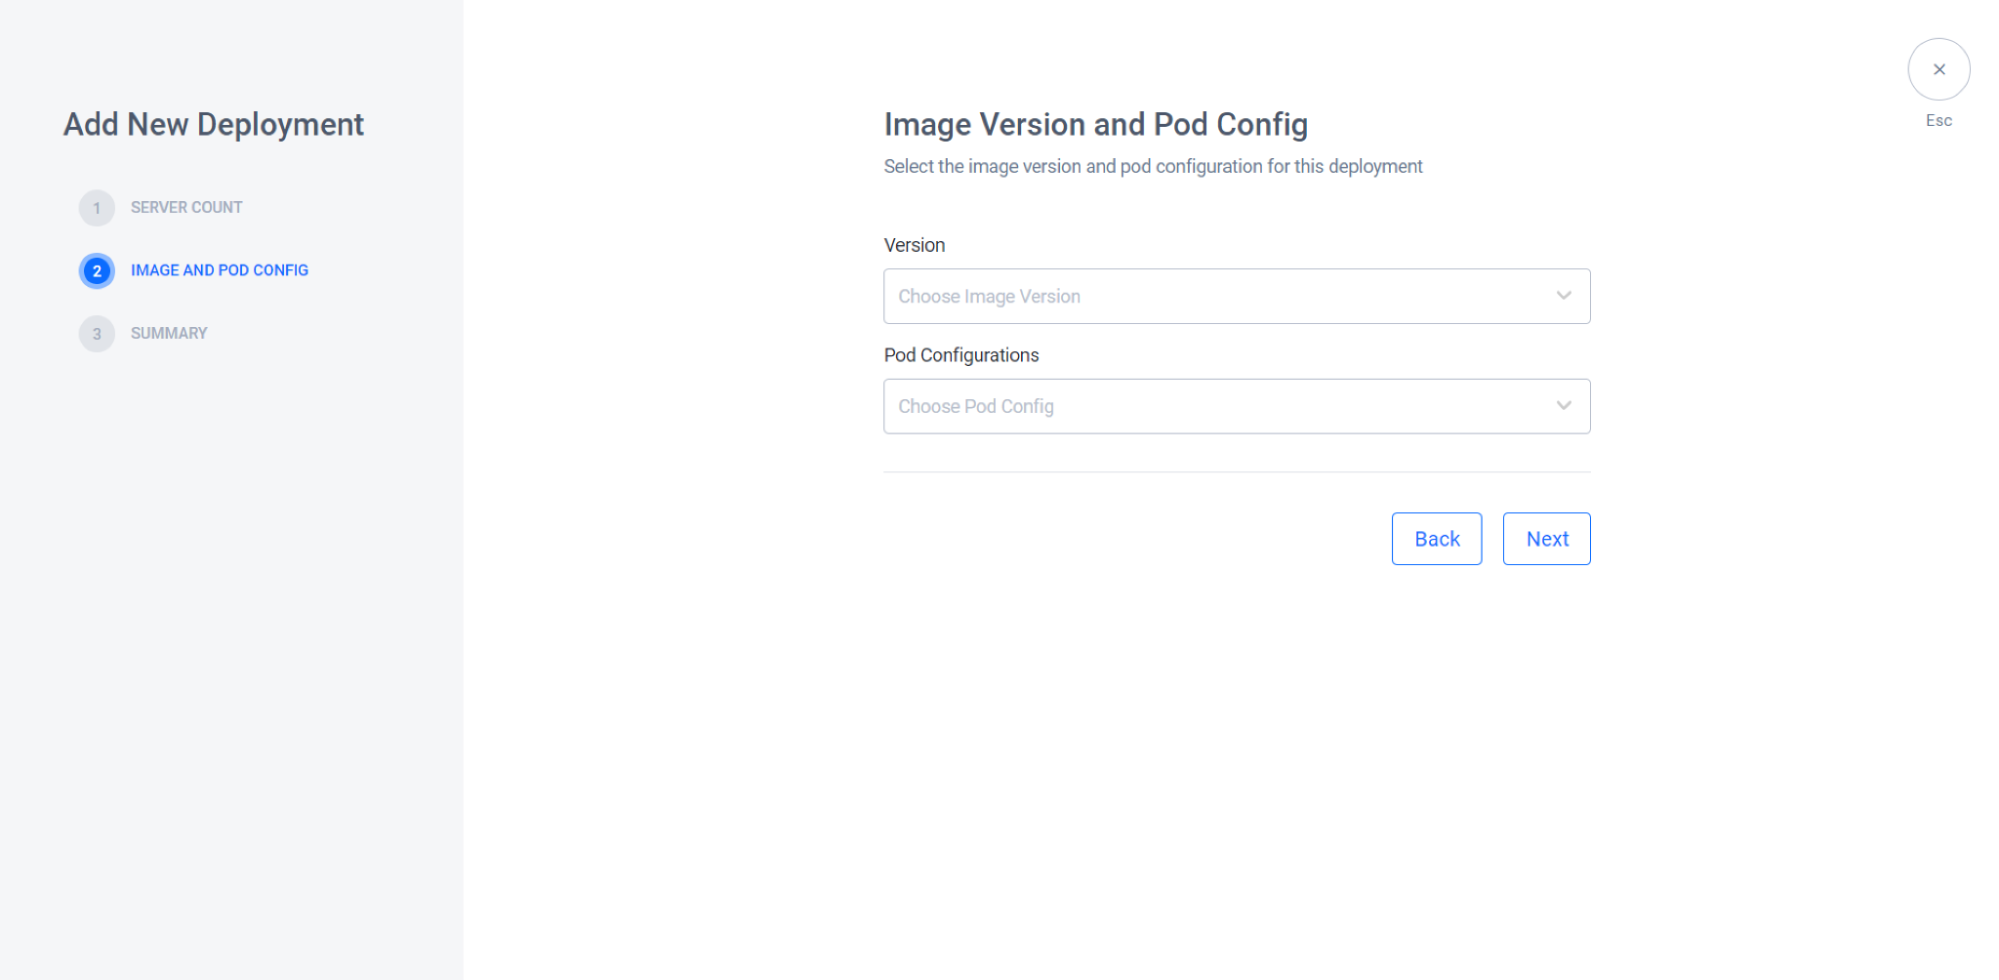
- You need to choose your Image Version that you have created before
- You need to choose your Pod Configuration that you have created before.
Click the Next button to go to the next step.
Here is your summary of Deployment Configurations. You can see the detailed information here before creating a new deployment. If you miss something you can go back by clicking the Back button, or if you are happy with the configuration you can click Create Deployment to create a new deployment.
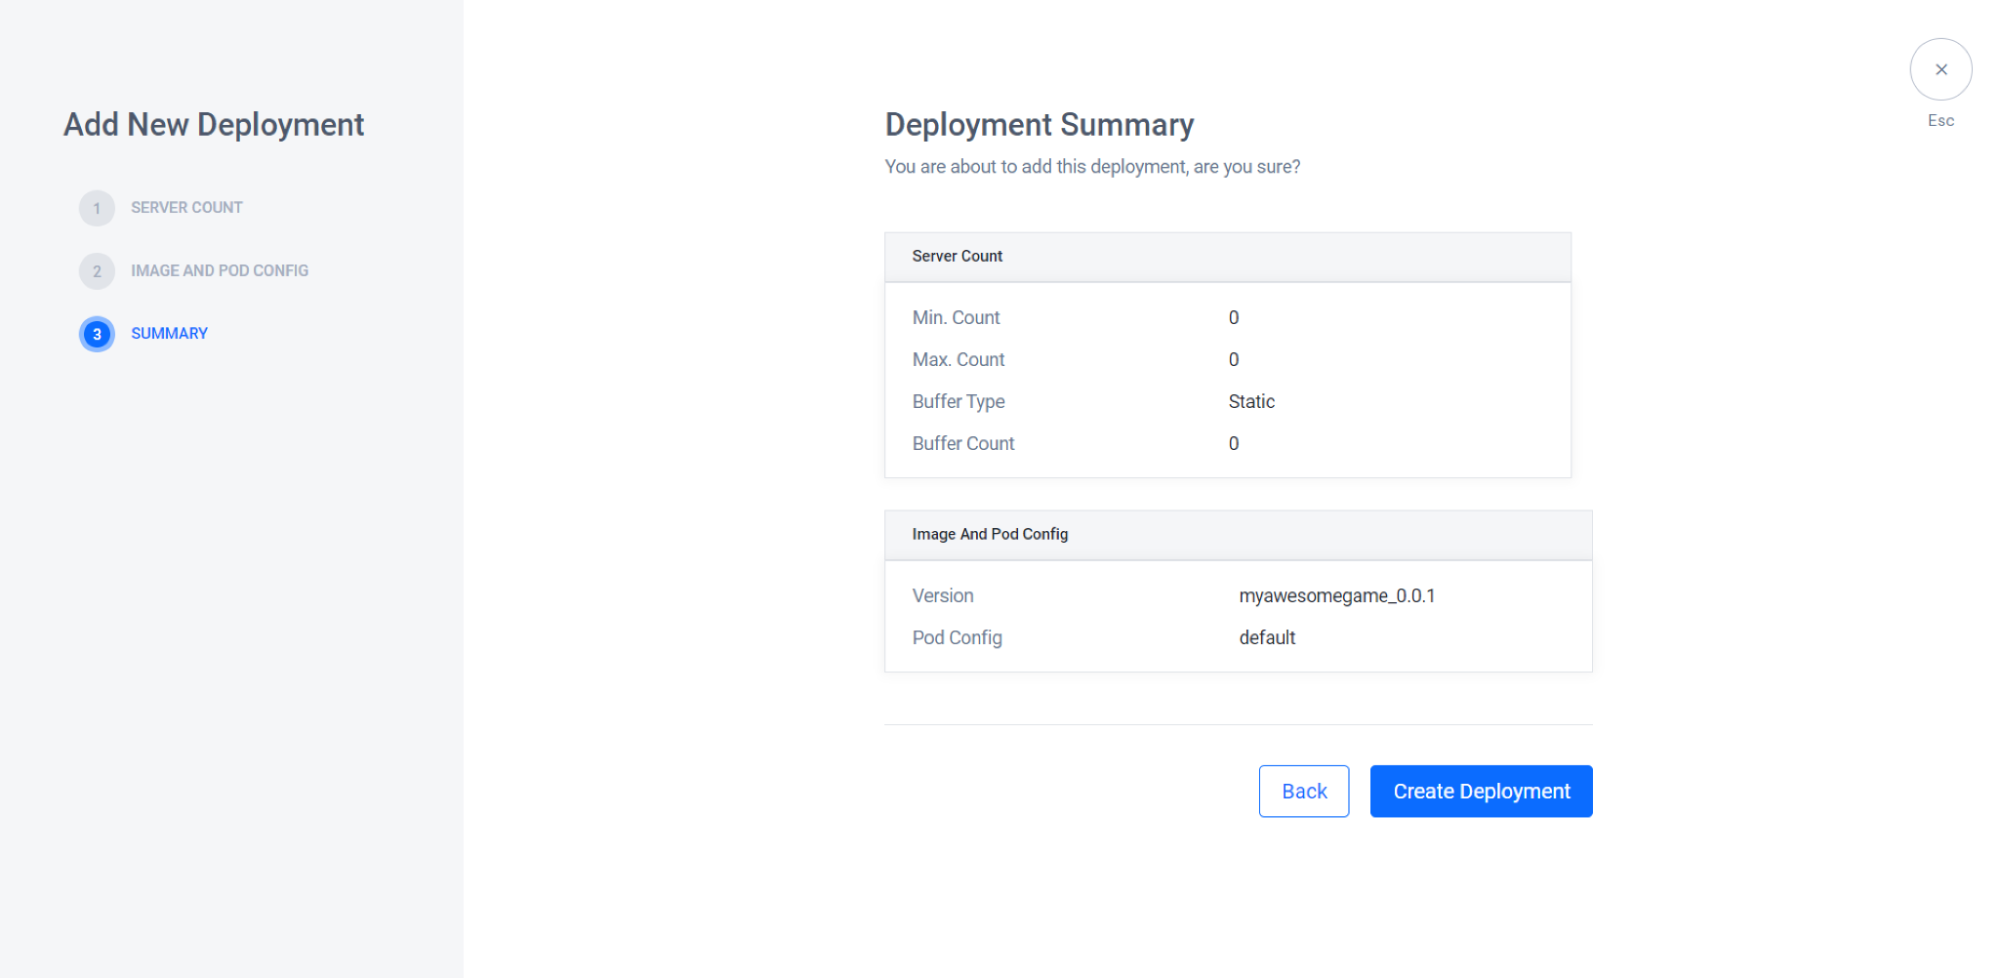
Then you will see all your detailed list of new deployments here under the deployment configuration panel.
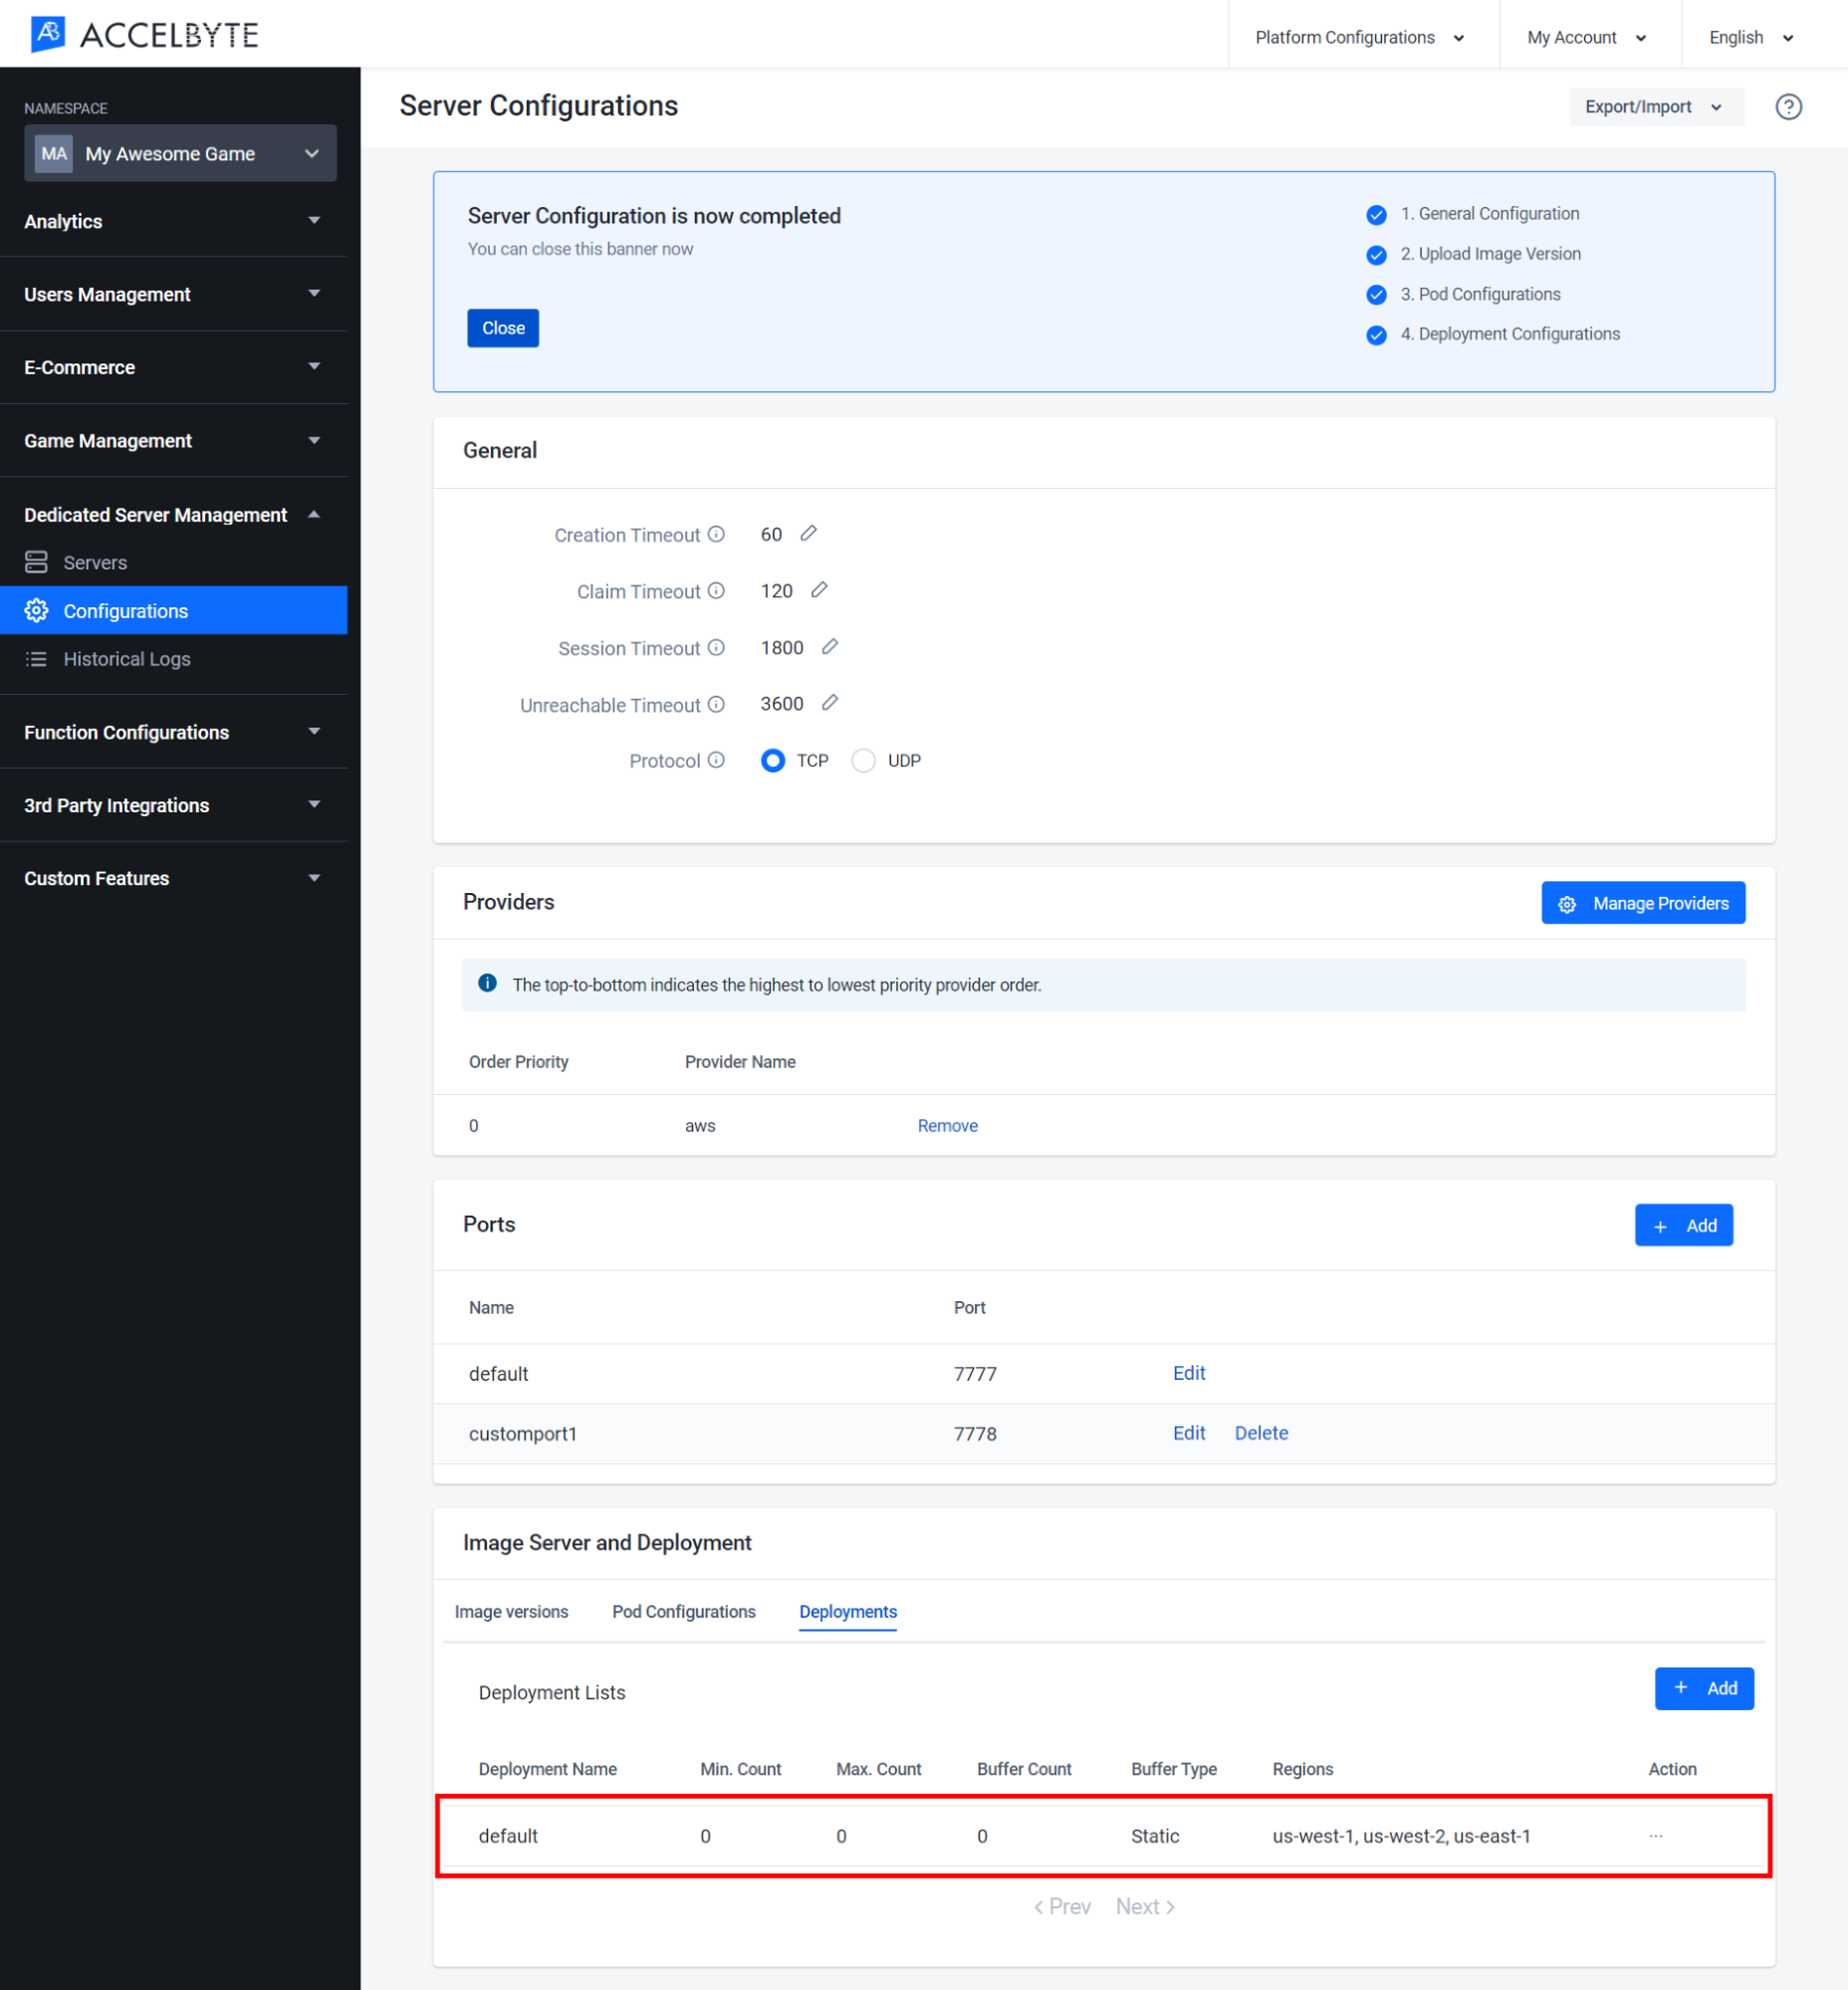
You can also click the Action button on the right of the list of the panel and then you can View or Delete your configuration. You can also edit all your configuration inside your View Configuration.
Patch Image Version
You can patch the DS Image using the same version of the image without having to upload a whole new version. To patch the image version, follow the steps below:
In the Admin Portal, go to Dedicated Server Management and select Configurations.
On the Server Configuration page, scroll down to the Image Server and Deployment section. Under the Image versions tab, you can see a list of the available image versions. Click the ellipsis button for your desired image and select View.
On the Image Server Detail page, under the Image Patch section, click the Add Image Patch button.
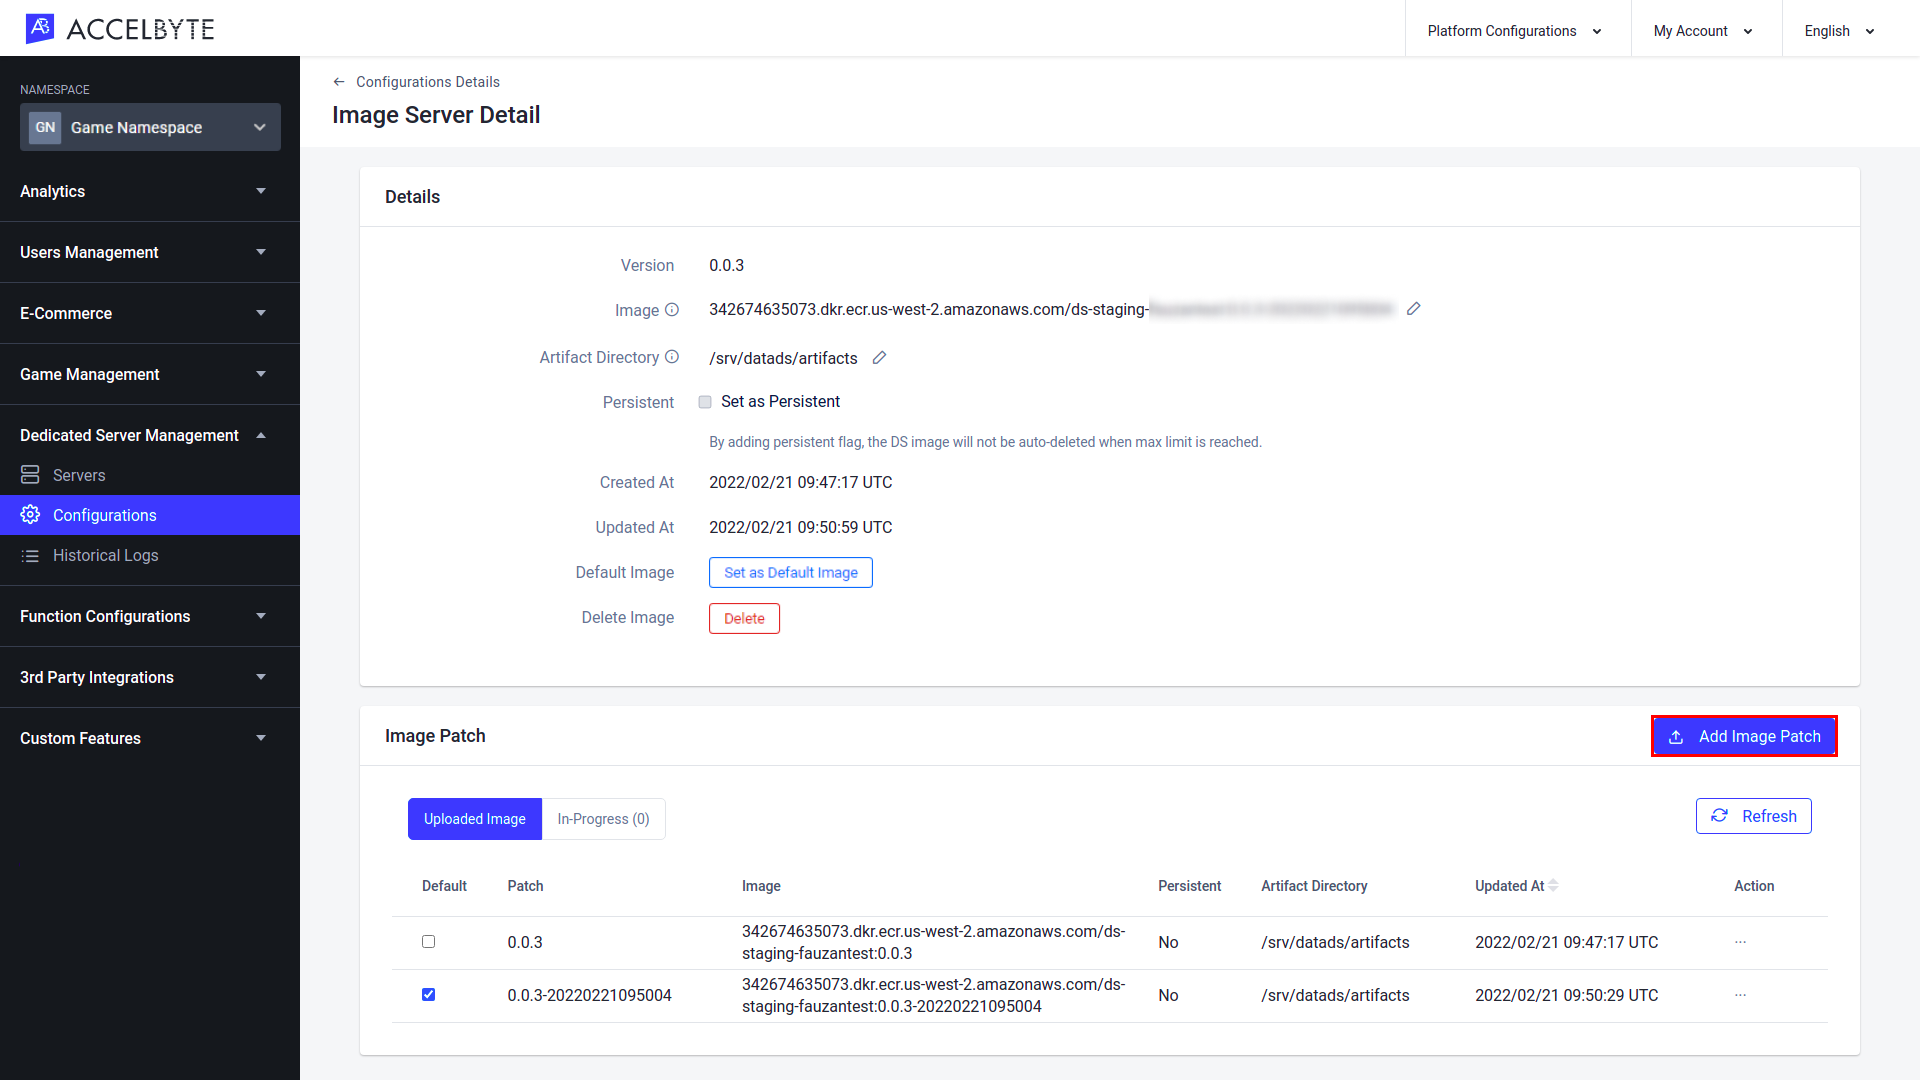
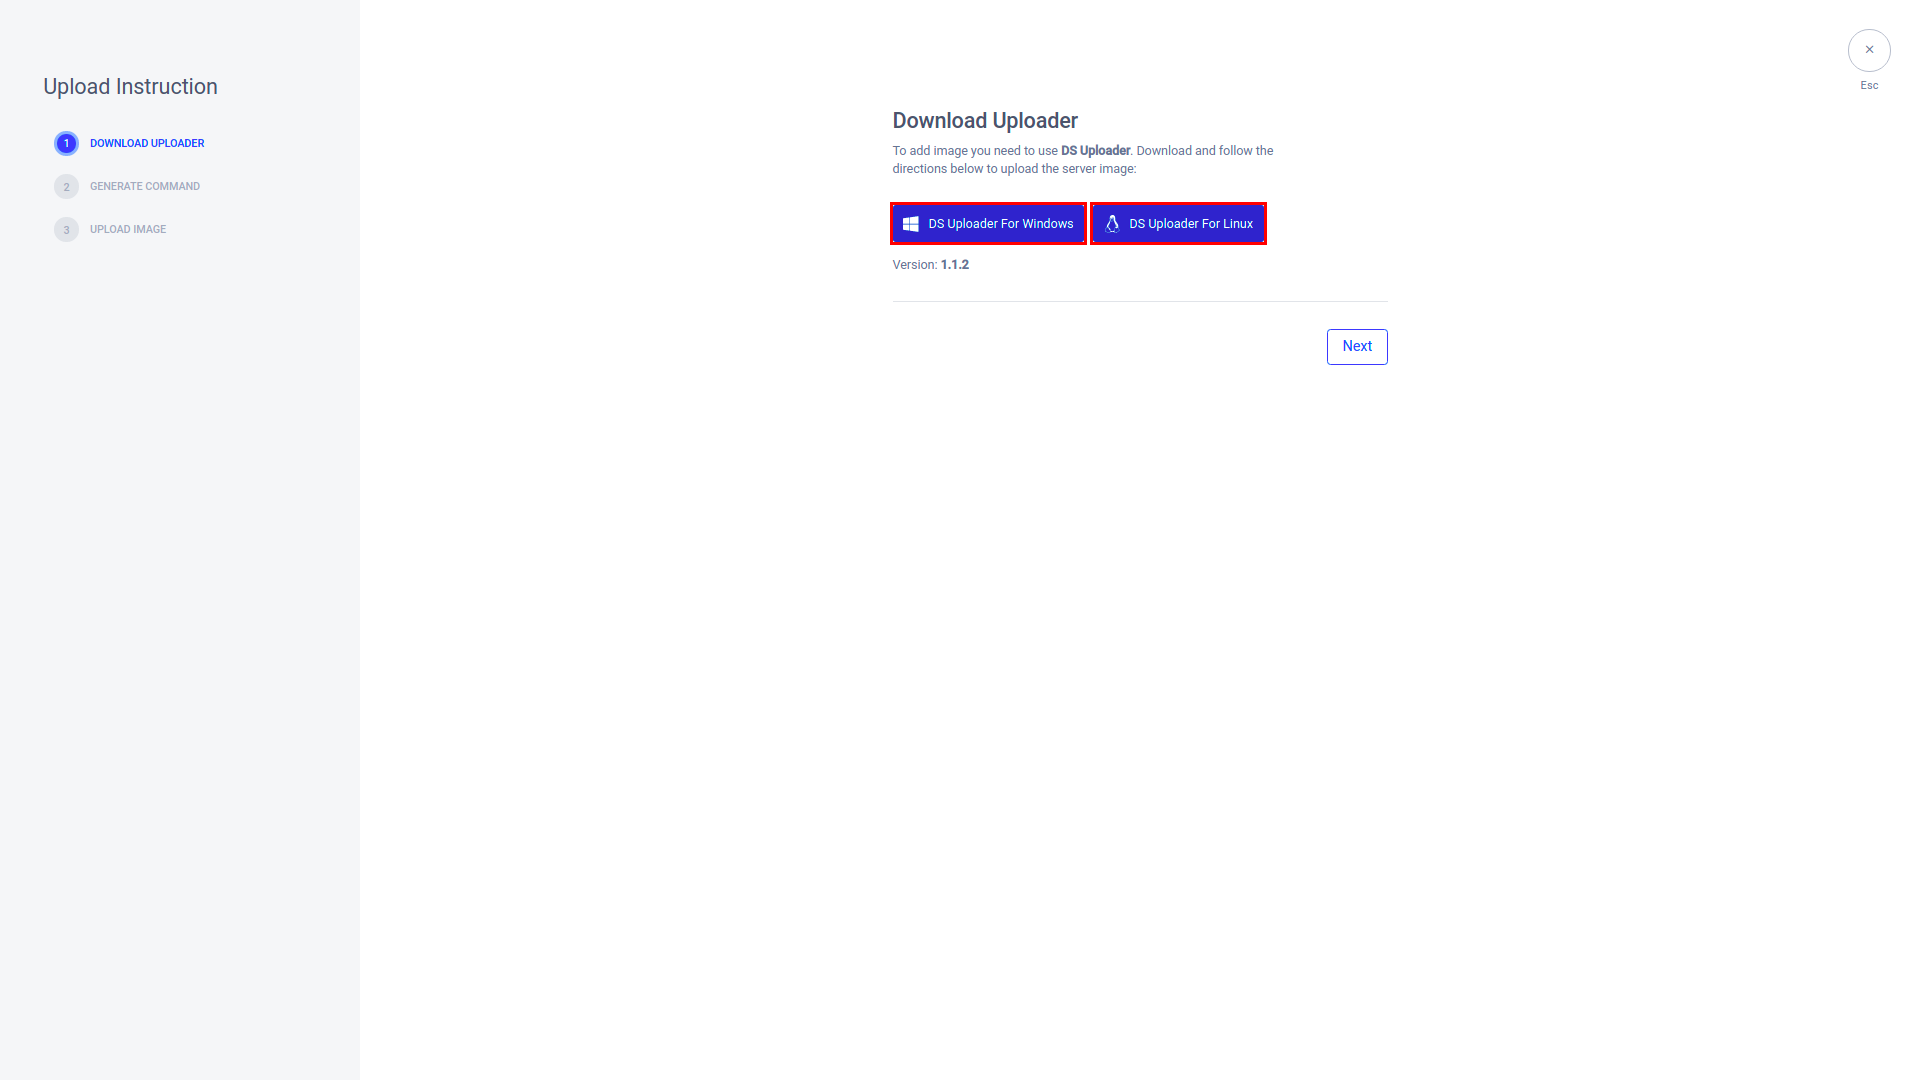
Download the version of the dedicated server uploader that matches your operating system. Once completed, click the Next button.
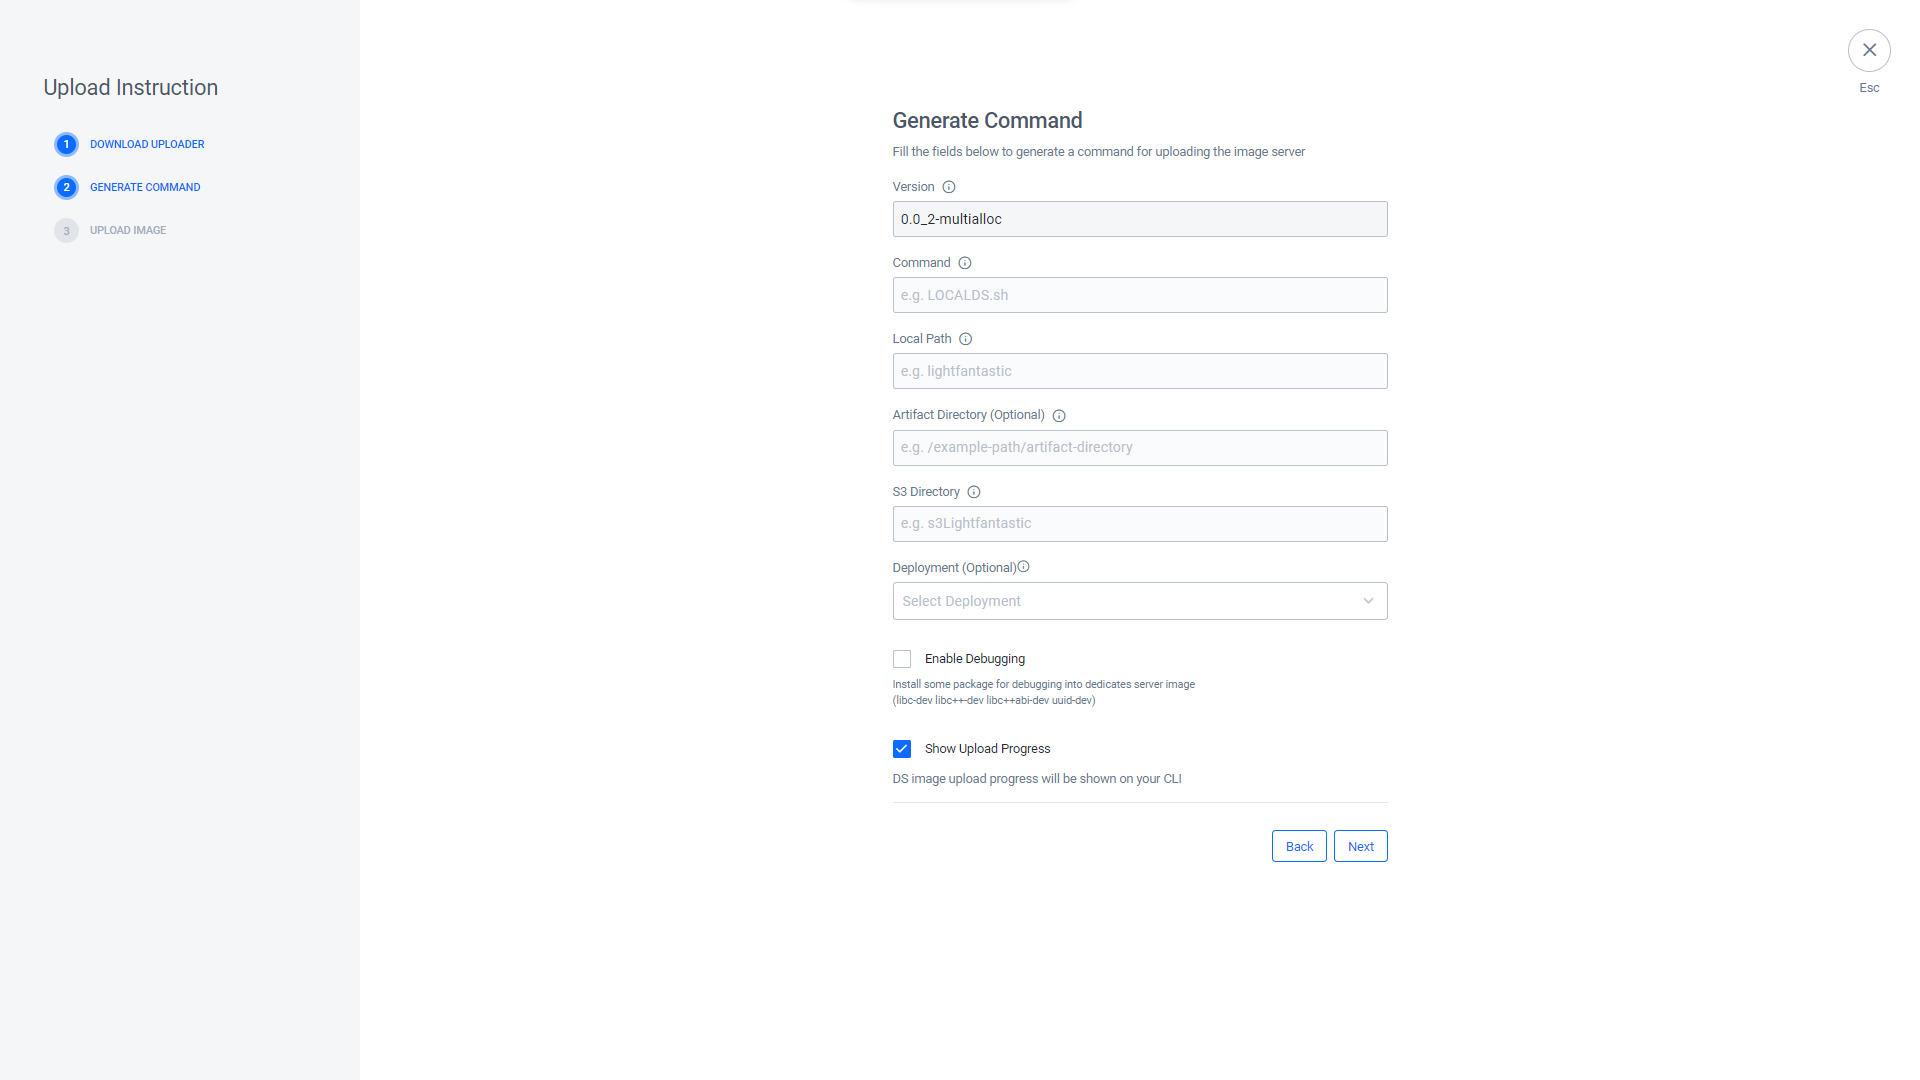
On the Generate Command page, fill in the fields with the data from your game server:
- Fill the Version field with the version of your game server.
- Fill the Command field with your game server's executable command. This can be found inside your game server directory.
- Fill the Local Path field with your game server's local path. You can use either a relative or absolute path.
- Fill the Artifact Directory field with the directory path where the artifact files will be stored.
- Fill the S3 Directory field with the directory of your S3 bucket.
- Fill the Deployment field with the deployment that will be used for this image server.
- Select the Enable Debugging option if you want to install a package for debugging into the DS image.
- Select the Show Upload Progress option if you want the DS image's upload progress to appear in your CLI.
Once completed, click the Next button.
A command will be automatically generated. You can use this command to upload your game server, but before doing so, ensure that you have replaced the client_id and client_secret with the Client ID and Client Secret of the IAM Client of your DS Uploader. Open the CLI in the folder that contains your DS Uploader and game server, and then run the command.
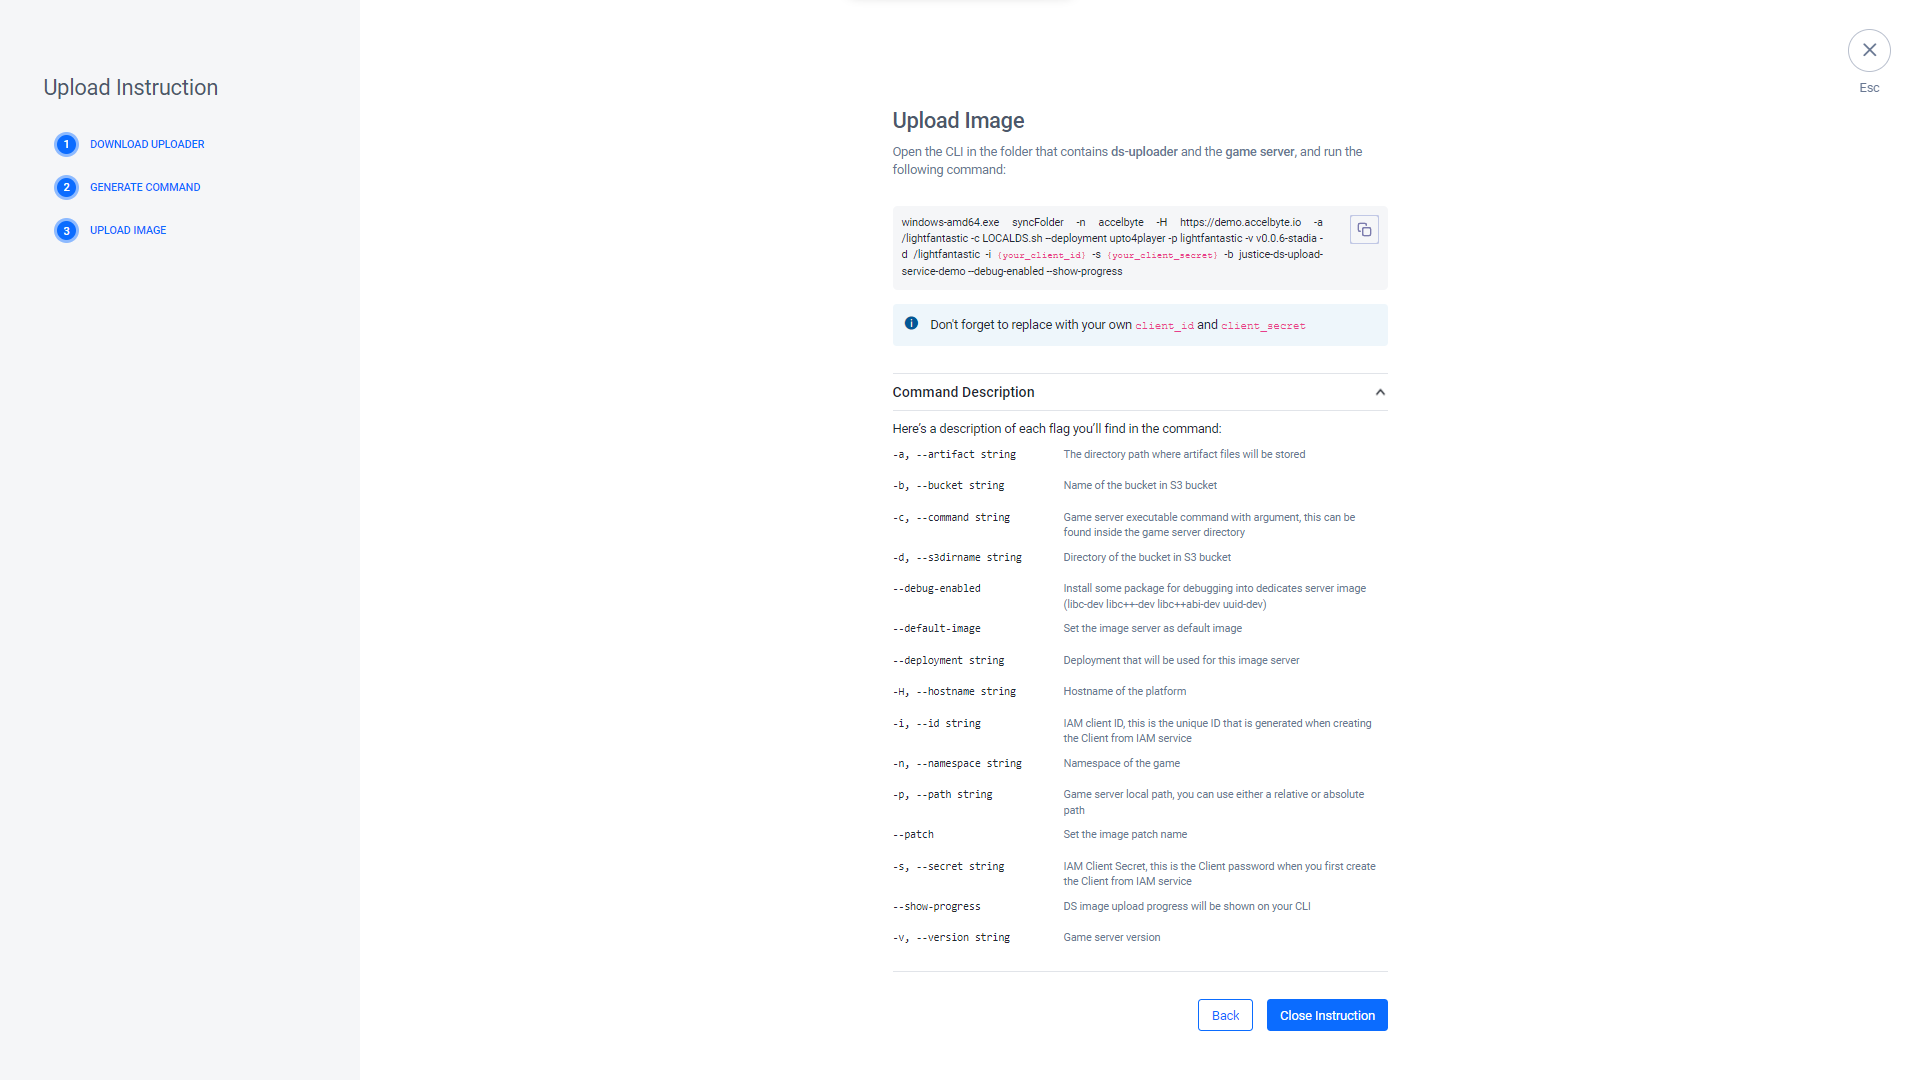
The command will contain multiple flags denoting the information you entered earlier. The flags and their meanings are listed below.
Flag Shortcut Description --artifact string -a The directory path where artifact files will be stored. --bucket string -b The name of your S3 bucket. --command string -c The server's executable command. --s3dirname string -d The directory path of your S3 bucket. --debug-enabled Use this flag to install a debugging package into the server. --default-image Use this flag to make this server the default server image. --deployment string The deployment that will be used for this image server. --hostname string -H The hostname path of the platform. --id string -i The IAM Client ID of your DS Uploader. --namespace string -n The namespace of your game. --path string -p The local path of the game server. --patch Use this flag to set the image as the patch of the version. If you don't include this patch, your upload will be uploaded as a new image version. --secret string -s The IAM Client Secret of your DS Uploader. --show-progress Use this flag to make the server image upload appear in your CLI during the upload. --version string -v The game server version. You can also view this information in your CLI by using the command \<ds-uploader>.exe --help.
Verify the Dedicated Server Configuration
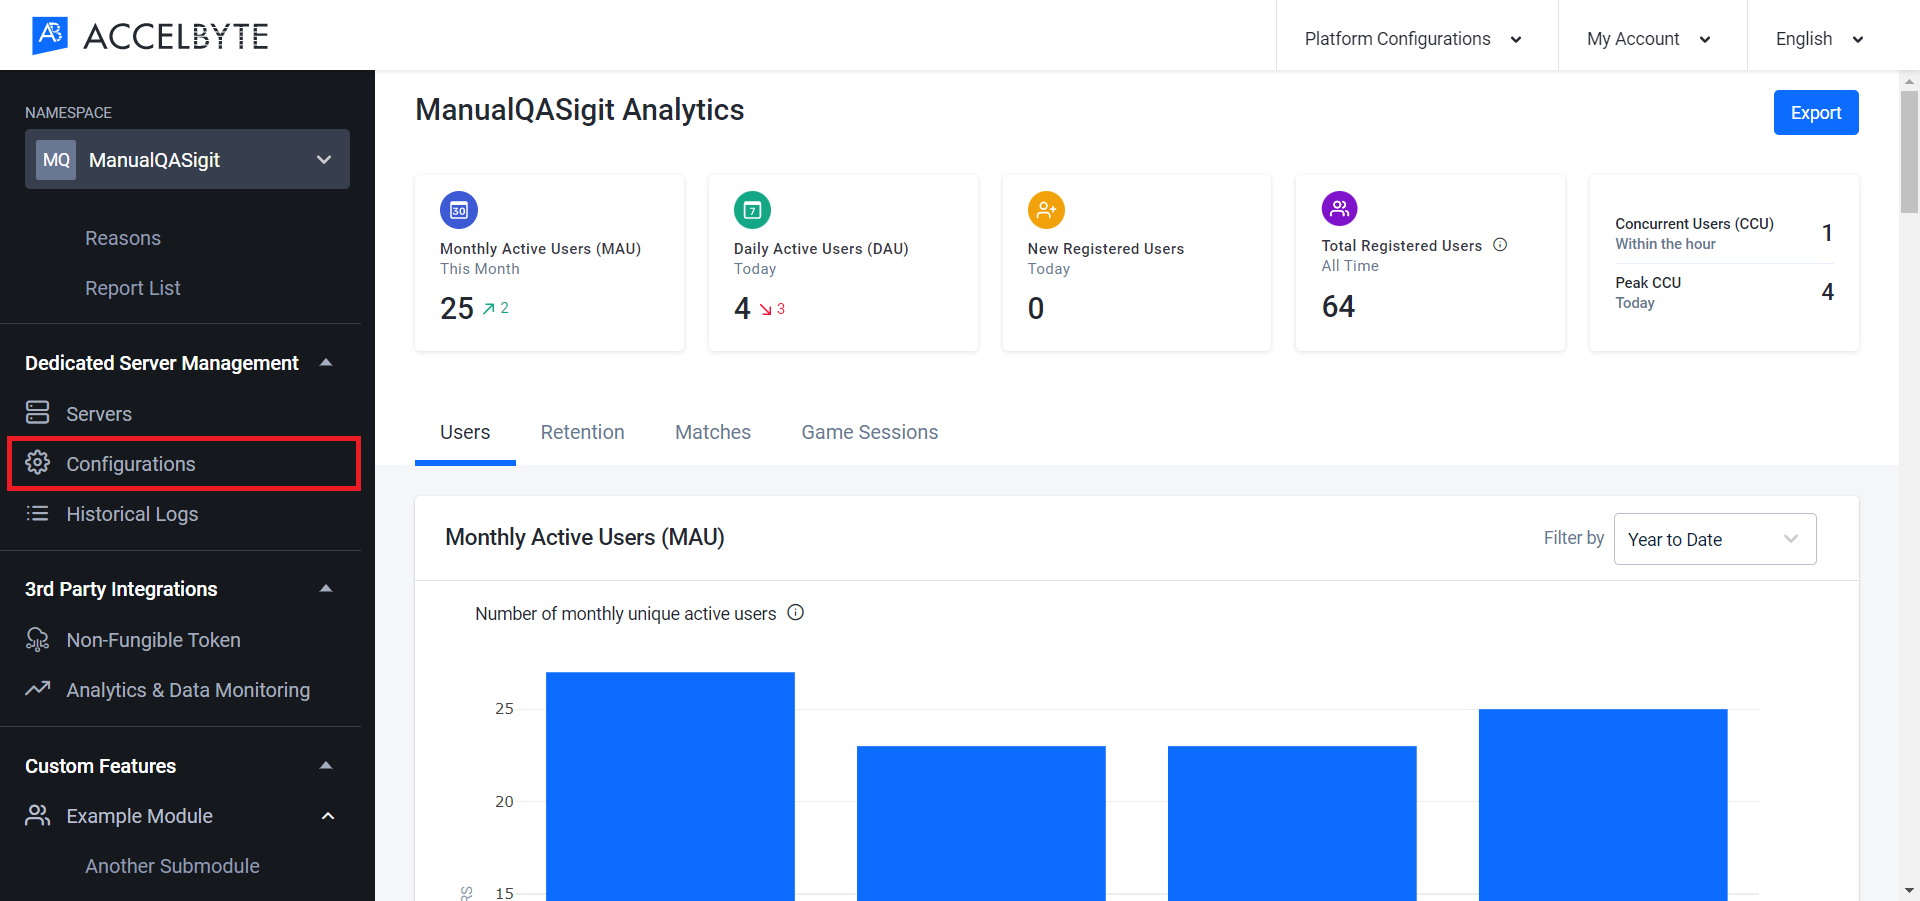
After you create a Dedicated Server Configuration, you should verify that the server has spawned correctly. In the Admin Portal, go to Dedicated Server Management and choose Servers.
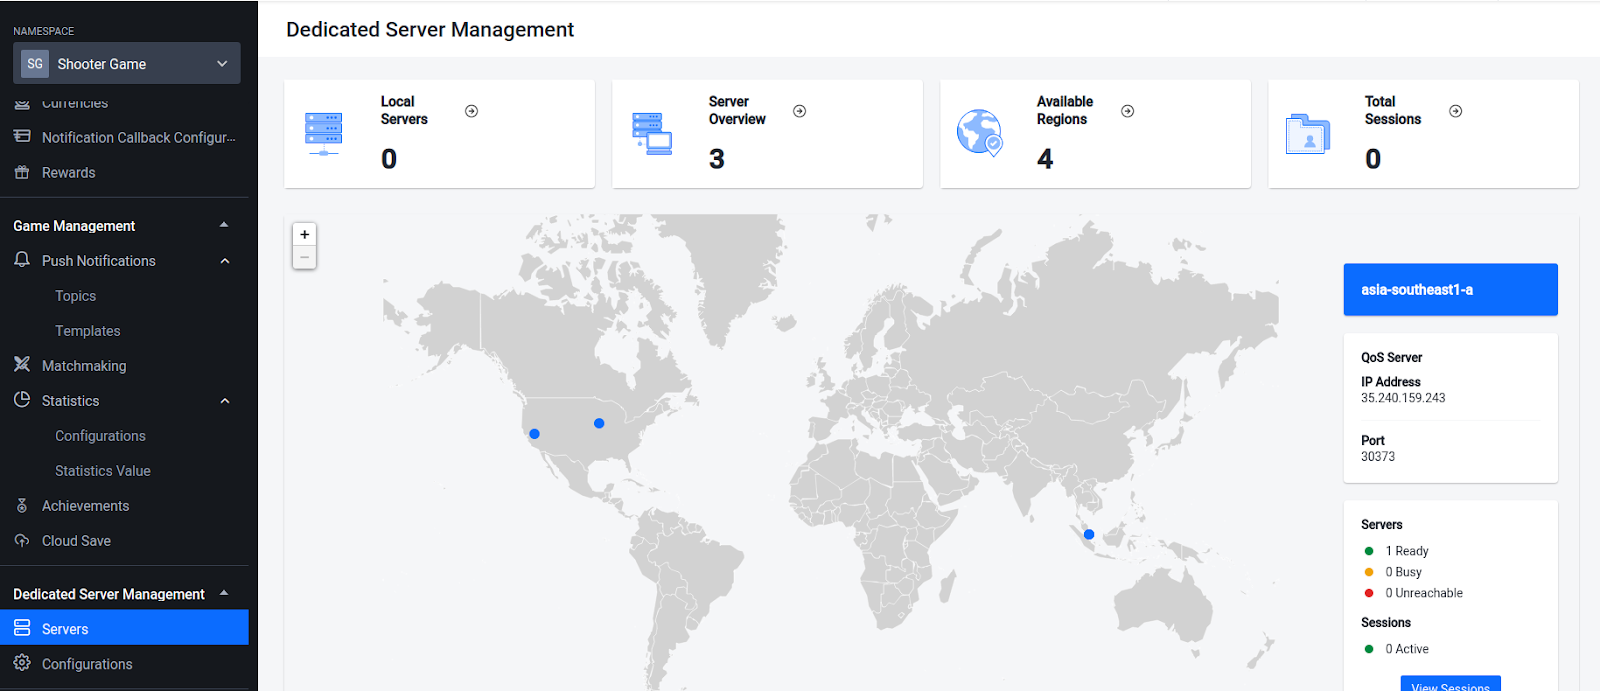
On the Servers page you'll see the elements listed below:
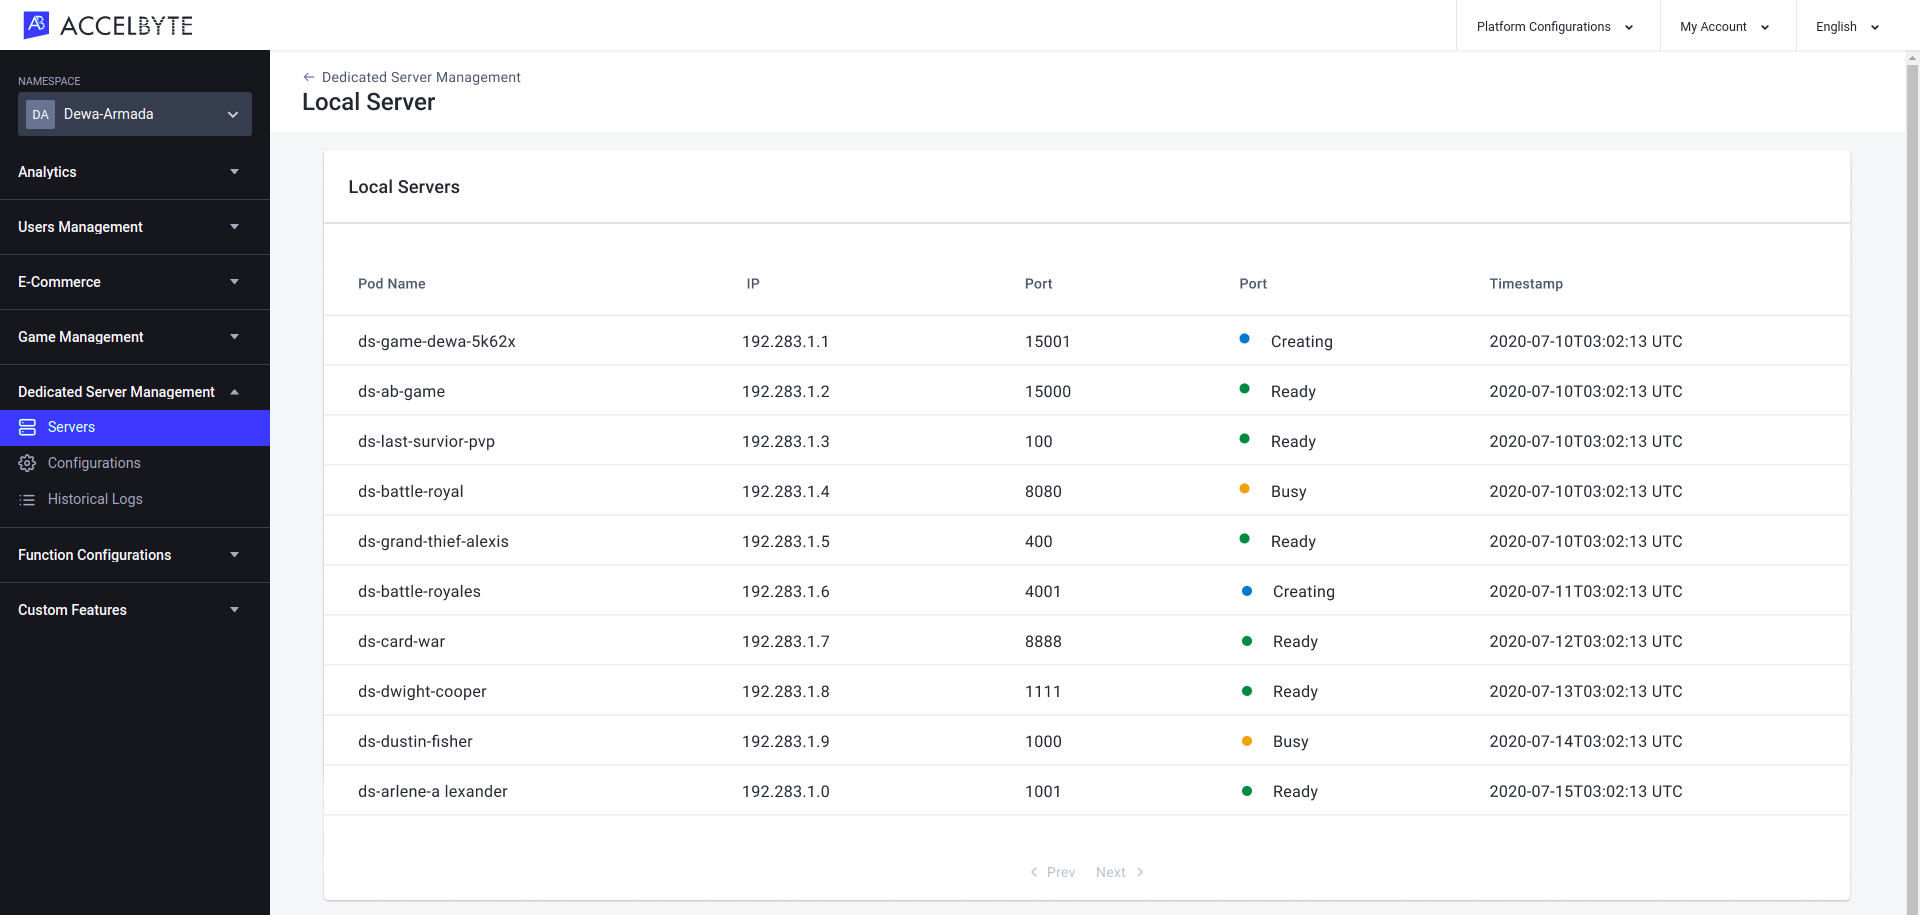
Local Server
The Local Server page shows the number of dedicated servers that run on your local computer. This type of dedicated server is used to perform testing before a game is published.
Server Overview
The Server Overview page shows the number of dedicated servers you have configured, from both AWS and GCP hosting providers.
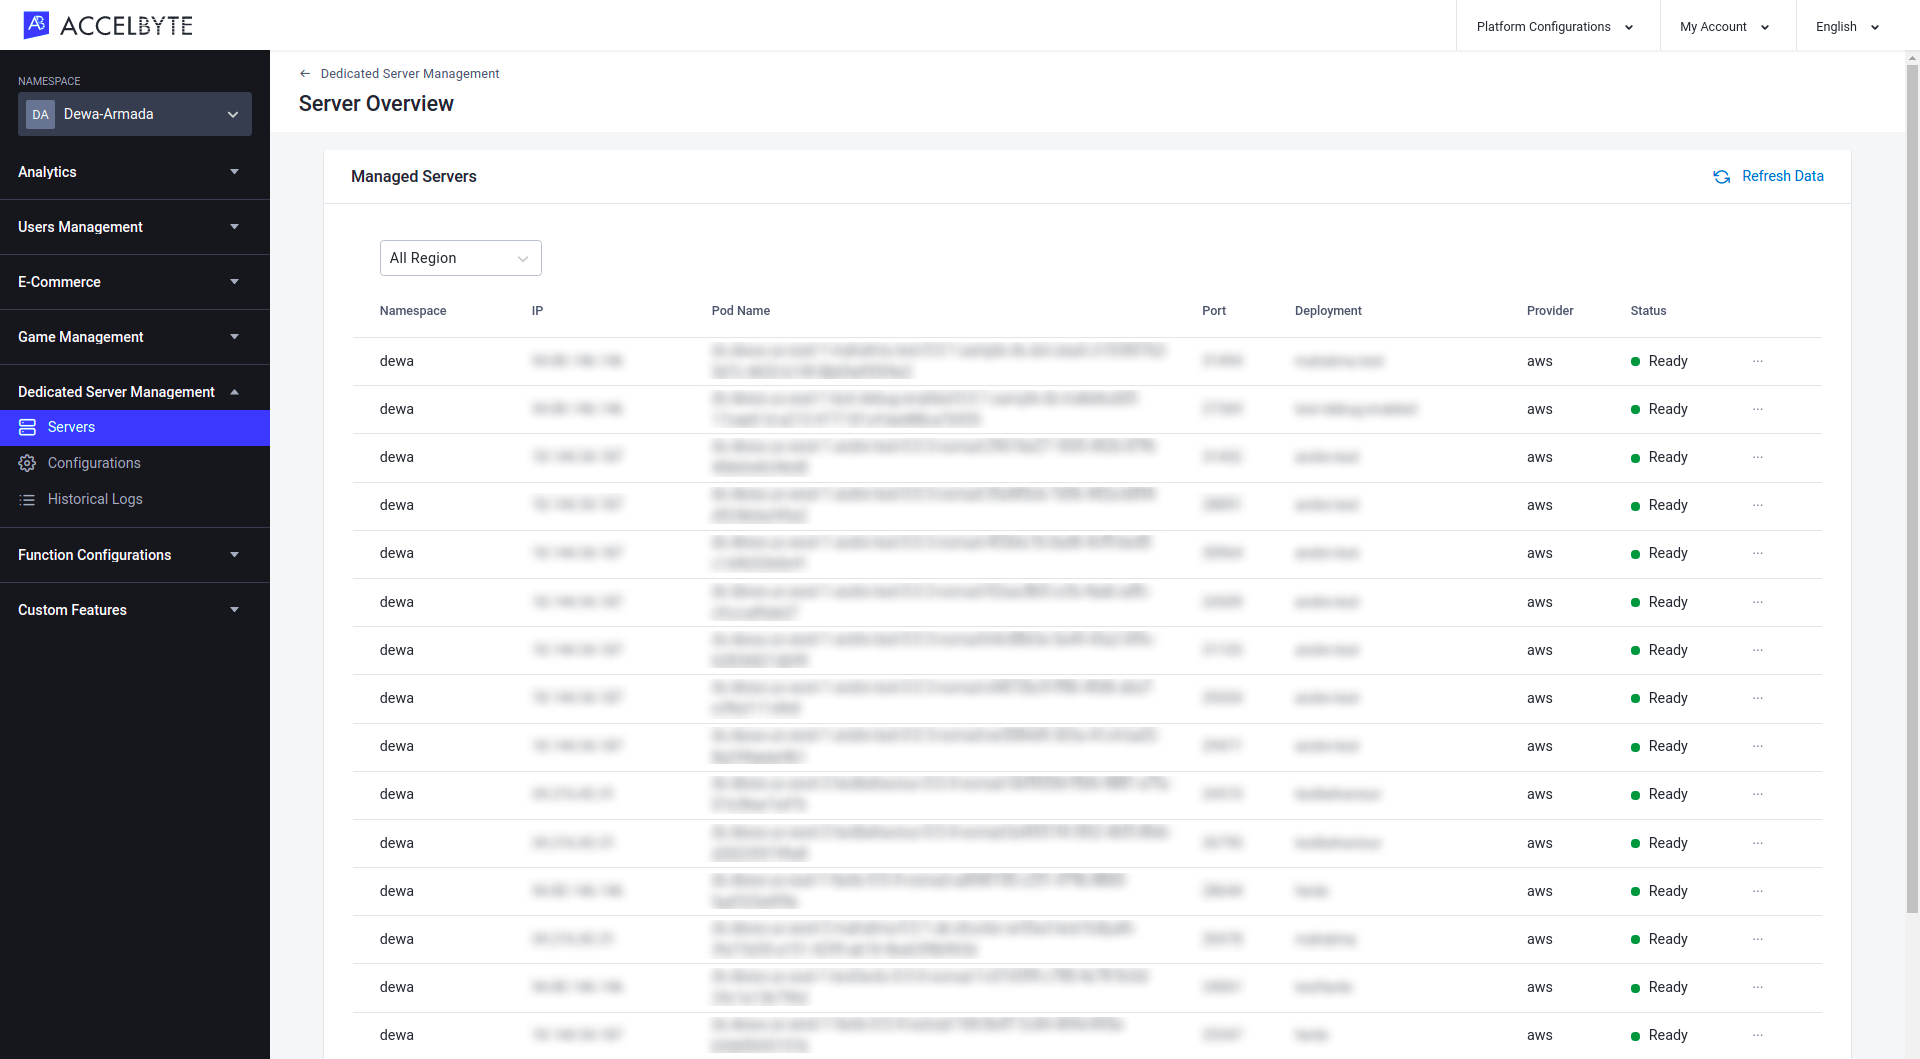
You can also sort servers by region.
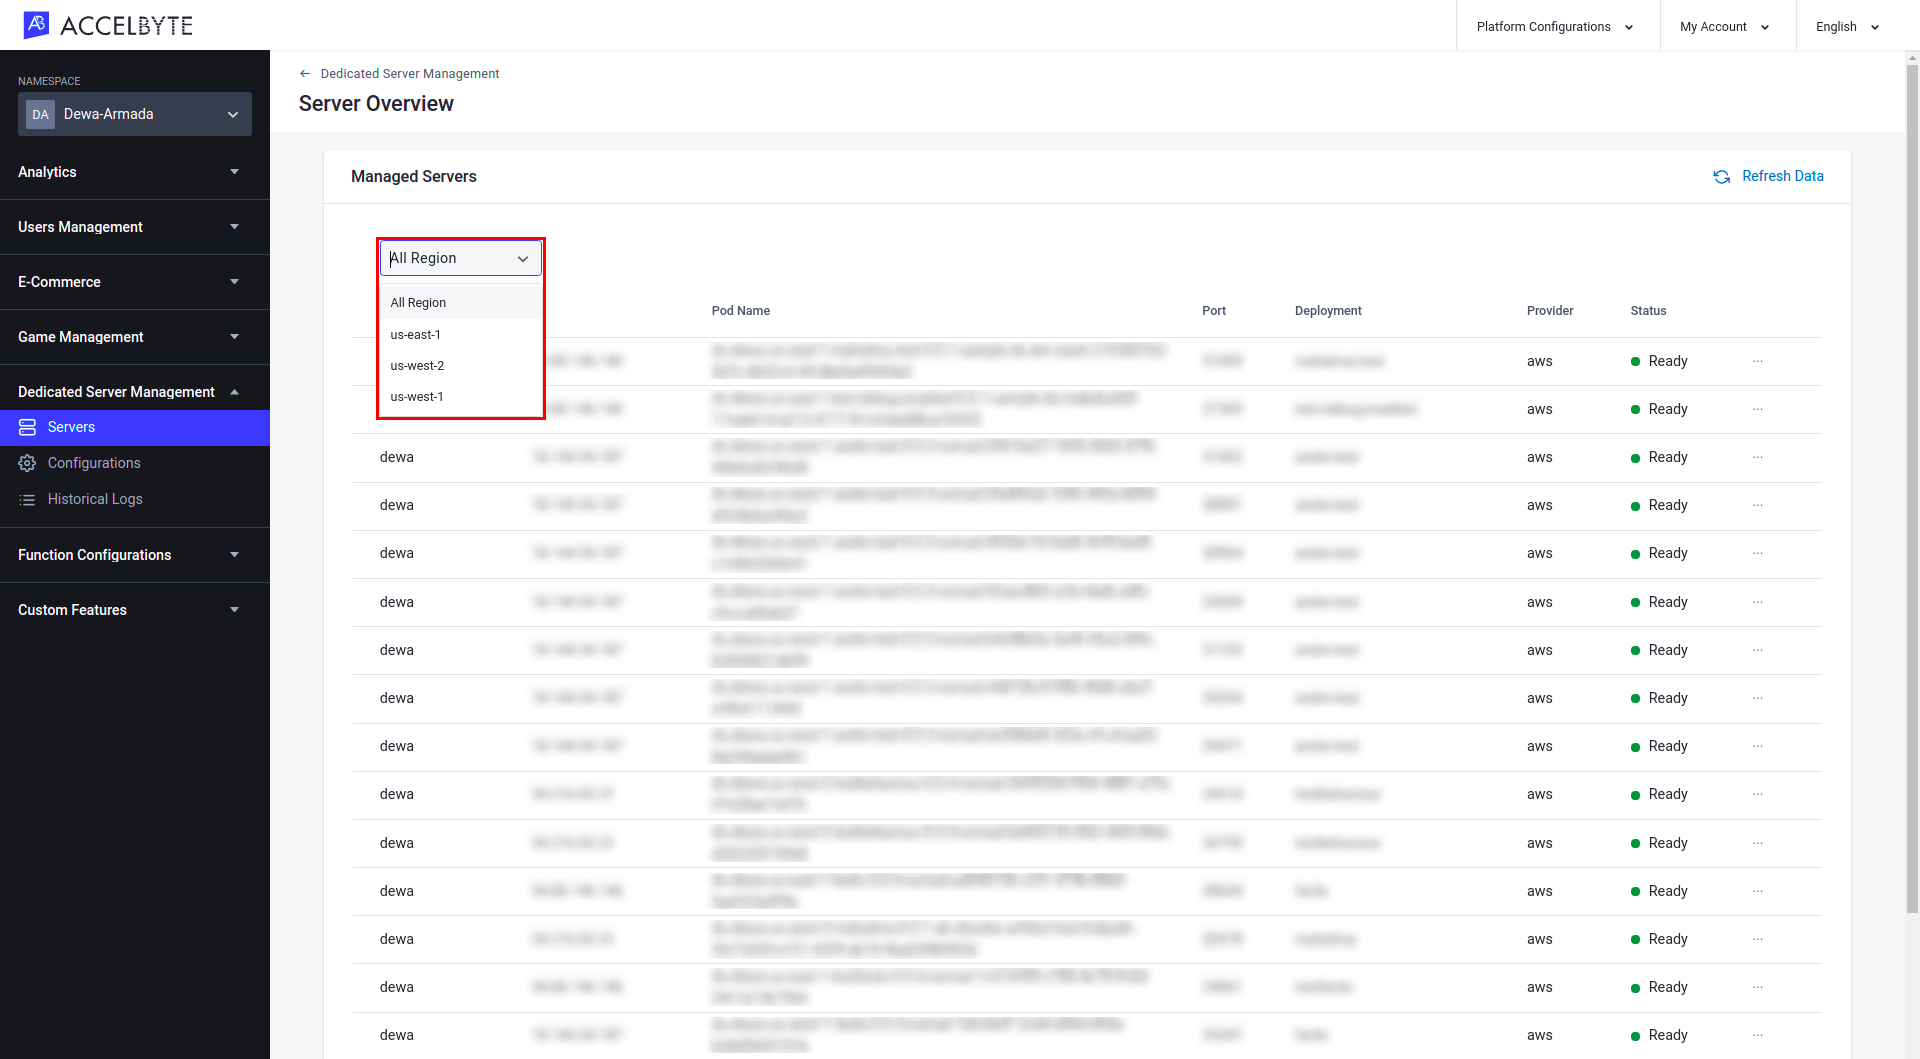
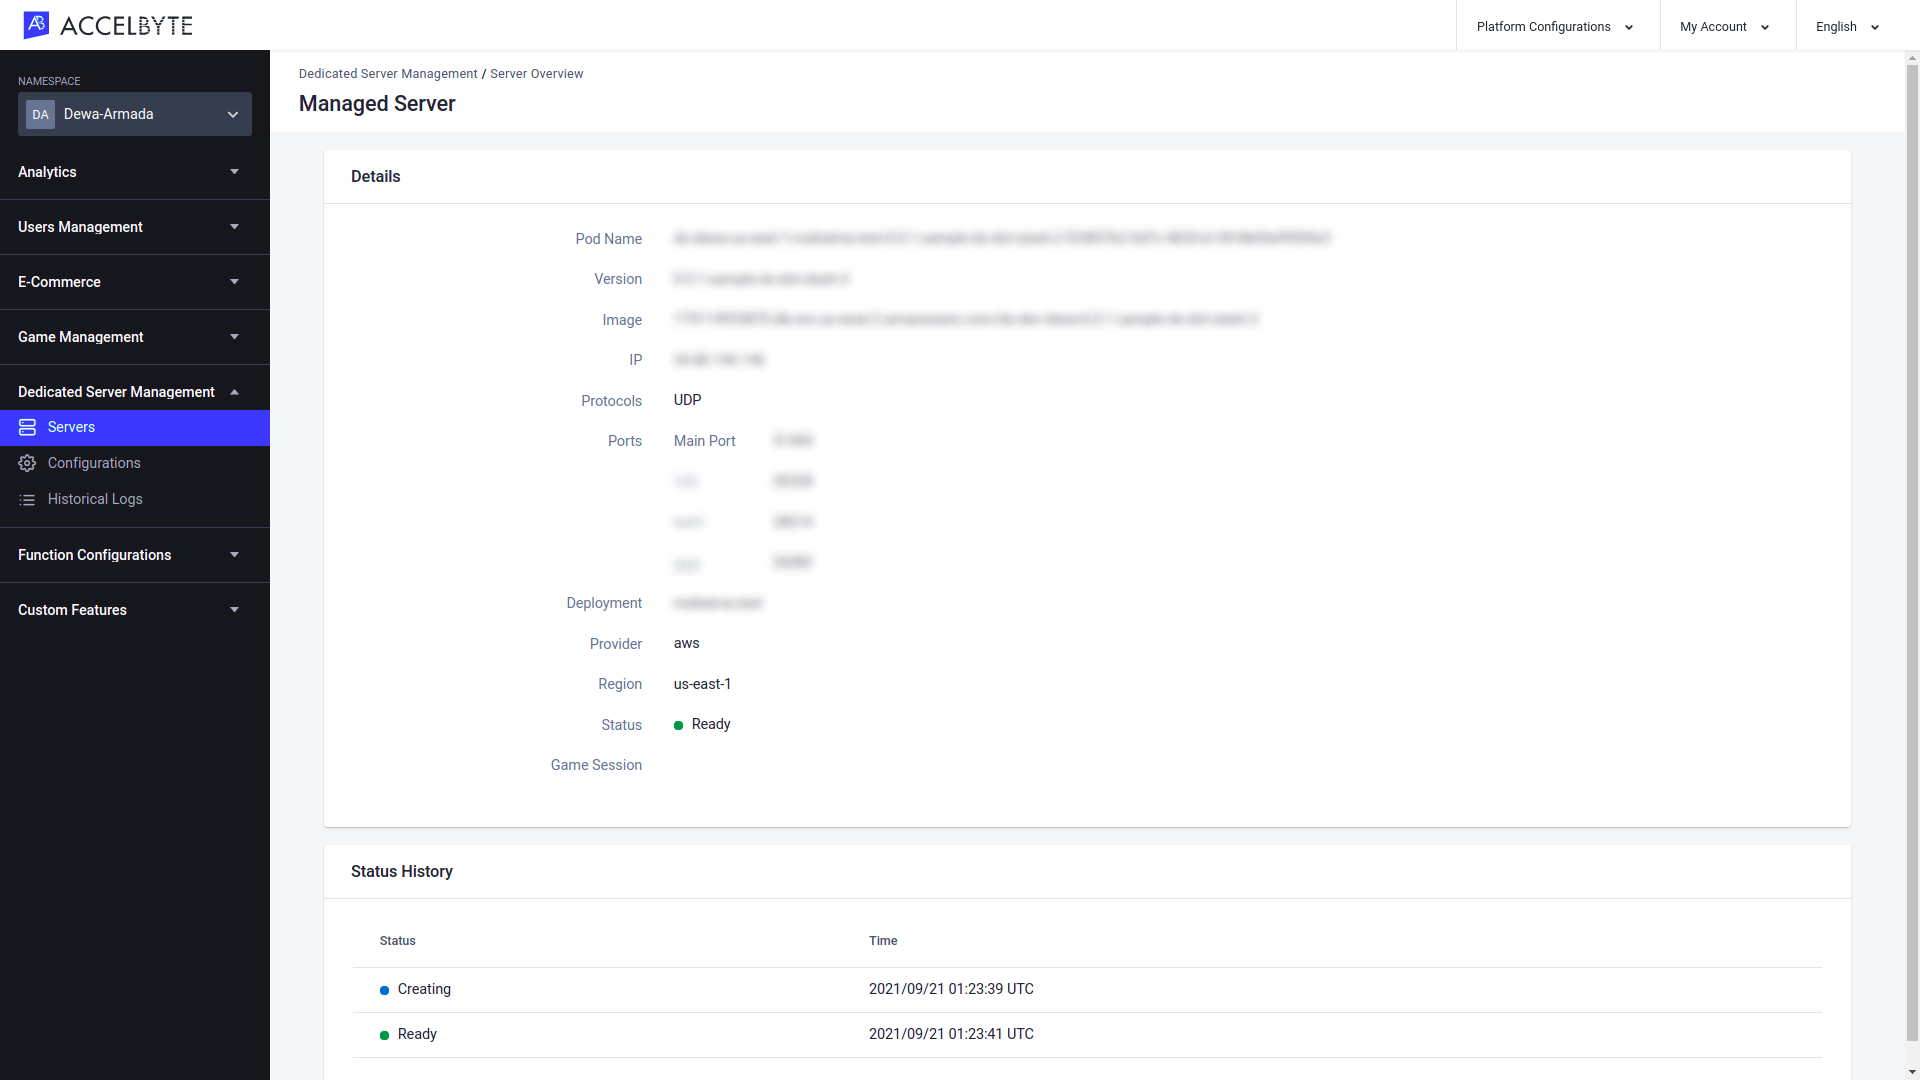
You can see the details of each server by clicking on the three dots next to the desired server and selecting View.
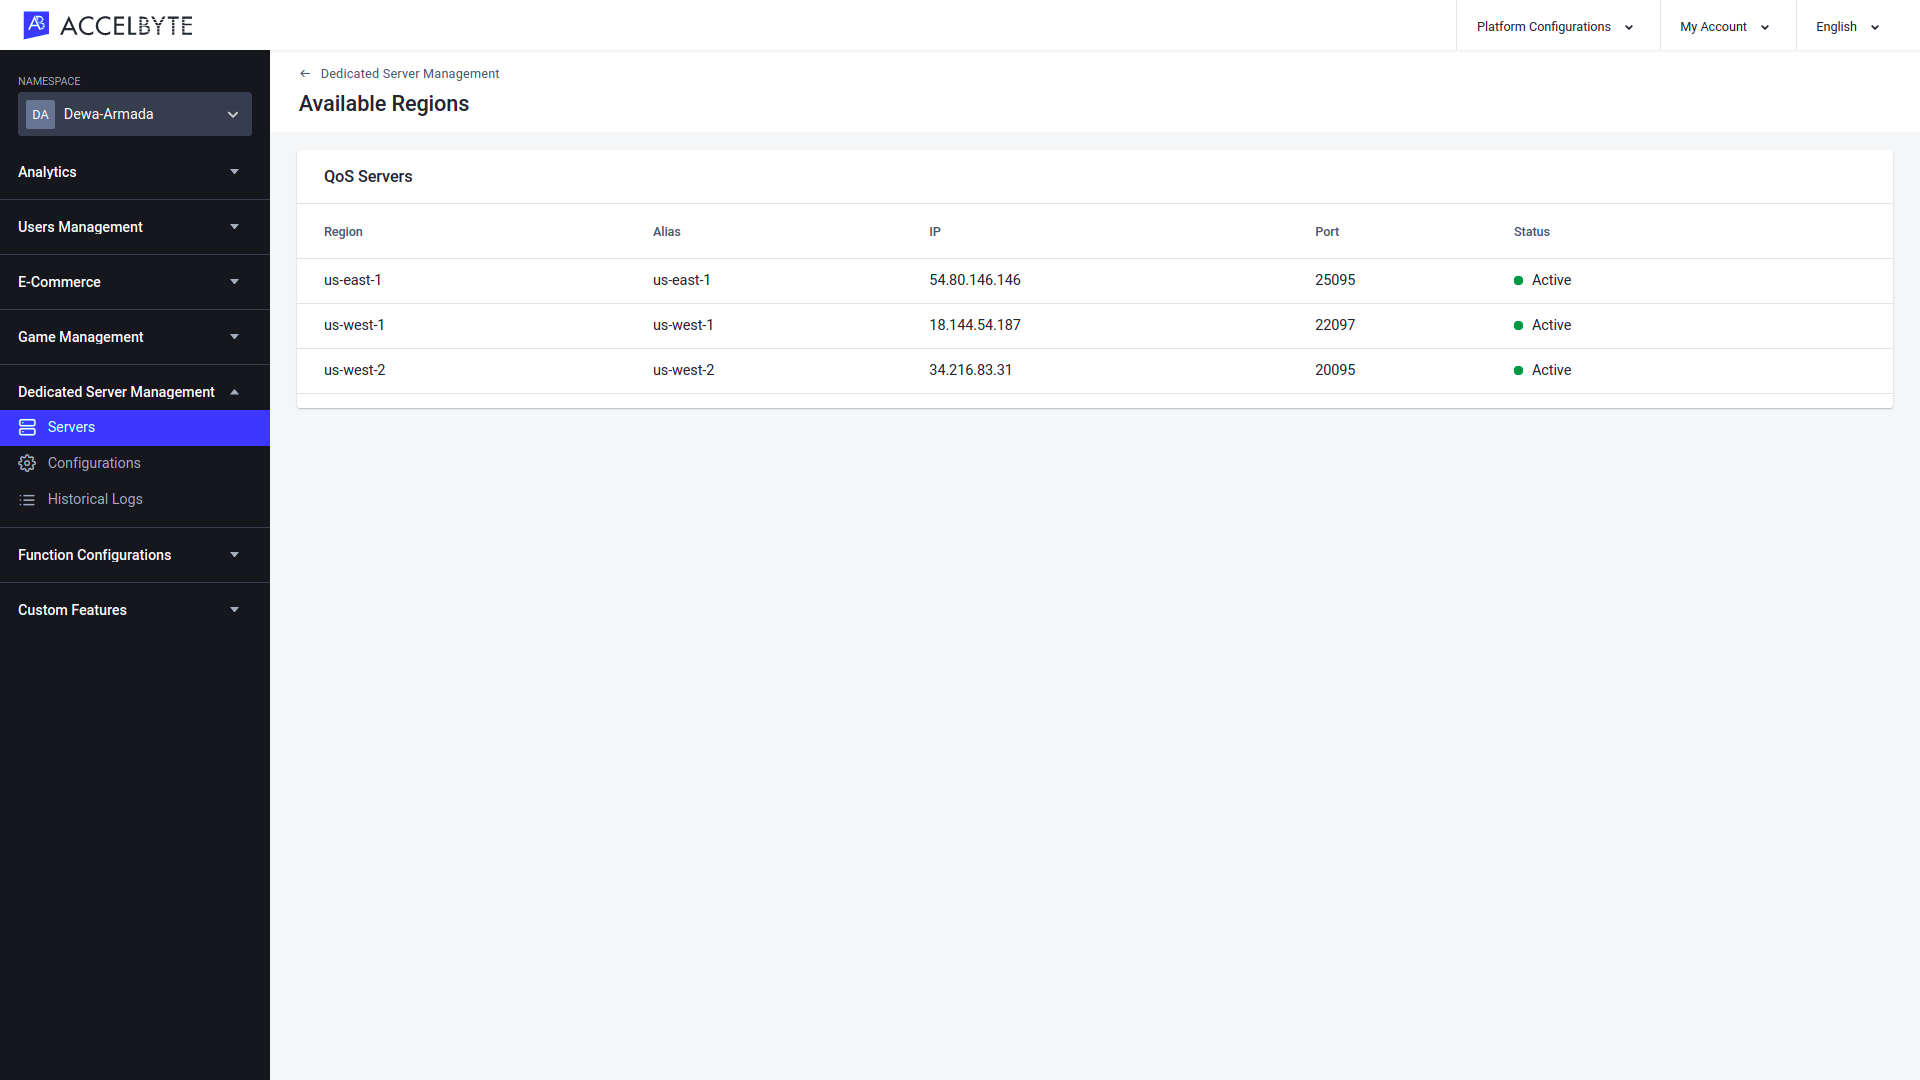
Available Regions
The Available Regions page shows the number of registered regions that you can run servers in. On this page, you can see the status of each region.
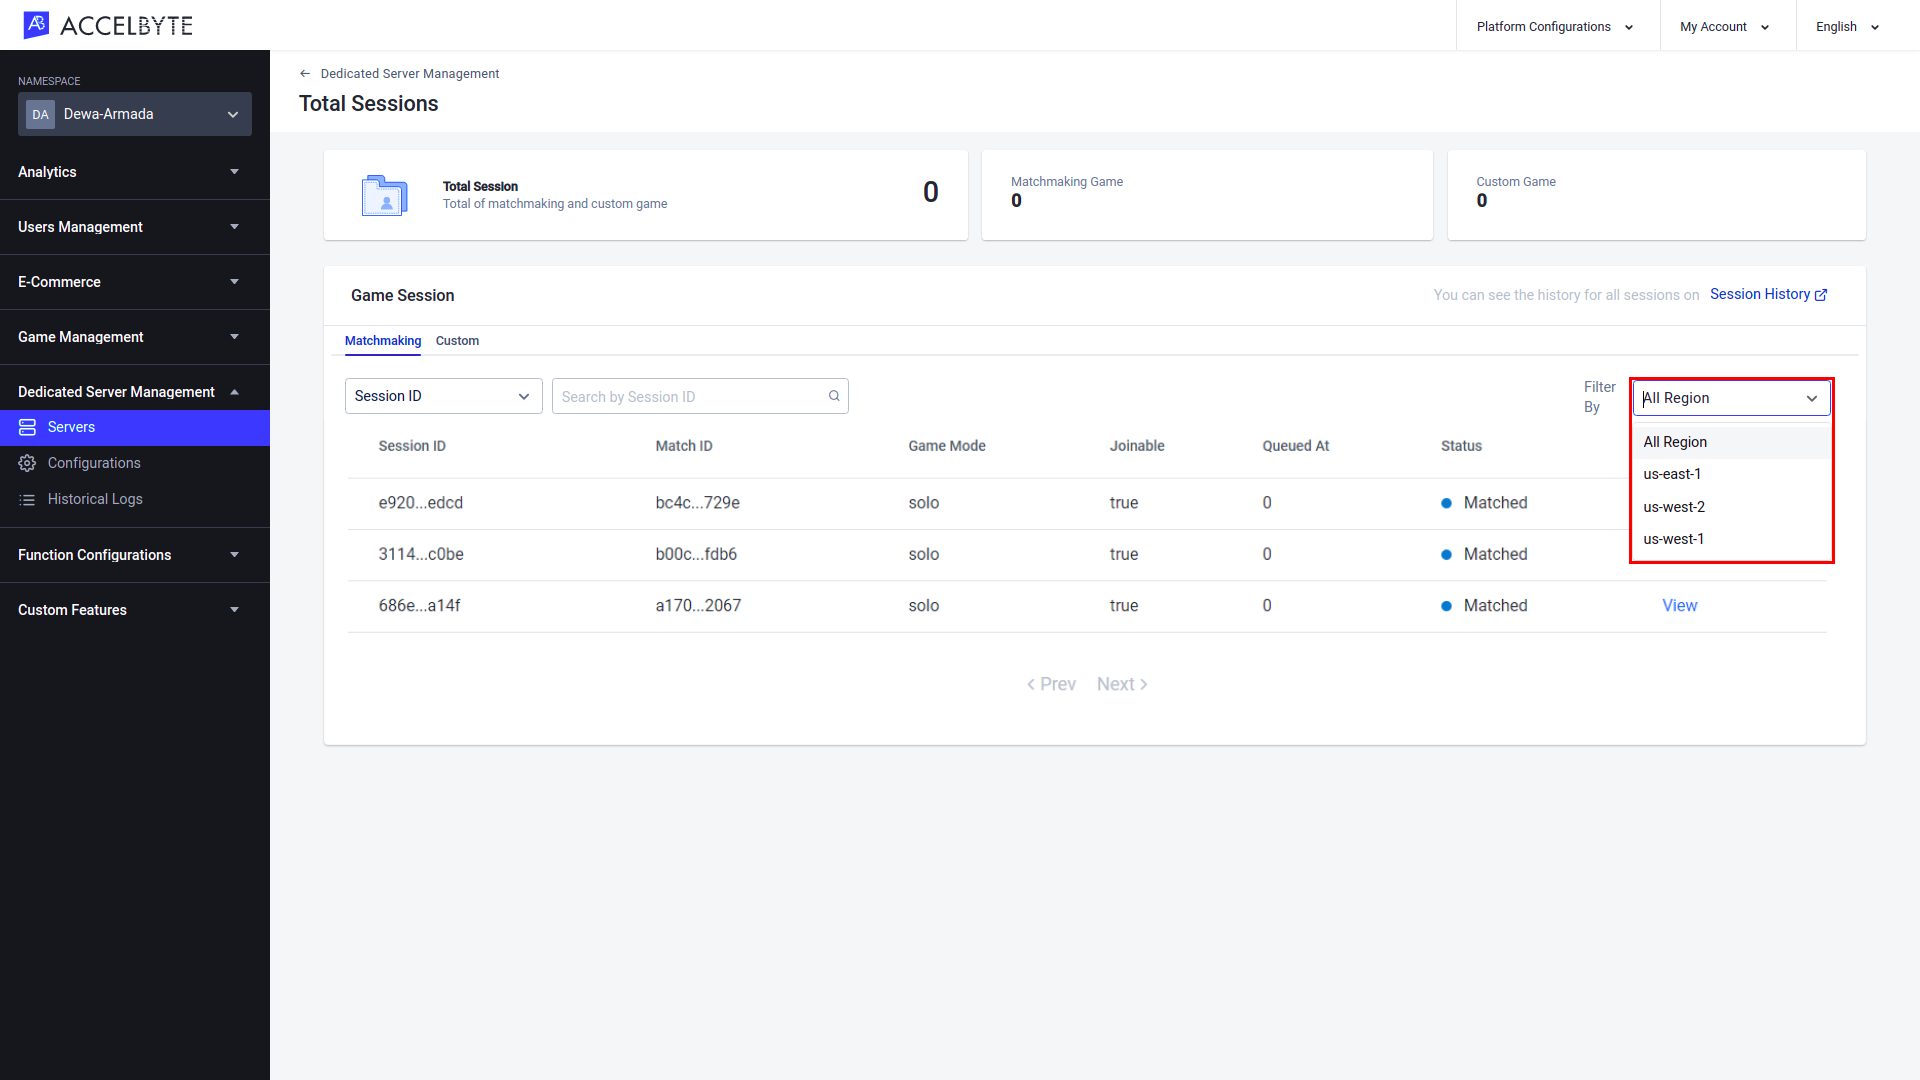
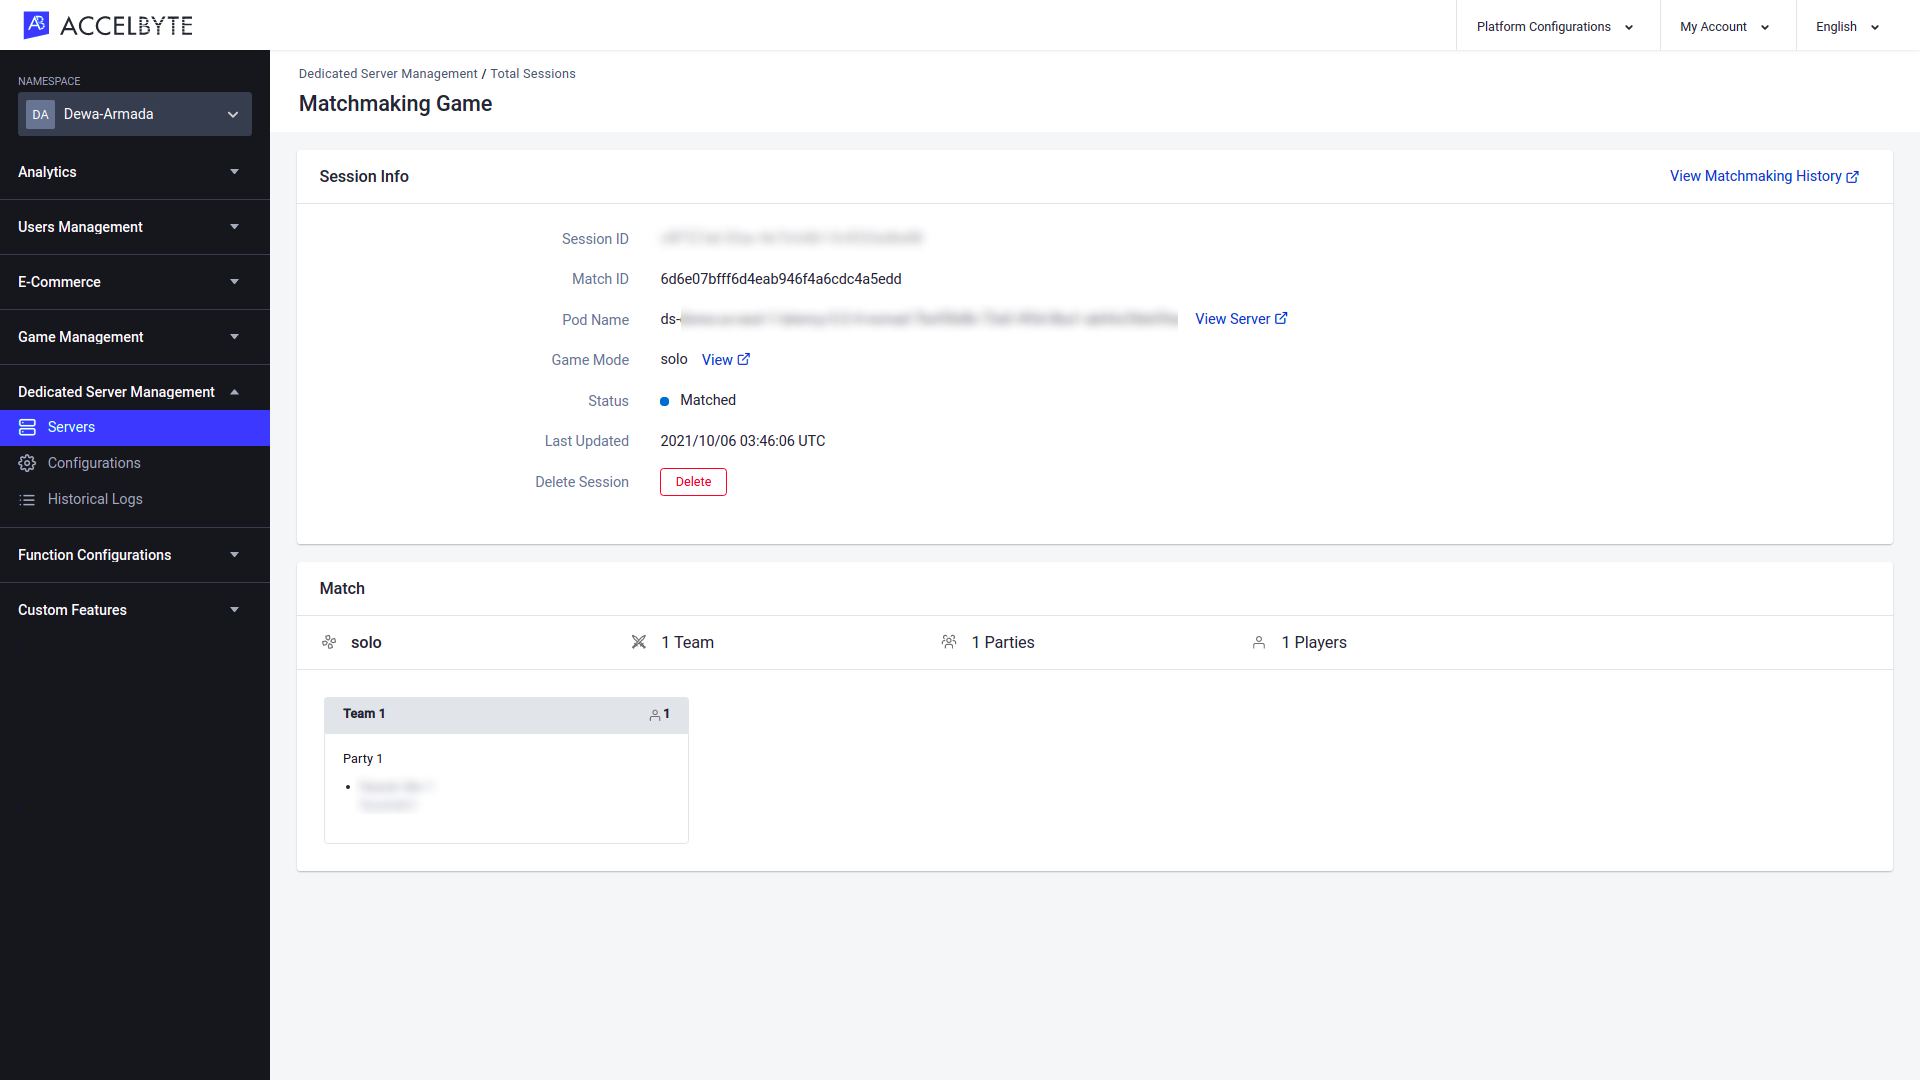
Total Sessions
The Total Sessions page shows the number of player sessions that are currently active.

You can search the active player sessions using the Session ID or Match ID.
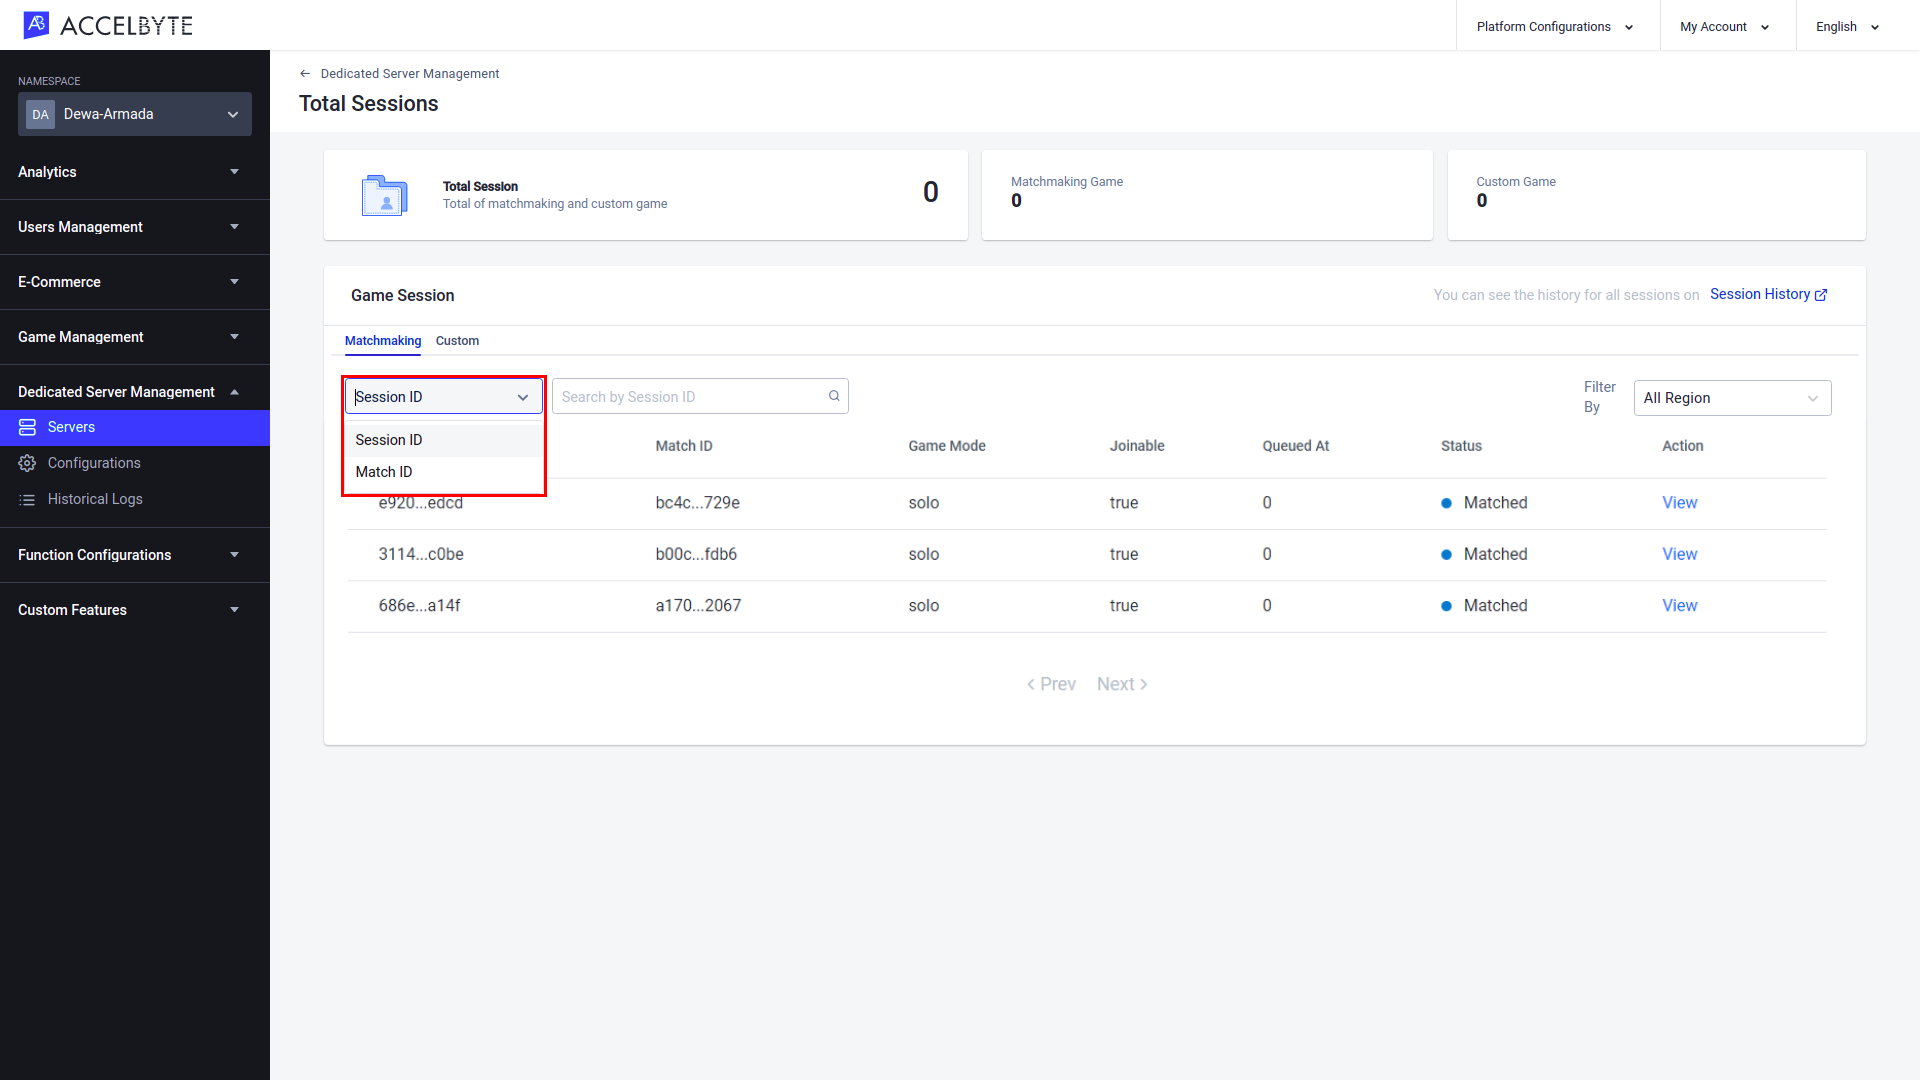
You can filter the active player sessions based on its region.
To see the session details, click View in the Action column next to the desired session.
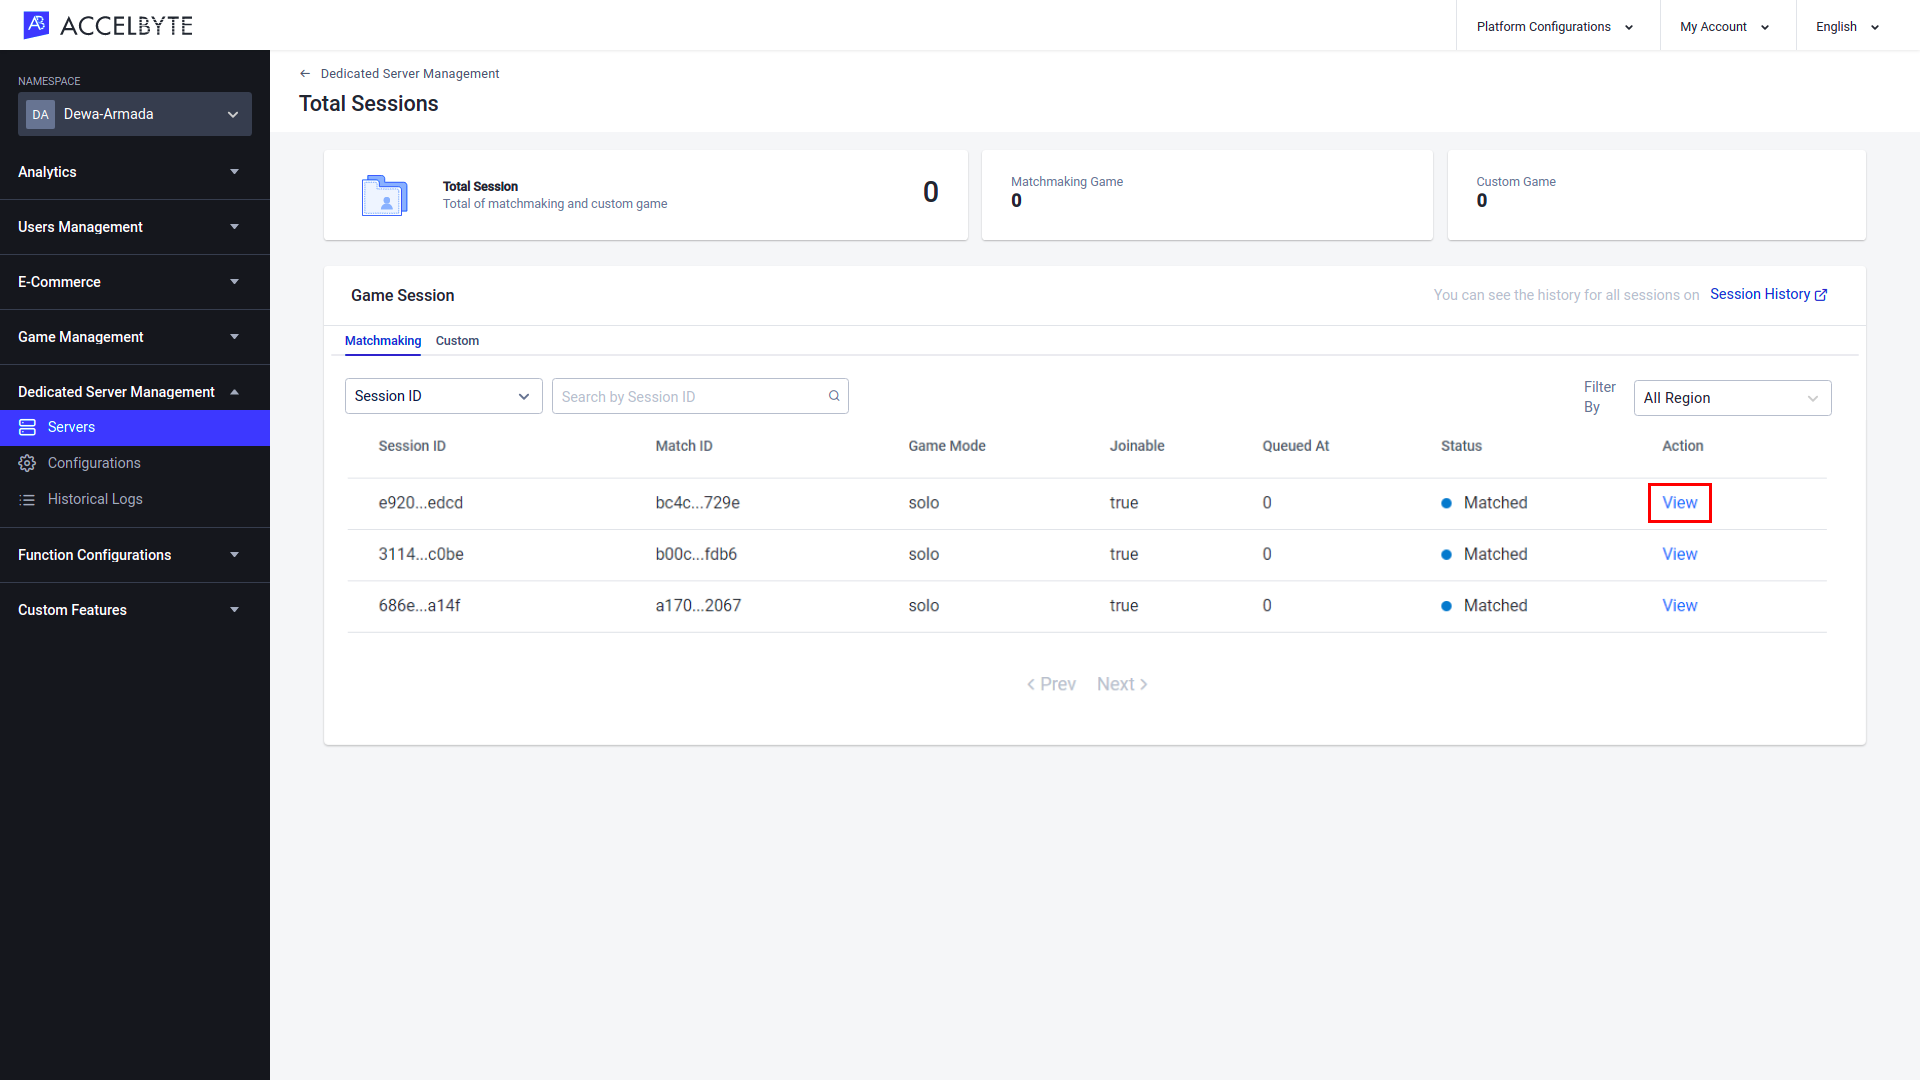
The Session Details page appears. Here you can see detailed information about the session.
Set the Priority for Server Types
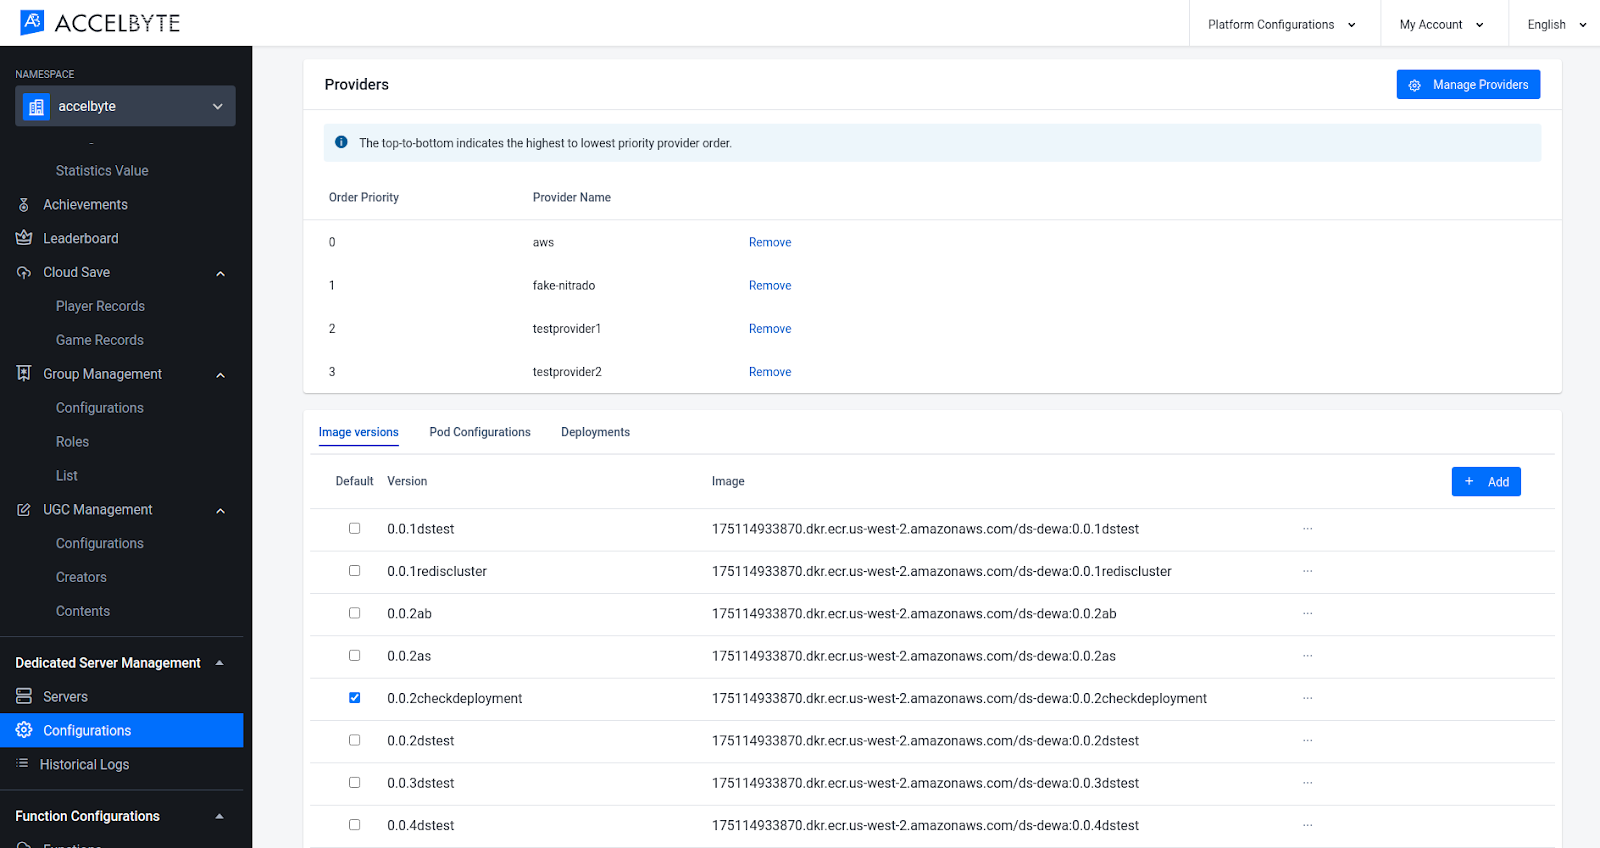
Armada is able to utilize multiple bare metal providers as well as the cloud. For this to work, each provider you use must be given a priority value which can be changed at anytime from the Admin Portal. These priority values determine which servers Armada fills up first before moving to other providers.
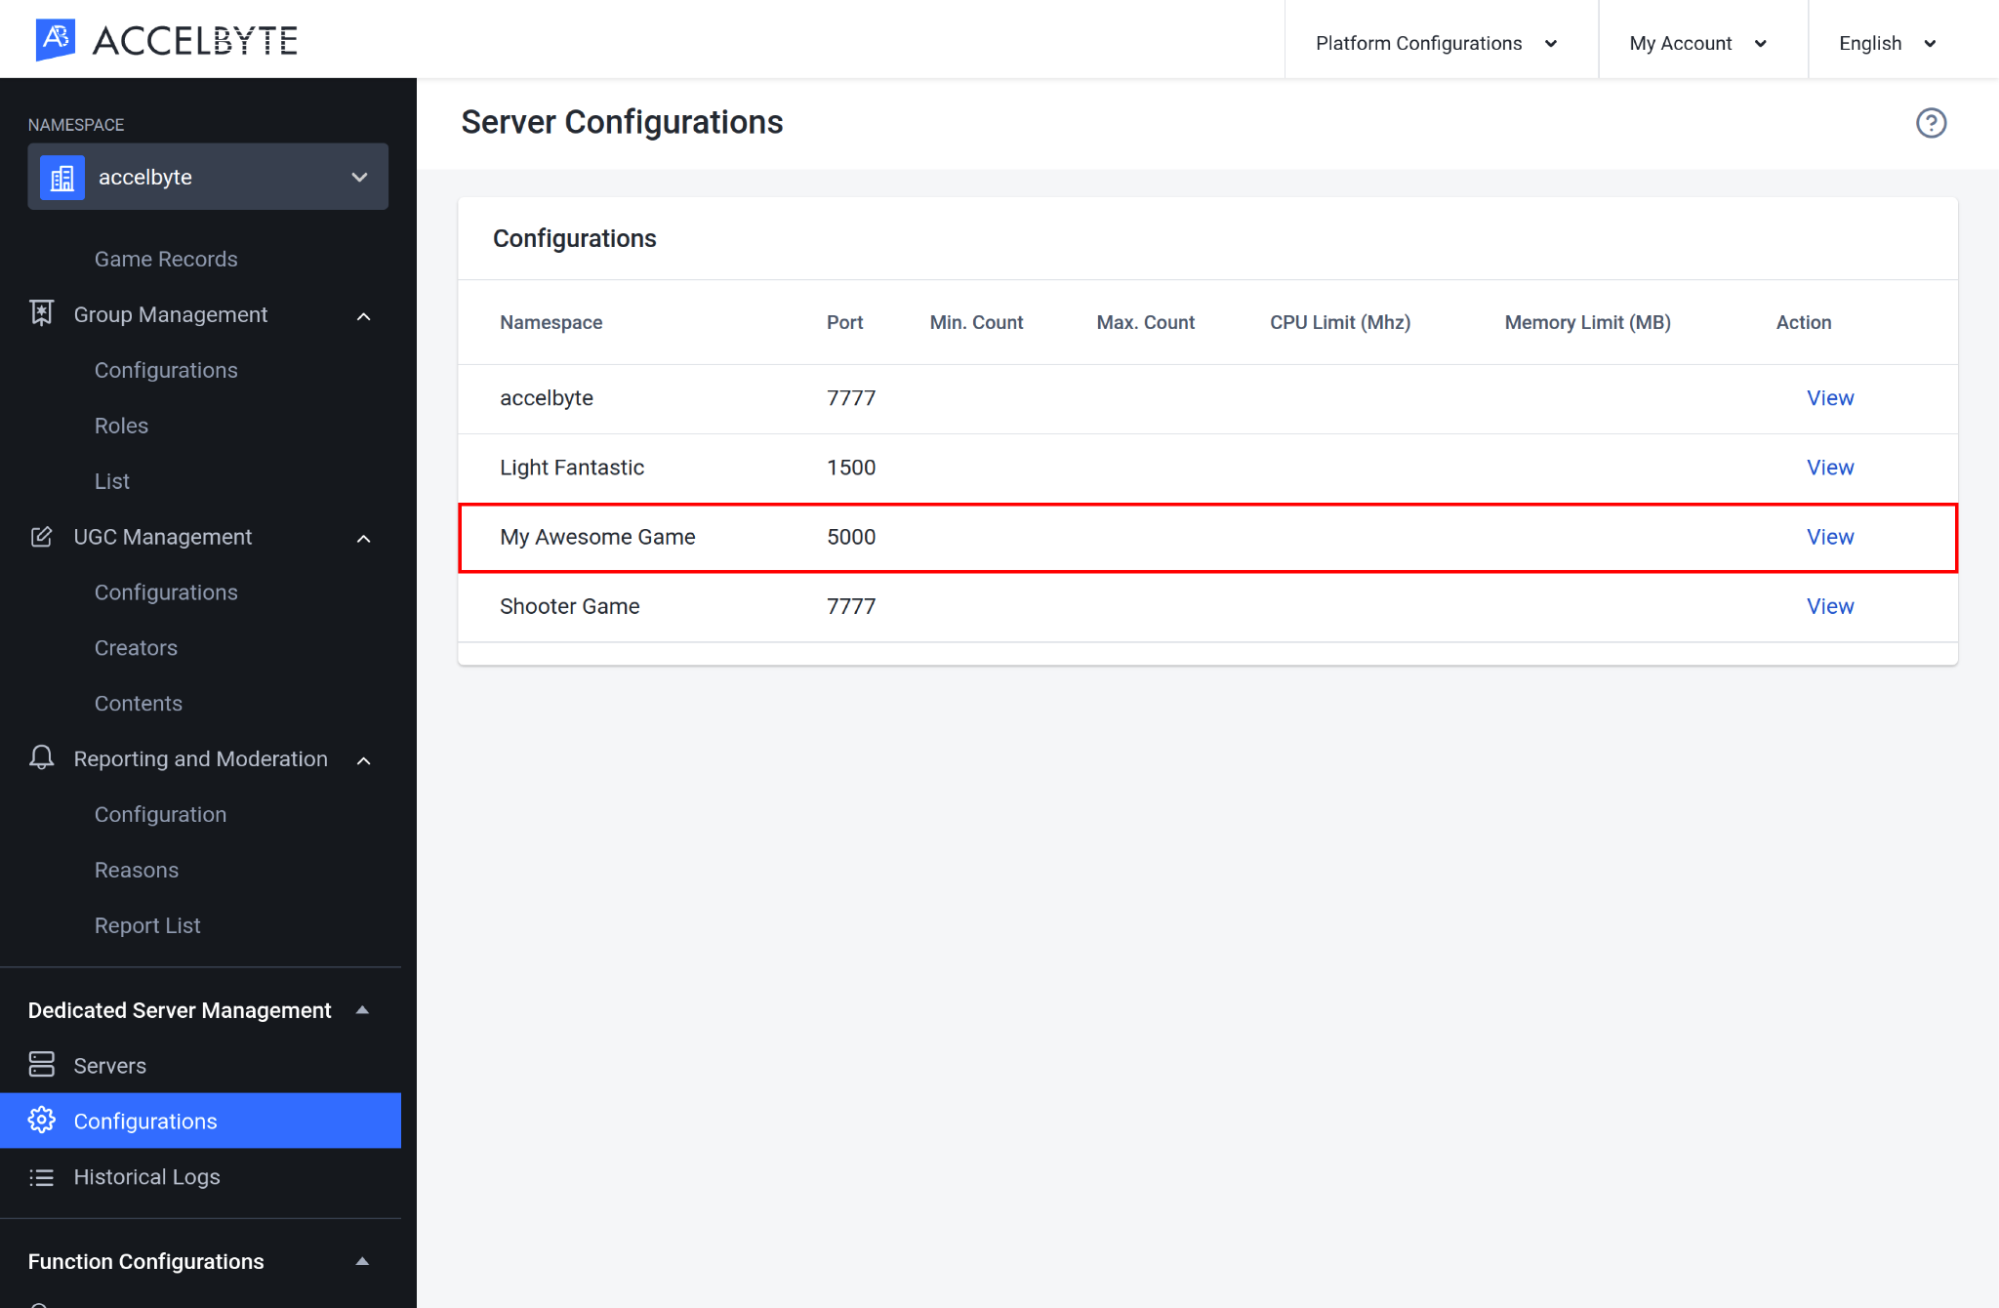
In the Admin Portal, scroll down to Dedicated Server Management and click on Configurations.
On the Configurations page, scroll down to the Providers section. Here you will see your currently configured providers and their priorities. Priority is set from 1 (highest priority) in descending order, meaning that Armada will use the highest server first before moving down the priority list. In the example below, 1 Serverscom will be used before 2 AWS.
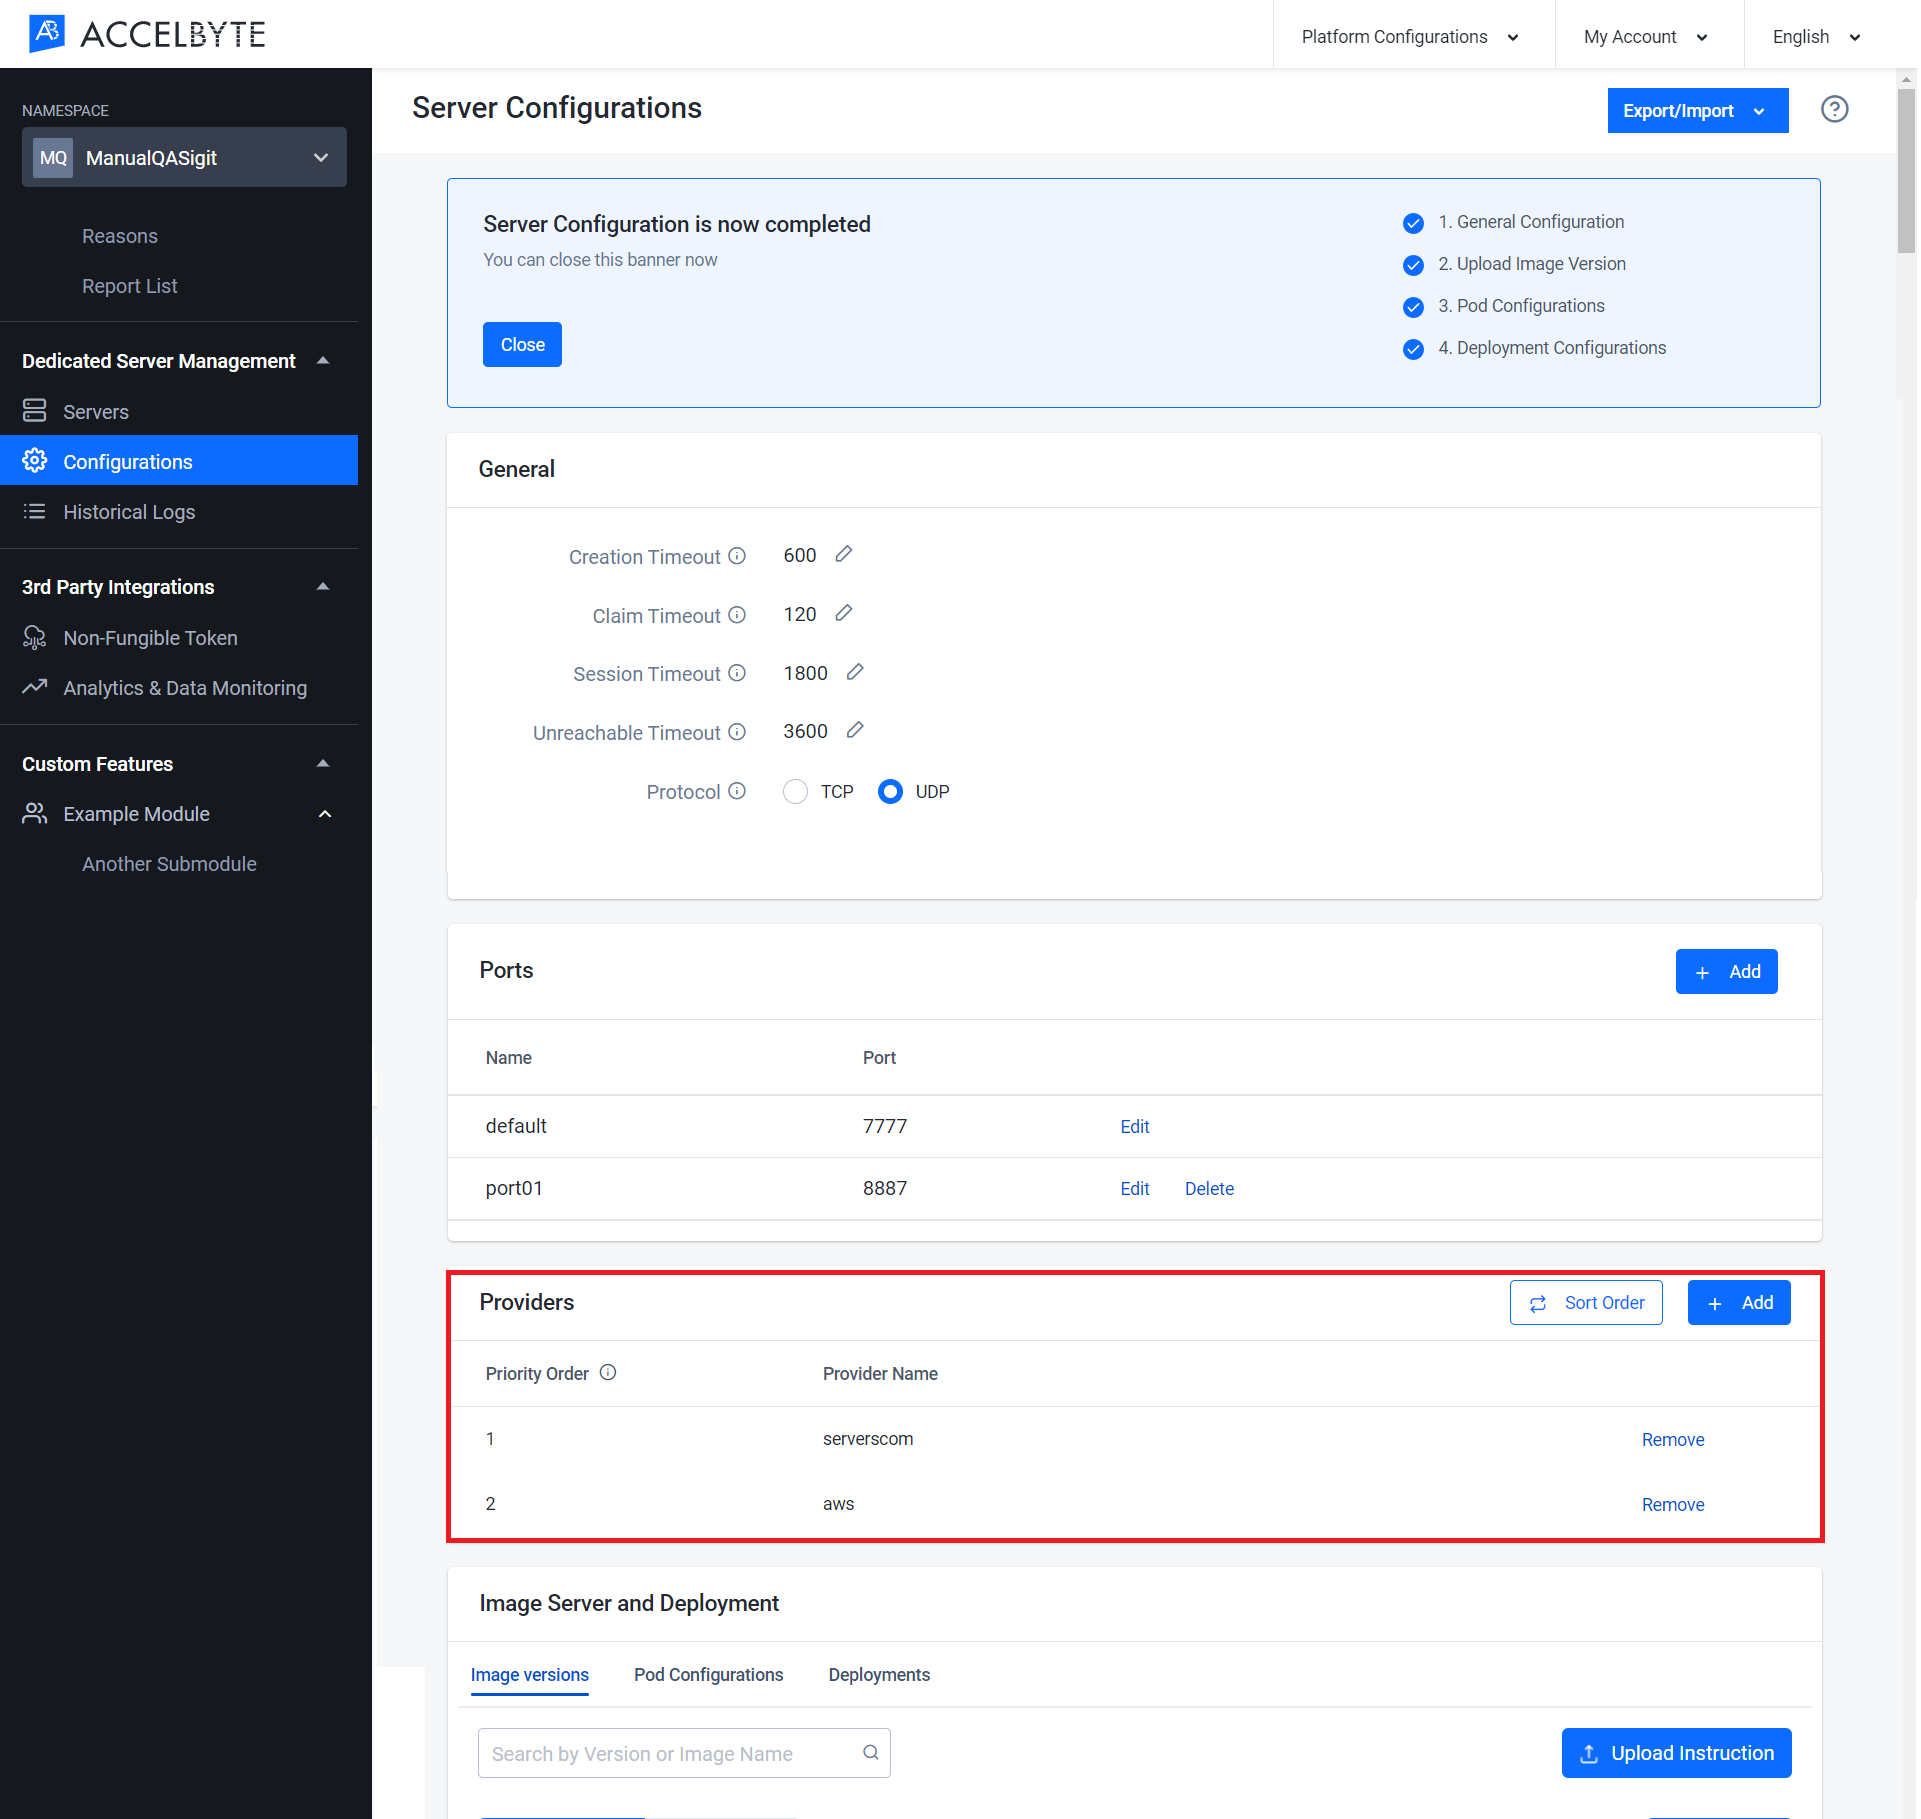
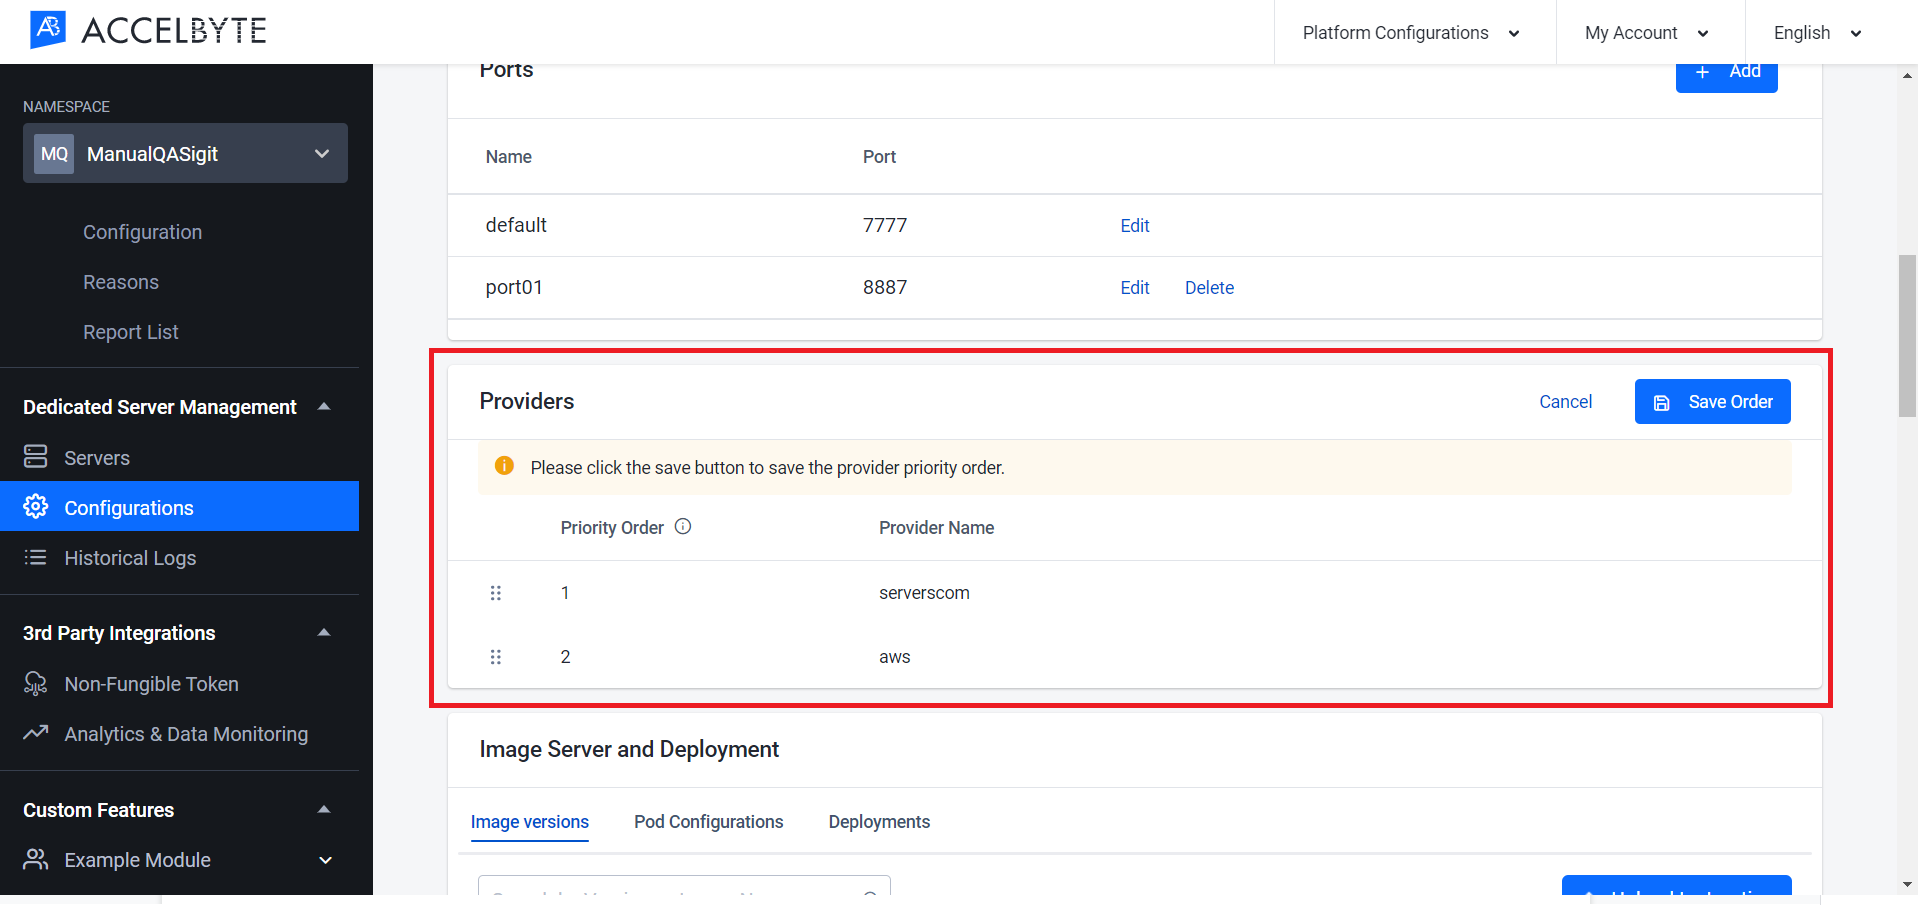
To change the priority order, click Sort Order in the top-right corner and click and drag your providers to rearrange them. Click Save Order to save your changes.
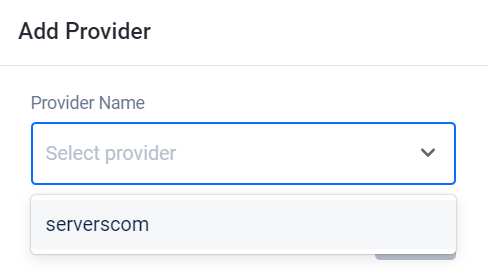
To add more providers to the priority list, click Add and choose from the dropdown list in the Add Provider popup.
TIP
Don't see your provider on the provider list? Only unsorted providers will be available in the Add Provider popup. If you want to add a new provider to your environment, contact the Armada team.
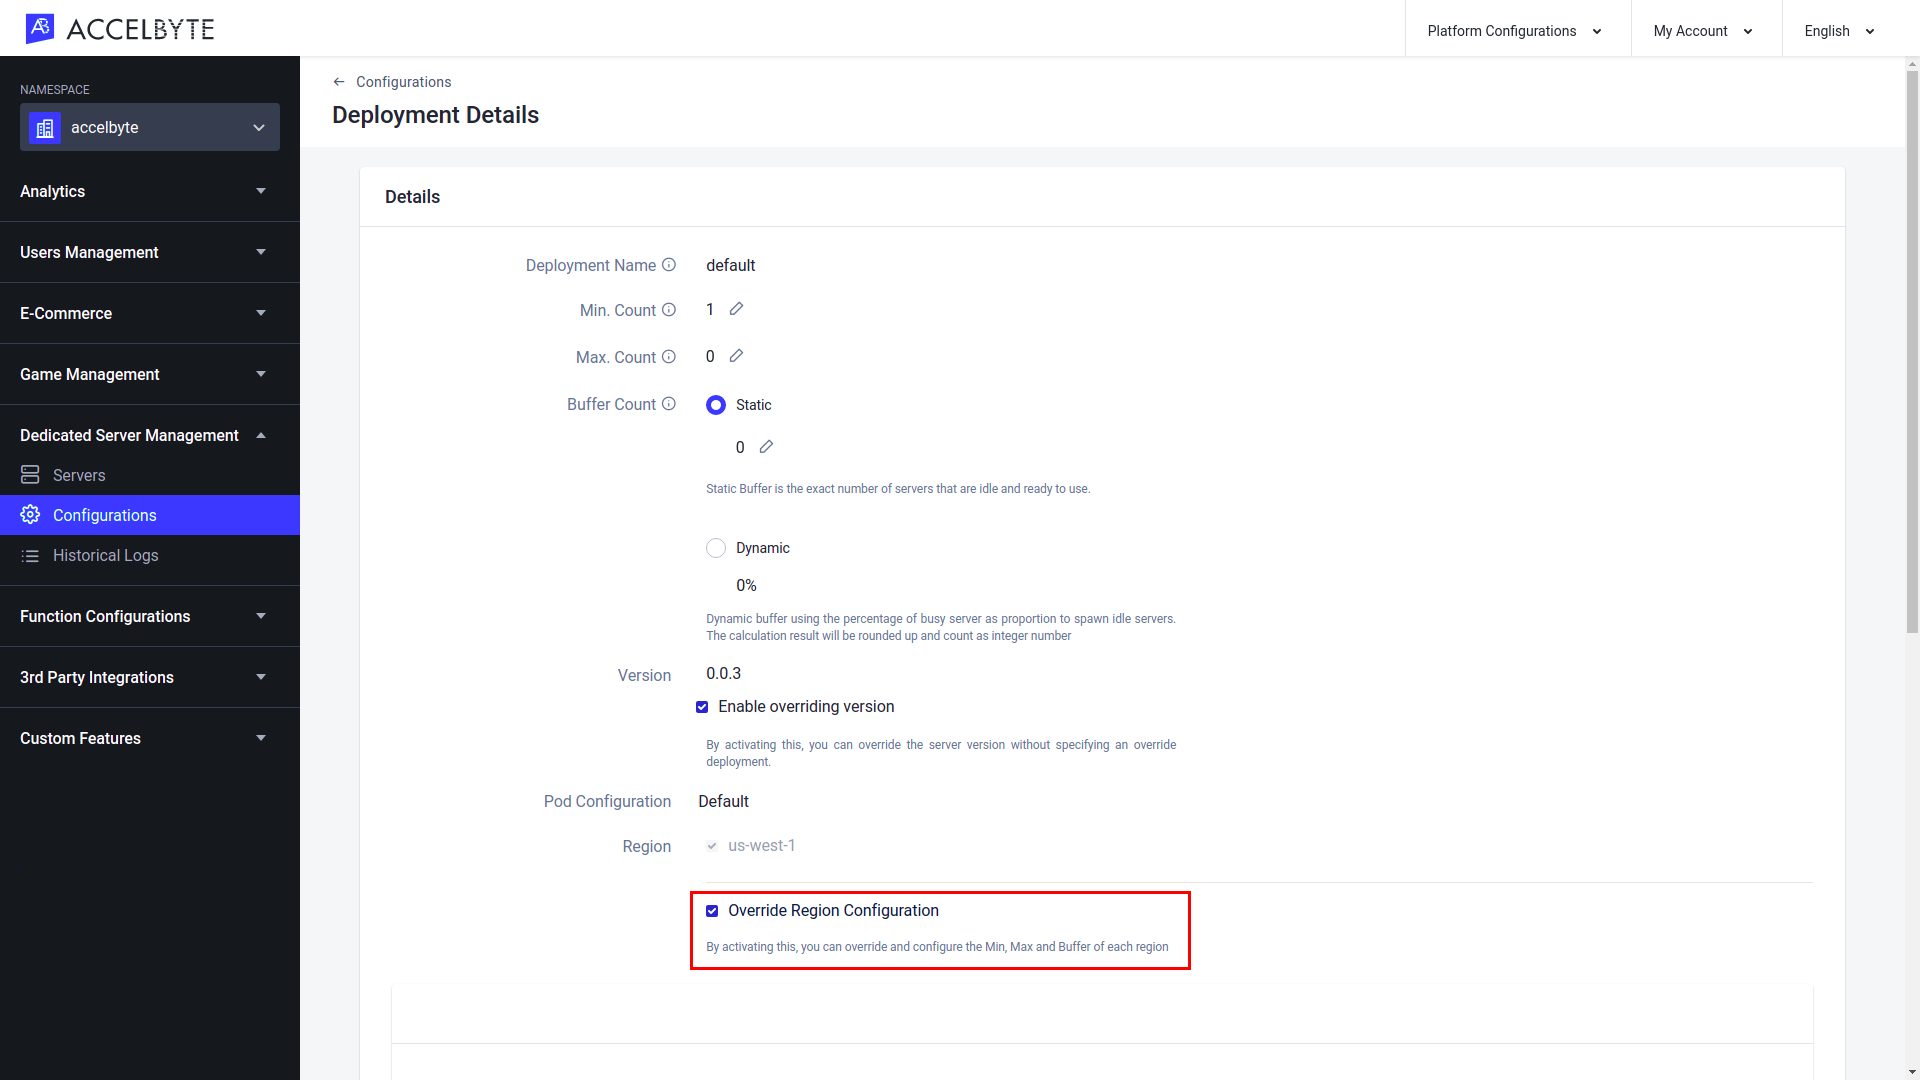
Default Deployment Configuration Override
Override Configuration of the Default Deployment
In the Admin Portal, go to the Dedicated Server Management section in the sidebar and open the Configurations menu.
In Server Configurations, choose your desired Configuration and select View.
In your server configuration, scroll down and select the Deployment tab.
Find the default deployment,click the ellipsis button, and select View.
In Deployment Details, toggle Enable overriding version to override the server version without specifying an override deployment.
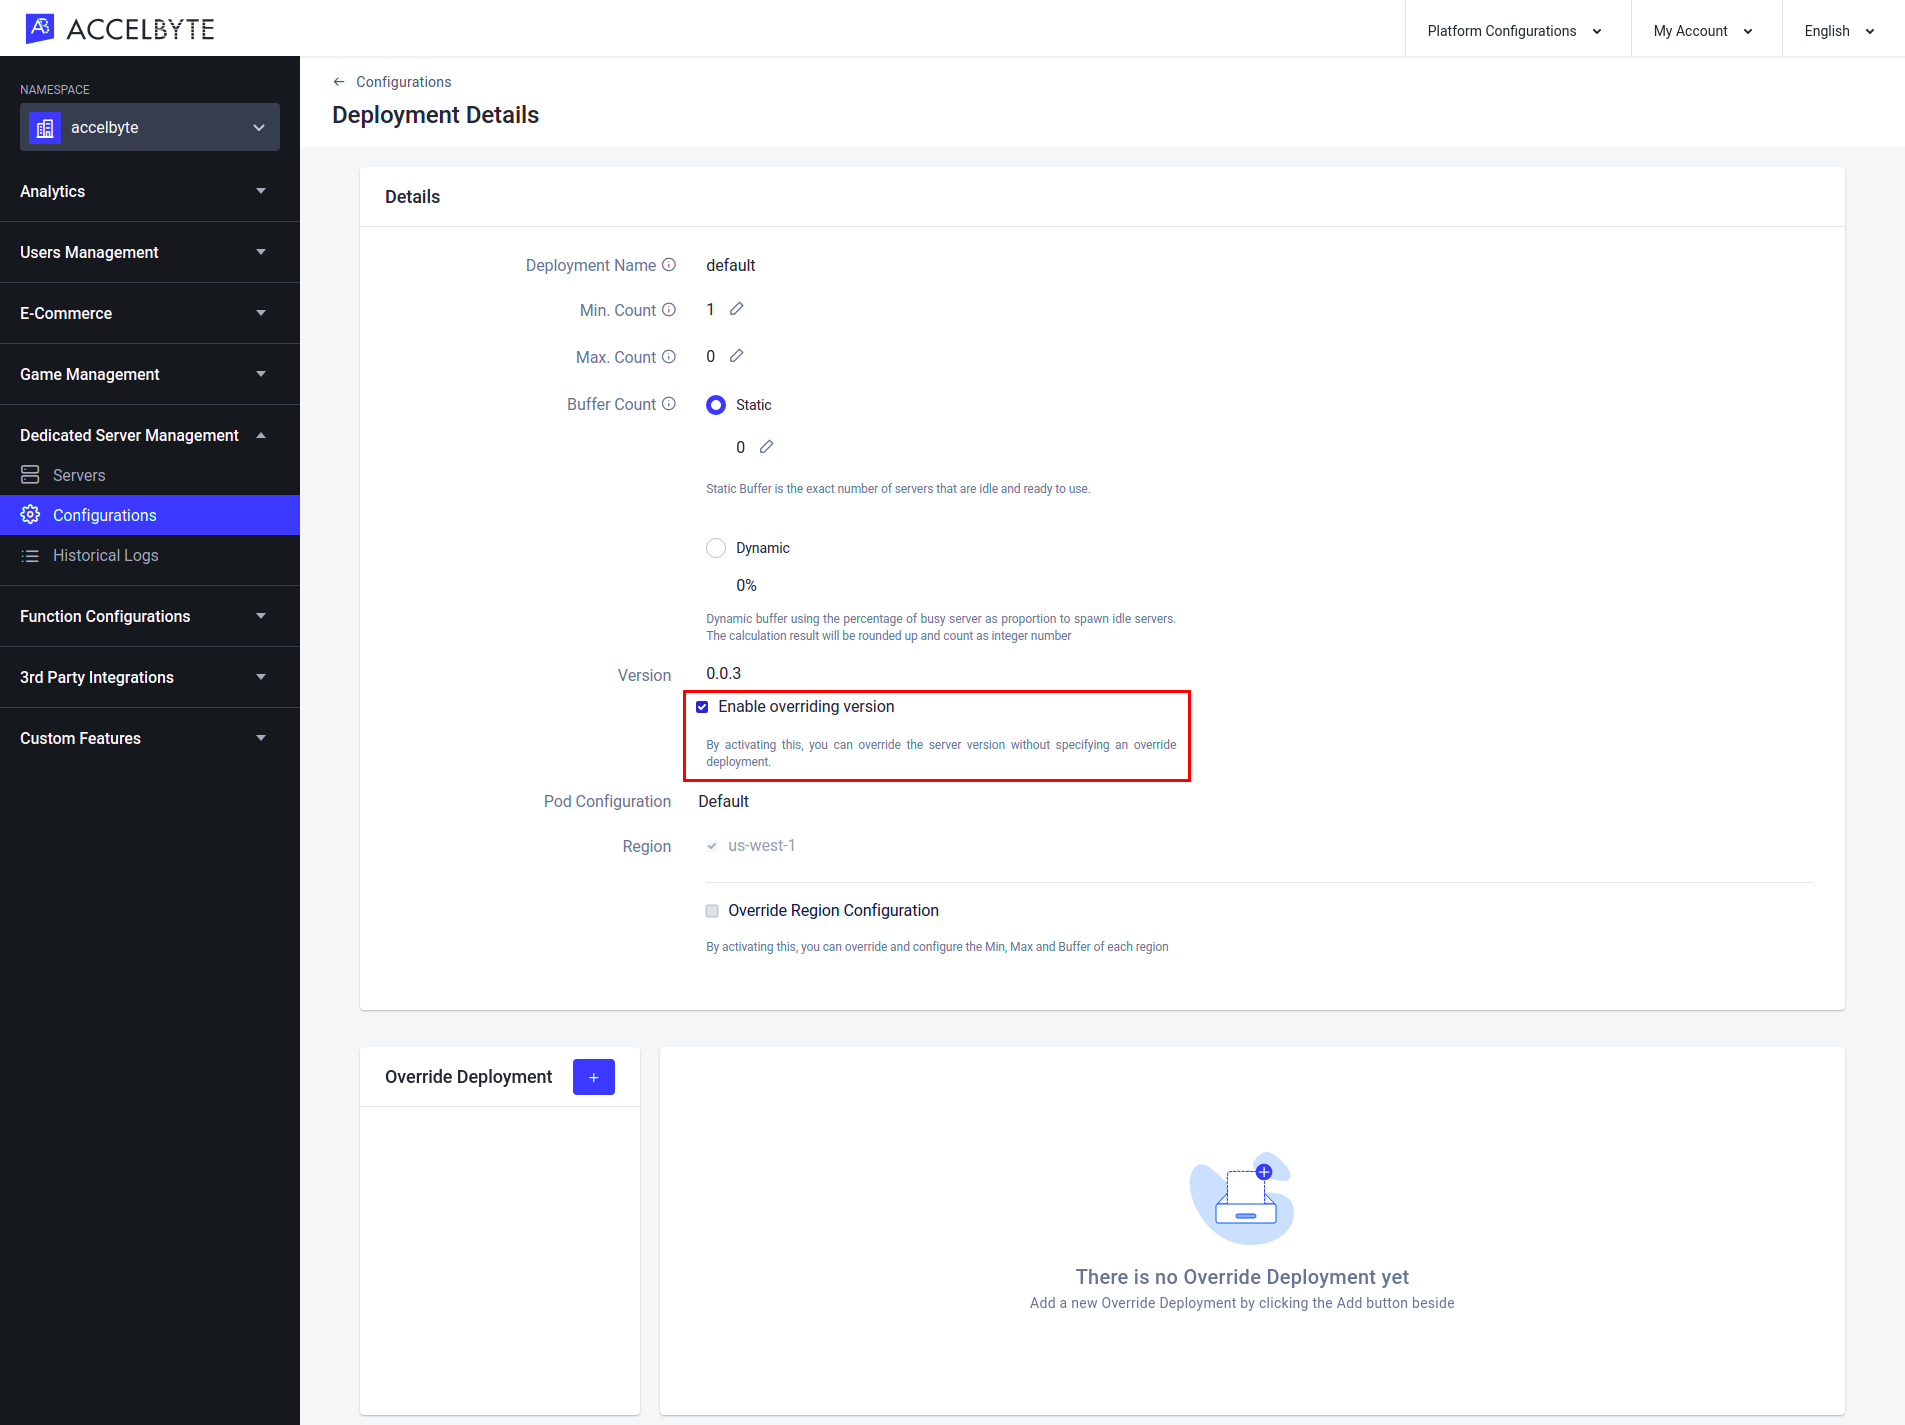
Once the server overrides the requested deployment version, the new version will appear on the Override Deployment list below.
Override Configuration in a Specific Deployment
In the Admin Portal, go to the Dedicated Server Management section in the sidebar and open the Configurations menu.

In Server Configurations, find your desired configuration and select View in its Action column.

In your server configuration, scroll down and select the Deployment tab.

Choose one of the deployments and click on the ellipsis to open that deployment's details.
On the Deployment Details page, choose if you want to override the deployment version or deployment region.
Deployment version
To override the deployment version, toggle Enable overriding version.

Go to the Override Deployment section and click the + button.
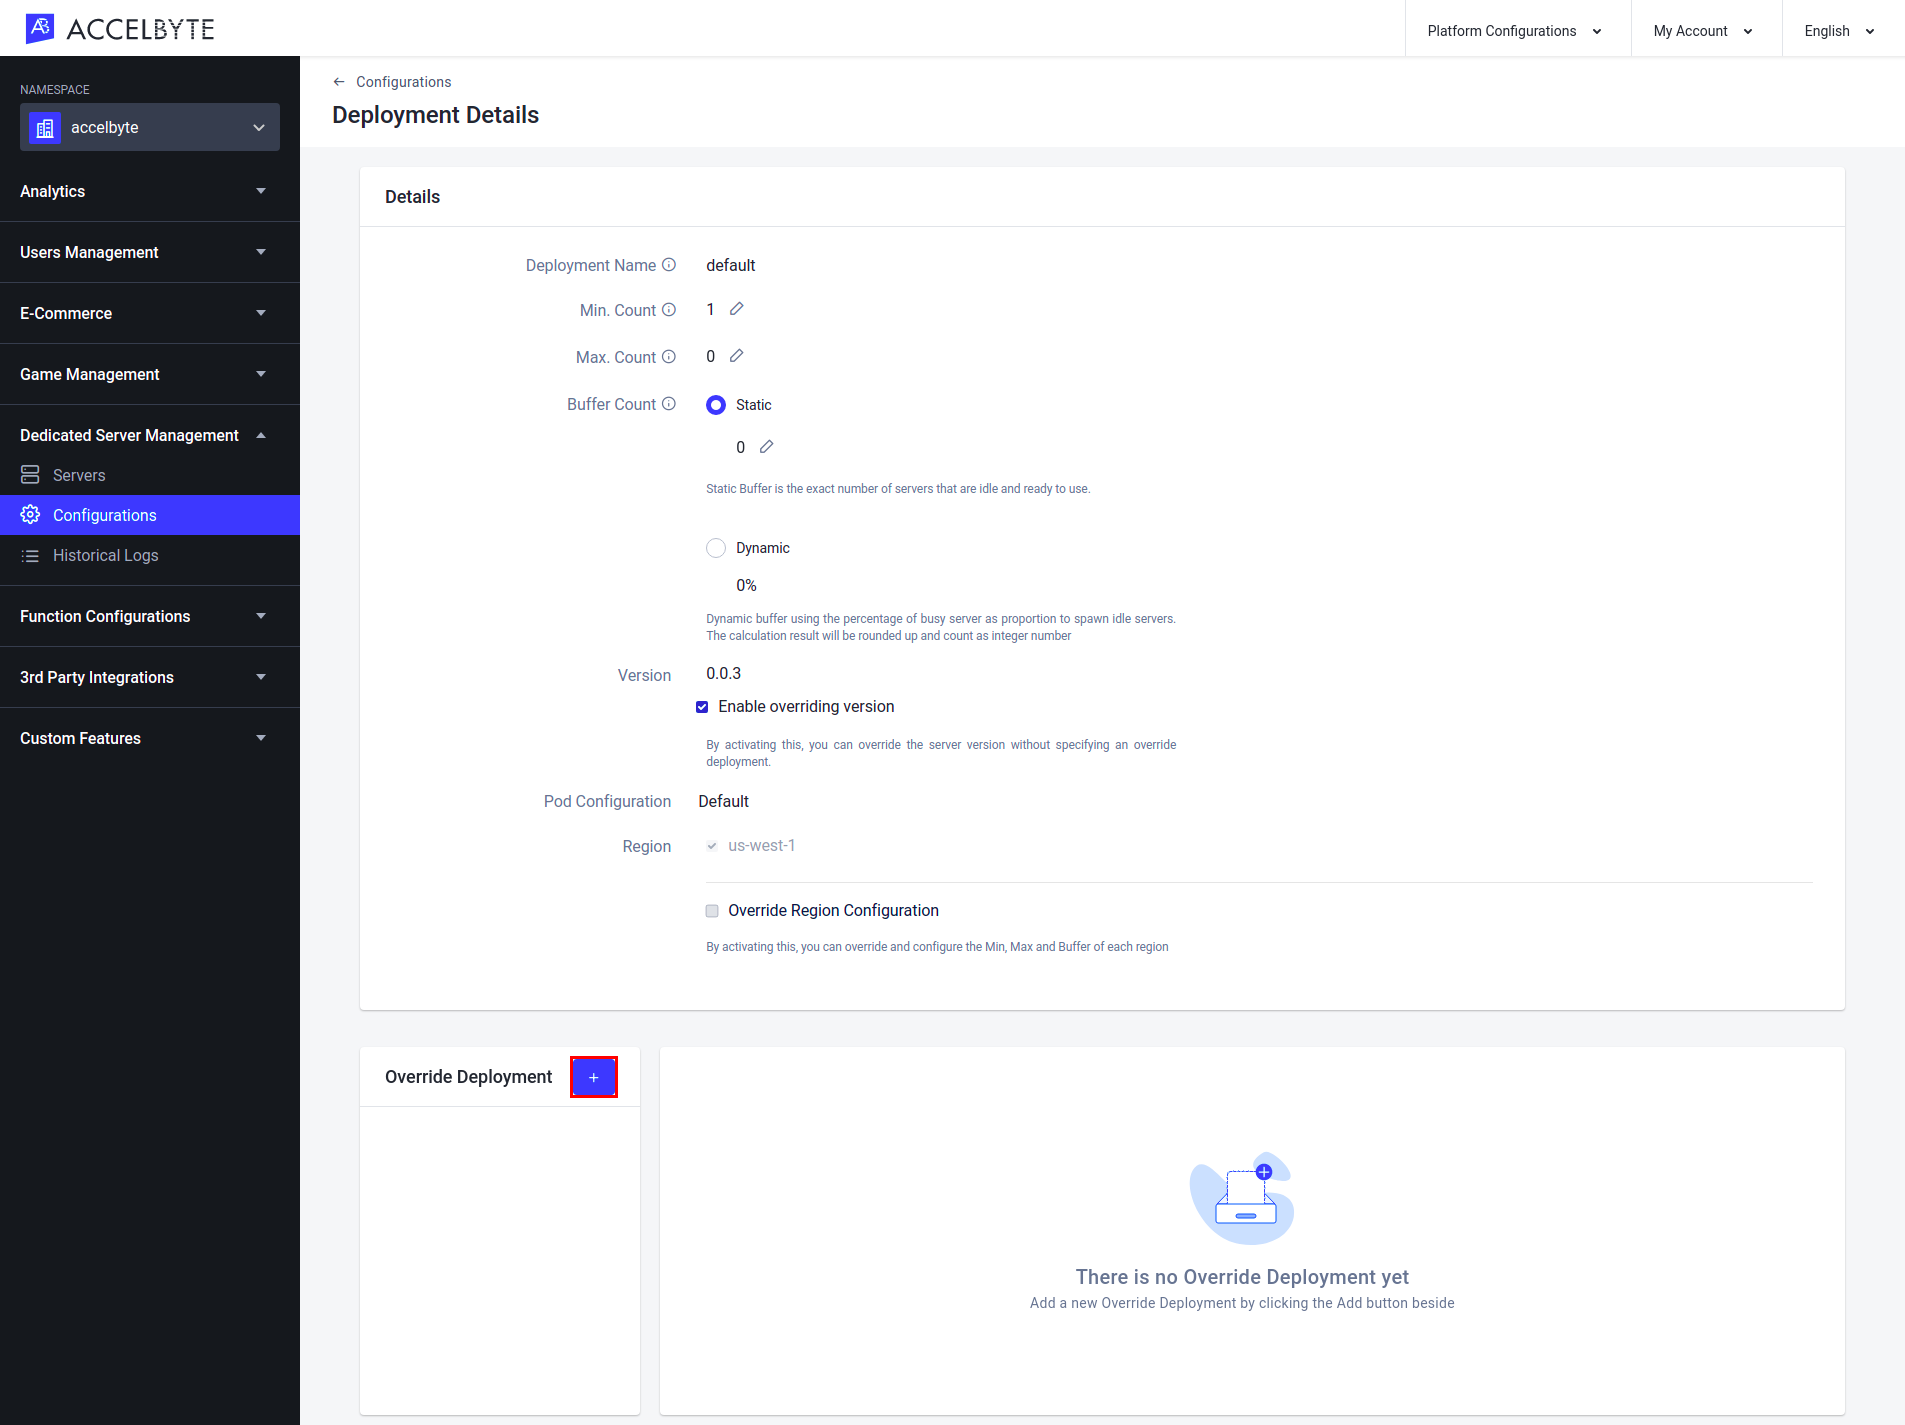
The Add Override Deployment popup will appear. Fill in the fields with the required information:
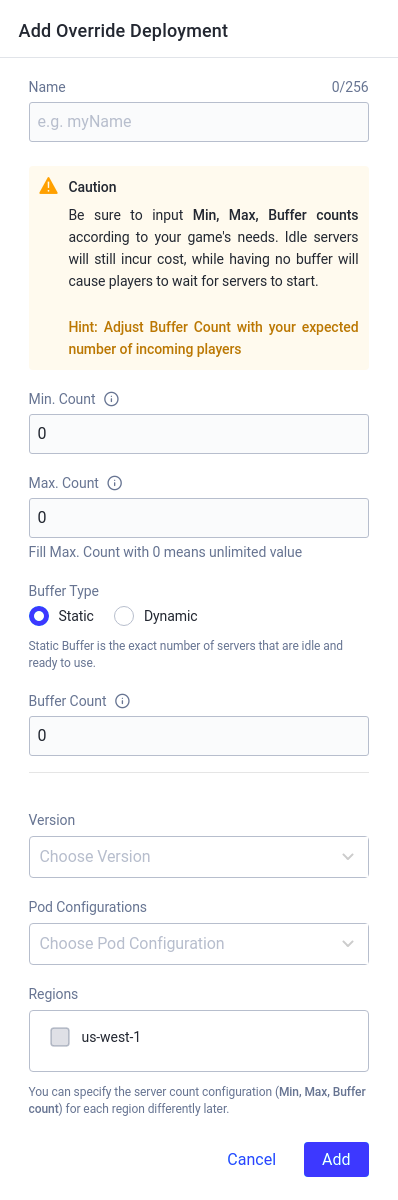
Select the Deployment Version from the list
Select the Pod Configuration.
Select the Region of the deployment.
Input the minimum number of dedicated servers allowed to spawn (whether active or idle) in the Min. Count field and the maximum number in the Max. Count field.
Choose either Static or Dynamic for the Buffer Type. The buffer refers to the default number of ready servers available at any given time. A Static buffer is set to a fixed quantity, while a Dynamic buffer is a percentage of the busy servers. For example, if you input 50% as the Dynamic buffer value and the current busy server count is 1, then one buffer server will be created. If the busy server count is 10, then five buffer servers will be created.
If you choose Static as your buffer type, fill in the Buffer Count field with the number of servers you want to be available at all times.
If you choose Dynamic as your buffer type, fill in the Buffer Percentage field with the percentage of busy servers you want to be available as a buffer.
Once completed, click Add and your override deployment will be added to the list.
Deployment Region
To override the Deployment Region, enable the Override Region Configuration option.
When the Override Region Configuration box is selected, the Region section appears. Select the Add button to add a new region.
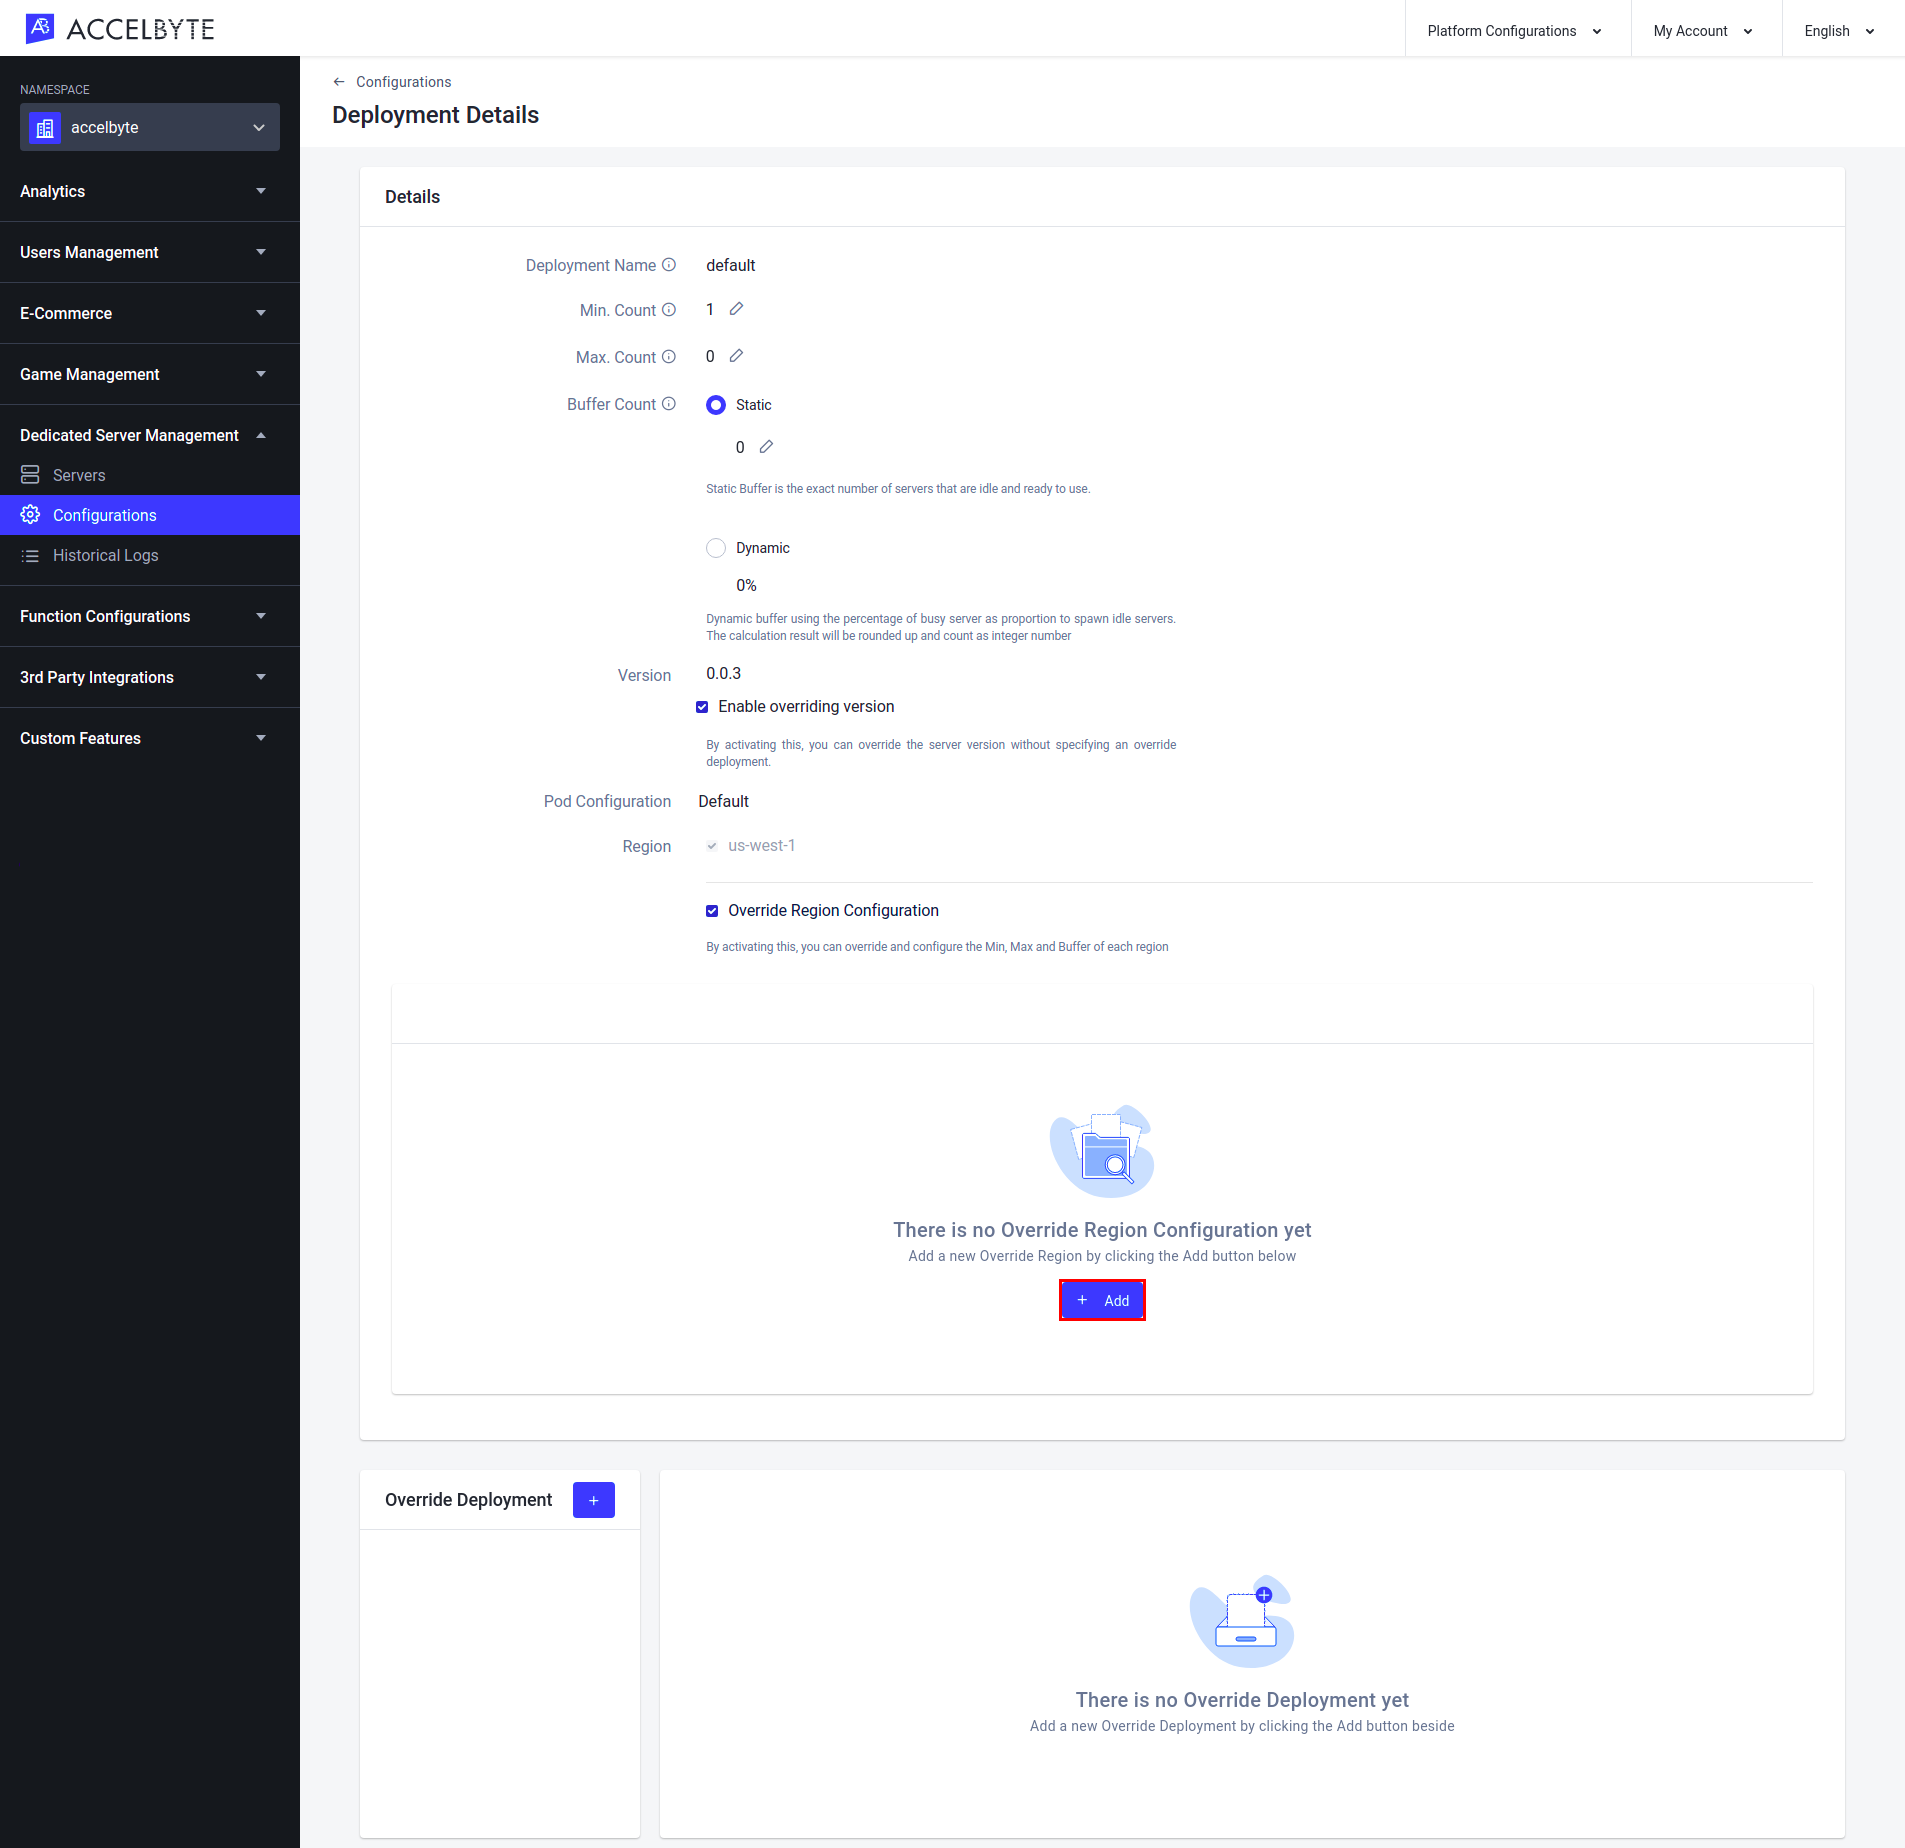
The Add Overridden Region form appears. Fill in the following fields with the required information:
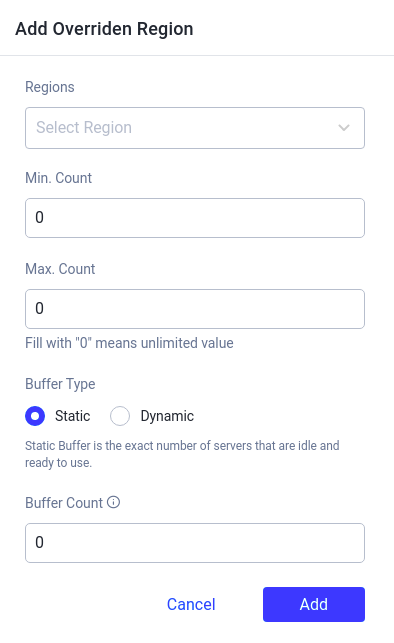
Choose the region you want to override in the Regions field.
Input the minimum number of dedicated servers that are allowed to spawn (whether active or idle) in the Min. Count field and the maximum number in the Max. Count field.
Choose either Static or Dynamic for the Buffer Type. The buffer refers to the default number of ready servers available at any given time. A Static buffer is set to a fixed quantity, while a Dynamic buffer is a percentage of the busy servers. For example, if you input 50% as the Dynamic buffer value and the current busy server count is 1, then one buffer server will be created. If the busy server count is 10, then five buffer servers will be created.
- If you choose Static as your buffer type, fill in the Buffer Count field with the number of servers you want to be available at all times.
If you choose Dynamic as your buffer type, fill in the Buffer Percentage field with the percentage of busy servers you want to be available as a buffer.
Once completed, click the Add button. Your new region-based buffer configuration will be added to the list.
Historical Logs
In the Historical Logs menu, you can download the DS Logs and DS Artifacts from a server, even after the server has been terminated. DS Logs are the automatically produced and time-stamped documentation of a server's events from the entire lifetime of the server, whereas DS Artifacts are the generated files that are written and stored during a server's lifetime. These files enable you to debug the DS even after it has been terminated. After termination, the DS Logs and DS Artifacts will appear in the Admin Portal.
View a Historical Log
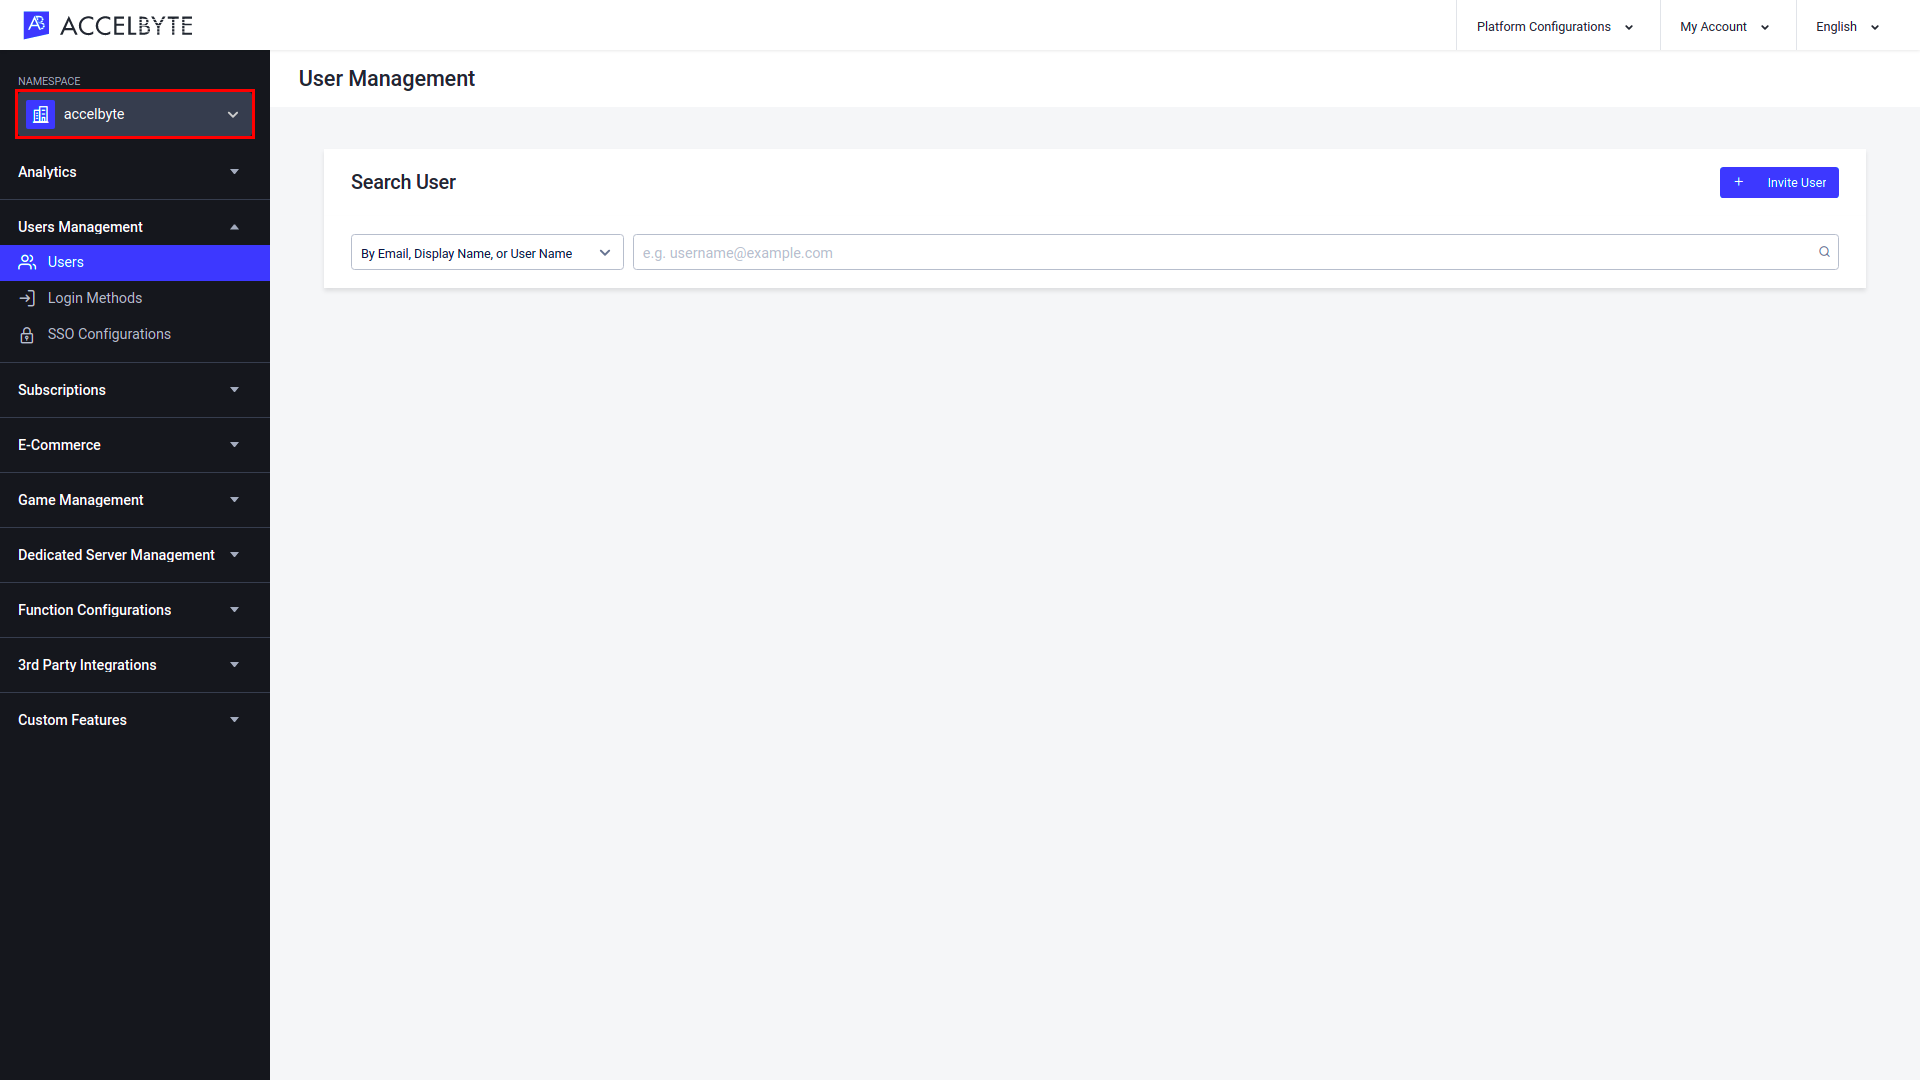
In the Admin Portal, choose the desired namespace.
TIP
Choose Publisher Namespace to see a list of the historical logs from all namespaces. You will be able to see a list of historical logs from a specific game namespace by filtering the logs.
Choose a Game Namespace to see the historical logs from that individual namespace.
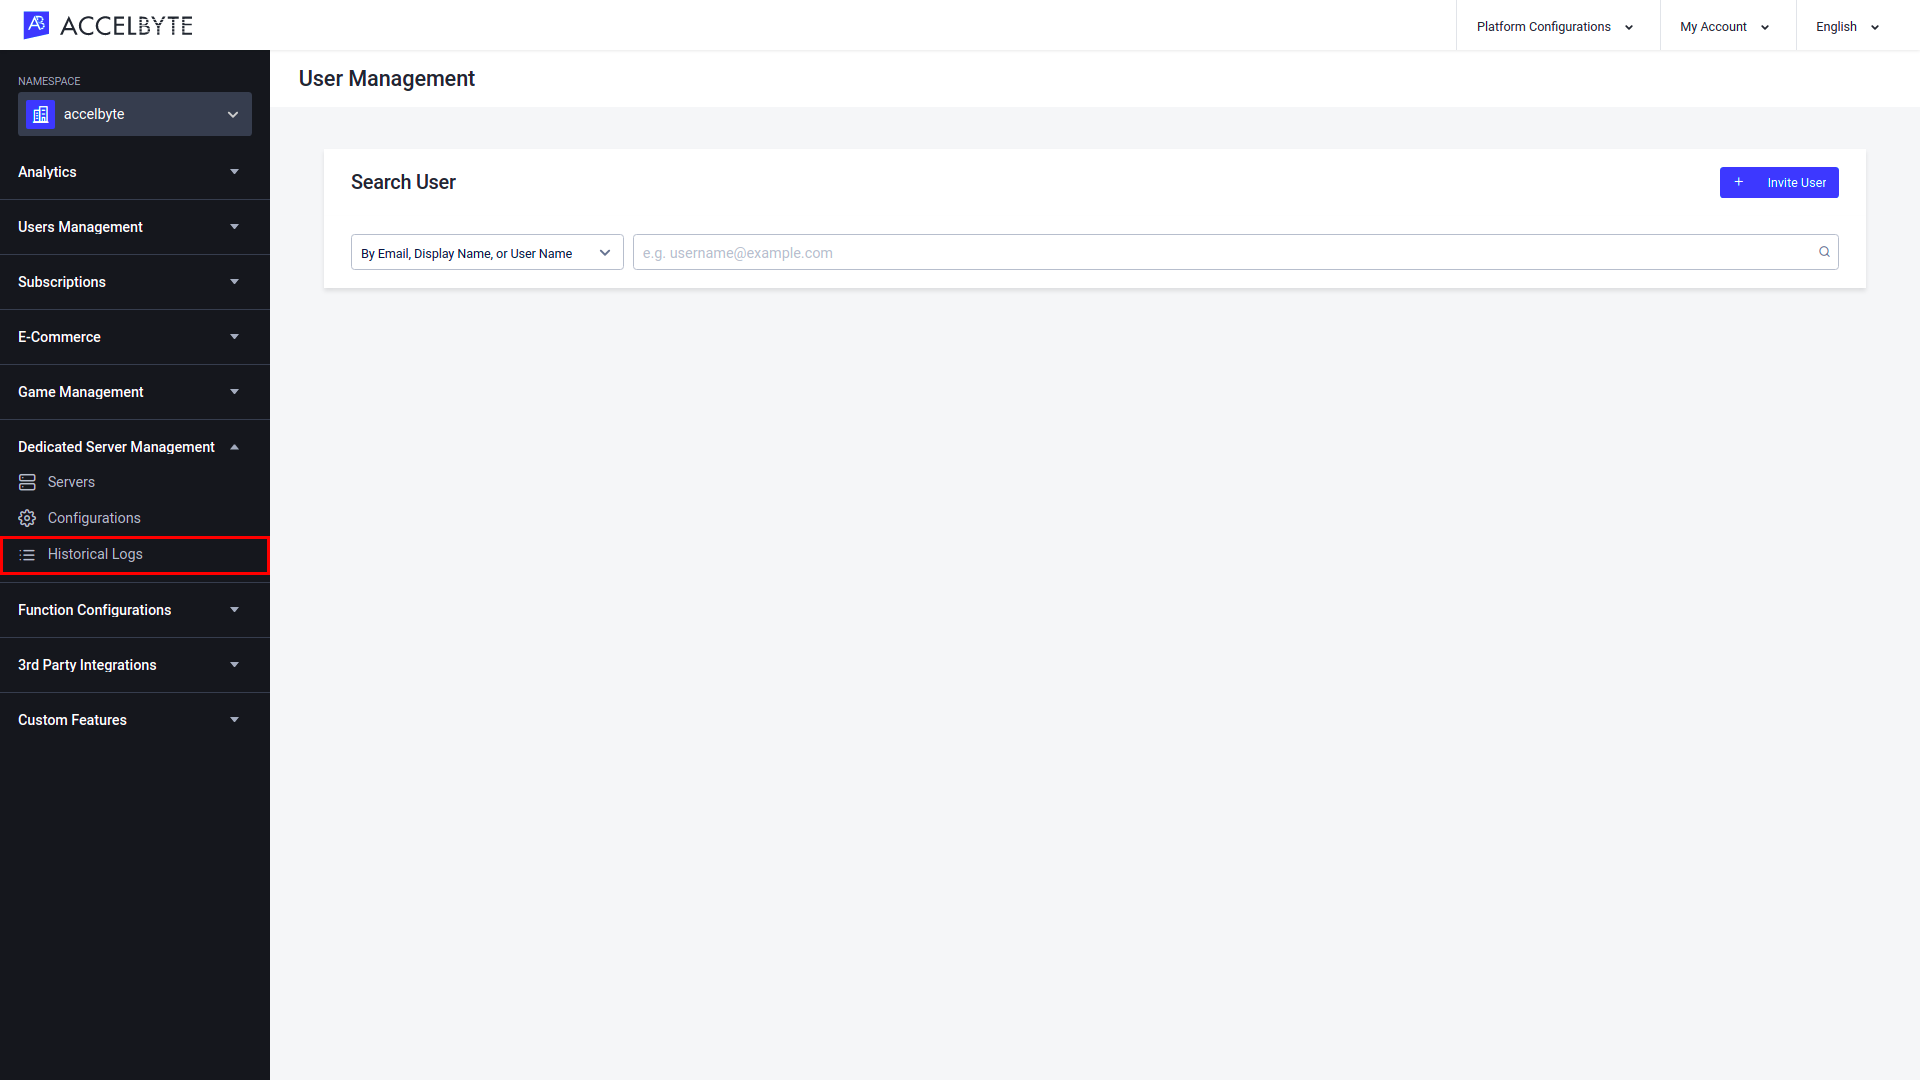
In the Admin Portal, go to the Dedicated Server Management section in the sidebar and open the Historical Logs menu.
On the Historical Logs page, you can see a list of the historical logs.

You can filter the historical log results using the following filters:
Use the Namespace filter to show logs from a specific namespace only. This filter will only appear if you are in the publisher namespace. Choose All to show results from all namespaces.
NOTE
If you choose All, you will also see results from all deployments.
Use the Deployment filter to show logs from a particular deployment only. Choose All to show results from all deployments in the selected namespace.
NOTE
If you want to select one specific deployment, you must first specify a game namespace in the Namespace field.
Use the Start Date and End Date fields to filter your search results to a particular period of time (optional).
Select Apply Filter to show the filtered results or Clear All to clear the filters.
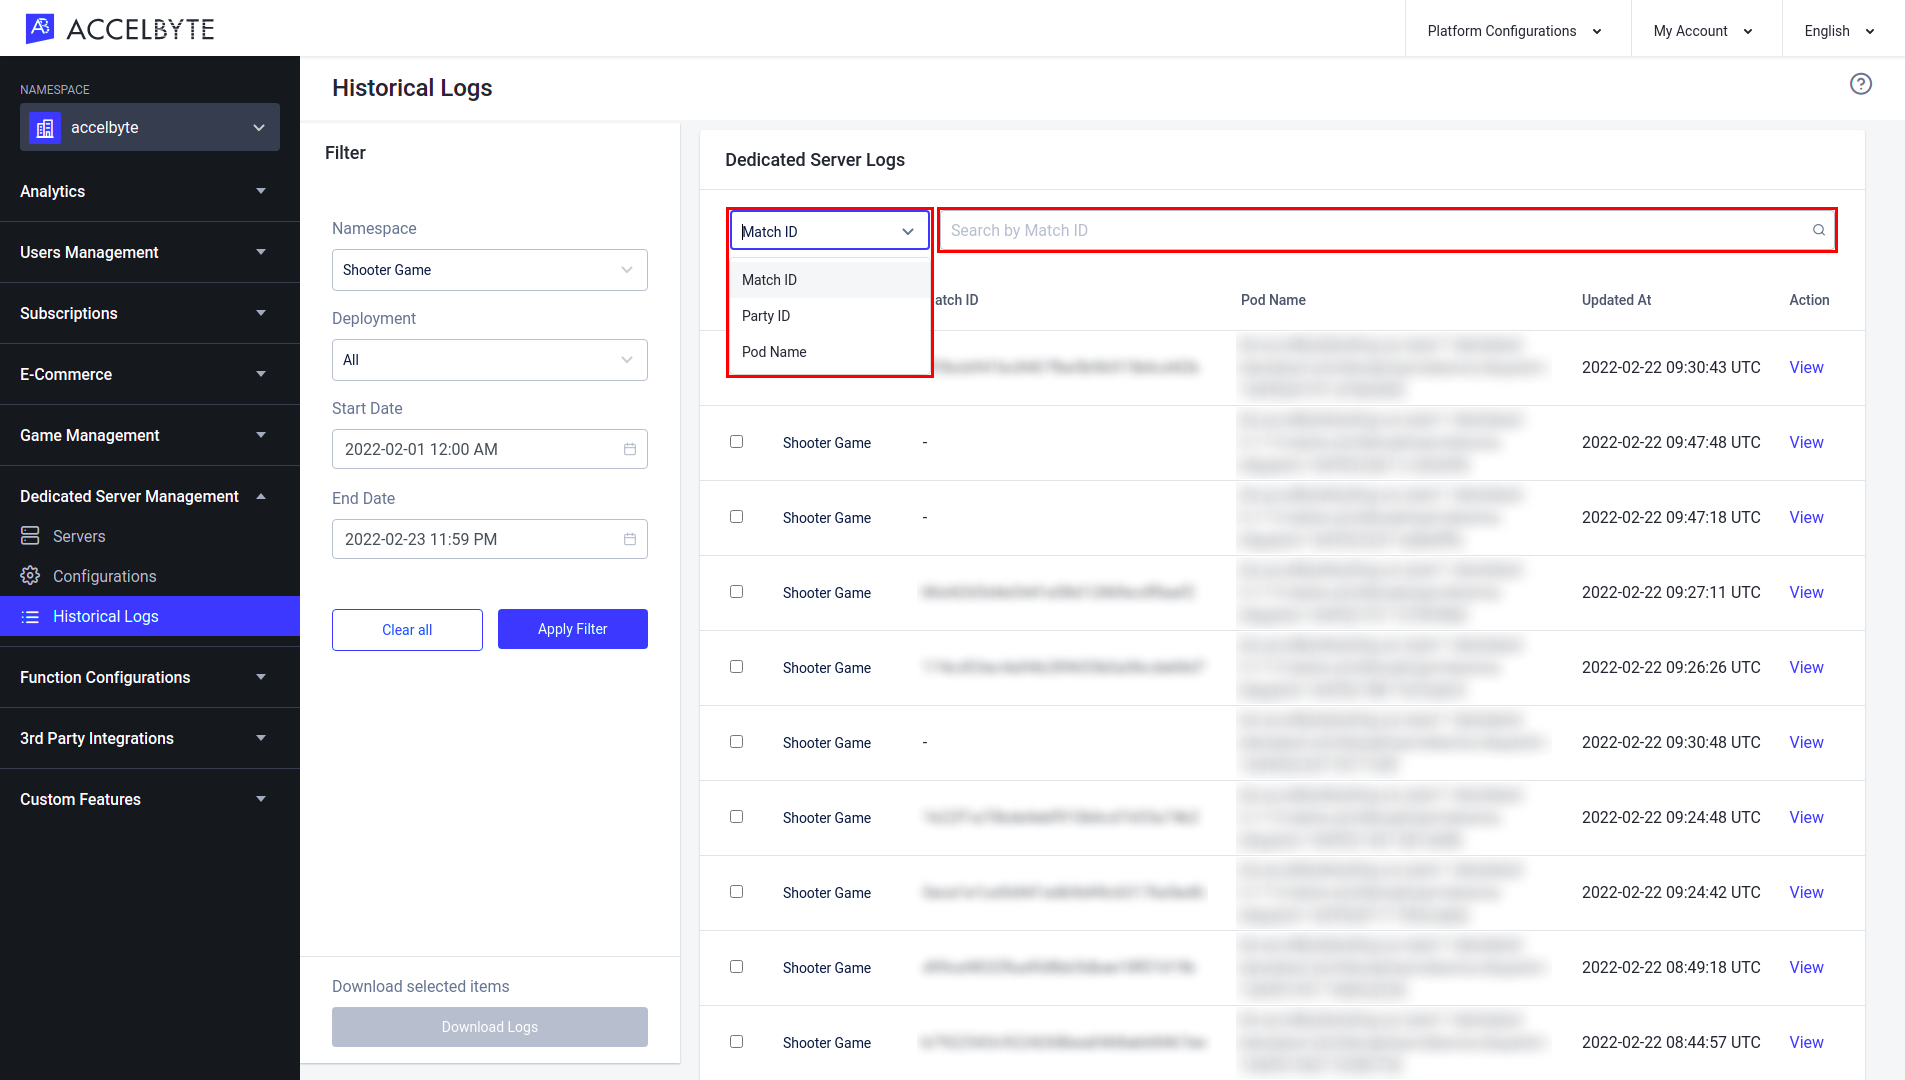
You can also search for a historical log by Match ID, Party ID, or Pod Name.
To view historical log's details, select View.
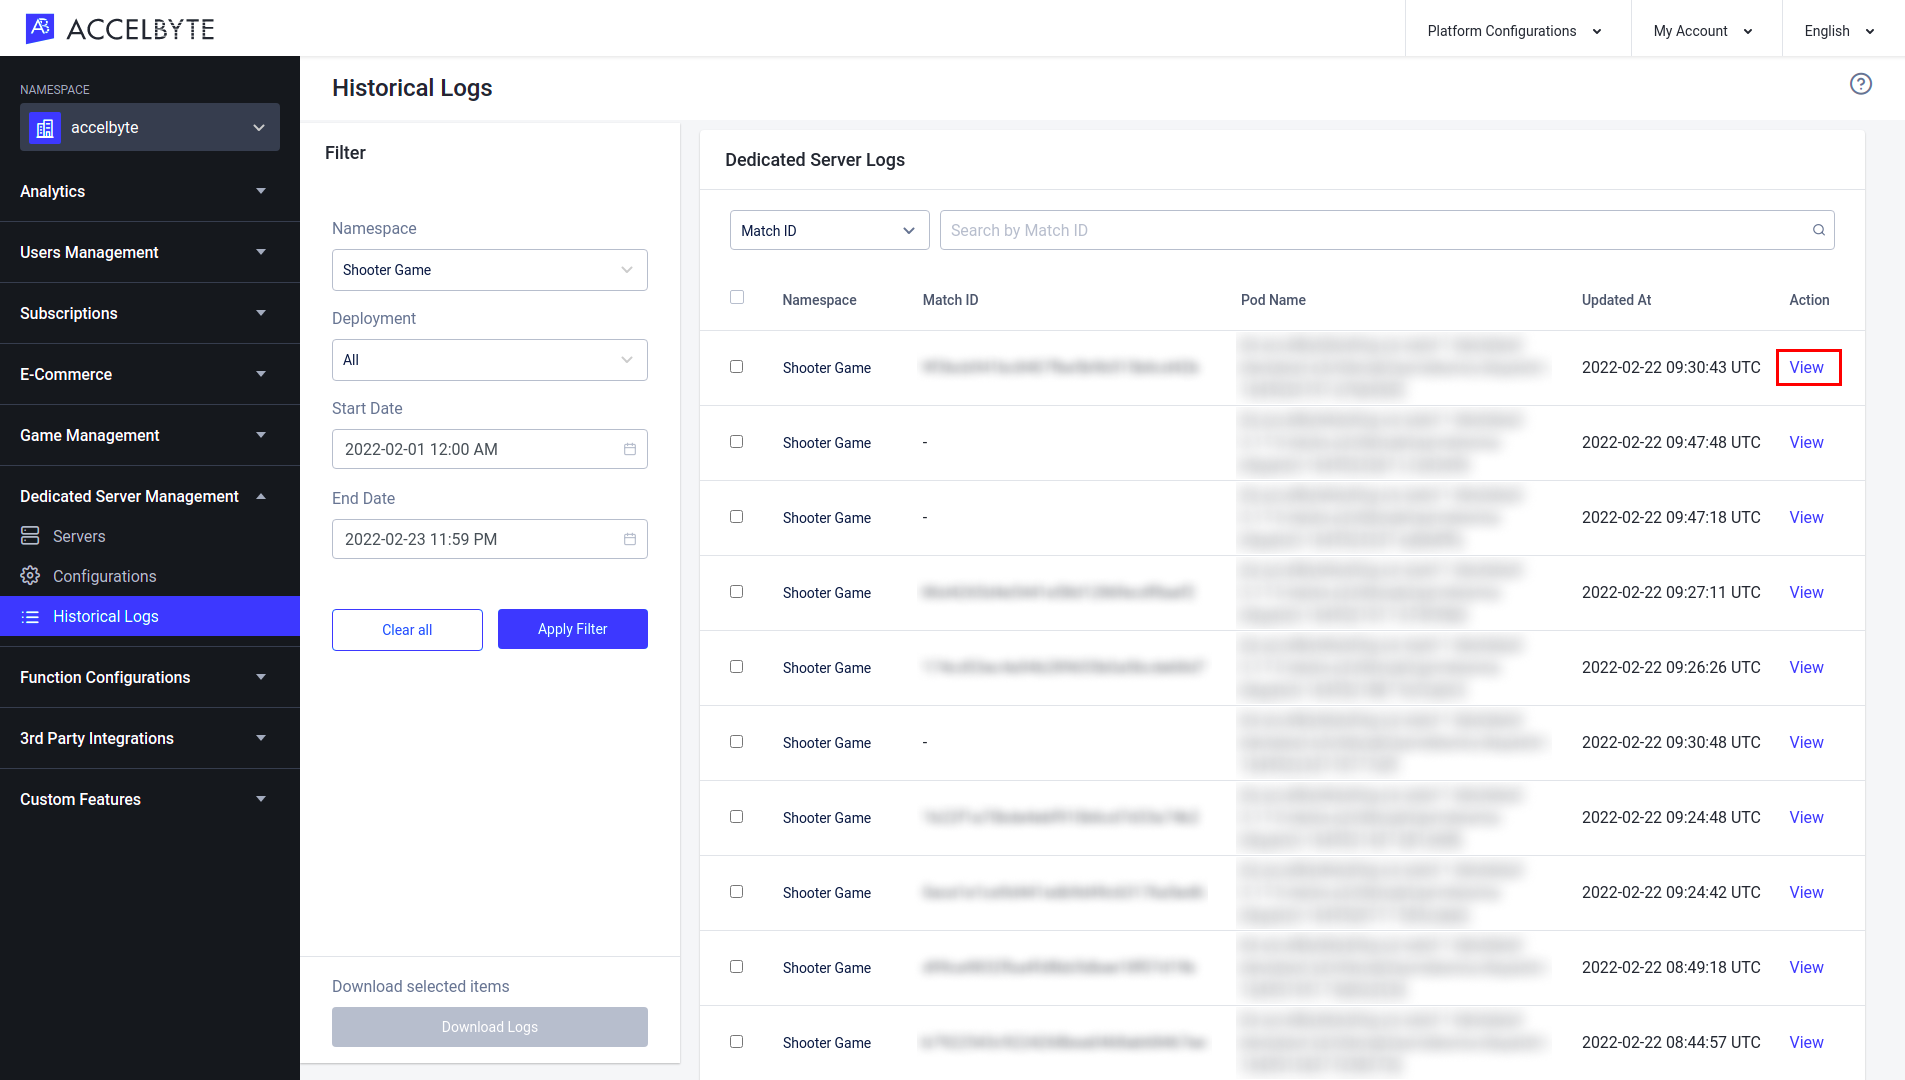
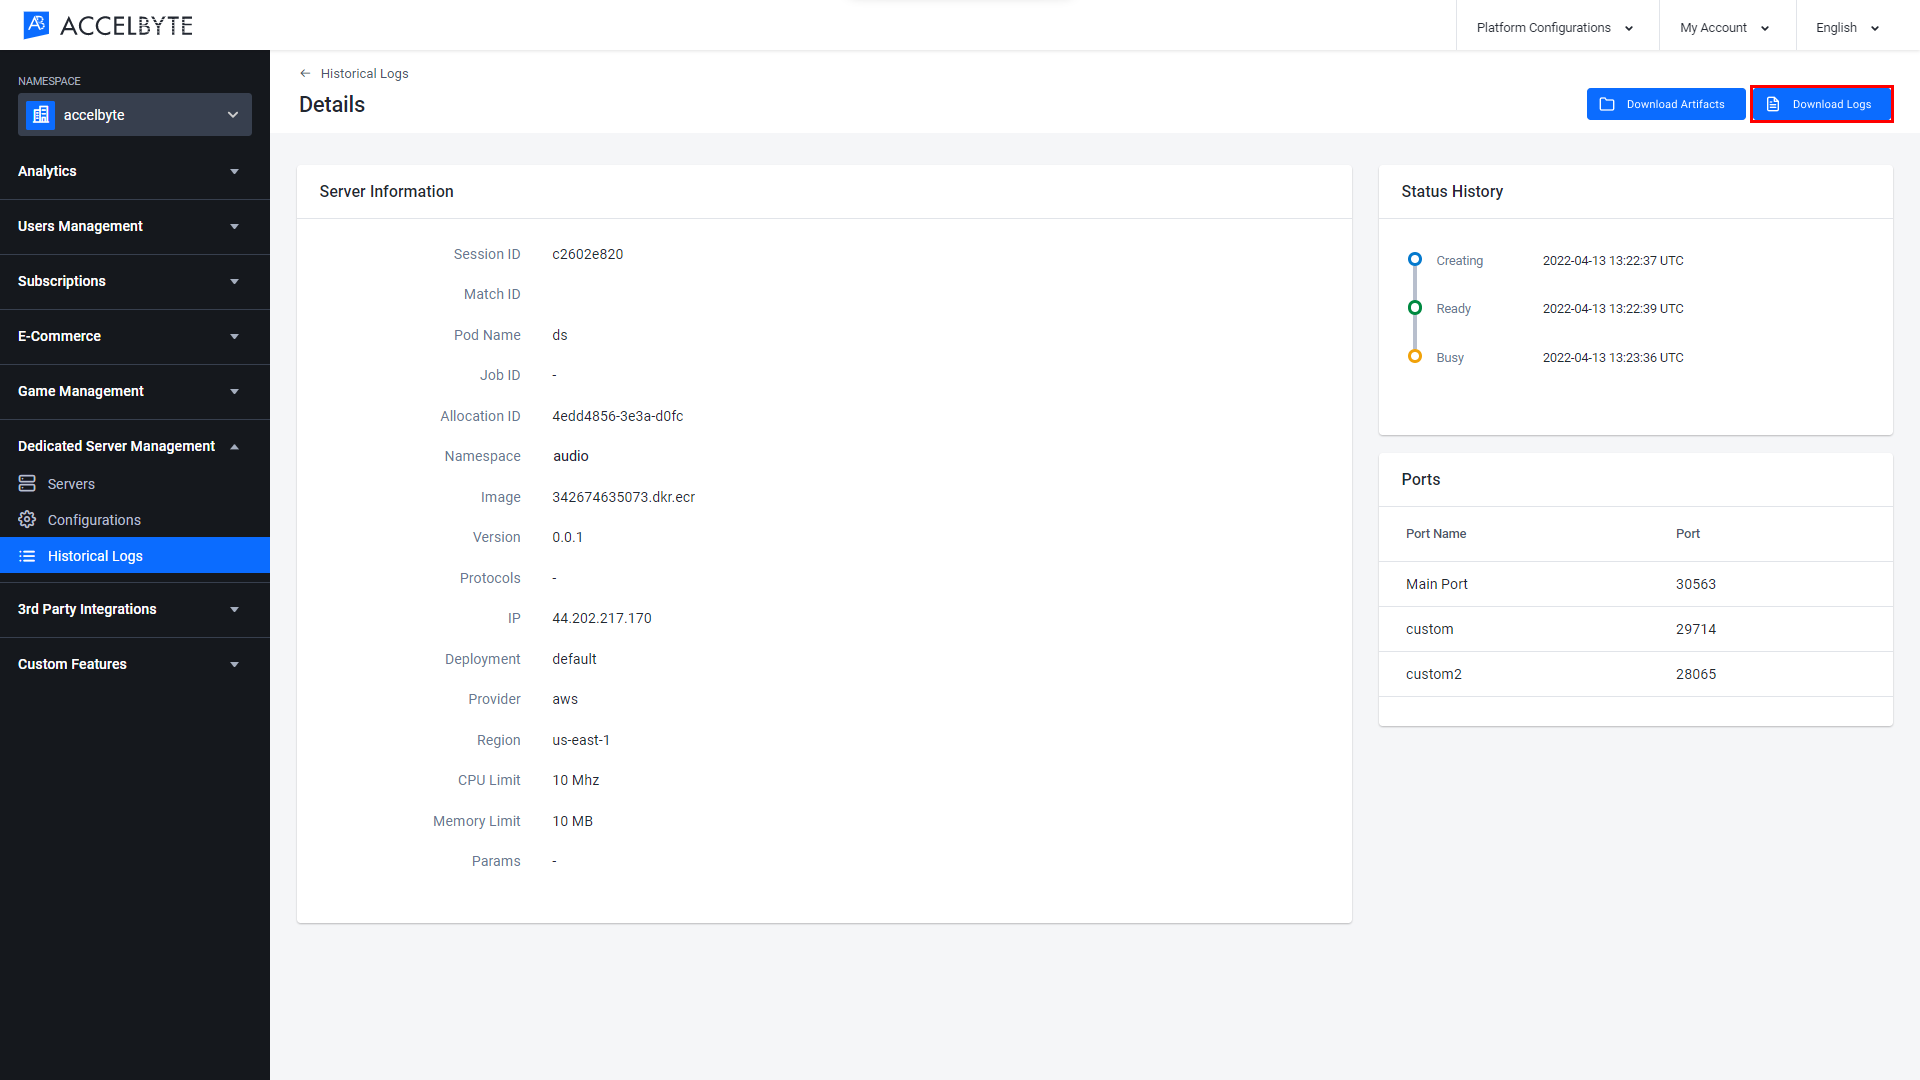
In the Details page, you can see detailed information about the selected historical log.

Download a Historical Log
On the Details page of the selected historical log, select the Download Logs button.
Bulk Download Historical Logs
In the Admin Portal, choose the desired namespace.
TIP
Choose Publisher Namespace to see a list of the historical logs from all namespaces. You will be able to see a list of historical logs from a specific game namespace by filtering the logs.
Choose a Game Namespace to see the historical logs from that individual namespace.

In the Admin Portal, go to the Dedicated Server Management section in the sidebar and open the Historical Logs menu.

On the Historical Logs page, you can see a list of the historical logs. You can use the following filters to refine your search:
- Use the Namespace filter to show logs from a specific namespace only. This filter will only appear if you are in the publisher namespace.
- Use the Deployment filter to show logs from a particular deployment only.
- Use the Start Date and End Date fields to filter your search results to a particular period of time (optional).
Select Apply Filter to show the results or Clear All to clear the filters.
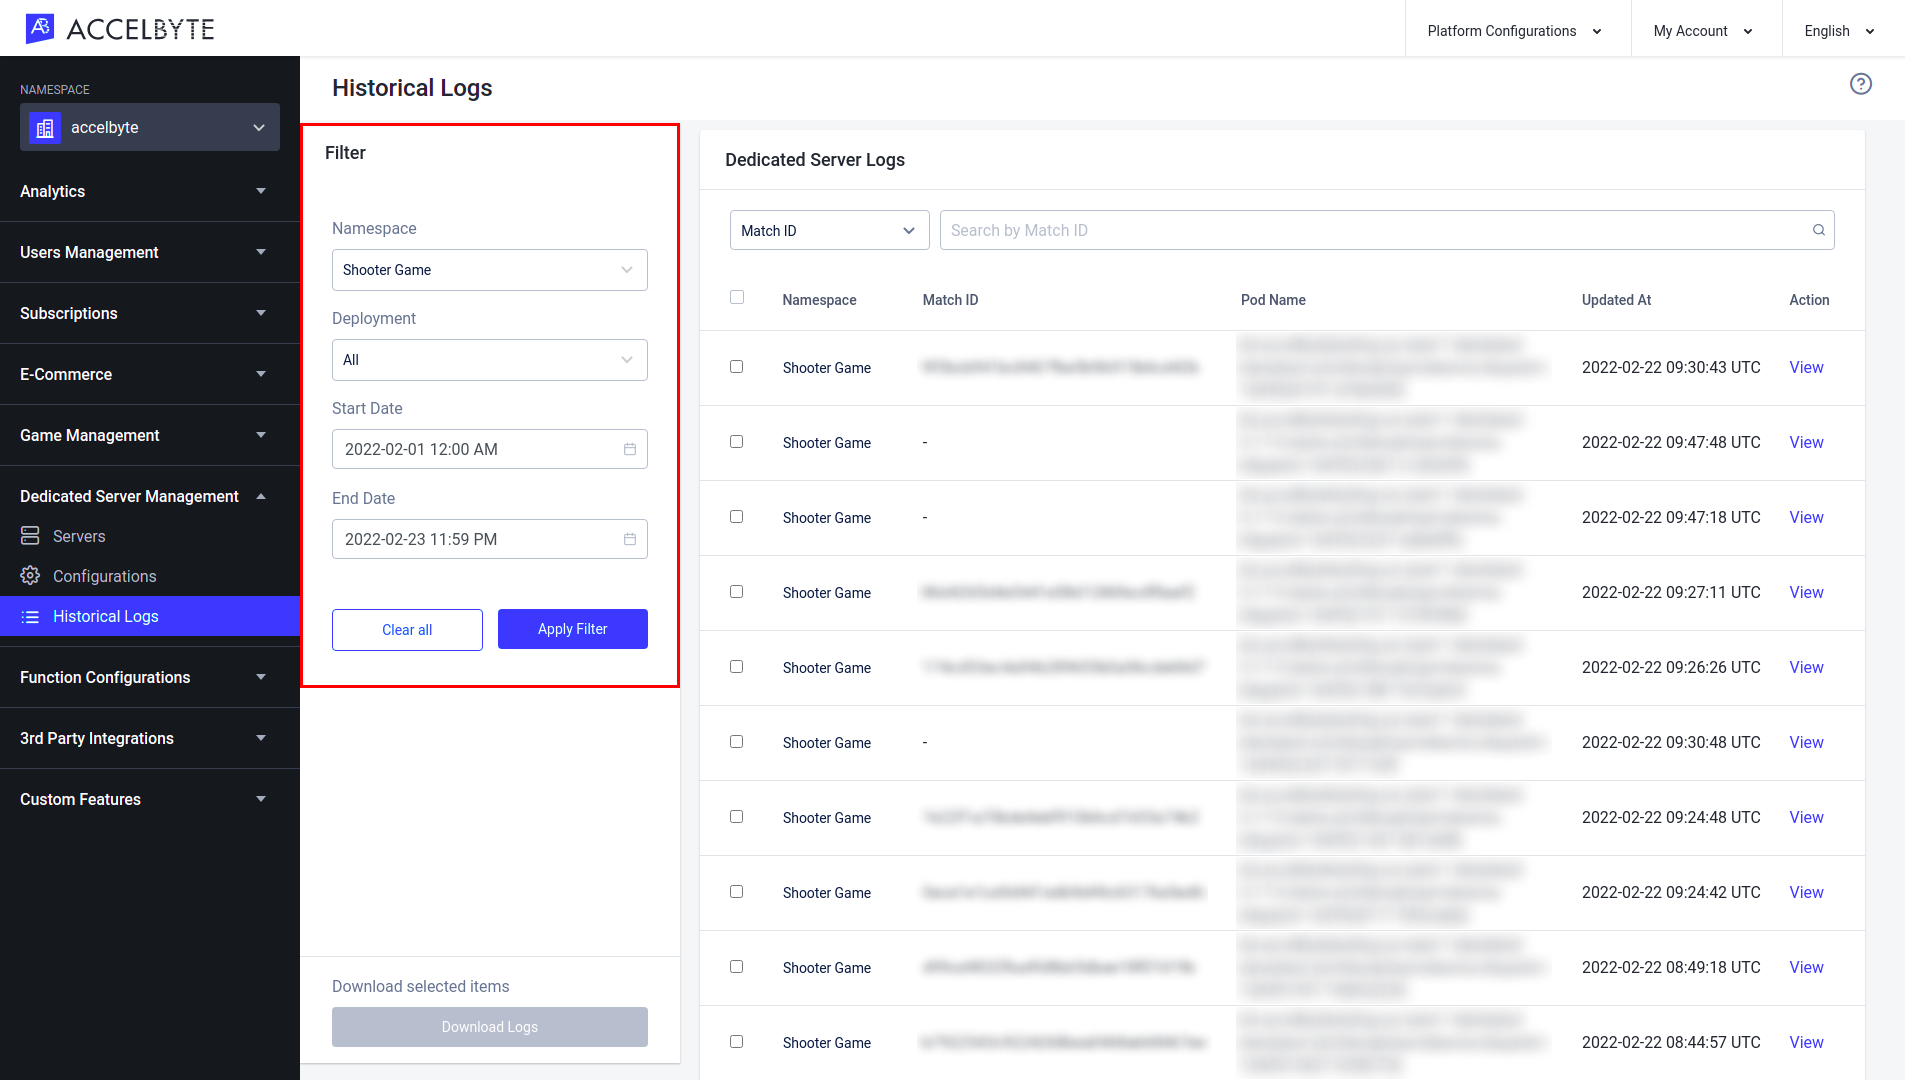
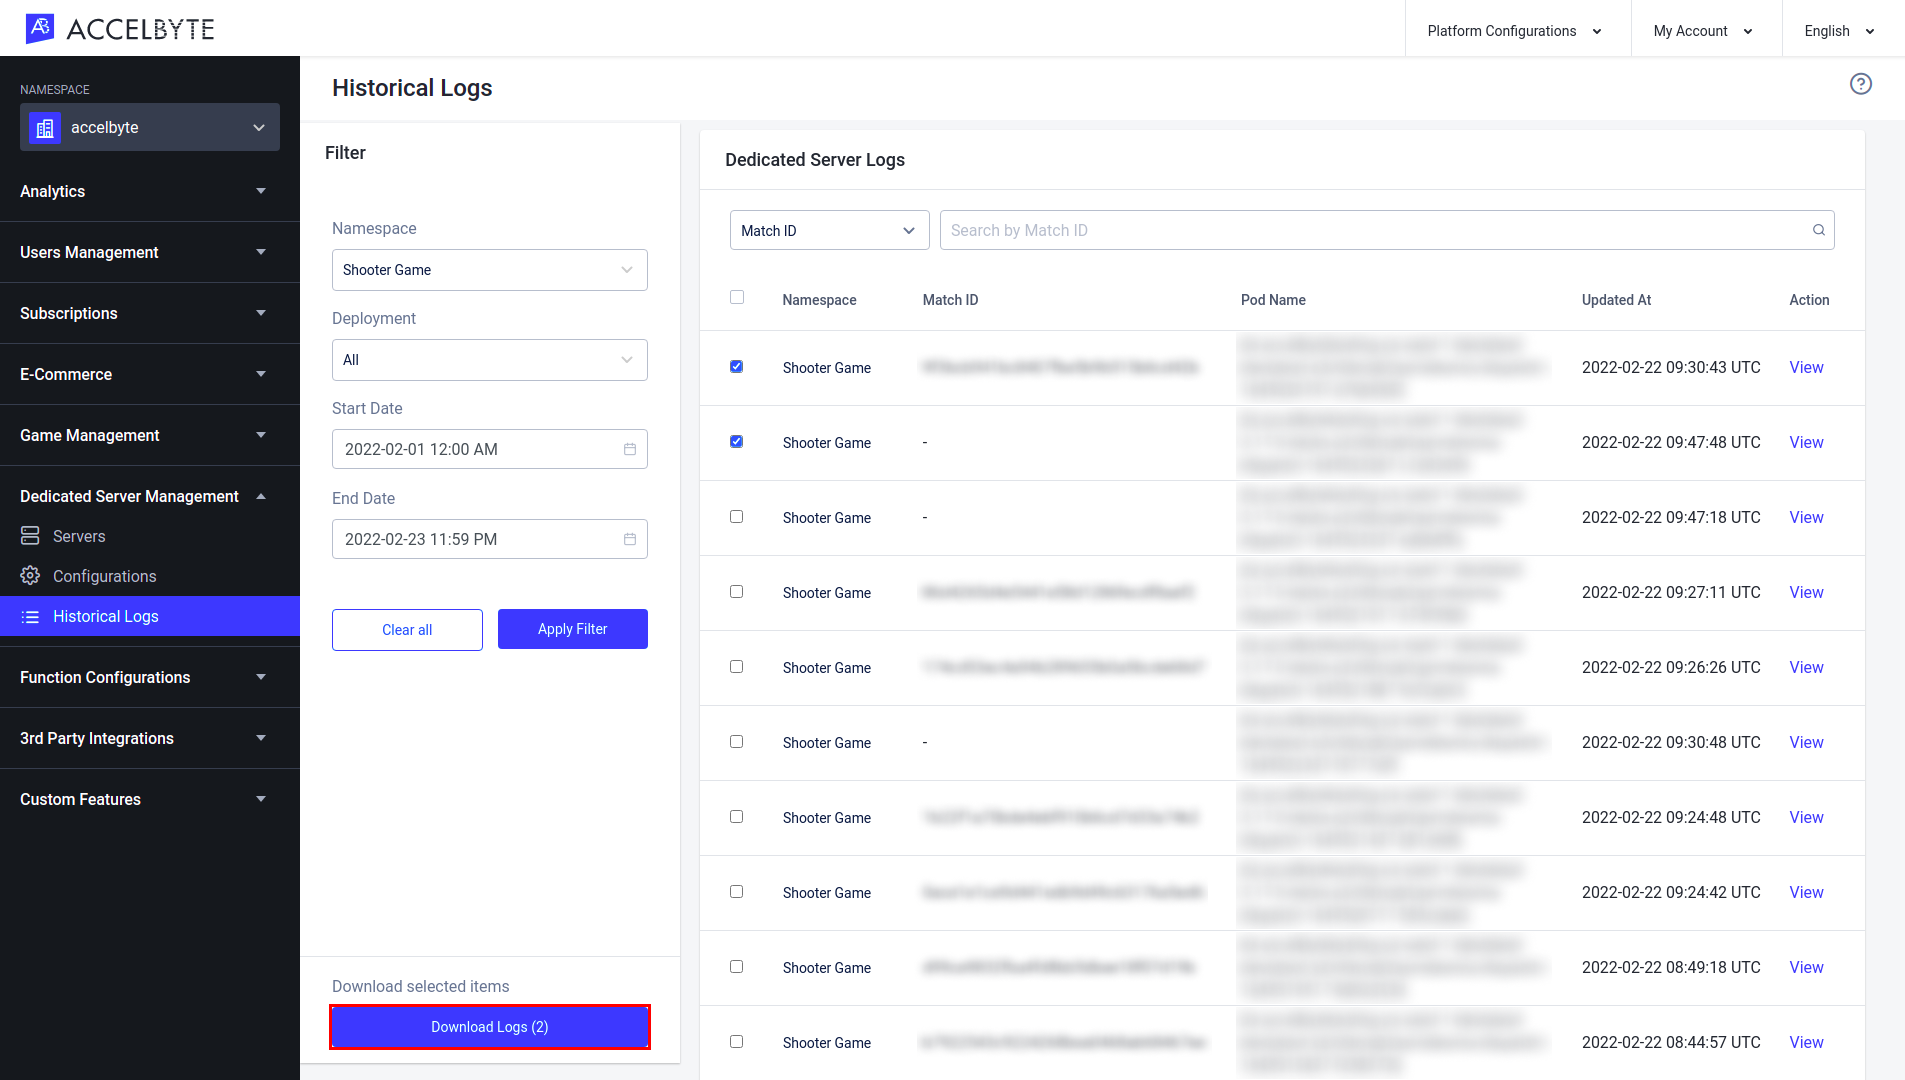
Select the logs you want to download by clicking the box on the right hand side of a log.

To download the log, select the Download Logs button.
Download Artifacts
NOTE
DS Artifacts can only be downloaded if you have filled the Artifact Directory field when uploading the image version.
If you didn't fill in the Artifact Directory field when you uploaded your image version, you can patch the image version at any time and fill in the Artifact Directory field before you attempt to download DS Artifacts.
On the Details page of your selected historical log, click the Download Artifacts button.
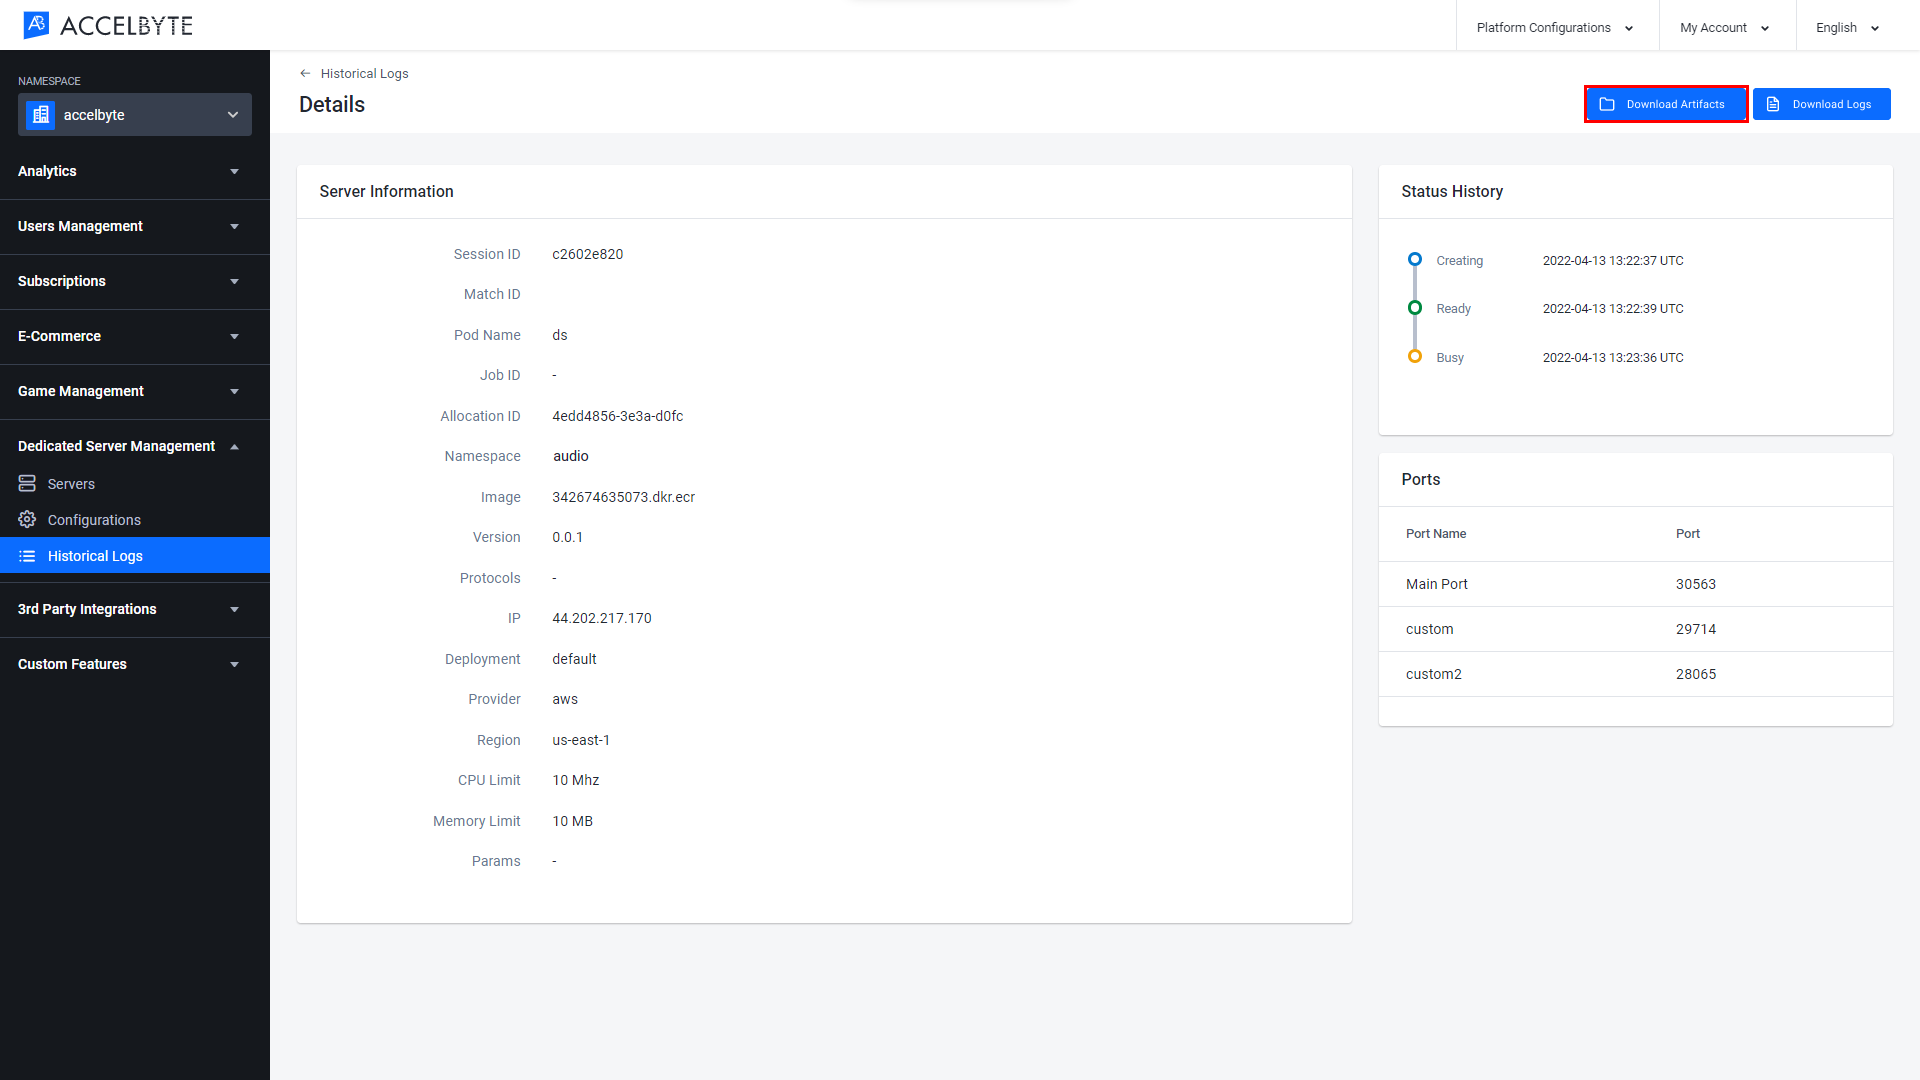
NOTE
You can only download the DS Artifacts of a server that has been claimed before. Claimed servers are labeled Busy.
Export and Import Dedicated Server Configurations
Export a Dedicated Server Configuration
Follow the steps below to export a Dedicated Server Configuration from your game namespace.
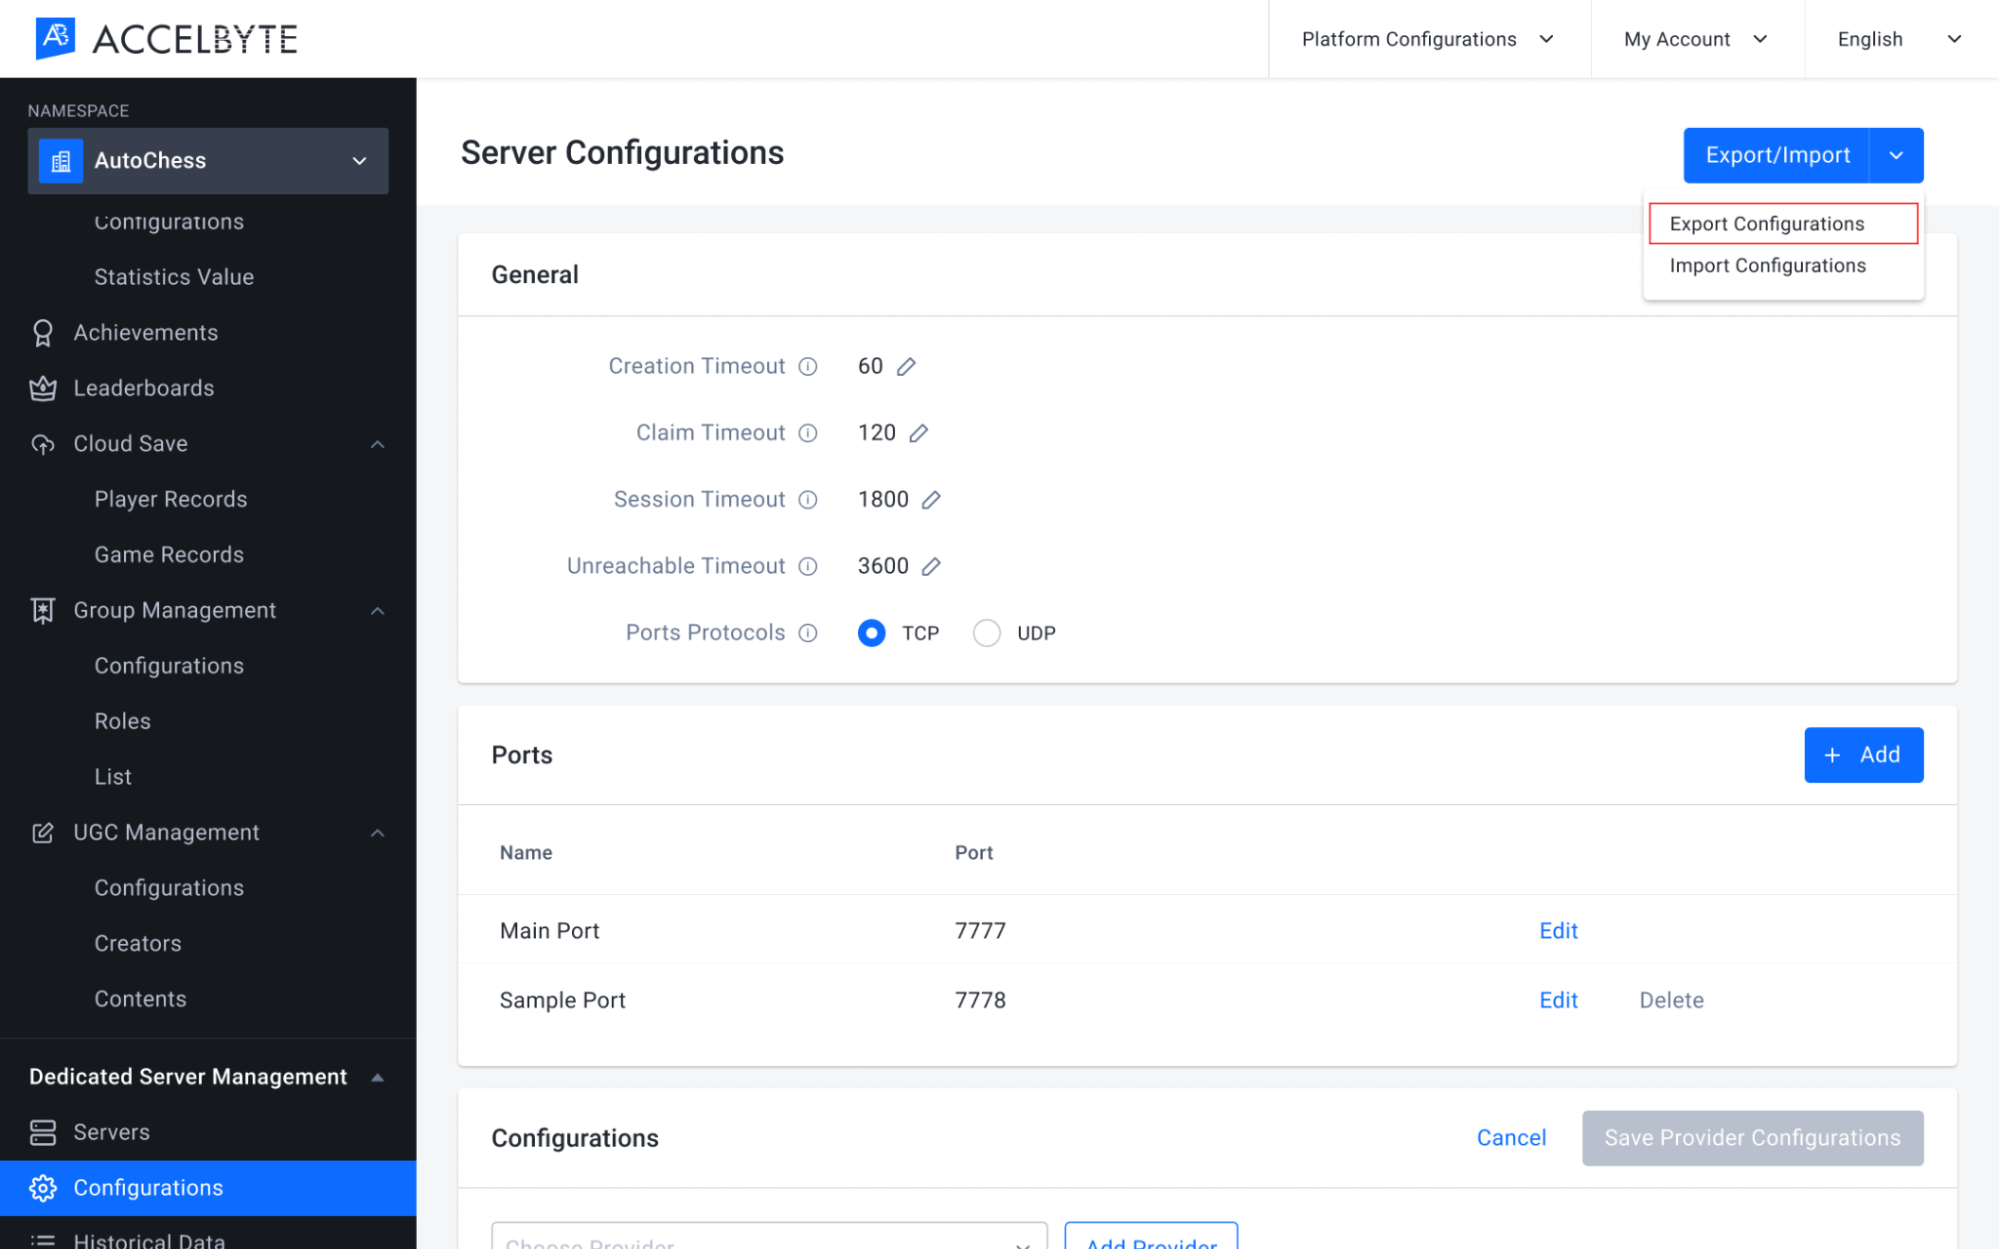
In the Admin Portal, open the game namespace that contains the configuration you want to export. On the Server Configurations page, click the Export/Import button. Then, click Export.
Your Server Configuration will be exported in a JSON file. Here is an example of the contents:
  {
   "namespace": "1",
   "createdAt": "2021-08-31T03:24:35Z",
   "updatedAt": "2021-08-31T03:24:35Z",
   "providers": [
    "aws"
   ],
   "port": 2,
   "protocol": "tcp",
   "creation_timeout": 120,
   "claim_timeout": 240,
   "session_timeout": 3600,
   "unreachable_timeout": 7200,
   "ports": {
    "customport1edit": 3,
    "customport2edit": 4
   },
   "default_version": "default",
   "pod_configs": [],
   "images": [],
   "deployments": []
  }
IMPORTANT
If you use our Matchmaking service, don't forget to also export your Matchmaking Configuration. You will need both configurations if you want to use them in a different game namespace.
Import a Dedicated Server Configuration
Follow the steps below to import a Dedicated Server Configuration into a game namespace.
In the Admin Portal, go to the game namespace where you want to import the configuration. On the Server Configurations page, click the Export/Import button. Then, click Import.

The Import Configuration form appears. Here, select the configuration file that you want to import.

A confirmation window appears. To confirm your selection, type IMPORT in the text box, then click the Import button.

Here you can see the configuration has been added to the namespace.

IMPORTANT
If you use our Matchmaking service, don't forget to also import your Matchmaking Configuration. You will need both configurations in this namespace to use Matchmaking with Armada.
Reserve a Server Using the API
When you use our Lobby service with Armada, it will create sessions and reserve servers for those sessions for you. If you prefer to use your own lobby, you can communicate with Armada via REST API to create a session and then reserve a server for that session. To do so, follow the steps below.
Create a Session
- Use the POST /dsmcontroller/namespaces/{namespace}/sessions endpoint to create a session.
- Input the Namespace field with the game namespace.
- Fill out the Request Body.
- Input the Game Mode taken from the matchmaking rules, e.g. 1v1, 3v3.
- Input the Party ID with the ID of the party the session is for, in UUID format.
- Input the Party Members with the user IDs of the players in the party. The user IDs should be in UUID format.
- Input the game namespace into the Namespace field.
- Input a Session ID using UUID format.
- Input the game client version in the Client Version field.
- Input the server configuration needed for the session in the Configuration field. If left empty, the default server configuration will be used.
- Input the Pod Name. This field is only used for local servers, for other servers leave this blank.
- Input the Region of the DSM.
Upon successful request, a new session will be created.
You can then check on the status of your session using the GET /dsmcontroller/namespaces/{namespace}/sessions/{sessionID} endpoint.
Claim a Server
- Use the POST /dsmcontroller/namespaces/{namespace}/sessions/claim endpoint to claim a server for your newly created session.
- Input the Namespace field with the game namespace.
- Fill out the Request Body.
- Input the session's Session ID.
Upon successful request, the DS will be claimed by your session.
Implementing the Lobby using the Unity SDK
Quick Reference
References
using AccelByte.Server;
Log in with Credentials
AccelByteServerPlugin.GetDedicatedServer().LoginWithClientCredentials(
result =>
{
    if (result.IsError)
    {
        Debug.Log($"Server login failed");
    }
    else
    {
        Debug.Log("Server login successful");
    }
});
Register Local DS to DSM
AccelByteServerPlugin.GetDedicatedServerManager().RegisterLocalServer(ip, portNumber, name, registerResult =>
{
    if (registerResult.IsError)
    {
        Debug.Log("Register Local Server to DSM failed");
    }
    else
    {
        Debug.Log("Register Local Server to DSM successful");
    }
});
Register DS to DSM
AccelByteServerPlugin.GetDedicatedServerManager().RegisterServer(port,
registerResult =>
{
    if (registerResult.IsError)
    {
        Debug.Log("Register Server to DSM failed");
    }
    else
    {
        Debug.Log("Register Server to DSM successful");
    }
});
Get Session ID to DSM
AccelByteServerPlugin.GetDedicatedServerManager().GetSessionId(dsmResult =>
{
    if (dsmResult.IsError)
    {
        Debug.Log("Failed Get Session Id");
    }
    else
    {
        Debug.Log("Successfully Get Session Id");
    }
});
Query Session Status to Matchmaking
AccelByteServerPlugin.GetMatchmaking().QuerySessionStatus(dsmResult.Value.session_id,
queryResult =>
{
    if (queryResult.IsError)
    {
        Debug.Log("Failed Query Session Status");
    }
    else
    {
        Debug.Log("Successfully Query Session Status");
    }
});
Deregister Local Server
AccelByteServerPlugin.GetDedicatedServerManager().DeregisterLocalServer(result =>
{
    if (result.IsError)
    {
        Debug.Log("Failed Deregister Local Server");
    }
    else
    {
        Debug.Log("Successfully Deregister Local Server");
    }
});
Shutdown Server
AccelByteServerPlugin.GetDedicatedServerManager().ShutdownServer(true,
result =>
{
    if (result.IsError)
    {
        Debug.Log("Failed Shutdown Server");
    }
    else
    {
        Debug.Log("Successfully Shutdown Server");
    }
});
Quickstart Guide
In this tutorial, you will learn how to integrate Armada with your game and test it on your local PC or in the AccelByte Server by uploading the server image. This guide assumes that you have already implemented the Lobby, Friends, Party, and Matchmaking services.
Since server implementation with Armada can vary for each game, you can familiarize yourself with other concepts and classes in the ServerModels.cs file inside the plugin SDK.
Before continuing, ensure that you have configured your AccelByteServerSDKConfig.json. Follow this tutorial to configure the server SDK.
We will start by adding simple Armada logic into the game.
Create a new script called ArmadaHandler.cs.
Add the following AccelByte library to the top of the script:
using AccelByte.Server;Create the Login logic for the Dedicated Server using client credentials. In the script, add the following code:
// Function called to Login by client credentials for the server.
public void LoginServer(int port, bool isLocal)
{
    AccelByteServerPlugin.GetDedicatedServer().LoginWithClientCredentials(result =>
    {
    if (result.IsError)
    {
        // If we error, grab the Error Code and Message to print in the Log
        Debug.Log($"Server login failed : {result.Error.Code}: {result.Error.Message}");
    }
    else
    {
        Debug.Log("Server login successful");
        // Some actions
    }
    });
}
Now you can begin to integrate Armada into your game with the local Dedicated Server. You will need to register your local Dedicated Server to the Dedicated Server Manager (DSM). This will allow your Dedicated Server to be tracked by AccelByte's DSM.
Log in with your client credentials and replace the actions comments as per the following code:
// Function called to Log in by client credentials for the server.
public static void LoginServer(int port, bool isLocal)
{
...
    else
    {
        Debug.Log("Server login successful");
        if (isLocal)
        {
            // Set local IP, server name, port
            string ip = "127.0.0.1";
            string name = $"localds-{DeviceProvider.GetFromSystemInfo().DeviceId}";
            uint portNumber = Convert.ToUInt32(port);

            // Register Local Server to DSM
AccelByteServerPlugin.GetDedicatedServerManager().RegisterLocalServer(ip, portNumber, name, registerResult =>
            {
                if (registerResult.IsError)
                {
                    Debug.Log("Register Local Server to DSM failed");
                }
                else
                {
                    Debug.Log("Register Local Server to DSM successful");
                }
            });
        }

    }
});
}
Once completed, you can now test your script to ensure it can log in and register your local Dedicated Server to the DSM. Call this function from somewhere else in MonoBehaviour.
void Start()
{
#if UNITY_SERVER
LoginServer("7777", false);
#endif
}
Build and run the project as a server build. Your server log will read Server login successful and Register Local Server to DSM successful if the action has been completed successfully. You can also check in the Admin Portal to see if your local Dedicated Server has successfully registered in the DSM.
WARNING
If you encounter a Server login failed: message, check your login credentials, API URLs, or the other configs in your AccelByteServerSDKConfig.json file.
Using the Armada Service, you can get match information by calling get Session ID from the DSM and use Session ID to get match information from the Matchmaking service.
public void GetMatchInfo()
{
// Get session id/ match id from DSM
AccelByteServerPlugin.GetDedicatedServerManager().GetSessionId(dsmResult =>
{
    if (dsmResult.IsError)
    {
        Debug.Log("Failed Get Session Id");
    }
    else
    {
        Debug.Log("Successfully Get Session Id");

        // Query Session Status to get match info from Matchmaking
        AccelByteServerPlugin.GetMatchmaking().QuerySessionStatus(dsmResult.Value.session_id, queryResult =>
        {
            if (queryResult.IsError)
            {
                Debug.Log("Failed Query Session Status");
            }
            else
            {
                Debug.Log("Successfully Query Session Status. The game mode is: " + queryResult.Value.game_mode);
            }
        });
    }
});
}
After a game has finished, you will need to deregister the local Dedicated Server from the DSM. Use the following code to create a Deregister Local Dedicated Server script.
public void UnregisterServer(bool isLocal)
{
if (isLocal)
{
    // Deregister Local Server to DSM
AccelByteServerPlugin.GetDedicatedServerManager().DeregisterLocalServer(result =>
    {
        if (result.IsError)
        {
            Debug.Log("Failed Deregister Local Server");
        }
        else
        {
            Debug.Log("Successfully Deregister Local Server");
        }
    });
}
}
Use the following code to attach this script when the local Dedicated Server needs to be closed:
void OnApplicationQuit()
{
#if UNITY_SERVER
UnregisterServer(false);
#endif
}
Now that you have set up all the required local Dedicated Server functions, you can begin to integrate Armada with the Dedicated Server. For the Login, use the same logic you created in Step 3. To register the Dedicated Server to the DSM so it can be spawned by Armada, you must modify the register logic as per the following:
// Function called to Login by client credentials for the server.
public void LoginServer(int port, bool isLocal)
{
...
    else
    {
        Debug.Log("Server login successful");

        if (!isLocal)
        {
        // Register Server to DSM
        AccelByteServerPlugin.GetDedicatedServerManager().RegisterServer(port, registerResult =>
        {
            if (registerResult.IsError)
            {
                Debug.Log("Register Server to DSM failed");
            }
            else
            {
                Debug.Log("Register Server to DSM successful");
            }
        });
    }
});
}
To obtain match information, use the same logic from Step 6.
Create a Deregister or Shutdown Dedicated Server from Dedicated Server Manager script by modifying the following in the deregistration script that you have already created in Step 7:
public static void UnregisterServer(bool isLocal)
{
if (!isLocal)
{
    // Shutdown Server to DSM
        AccelByteServerPlugin.GetDedicatedServerManager().ShutdownServer(true, result =>
        {
            if (result.IsError)
            {
                Debug.Log("Failed Shutdown Server");
            }
            else
            {
                Debug.Log("Successfully Shutdown Server");
            }
        });
}
}
For testing purposes, modify the boolean that you used in the Start() function to test your local servers.
void Start()
{
#if UNITY_SERVER
LoginServer("7777", true);
#endif
}
Modify the boolean in the OnApplicationQuit() function.
void OnApplicationQuit()
{
#if UNITY_SERVER
UnregisterServer(true);
#endif
}
Now you can build your server and upload the image into the AccelByte Server. Follow this guide to upload the image to the AccelByte Server. Once completed, your server should be automatically created when the client gets a DS Updated notification event from the Matchmaking service.
NOTE
You can also configure the timeout for the Dedicated Server in the Admin Portal by following this guide. We recommend uploading your server image to the AccelByte Server with the Linux Server build.
Congratulations! You have now learnt how to use Armada!
Continue on for a step by step example of the code implementation.
Step by Step Guide
Code Implementation
Turn your ArmadaHandler.cs script into a wrapper by changing the class to static and removing the MonoBehaviour base class. This will make it easier to call the GameManager script from your own game later.
public static class ArmadaHandlerChange the server login function into a static function.
public static void LoginServer(int port, bool isLocal) { … }Modify the register server script to be more flexible so it can be used as a local Dedicated Server or Dedicated Server in a single build.
public static void LoginServer(int port, bool isLocal)
{
AccelByteServerPlugin.GetDedicatedServer().LoginWithClientCredentials(result =>
{
    if (result.IsError)
    {
        // If we error, grab the Error Code and Message to print in the Log
        Debug.Log($"Server login failed : {result.Error.Code}: {result.Error.Message}");
    }
    else
    {
        Debug.Log("Server login successful");

        if (!isLocal)
        {
            // Register Server to DSM
            AccelByteServerPlugin.GetDedicatedServerManager().RegisterServer(port, registerResult =>
            {
                if (registerResult.IsError)
                {
                    Debug.Log("Register Server to DSM failed");
                }
                else
                {
                    Debug.Log("Register Server to DSM successful");
                }
            });
        }
        else
        {
            string ip = "127.0.0.1";
            string name = $"localds-{DeviceProvider.GetFromSystemInfo().DeviceId}";
            uint portNumber = Convert.ToUInt32(port);

            // Register Local Server to DSM
            AccelByteServerPlugin.GetDedicatedServerManager().RegisterLocalServer(ip, portNumber, name, registerResult =>
            {
                if (registerResult.IsError)
                {
                    Debug.Log("Register Local Server to DSM failed");
                }
                else
                {
                    Debug.Log("Register Local Server to DSM successful");
                }
            });
        }
    }
});
}
Once completed, you can use the Matchmaking information to check whether the connected client is allowed to enter the current server. To do this, create a GetPlayerInfo function that uses a callback. Attach this function to another script and wait until the asynchronous function has been completed.
public static void GetPlayerInfo(ResultCallback<MatchmakingResult> callback)
{
// Get session id/ match id from DSM
AccelByteServerPlugin.GetDedicatedServerManager().GetSessionId(dsmResult =>
{
    if (dsmResult.IsError)
    {
        Debug.Log("Failed Get Session Id");

        callback.TryError(dsmResult.Error);
    }
    else
    {
        // Query Session Status to get match info from Matchmaking
        AccelByteServerPlugin.GetMatchmaking().QuerySessionStatus(dsmResult.Value.session_id, queryResult =>
        {
            if (queryResult.IsError)
            {
                Debug.Log("Failed Query Session Status");

                callback.TryError(queryResult.Error);
            }
            else
            {
                // Return error if status is not matched
                if (queryResult.Value.status != AccelByte.Models.MatchmakingStatus.matched)
                {
                    Debug.Log("Matchmaking status is not matched");

                    // Return error callback
                    callback.TryError(queryResult.Error);
                }

                // Return success callback
                callback.TryOk(queryResult.Value);
            }
        });
    }
});
}
Change the Unregister Dedicated Server function to a static function.
public static void UnregisterServer(bool isLocal) { … }Change the Unregister Server script to make it more flexible. This way, you won't need to make a different build for your local Dedicated Server and Dedicated Server.
public static void UnregisterServer(bool isLocal)
{
if (isLocal)
{
    // Deregister Local Server to DSM
    AccelByteServerPlugin.GetDedicatedServerManager().DeregisterLocalServer(result =>
    {
        if (result.IsError)
        {
            Debug.Log("Failed Deregister Local Server");
        }
        else
        {
            Debug.Log("Successfully Deregister Local Server");

            Application.Quit();
        }
    });
}
else
{
    // Shutdown Server to DSM
    AccelByteServerPlugin.GetDedicatedServerManager().ShutdownServer(true, result =>
    {
        if (result.IsError)
        {
            Debug.Log("Failed Shutdown Server");
        }
        else
        {
            Debug.Log("Successfully Shutdown Server");

            Application.Quit();
        }
    });
}
}
Once completed, you can begin to integrate Armada into your game. In the steps above, this tutorial has used GameplayManager.cs to handle the server script. Start by storing a boolean variable to determine whether the tests are local. Set the value to false to use the AccelByte Server as default.
private bool isLocal = false;Remove the Start() function and replace it with the following function in GameplayManager.cs. This will determine whether your game is a local build for the server to log in.
internal void OnAccelByteServerStarted(int port)
{
// Get the local command line argument for the local test
isLocal = ConnectionHandler.GetLocalArgument();

ArmadaHandler.LoginServer(port, isLocal);
}
Override the OnStartServer() function from the WatchTimeNetworkManager.cs script:
public override void OnStartServer()
{
base.OnStartServer();

GameplayManager.OnAccelByteServerStarted(transport.ServerUri().Port);
GameplayManager.OnServerStarted();
}
Navigate back to GameplayManager.cs and add the following code to obtain the Session ID and query match information when a player tries to connect to the server:
void OnServerStartClient(NetworkConnection conn, ServerStartClientMessage msg)
{
playerInfos.Add(conn, new PlayerInfo { playerId = msg.playerId, displayName = msg.displayName });

PlayerInfo playerInfo = playerInfos[conn];

ArmadaHandler.GetPlayerInfo(result =>
{
    if (result.IsError) return;

    bool isPartyA = true;
    bool foundPlayer = false;

    // Get total player from game mode in result
    totalPlayers = result.Value.game_mode.ToGameMode().GetTotalPlayers();

    // Check if the user exists and assign the party
    foreach (var ally in result.Value.matching_allies)
    {
        foreach (var party in ally.matching_parties)
        {
            foreach (var user in party.party_members)
            {
                if (user.user_id == playerInfo.playerId)
                {
                    playerInfo.isPartyA = isPartyA;

                    foundPlayer = true;
                    break;
                }
            }

            if (foundPlayer) break;
        }

        if (foundPlayer) break;

        isPartyA = !isPartyA;
    }

    // Remove player info if the player is not registered in the current match
    if (!foundPlayer)
    {
        playerInfos.Remove(conn);
        return;
    }

    totalPlayersConnected++;

    Debug.Log($"Total player Connected : {totalPlayersConnected}/{totalPlayers}");

    // Update player infos dictionary
    playerInfos[conn] = playerInfo;

    Debug.Log(string.Format("Player {0} is joining in the party {1}", playerInfo.displayName, playerInfo.isPartyA ? "A" : "B"));

    // Start the game if total players connected and total players are same
    if (totalPlayersConnected == totalPlayers)
    {

        foreach (NetworkConnection connection in playerInfos.Keys)
        {
            connection.Send(new ClientStartClientResponseMessage { });
        }
        if (isServer)
        {
            StartCoroutine(CountdownTimer());
        }
    }
});
}
Create an Unregister Server script to listen to a variable that holds the boolean value of local test in the OnApplicationQuit() function in GameplayManager.cs.
private void OnApplicationQuit()
{
#if UNITY_SERVER
ArmadaHandler.UnregisterServer(isLocal);
#endif
}
Add a timer to unregister the Dedicated Server after the game has finished.
IEnumerator CloseServer(int timeout = 30)
{
Debug.Log("Start countdown to close server");

for (int i = 0; i < timeout; i++)
{
    yield return new WaitForSeconds(1.0f);
}

ArmadaHandler.UnregisterServer(isLocal);
}
Call the Close Server countdown function in GameplayManager.cs when the game has finished.
void OnServerStopTimerMessage(NetworkConnection conn, ServerRequestStopTimerMessage msg)
{
totalPlayersStop++;

PlayerInfo playerInfo = playerInfos[conn];
playerInfo.playerScoreTime = mainTime;
playerInfos[conn] = playerInfo;

Debug.Log($"Total player Stop: {totalPlayersStop}/{totalPlayers}");

if (totalPlayersStop == totalPlayers)
{
    StartCoroutine(CloseServer());
    OnServerStopGameplay();
}
}
Build your server and upload your server image to the AccelByte Server.
Once completed, you can test your build. To test on your local PC, run the local server with the command line argument -local. You can either create a shortcut or a batch file to test local servers. If you want to create a batch file, you can use the following example: batch file.
@ECHO ON

start Server/Justice-Unity-Tutorial-Project.exe local
Congratulations! You have fully implemented the Armada Service and successfully installed the AccelByte Unity SDK and AccelByte Config file.
Full Code
ArmadaHandler.cs
// Copyright (c) 2022 AccelByte Inc. All Rights Reserved.
// This is licensed software from AccelByte Inc, for limitations
// and restrictions contact your company contract manager.

using System;
using System.Collections.Generic;
using UnityEngine;
using AccelByte.Server;
using AccelByte.Api;
using AccelByte.Core;
using AccelByte.Models;

public static class ArmadaHandler
{
    /// <summary>
    /// Server login with the server client credentials and register DS to DSM
    /// </summary>
    /// <param name="port"> </param>
    /// <param name="isLocal"></param>
    public static void LoginServer(int port, bool isLocal)
    {
        AccelByteServerPlugin.GetDedicatedServer().LoginWithClientCredentials(result =>
        {
            if (result.IsError)
            {
                // If we error, grab the Error Code and Message to print in the Log
                Debug.Log($"Server login failed : {result.Error.Code}: {result.Error.Message}");
            }
            else
            {
                Debug.Log("Server login successful");

                if (!isLocal)
                {
                    // Register Server to DSM
                    AccelByteServerPlugin.GetDedicatedServerManager().RegisterServer(port, registerResult =>
                    {
                        if (registerResult.IsError)
                        {
                            Debug.Log("Register Server to DSM failed");
                        }
                        else
                        {
                            Debug.Log("Register Server to DSM successful");
                        }
                    });
                }
                else
                {
                    string ip = "127.0.0.1";
                    string name = $"localds-{DeviceProvider.GetFromSystemInfo().DeviceId}";
                    uint portNumber = Convert.ToUInt32(port);

                    // Register Local Server to DSM
                    AccelByteServerPlugin.GetDedicatedServerManager().RegisterLocalServer(ip, portNumber, name, registerResult =>
                    {
                        if (registerResult.IsError)
                        {
                            Debug.Log("Register Local Server to DSM failed");
                        }
                        else
                        {
                            Debug.Log("Register Local Server to DSM successful");
                        }
                    });
                }
            }
        });
    }

    /// <summary>
    /// Unregister DS from DSM and quit the app
    /// </summary>
    /// <param name="isLocal"> Unregister local DS if the value is true</param>
    public static void UnregisterServer(bool isLocal)
    {
        if (isLocal)
        {
            // Deregister Local Server to DSM
            AccelByteServerPlugin.GetDedicatedServerManager().DeregisterLocalServer(result =>
            {
                if (result.IsError)
                {
                    Debug.Log("Failed Deregister Local Server");
                }
                else
                {
                    Debug.Log("Successfully Deregister Local Server");

                    Application.Quit();
                }
            });
        }
        else
        {
            // Shutdown Server to DSM
            AccelByteServerPlugin.GetDedicatedServerManager().ShutdownServer(true, result =>
            {
                if (result.IsError)
                {
                    Debug.Log("Failed Shutdown Server");
                }
                else
                {
                    Debug.Log("Successfully Shutdown Server");

                    Application.Quit();
                }
            });
        }
    }

    /// <summary>
    /// DS queries match info from Matchmaking (MM)
    /// </summary>
    /// <param name="callback"> Return match info callback</param>
    public static void GetPlayerInfo(ResultCallback<MatchmakingResult> callback)
    {
        // Get session id/ match id from DSM
        AccelByteServerPlugin.GetDedicatedServerManager().GetSessionId(dsmResult =>
        {
            if (dsmResult.IsError)
            {
                Debug.Log("Failed Get Session Id");

                callback.TryError(dsmResult.Error);
            }
            else
            {
                // Query Session Status to get match info from Matchmaking
                AccelByteServerPlugin.GetMatchmaking().QuerySessionStatus(dsmResult.Value.session_id, queryResult =>
                {
                    if (queryResult.IsError)
                    {
                        Debug.Log("Failed Query Session Status");

                        callback.TryError(queryResult.Error);
                    }
                    else
                    {
                        // Return error if status is not matched
                        if (queryResult.Value.status != AccelByte.Models.MatchmakingStatus.matched)
                        {
                            Debug.Log("Matchmaking status is not matched");

                            // Return error callback
                            callback.TryError(queryResult.Error);
                        }

                        // Return success callback
                        callback.TryOk(queryResult.Value);
                    }
                });
            }
        });
    }
}
WatchTimeNetworkManager.cs
// Copyright (c) 2022 AccelByte Inc. All Rights Reserved.
// This is licensed software from AccelByte Inc, for limitations
// and restrictions contact your company contract manager.

using Mirror;
using System;
using UnityEngine;

public class WatchTimeNetworkManager : NetworkManager
{
    [SerializeField]
    private GameplayManager GameplayManager;

    public override void Start()
    {
        base.Start();

#if !UNITY_SERVER
        // Change ip and port based on DS info in the client
        networkAddress = ConnectionHandler.ip;
        gameObject.GetComponent<kcp2k.KcpTransport>().Port = ConnectionHandler.uPort;

        // Auto start the client connection
        StartClient();
#endif
    }

    #region Client System Callbacks

    /// <summary>
    /// Called on the client when connected to a server.
    /// <para>The default implementation of this function sets the client as ready and adds a player. Override the function to dictate what happens when the client connects.</para>
    /// </summary>
    /// <param name="conn">Connection to the server.</param>
    public override void OnClientConnect(NetworkConnection conn)
    {
        base.OnClientConnect(conn);
        GameplayManager.OnPlayerStarted();
    }
    #endregion

    #region Start & Stop Callbacks

    /// <summary>
    /// Called when a server is started - including when a host is started.
    /// <para>StartServer has multiple signatures, but they all cause this hook to be called.</para>
    /// </summary>
    public override void OnStartServer()
    {
        base.OnStartServer();

        GameplayManager.OnAccelByteServerStarted(transport.ServerUri().Port);
        GameplayManager.OnServerStarted();
    }
    #endregion

    /// <summary>
    /// Called when the server stop the client connections
    /// </summary>
    public override void OnStopClient()
    {
        base.OnStopClient();
        GameplayManager.OnPlayerDisconnected();
    }
}
GameplayManager.cs
// Copyright (c) 2022 AccelByte Inc. All Rights Reserved.
// This is licensed software from AccelByte Inc, for limitations
// and restrictions contact your company contract manager.

using System.Collections;
using System.Collections.Generic;
using System.Linq;
using UnityEngine;
using AccelByte.Api;
using Mirror;

public class GameplayManager : NetworkBehaviour
{
    [SerializeField]
    private GameplayInterface gameCanvas;

    private int totalPlayersConnected = 0;
    private int totalPlayersStop = 0;
    private int totalPlayers = 0;

    private bool isLocal = false;

    private double targetTime;
    private double mainTime;

    internal static readonly Dictionary<NetworkConnection, PlayerInfo> playerInfos = new Dictionary<NetworkConnection, PlayerInfo>();

    /// <summary>
    /// Called by server to login by credentials
    /// </summary>
    /// <param name="port"></param>
    internal void OnAccelByteServerStarted(int port)
    {
        // Get the local command line argument for the local test
        isLocal = ConnectionHandler.GetLocalArgument();

        ArmadaHandler.LoginServer(port, isLocal);
    }

    /// <summary>
    /// Called on Start Server
    /// </summary>
    internal void OnServerStarted()
    {
        if (!NetworkServer.active) return;

        NetworkServer.RegisterHandler<ServerStartClientMessage>(OnServerStartClient);
        NetworkServer.RegisterHandler<ServerRequestStopTimerMessage>(OnServerStopTimerMessage);
    }

    /// <summary>
    /// Called on Client connect to server
    /// </summary>
    internal void OnPlayerStarted()
    {
        if (!NetworkClient.active) return;

        NetworkClient.RegisterHandler<ClientStartClientResponseMessage>(OnStartClientResponse);
        NetworkClient.RegisterHandler<ClientUpdateCountdownTimerMessage>(OnUpdateCountdownTime);
        NetworkClient.RegisterHandler<ClientChangeToGameplayStateMessage>(OnChangeToGameplayState);
        NetworkClient.RegisterHandler<ClientUpdateMainTimeMessage>(OnUpdateMainTime);
        NetworkClient.RegisterHandler<ClientOnAllPlayerStopTime>(OnAllClientStopTime);

        // Current user's userId and displayName
        string userId = AccelBytePlugin.GetUser().Session.UserId;
        string displayName = LobbyHandler.Instance.partyHandler.partyMembers[userId];

        NetworkClient.connection.Send(new ServerStartClientMessage { playerId = userId, displayName = displayName });

        // Set the user id inside the gameplay interface player id. this to check after gameplay ended, the interface will know where their current player information by matching the player id
        gameCanvas.playerId = userId;
    }

    /// <summary>
    /// Called on Client disconnect
    /// </summary>
    internal void OnPlayerDisconnected()
    {
        gameCanvas.ChangePanel(GameplayInterfaceState.None);
    }

    /// <summary>
    /// Send message to server that player press the stop button
    /// </summary>
    public void RequestStopTime()
    {
        NetworkClient.connection.Send(new ServerRequestStopTimerMessage { });
    }

    /// <summary>
    /// Server set player's info
    /// </summary>
    /// <param name="conn"> player's network connection</param>
    /// <param name="msg"> message that contains player's info</param>
    void OnServerStartClient(NetworkConnection conn, ServerStartClientMessage msg)
    {
        playerInfos.Add(conn, new PlayerInfo { playerId = msg.playerId, displayName = msg.displayName });

        PlayerInfo playerInfo = playerInfos[conn];

        ArmadaHandler.GetPlayerInfo(result =>
        {
            if (result.IsError) return;

            bool isPartyA = true;
            bool foundPlayer = false;

            // Get total player from game mode in result
            totalPlayers = result.Value.game_mode.ToGameMode().GetTotalPlayers();

            // Check if the user exists and assign the party
            foreach (var ally in result.Value.matching_allies)
            {
                foreach (var party in ally.matching_parties)
                {
                    foreach (var user in party.party_members)
                    {
                        if (user.user_id == playerInfo.playerId)
                        {
                            playerInfo.isPartyA = isPartyA;

                            foundPlayer = true;
                            break;
                        }
                    }

                    if (foundPlayer) break;
                }

                if (foundPlayer) break;

                isPartyA = !isPartyA;
            }

            // Remove player info if the player is not registered in the current match
            if (!foundPlayer)
            {
                playerInfos.Remove(conn);
                return;
            }

            totalPlayersConnected++;

            Debug.Log($"Total player Connected : {totalPlayersConnected}/{totalPlayers}");

            // Update player infos dictionary
            playerInfos[conn] = playerInfo;

            Debug.Log(string.Format("Player {0} is joining in the party {1}", playerInfo.displayName, playerInfo.isPartyA ? "A" : "B"));

            // Start the game if total players connected and total players are same
            if (totalPlayersConnected == totalPlayers)
            {

                foreach (NetworkConnection connection in playerInfos.Keys)
                {
                    connection.Send(new ClientStartClientResponseMessage { });
                }
                if (isServer)
                {
                    StartCoroutine(CountdownTimer());
                }
            }
        });
    }

    /// <summary>
    /// Server set the player stop time
    /// </summary>
    /// <param name="conn"> player's network connection</param>
    /// <param name="msg"> server's message</param>
    void OnServerStopTimerMessage(NetworkConnection conn, ServerRequestStopTimerMessage msg)
    {
        totalPlayersStop++;

        PlayerInfo playerInfo = playerInfos[conn];
        playerInfo.playerScoreTime = mainTime;
        playerInfos[conn] = playerInfo;

        Debug.Log($"Total player Stop: {totalPlayersStop}/{totalPlayers}");

        if (totalPlayersStop == totalPlayers)
        {
            StartCoroutine(CloseServer());
            OnServerStopGameplay();
        }
    }

    /// <summary>
    /// Server finish the round since all players have pressed the stop button
    /// </summary>
    void OnServerStopGameplay()
    {
        StopCoroutine("StopWatch");

        List<NetworkConnection> keysToUpdate = new List<NetworkConnection>();
        keysToUpdate.AddRange(playerInfos.Keys.ToArray());

        List<double> scores = new List<double>();
        for (int i = 0; i < keysToUpdate.Count; i++)
        {
            scores.Add(Mathf.Abs((float)(targetTime - playerInfos.Values.ToArray()[i].playerScoreTime)));
        }

        double currentHigherScore = 99999999.0f; // in this case the lower value is the winner
        for (int i = 0; i < scores.Count; i++)
        {
            if (scores[i] < currentHigherScore)
            {
                currentHigherScore = scores[i];
            }
        }

        int highscoreIndex = scores.FindIndex(x => x == currentHigherScore);

        for (int i = 0; i < keysToUpdate.Count; i++)
        {
            PlayerInfo playerInformation = playerInfos[keysToUpdate[i]];
            if (playerInformation.isPartyA == playerInfos[keysToUpdate[highscoreIndex]].isPartyA)
            {
                playerInformation.isWin = true;
            }
            else
            {
                playerInformation.isWin = false;
            }
            playerInfos[keysToUpdate[i]] = playerInformation;
        }

        foreach (NetworkConnection connection in playerInfos.Keys)
        {
            connection.Send(new ClientOnAllPlayerStopTime { allPlayerInfos = playerInfos.Values.ToArray(), targetTime = targetTime });
        }
    }

    /// <summary>
    /// Coroutine: Update loading countdown from 3 to 0
    /// </summary>
    /// <returns> wait for 1 second</returns>
    IEnumerator CountdownTimer()
    {
        for (int countdown = 3; countdown >= 0; countdown--)
        {
            foreach (NetworkConnection connection in playerInfos.Keys)
            {
                if (isServer)
                {
                    connection.Send(new ClientUpdateCountdownTimerMessage { time = countdown });
                }
            }

            yield return new WaitForSeconds(1.0f);

            if (countdown == 0)
            {
                // Set target time

                // random target time with range a to b seconds
                targetTime = Random.Range(3.0f, 9.0f);

                // send targetTime value to all client
                foreach (NetworkConnection connection in playerInfos.Keys)
                {
                    connection.Send(new ClientChangeToGameplayStateMessage { targetTime = targetTime });
                }

                StartCoroutine(MainTime());
            }
        }
    }

    /// <summary>
    /// Coroutine: Update current running mainTime
    /// </summary>
    /// <returns></returns>
    IEnumerator MainTime()
    {
        while (true)
        {
            mainTime += Time.deltaTime;

            foreach (NetworkConnection connection in playerInfos.Keys)
            {
                connection.Send(new ClientUpdateMainTimeMessage { mainTime = mainTime });
            }

            yield return null;
        }
    }

    /// <summary>
    /// Unregister server and close the server automatically after the time is timeout
    /// </summary>
    /// <param name="timeout"></param>
    /// <returns></returns>
    IEnumerator CloseServer(int timeout = 30)
    {
        Debug.Log("Start countdown to close server");

        for (int i = 0; i < timeout; i++)
        {
            yield return new WaitForSeconds(1.0f);
        }

        ArmadaHandler.UnregisterServer(isLocal);
    }

    /// <summary>
    /// On client start, change panel to ReadyPanel
    /// </summary>
    /// <param name="msg"> client's message</param>
    void OnStartClientResponse(ClientStartClientResponseMessage msg)
    {
        gameCanvas.ChangePanel(GameplayInterfaceState.Loading);
    }

    /// <summary>
    /// On loading countdown, update LoadingPanel's UI
    /// </summary>
    /// <param name="msg"></param>
    void OnUpdateCountdownTime(ClientUpdateCountdownTimerMessage msg)
    {
        gameCanvas.UpdateLoadingPanelUI(msg.time);
    }

    /// <summary>
    /// Change panel to GameplayPanel and start the game
    /// </summary>
    /// <param name="msg"></param>
    void OnChangeToGameplayState(ClientChangeToGameplayStateMessage msg)
    {
        gameCanvas.ChangePanel(GameplayInterfaceState.Gameplay);
        gameCanvas.UpdateTargetTimeUI(msg.targetTime);
    }

    /// <summary>
    /// On current mainTime update, update mainTime to its UI
    /// </summary>
    /// <param name="msg"></param>
    void OnUpdateMainTime(ClientUpdateMainTimeMessage msg)
    {
        gameCanvas.UpdateMainTimeUI(msg.mainTime);
    }

    /// <summary>
    /// On all players have pressed the stop button, finish the game
    /// </summary>
    /// <param name="msg"></param>
    void OnAllClientStopTime(ClientOnAllPlayerStopTime msg)
    {
        gameCanvas.ChangePanel(GameplayInterfaceState.Result);
        gameCanvas.UpdateResultPanelUI(msg.allPlayerInfos, msg.targetTime);
    }

    private void OnApplicationQuit()
    {
#if UNITY_SERVER
        ArmadaHandler.UnregisterServer(isLocal);
#endif
    }
}
Related Concepts
- Read the Matchmaking documentation to learn more about our matchmaking service.