Matchmaking
Overview
AccelByte Cloud's Matchmaking service allows parties to be paired to compete against each other in your game. With AccelByte Cloud's Matchmaking services, you can create your own matchmaking rules (MMR) for how parties are matched. MMR is used to determine how parties are matched up under ideal conditions. You can also create flex rules, which dictate how to match parties when ideal matches aren't possible. These flex rules usually include time limits for the matchmaking process, to ensure that players don't have to wait too long to play your game.
Like our Cloud Party services, Cloud Matchmaking uses WebSocket to ensure real-time updates for players. Here's the basic flow of our matchmaking service:
Start Matchmaking A party leader can make a request to initiate the matchmaking process.
Confirm Players are Ready During the matchmaking process, each player needs to confirm they are ready to play. When all of the players are ready to start, the game will begin.
Re-matchmaking Matchmaking will restart if any players in the matchup aren't ready to play.
Cancel Matchmaking Party leaders can cancel the matchmaking process before it's completed.
Players need to be in a party to use matchmaking. The Cloud Matchmaking service supports parties with single users or multiple users, and also supports matching parties with an asymmetrical number of users, e.g. a party with 1 user vs. a party with 3 users. You can configure all of the matchmaking rules in our Admin Portal.
Prerequisites
Before implementing the Matchmaking service, you need to define the Statistics that will be used by the Matchmaking service to match players together.
Set Up the Matchmaking Channel in the Admin Portal
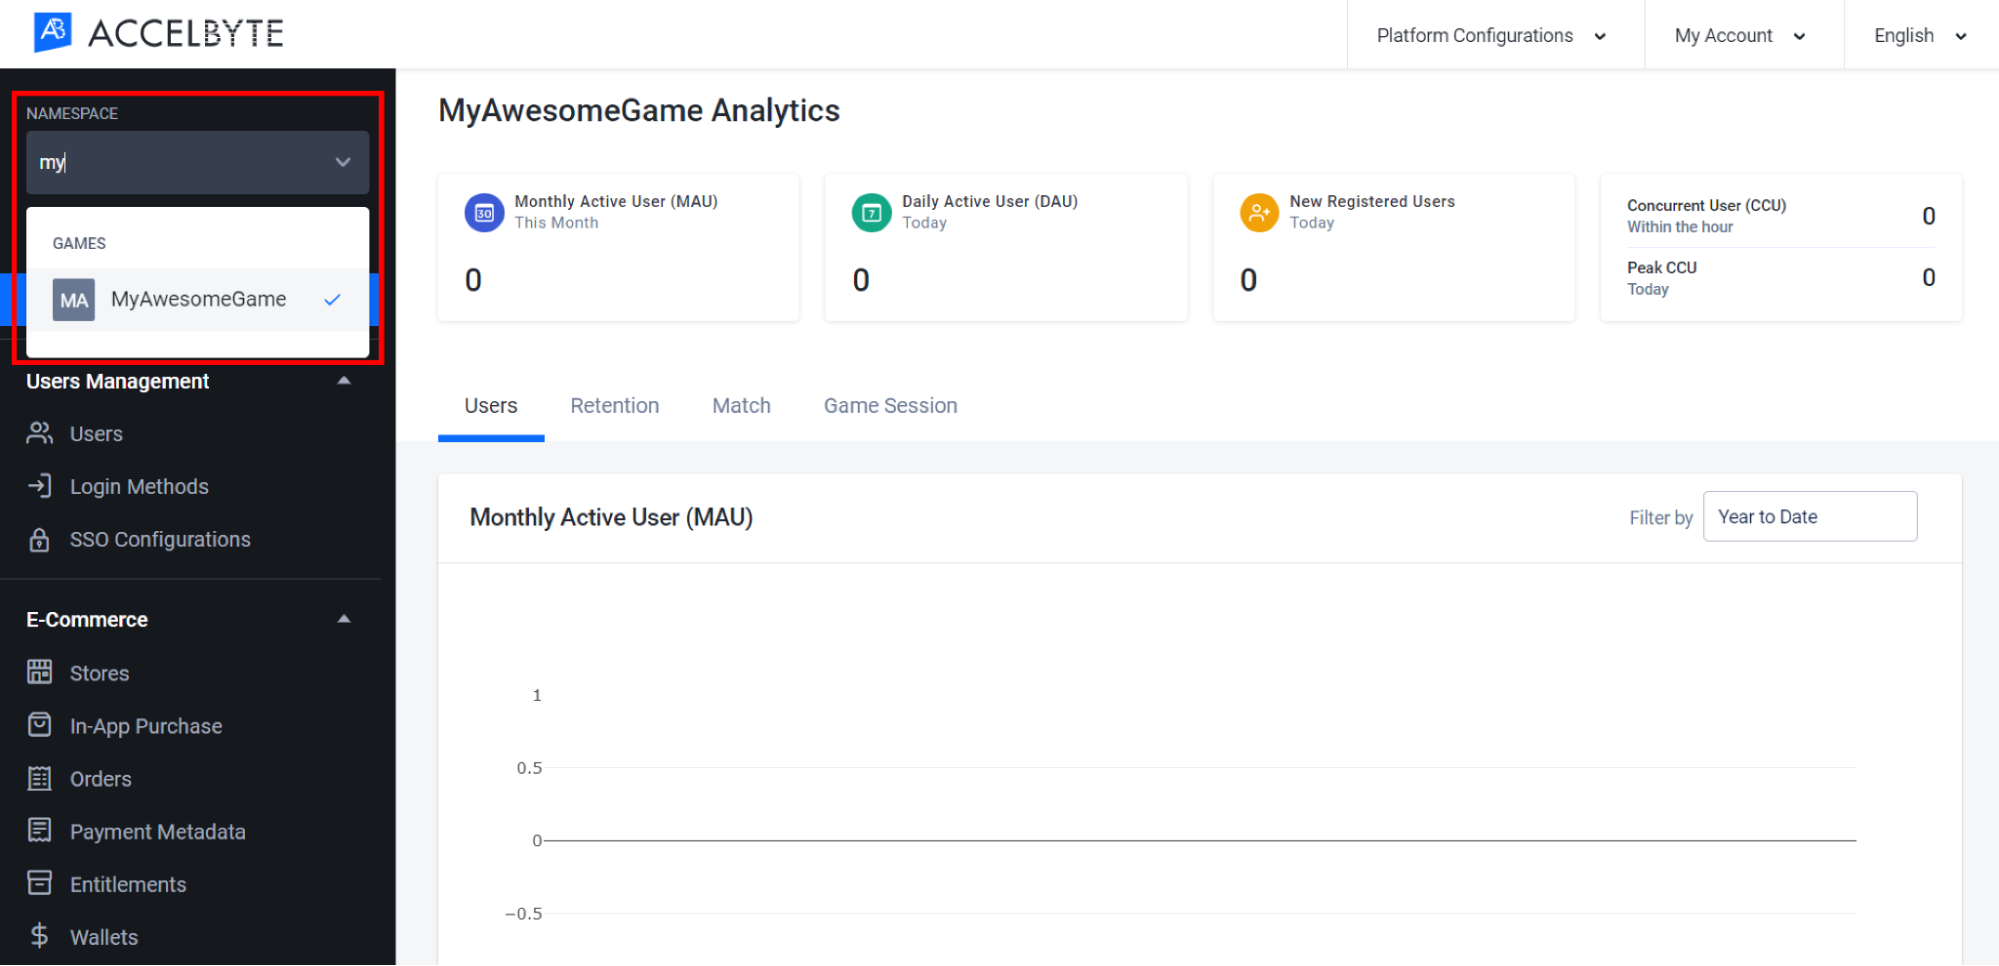
First, you need to choose your Game Namespace in the Admin Portal
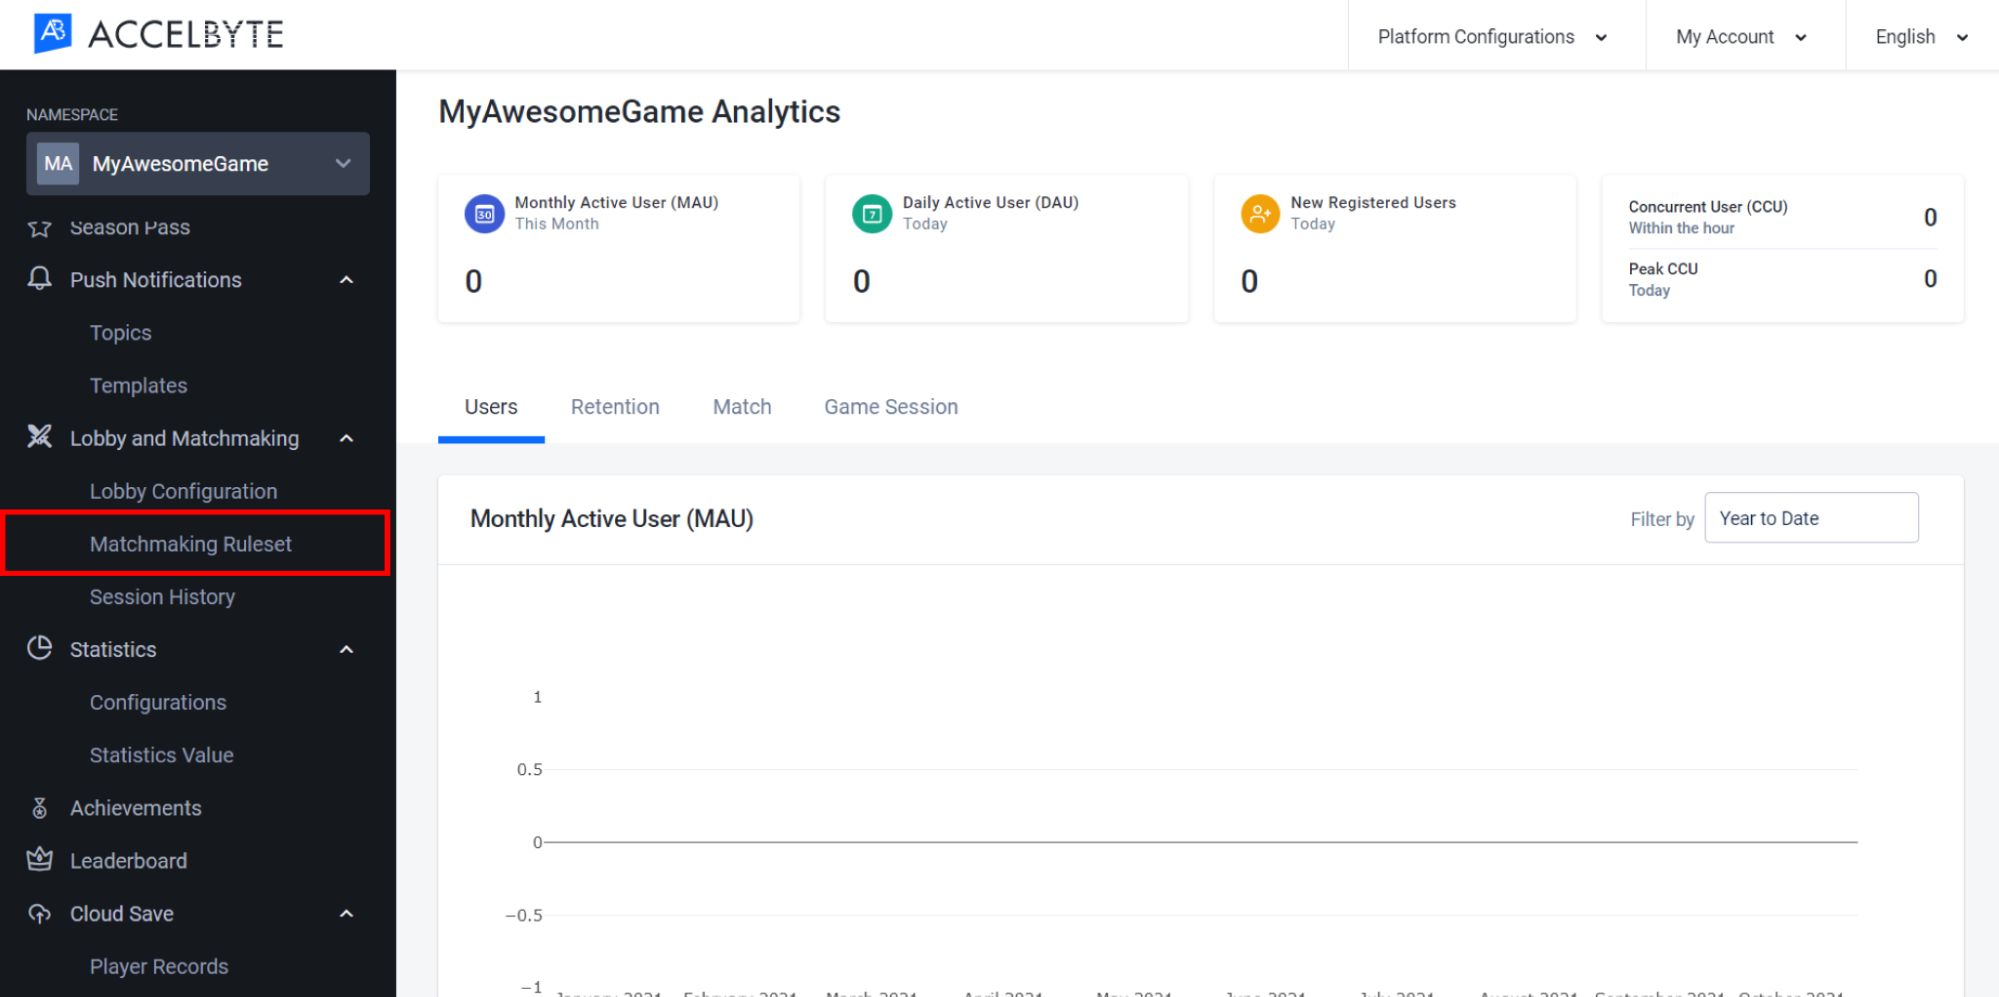
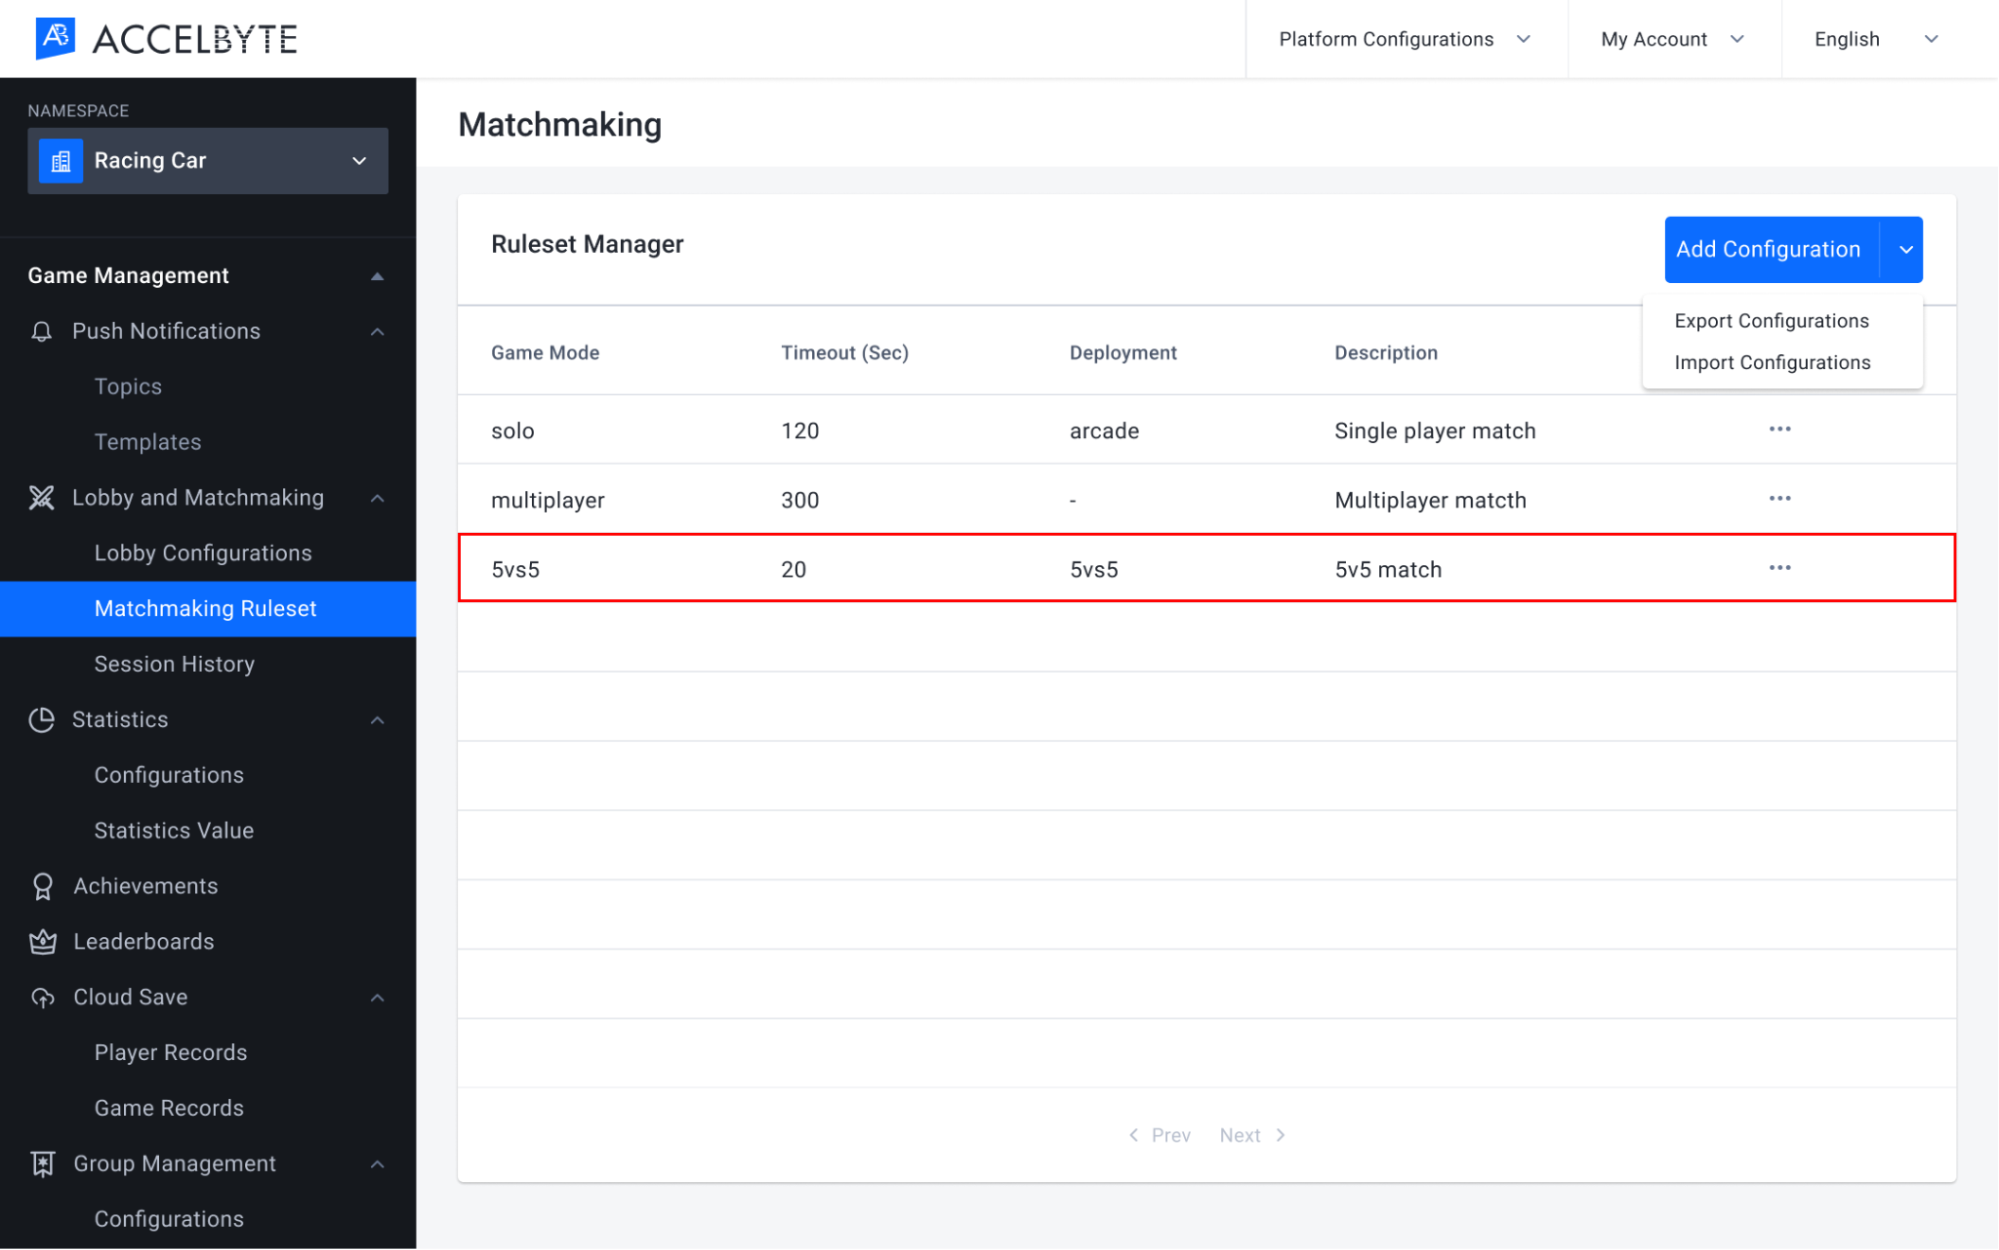
In the Game Management section, open the Lobby and Matchmaking section and click Matchmaking Ruleset.
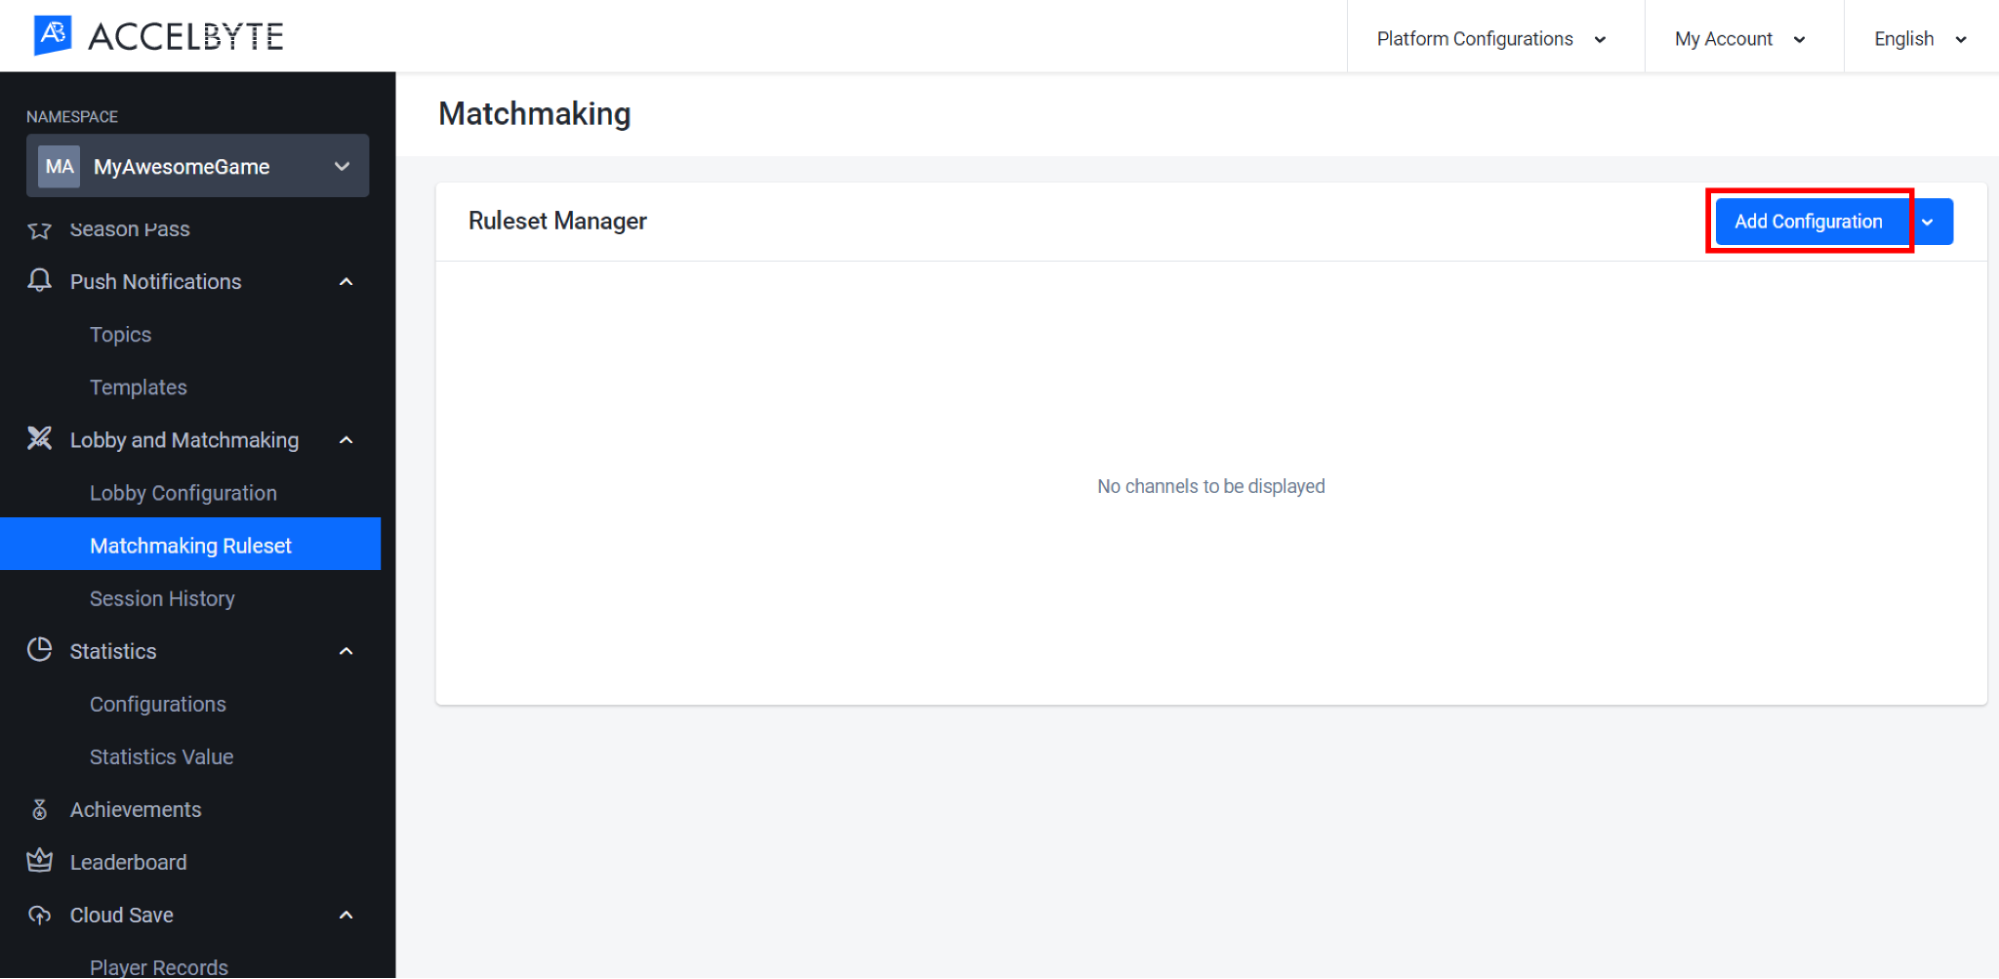
On the Matchmaking page, click Add Configuration to create a new matchmaking channel.
The Create Ruleset wizard will appear. Fill in the required information on each page.
Configuration
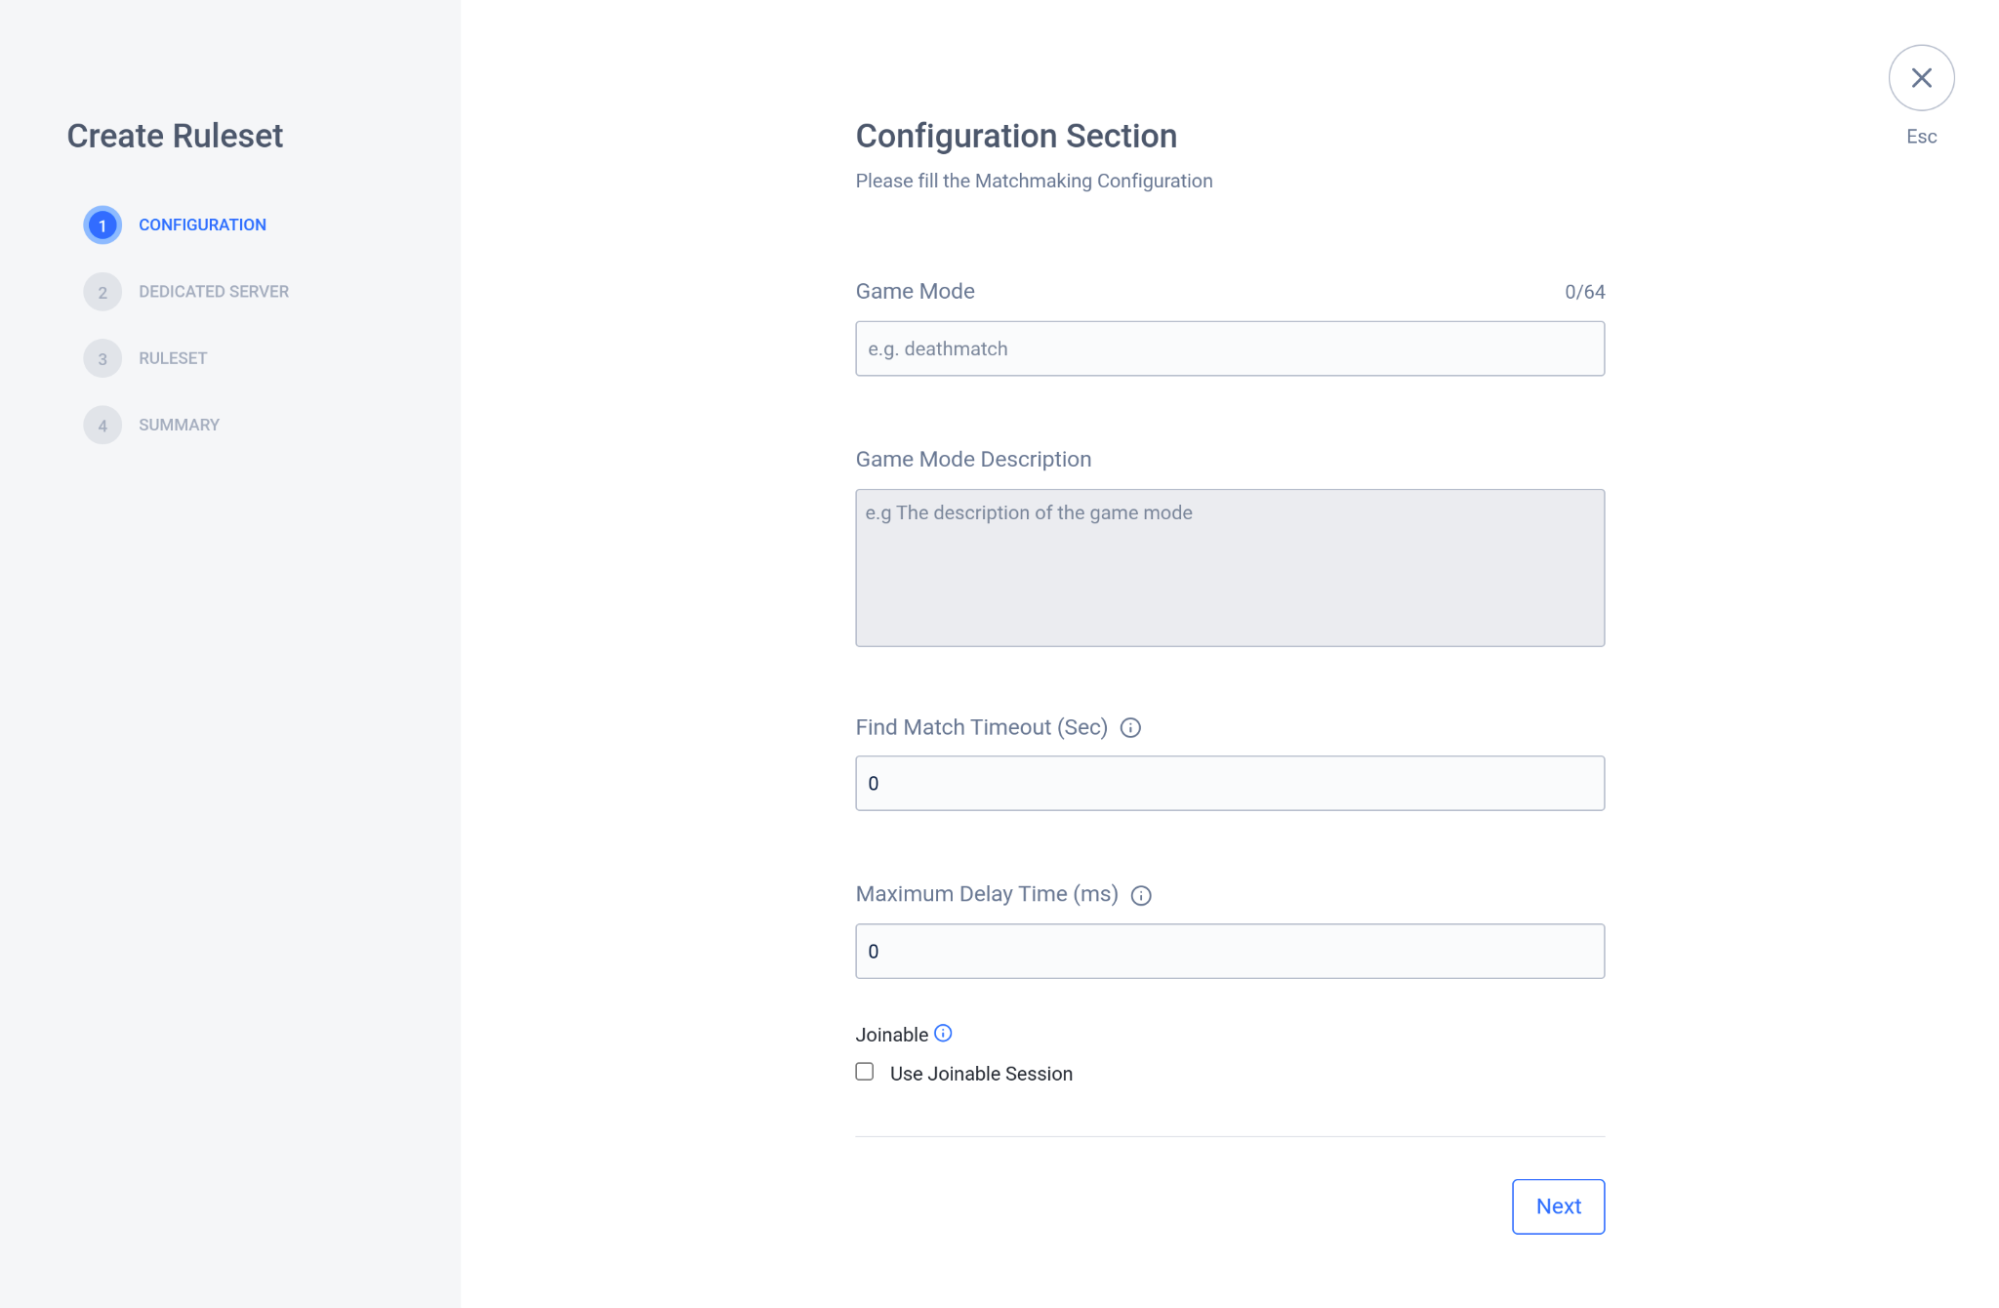
Input a name for the game mode in the Game Mode field.
Input a description of the game mode in the Game Mode Description field.
Input the amount of time, in seconds, that the game client should spend finding a match before timing out in the Find Match Timeout (sec) field.
Input the amount of time, in milliseconds, the game server will wait to assign a Match ID to a newly initiated match in the Maximum Delay TIme (ms) field.
TIP
The Maximum Delay Time can be used to help players be matched together in any situation where player count is low, such as during testing.
If you want your matchmaking to be joinable, select the Use Joinable Session option.
If you select Use Joinable Session, input how long, in seconds, a match should be joinable before timing out in the Joinable Session Timeout (sec) field.
IMPORTANT
Before you can implement joinable sessions, you must grant the following permission to your game server's IAM Client:
Usage
Resource
Action
Joinable Session
NAMESPACE:{namespace}:SESSION
Create, Read, Update, Delete
After filling in all of the fields in the Configuration section, click Next.
Dedicated Server
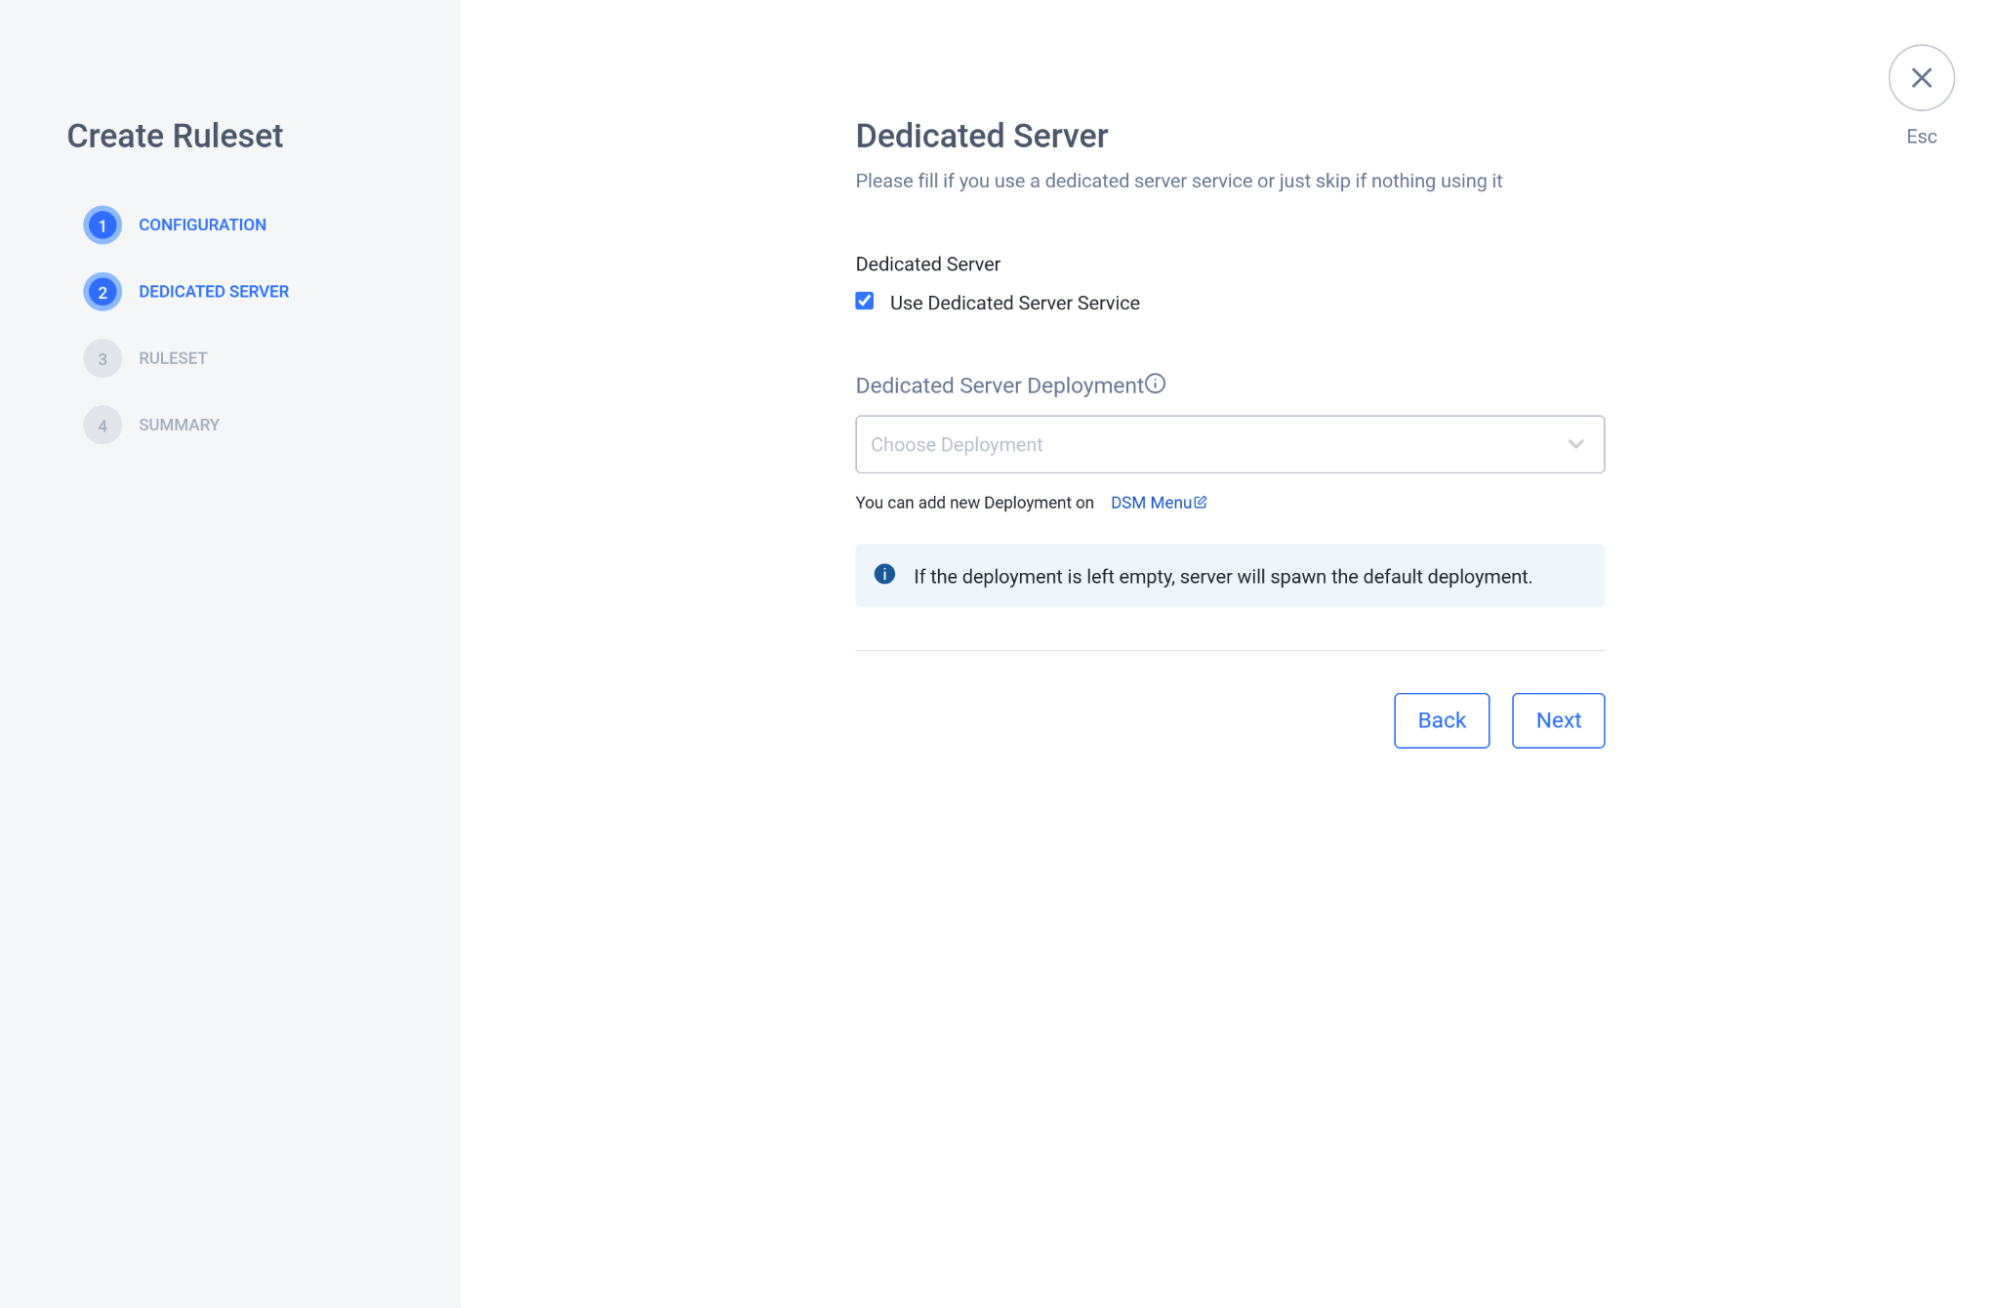
If you want to use Armada, select the Dedicated Server option.
- Choose the Dedicated Server Deployment. If the deployment is left empty, Armada will spawn the default deployment.
After filling the fields in the Dedicated Server section, click Next.
Ruleset
Choose Game Mode Only if your game only has one game mode.
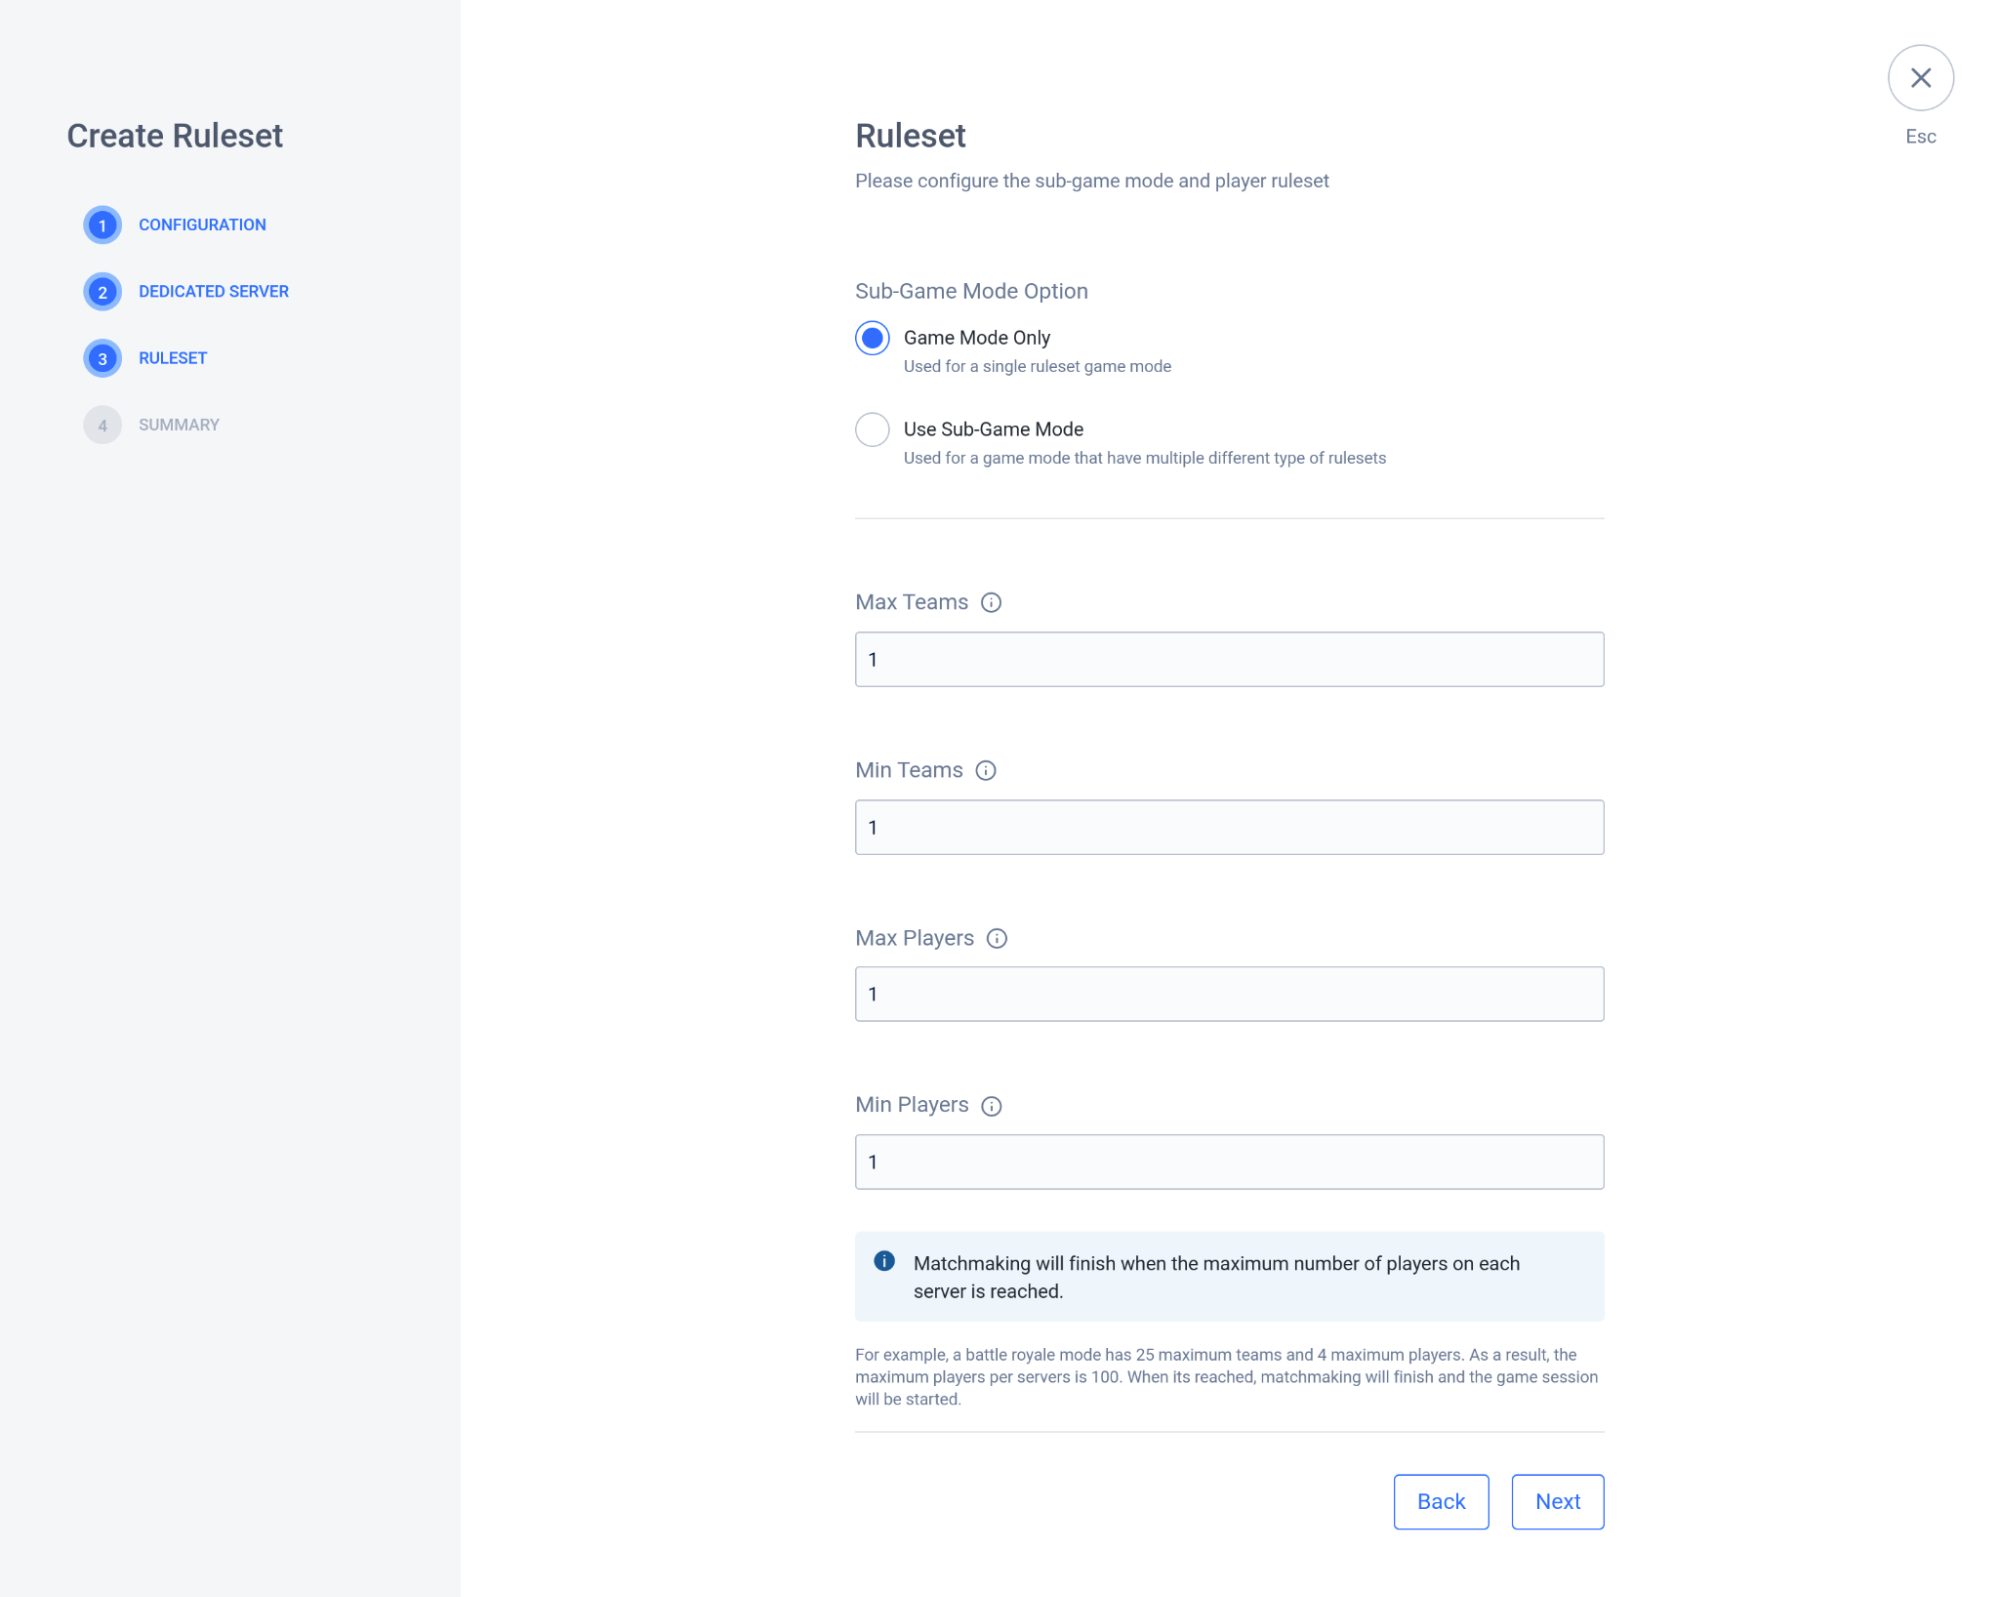
Input the maximum number of teams allowed in a match into the Max Teams field.
Input the minimum number of teams required for a match into the Min Teams field.
Input the maximum number of players allowed in a party into the Max Players field.
Input the minimum number of players required to form a party into the Min Players field.
Choose Sub Game Mode if your game hsa more than one game mode.
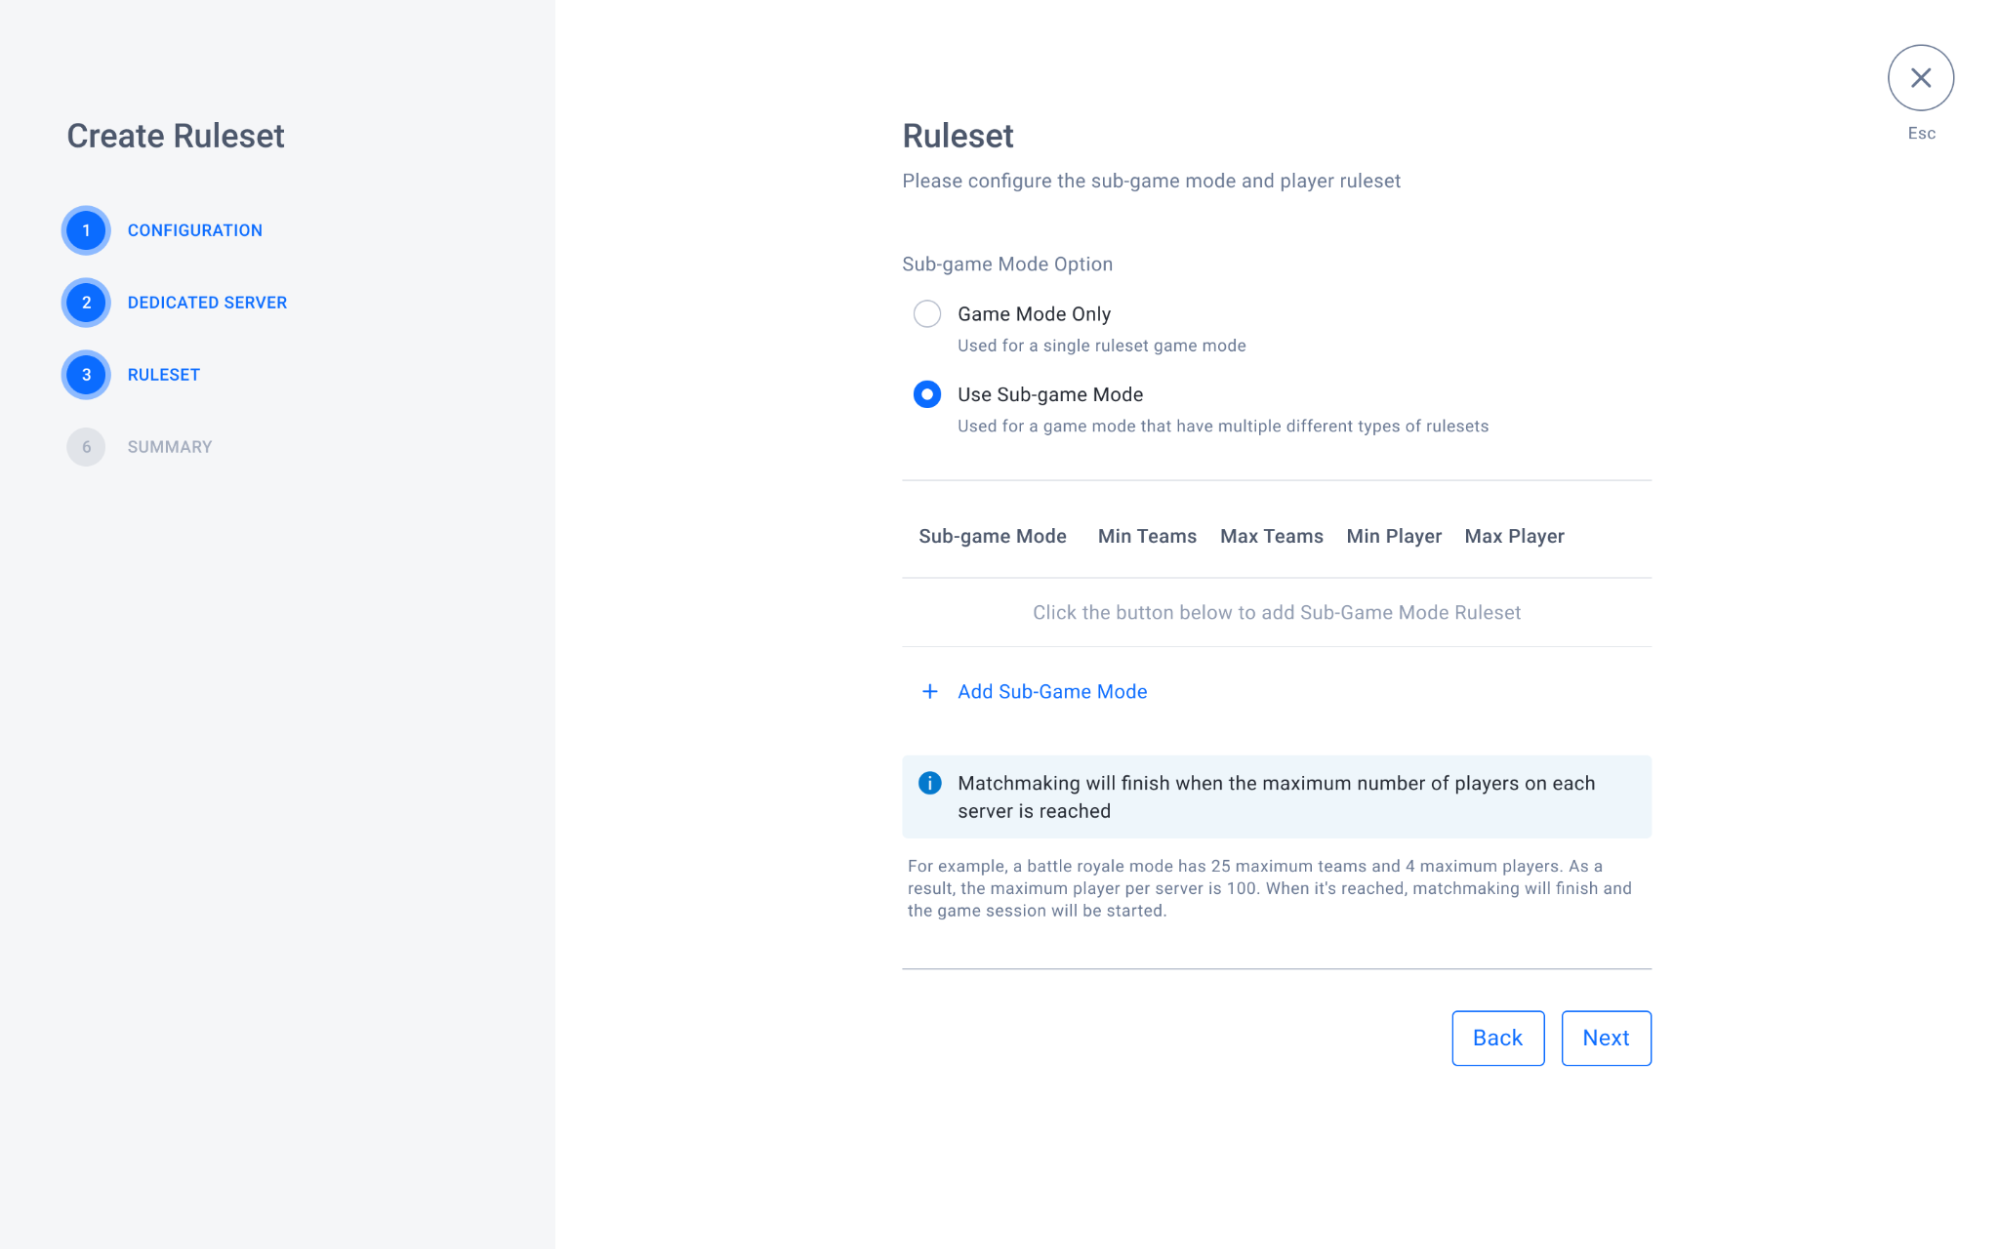
Click Add Sub-Game Mode to add a ruleset for one of your game modes.
The Add Ruleset form appears. Fill in the required fields, as seen below:
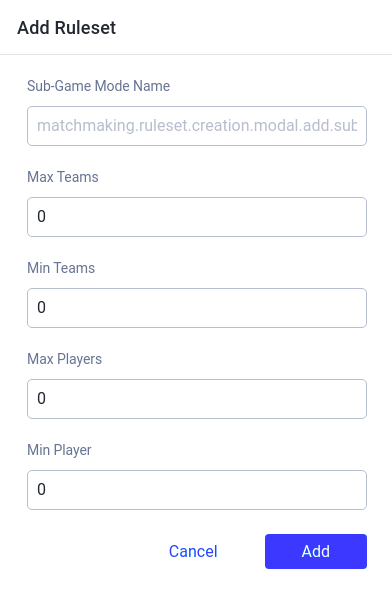
Input a name for the game mode in the Sub-Game Mode Name field.
Input the maximum number of teams allowed in a match into the Max Teams field.
Input the minimum number of teams required for a match into the Min Teams field.
Input the maximum number of players allowed in a party into the Max Players field.
Input the minimum number of players required to form a party into the Min Players field.
After filling the Add Ruleset form, click the Add button.
Repeat this step, creating a ruleset for each of your different game modes. Once completed, click Next.
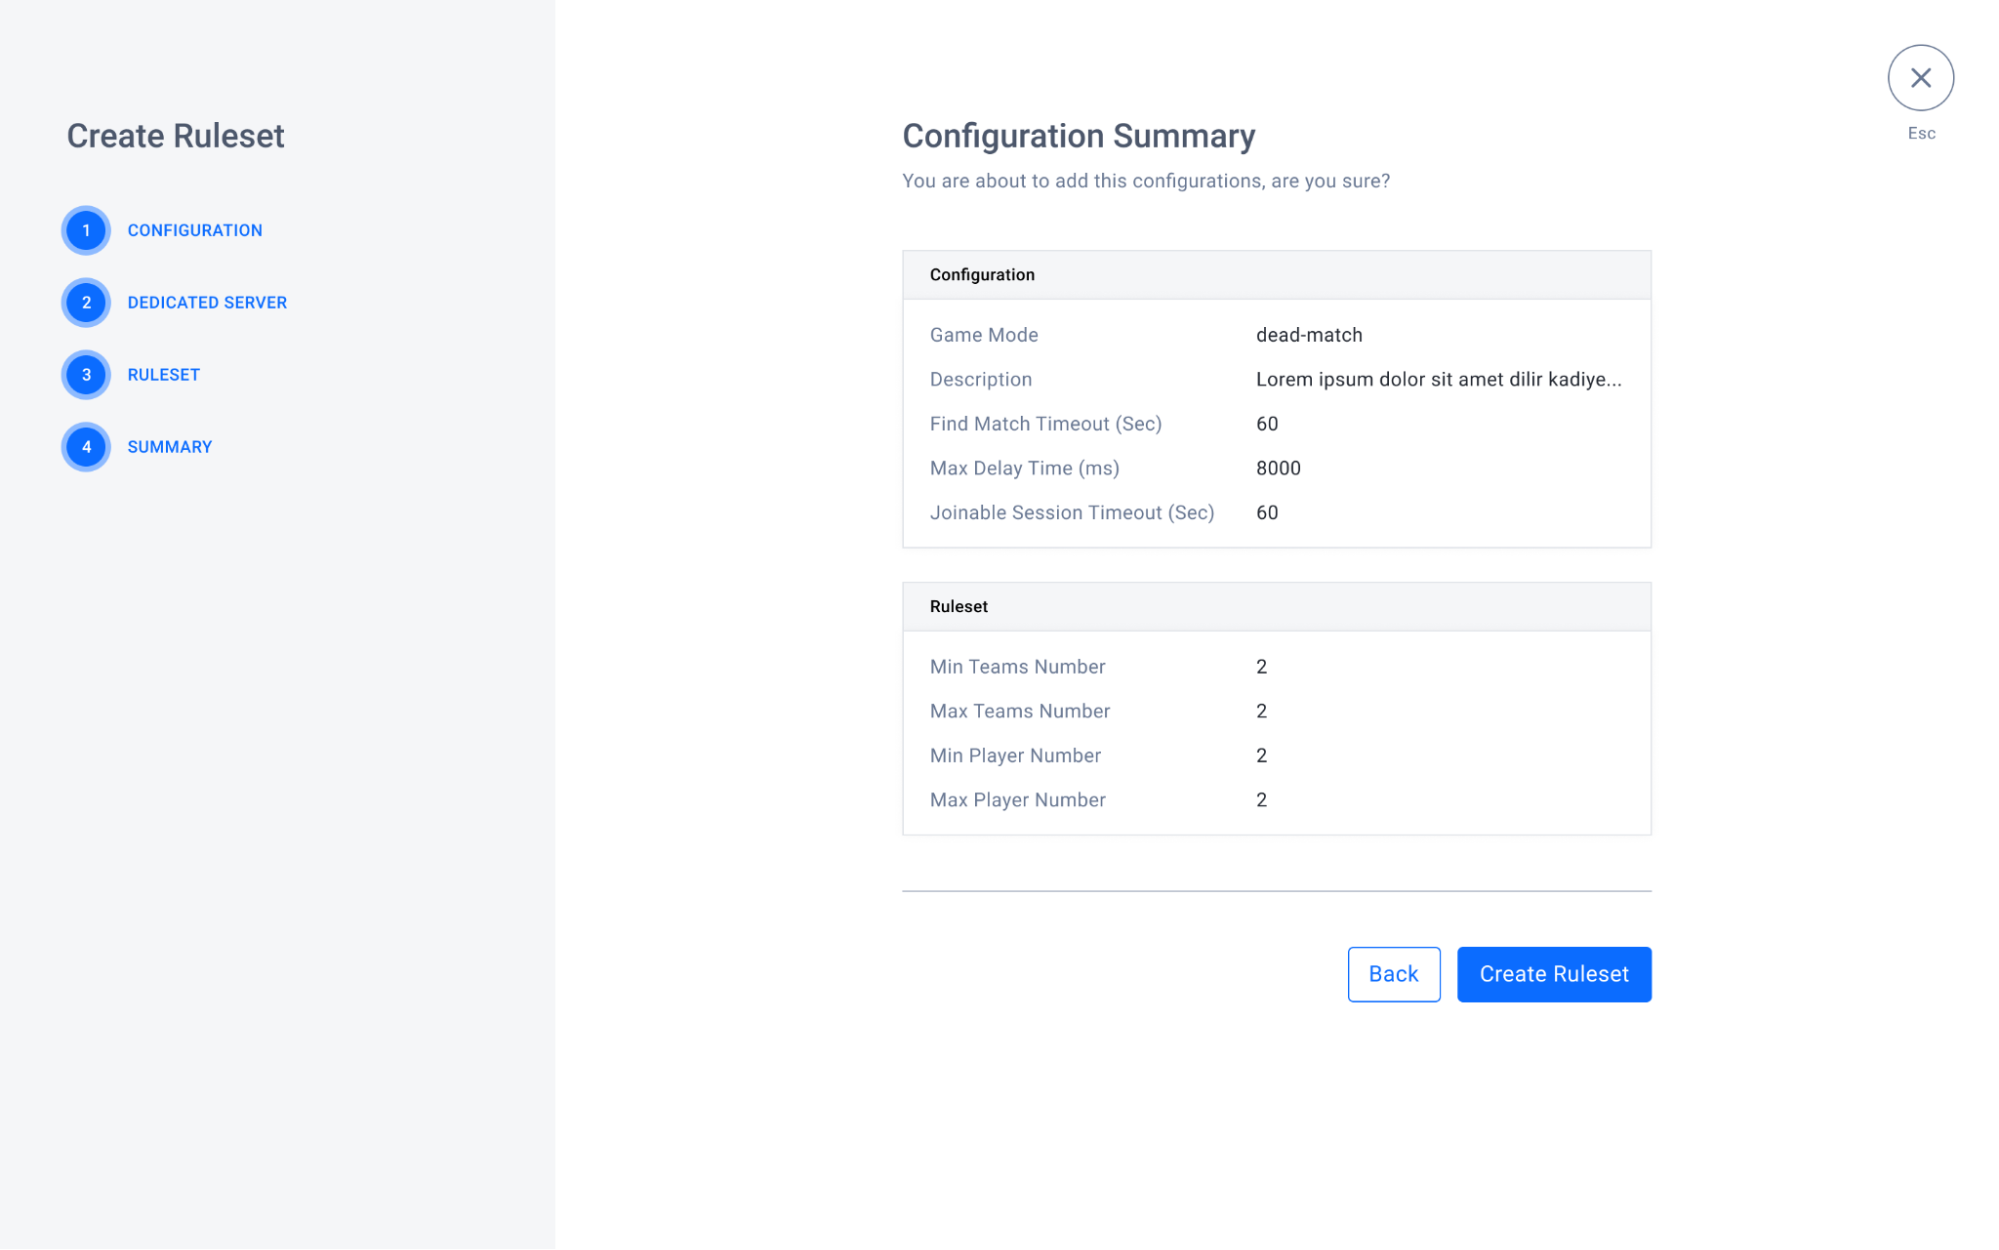
Summary
The summary of your configuration appears. Click Next to create the configuration.
Add Flexing Match Teams
After configuring your Match Team, you can add a Flexing Match Team rule to prevent players from timing out when not enough players are available for a standard Match Team. In the Flexing Match Team, you can define the rules and player numbers that apply after a set duration of time.
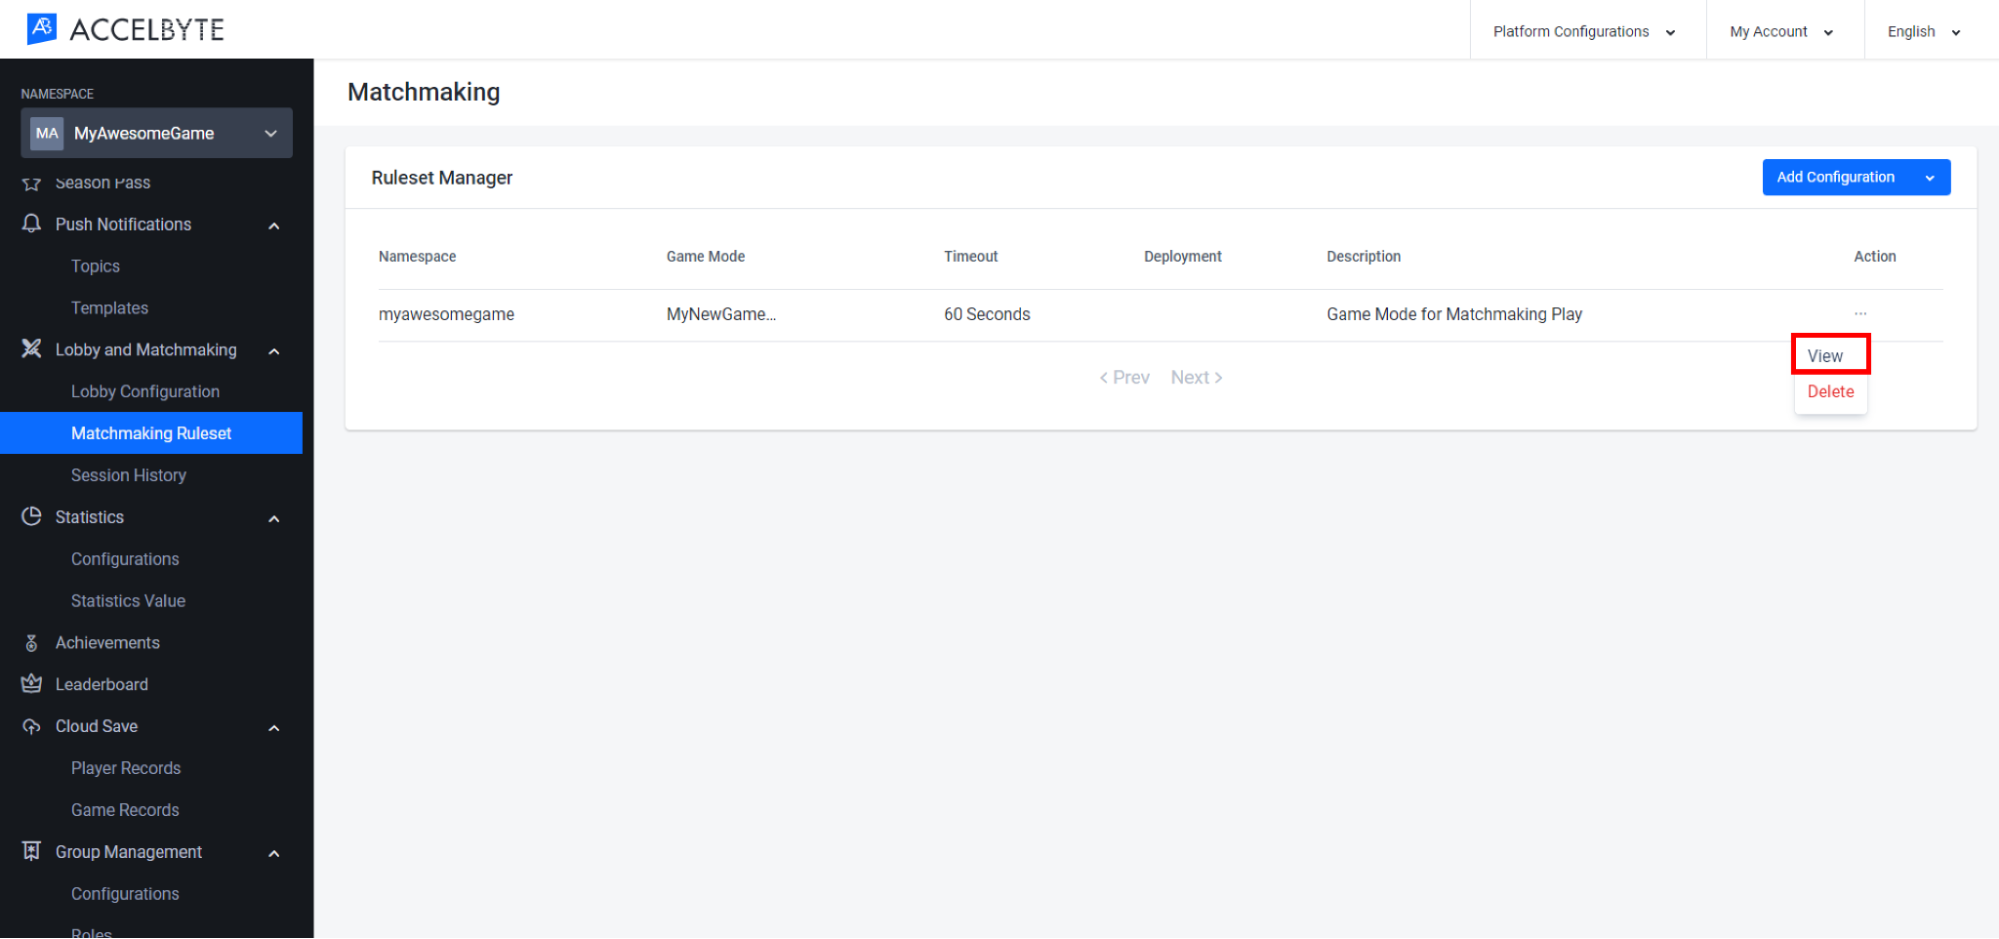
In the Admin Portal, go to the Matchmaking Ruleset page. Choose the Game Mode you wish to manage. In the Action column, click the ellipsis button and select View. You will be directed to the Matchmaking Configuration page.
Open the Match Teams tab, scroll down to the Flexing Match Teams section, and click the Add Flexing Team button.
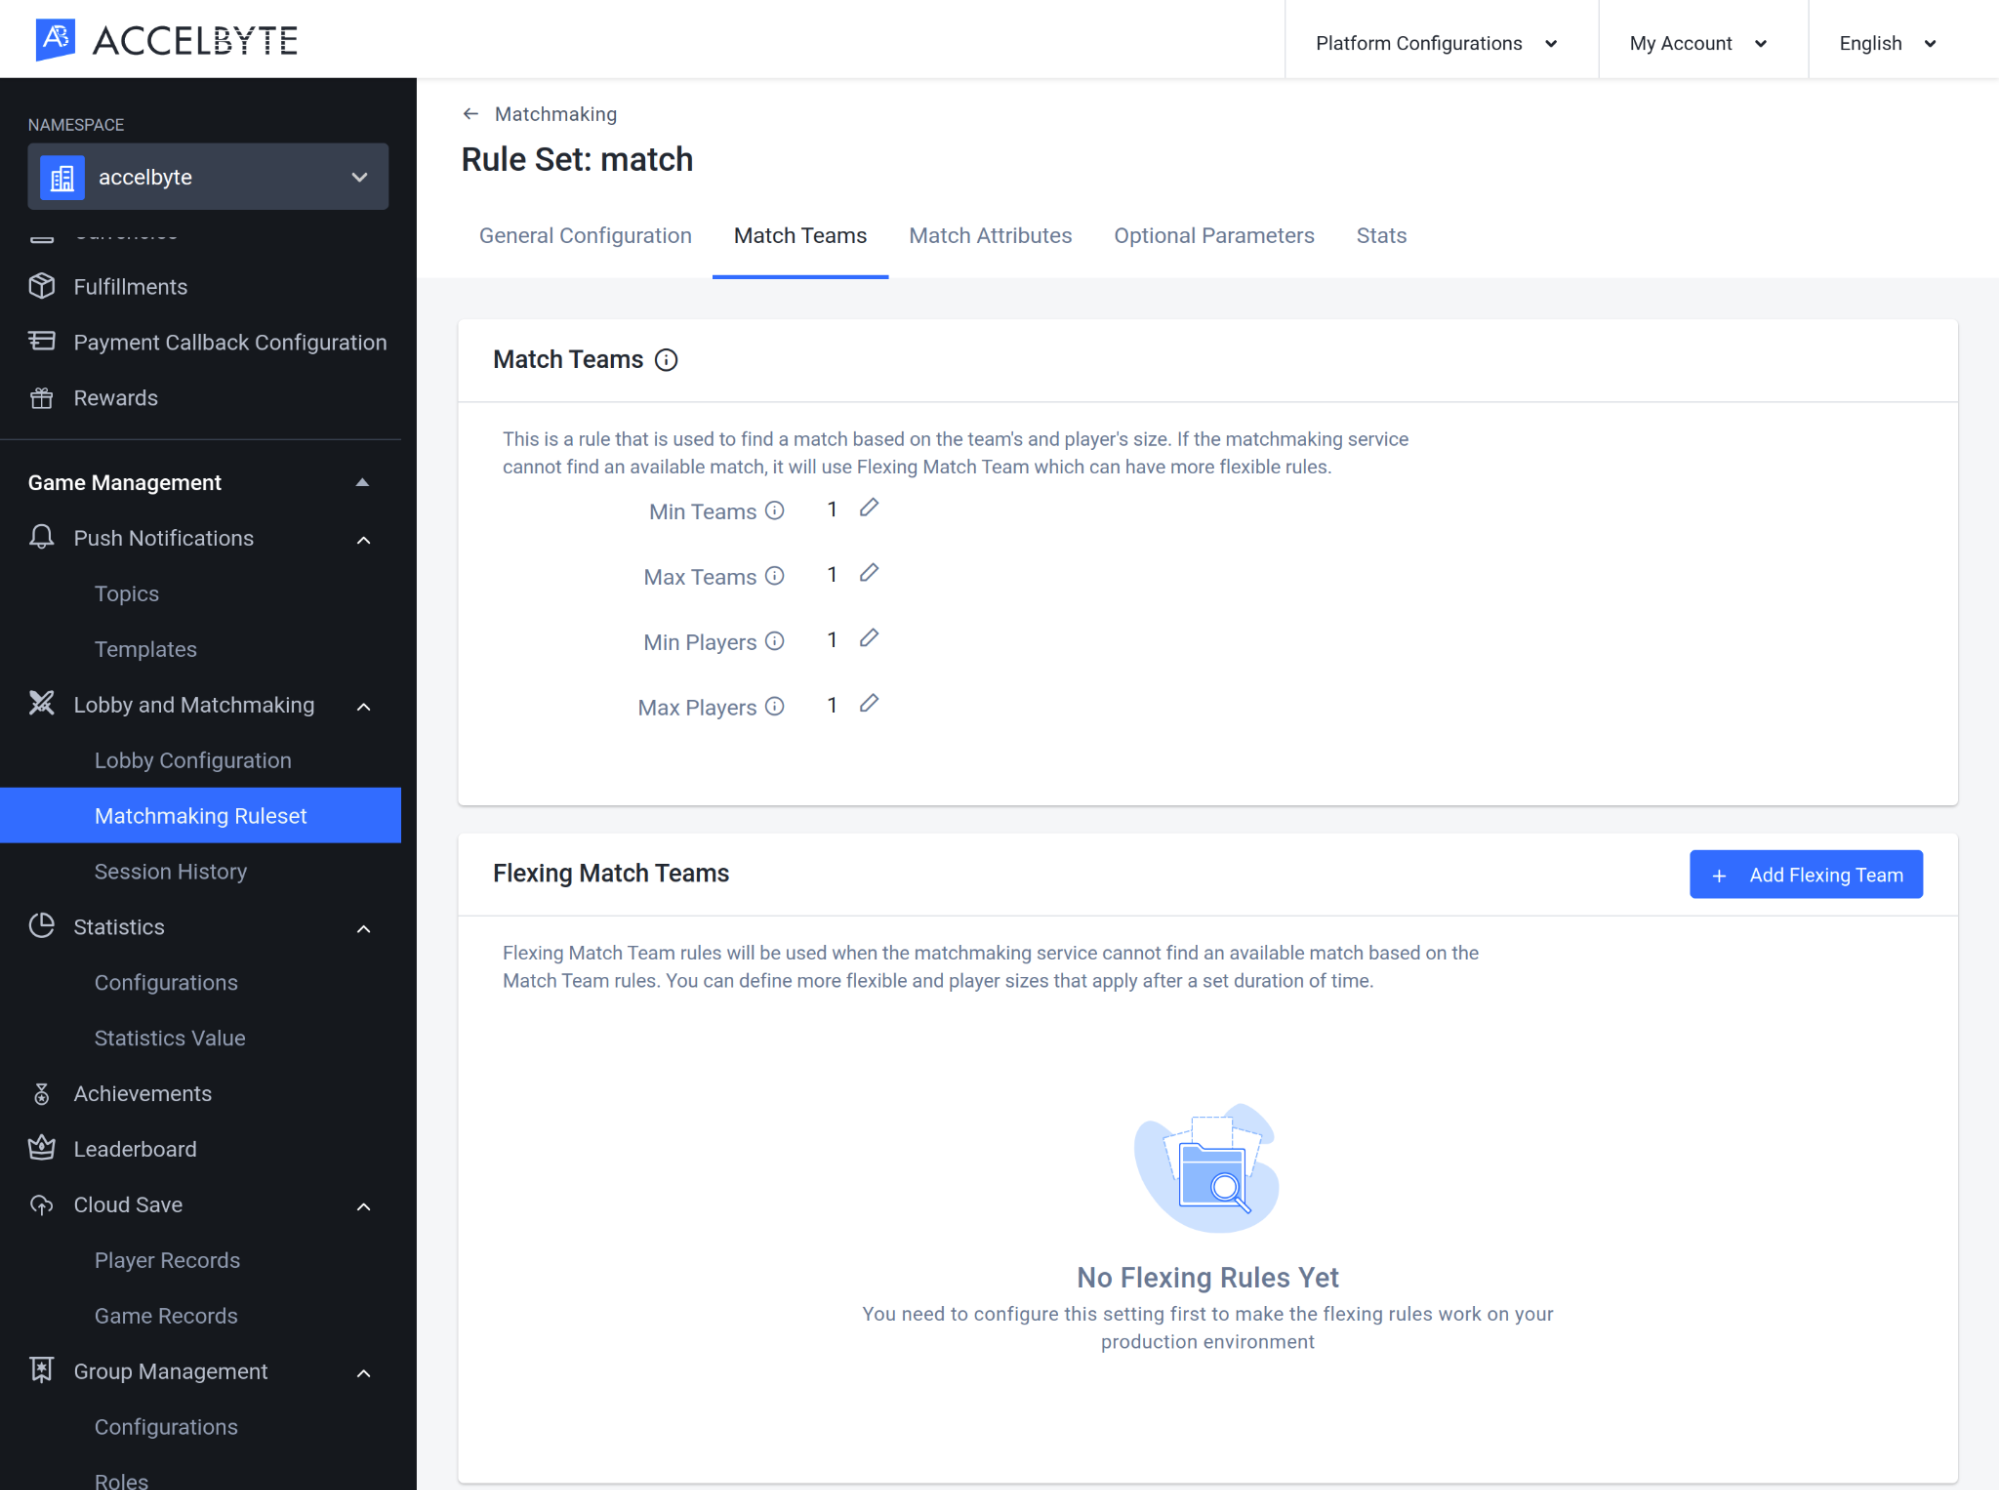
Fill in the Add Flexing Match Team Rule box with the required fields:
Input the minimum number of teams required for a match into the Min Teams field.
Input the maximum number of teams allowed in a match into the Max Teams field.
Input the minimum number of players required to form a party into the Min Players field.
Input the maximum number of players allowed in a party into the Max Players field.
Input the duration (in seconds) for the Flexing Team Rule to take effect into the Duration (Sec) field.
Once completed, click the Add button and the Flexing Match Team will be added to the list.

Matching Rules
In the Matching Rules, there are two types of attributes/rules. The main match rule will be used to find an available match, and the Flexing Match Rule will be used when the matchmaking service cannot find an available match based on the main match rules.
Add Matching Rules
In the Admin Portal, go to the Matchmaking Ruleset page. Choose the Game Mode to which you want to add matchmaking rules. In the Action column, click the ellipsis button and select View. You will be directed to the Matchmaking Detail page.

In the Match Attributes tab, go to the Match Attributes section, click the Add Main Rule button.
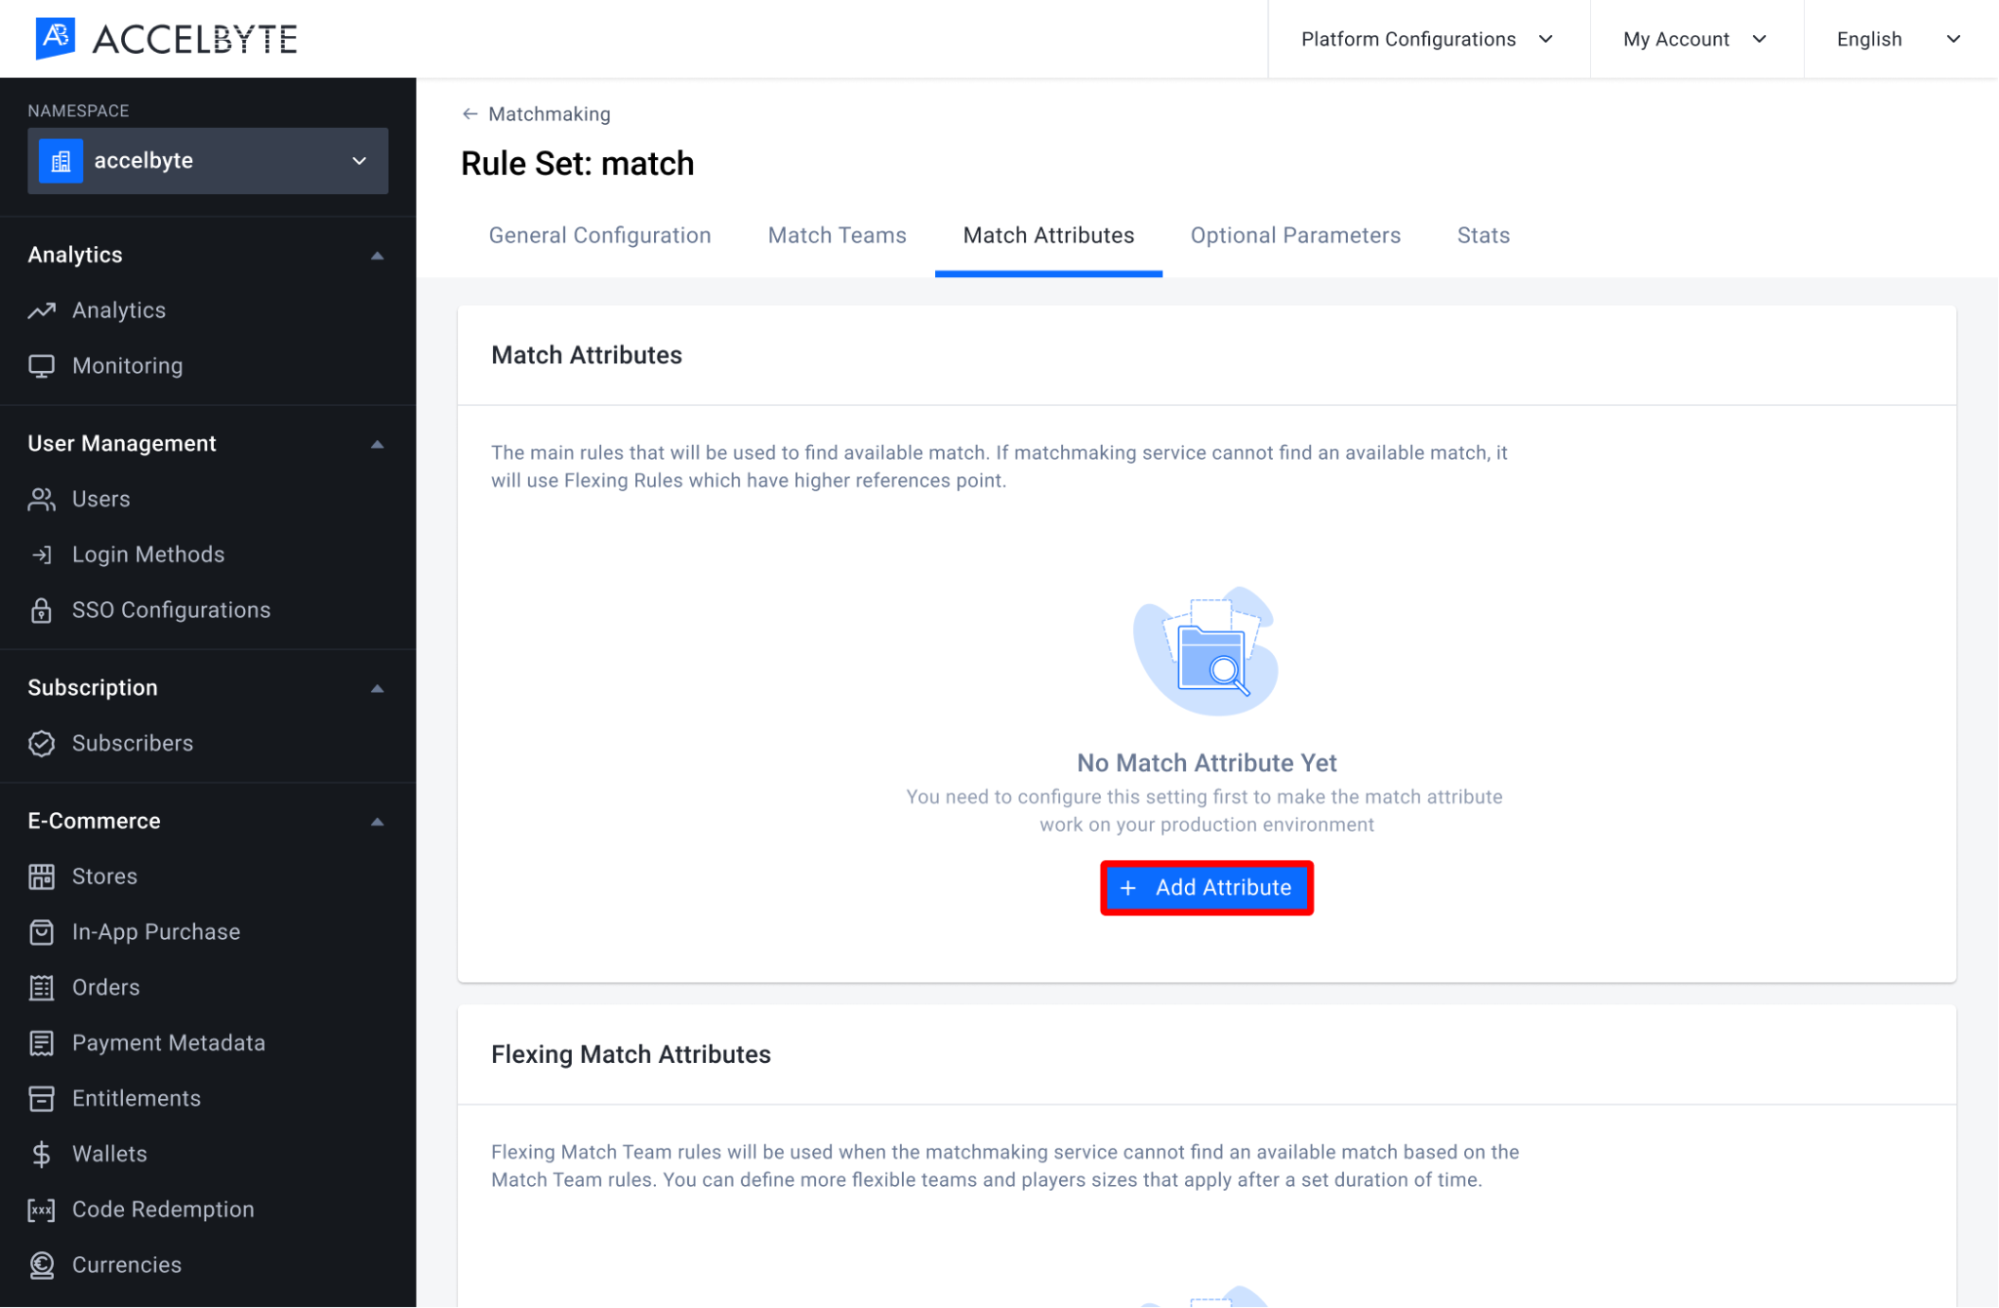
Fill in the required information in the form that appears.
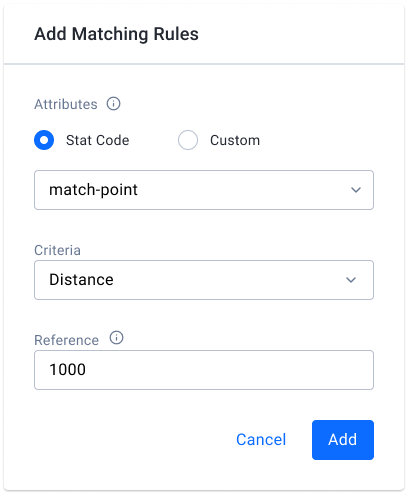
Choose the player attribute. You can choose Stat Code if you've already created the related statistic configuration, check Statistics documentation for more information to create new statistics. Otherwise, you can choose Custom if you want to use a custom attribute that doesn't have a stat code. For this example, we're going to choose a stat code.
Input the player Attribute field with the stat code you used when you configured the related statistic, e.g. match-point. You do not need to fill in this field if you selected Custom above.
Input the Criteria for matchmaking. Currently, the only supported value for criteria is Distance, which refers to the difference between players' attributes. Matchmaking will match players based on their attribute distance.
Input the Reference point or number used for the criteria. As an example, if the distance reference is 1000 and the player's attribute value is 2000, the matchmaking service will match players with attribute values between 1000 and 3000.
Click Add to continue. The matching rule will be added to the list.
Add Flexing Rules
On the Matchmaking Detail page, switch to the Match Attributes tab. In the Flexing Match Attributes section, click the Add Flexing Attribute button.
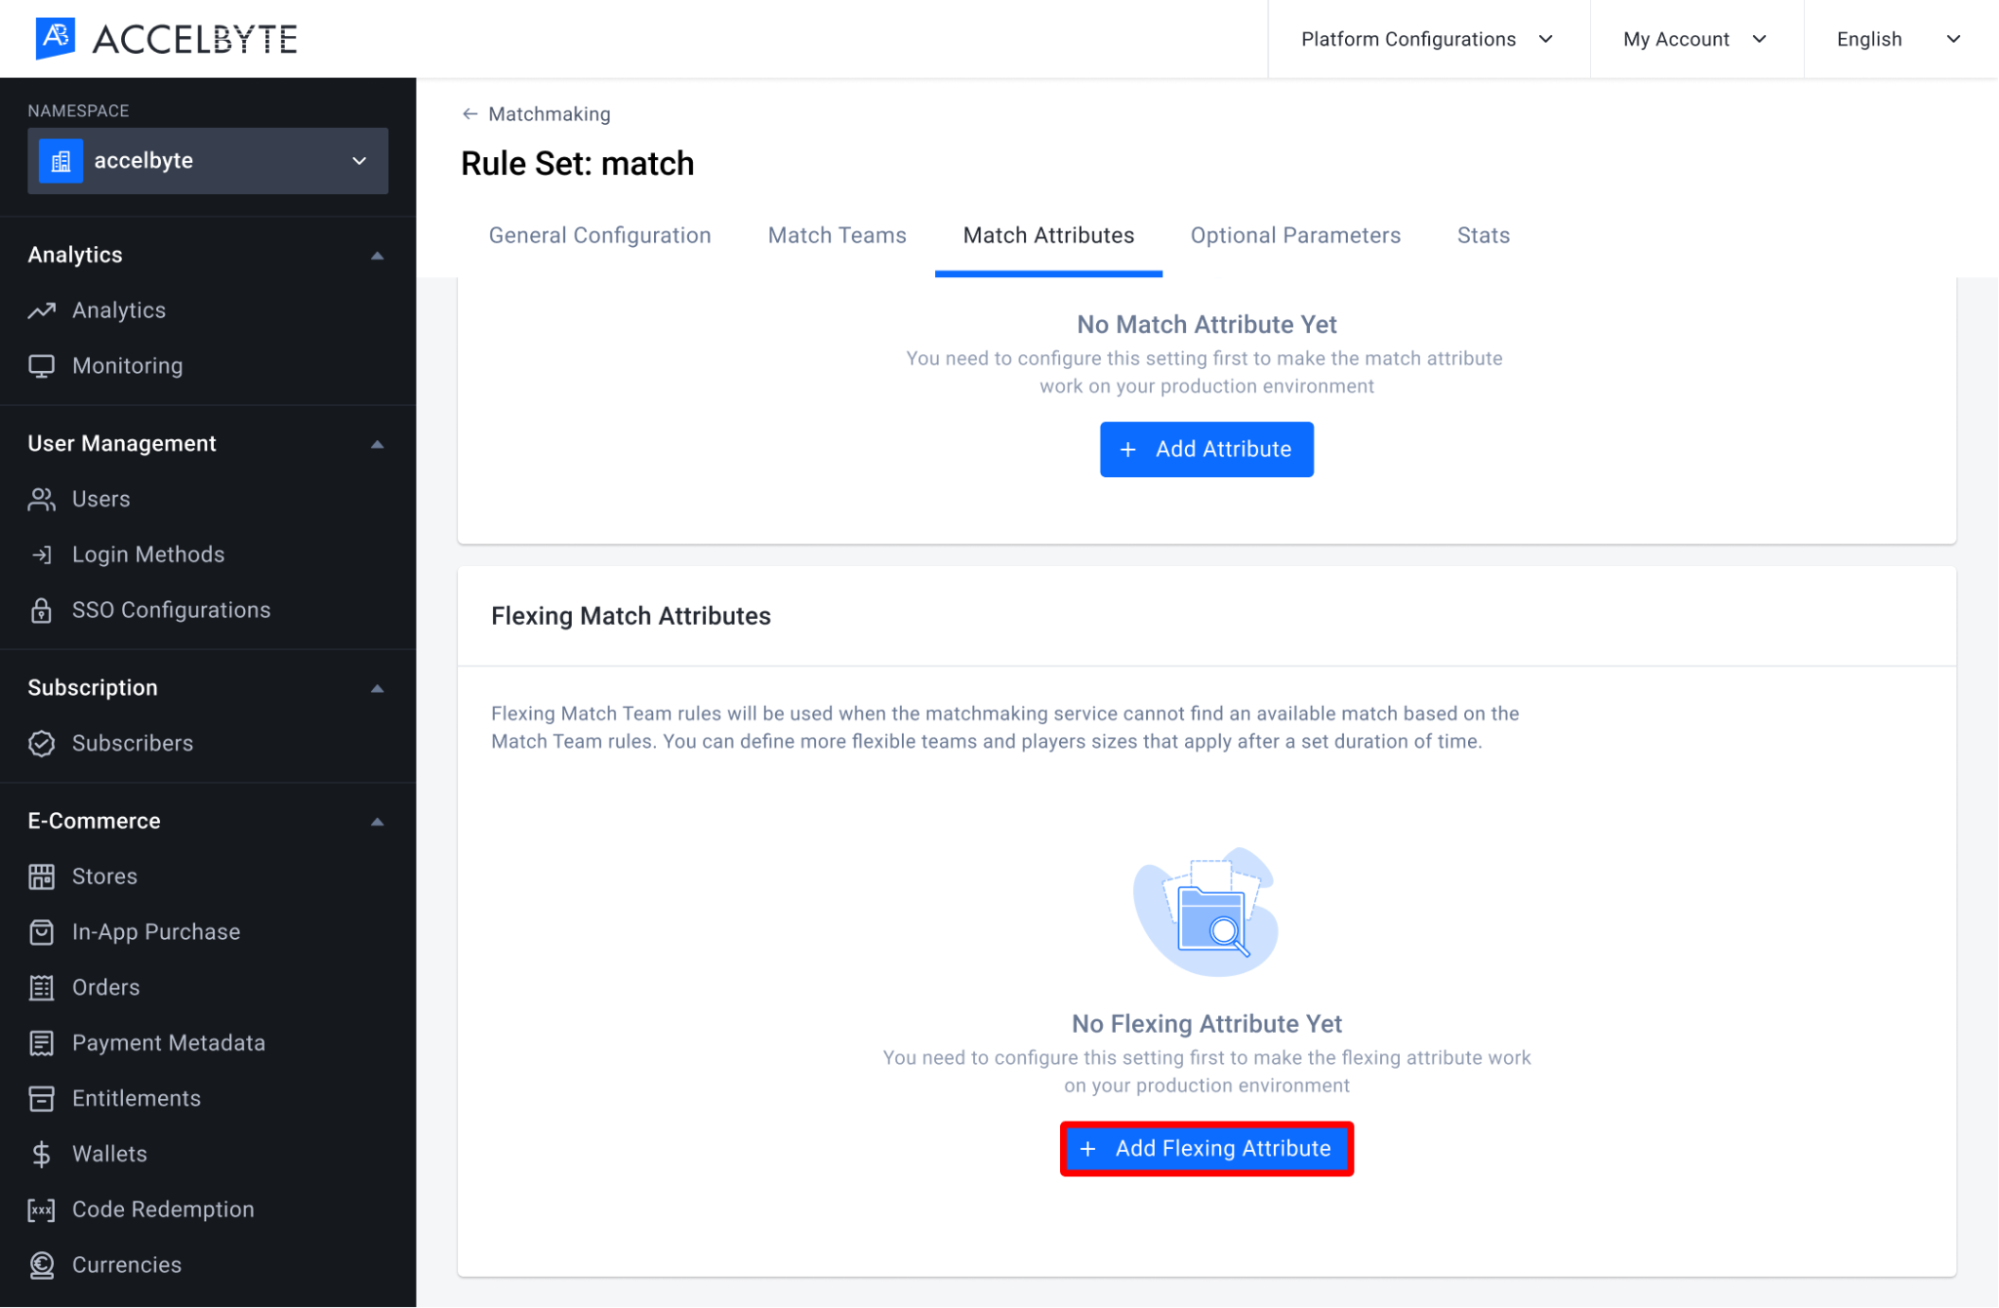
The Add Flexing Rules form will appear. Fill in the required fields.
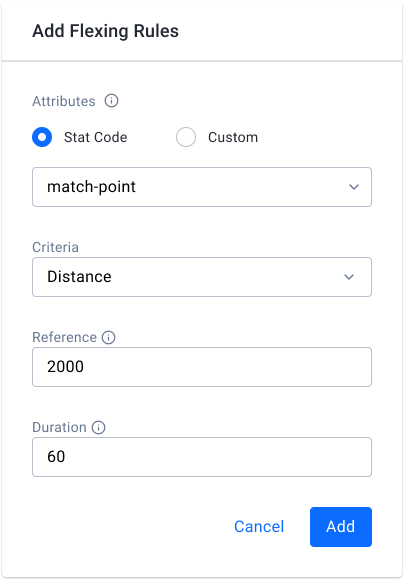
Choose the player attribute. You can choose Stat Code if you've already created the related statistic configuration, or choose Custom if you want to use a custom attribute that doesn't have a stat code. For this example, we're going to choose a stat code.
Input the player Attribute field with the stat code you used when you configured the related statistic, e.g. match-point. You do not need to fill in this field if you selected Custom above.
Input the Criteria for matchmaking. Currently, the only supported value for criteria is Distance, which refers to the difference between players' attributes.
Input the Reference point or number used for the criteria. The reference for the flexing rule should be higher than the matching rule since it's used to broaden the search for matchmaking. For example, if the matching rule distance value is 1000, then the flexing rule should be 2000, so it can widen the search for available players.
Input the Duration of time it will take for the flexing rules to take effect if no matches are found under the matching rules.
Click Add to save the rules. The new flexing rule will be added to the list.
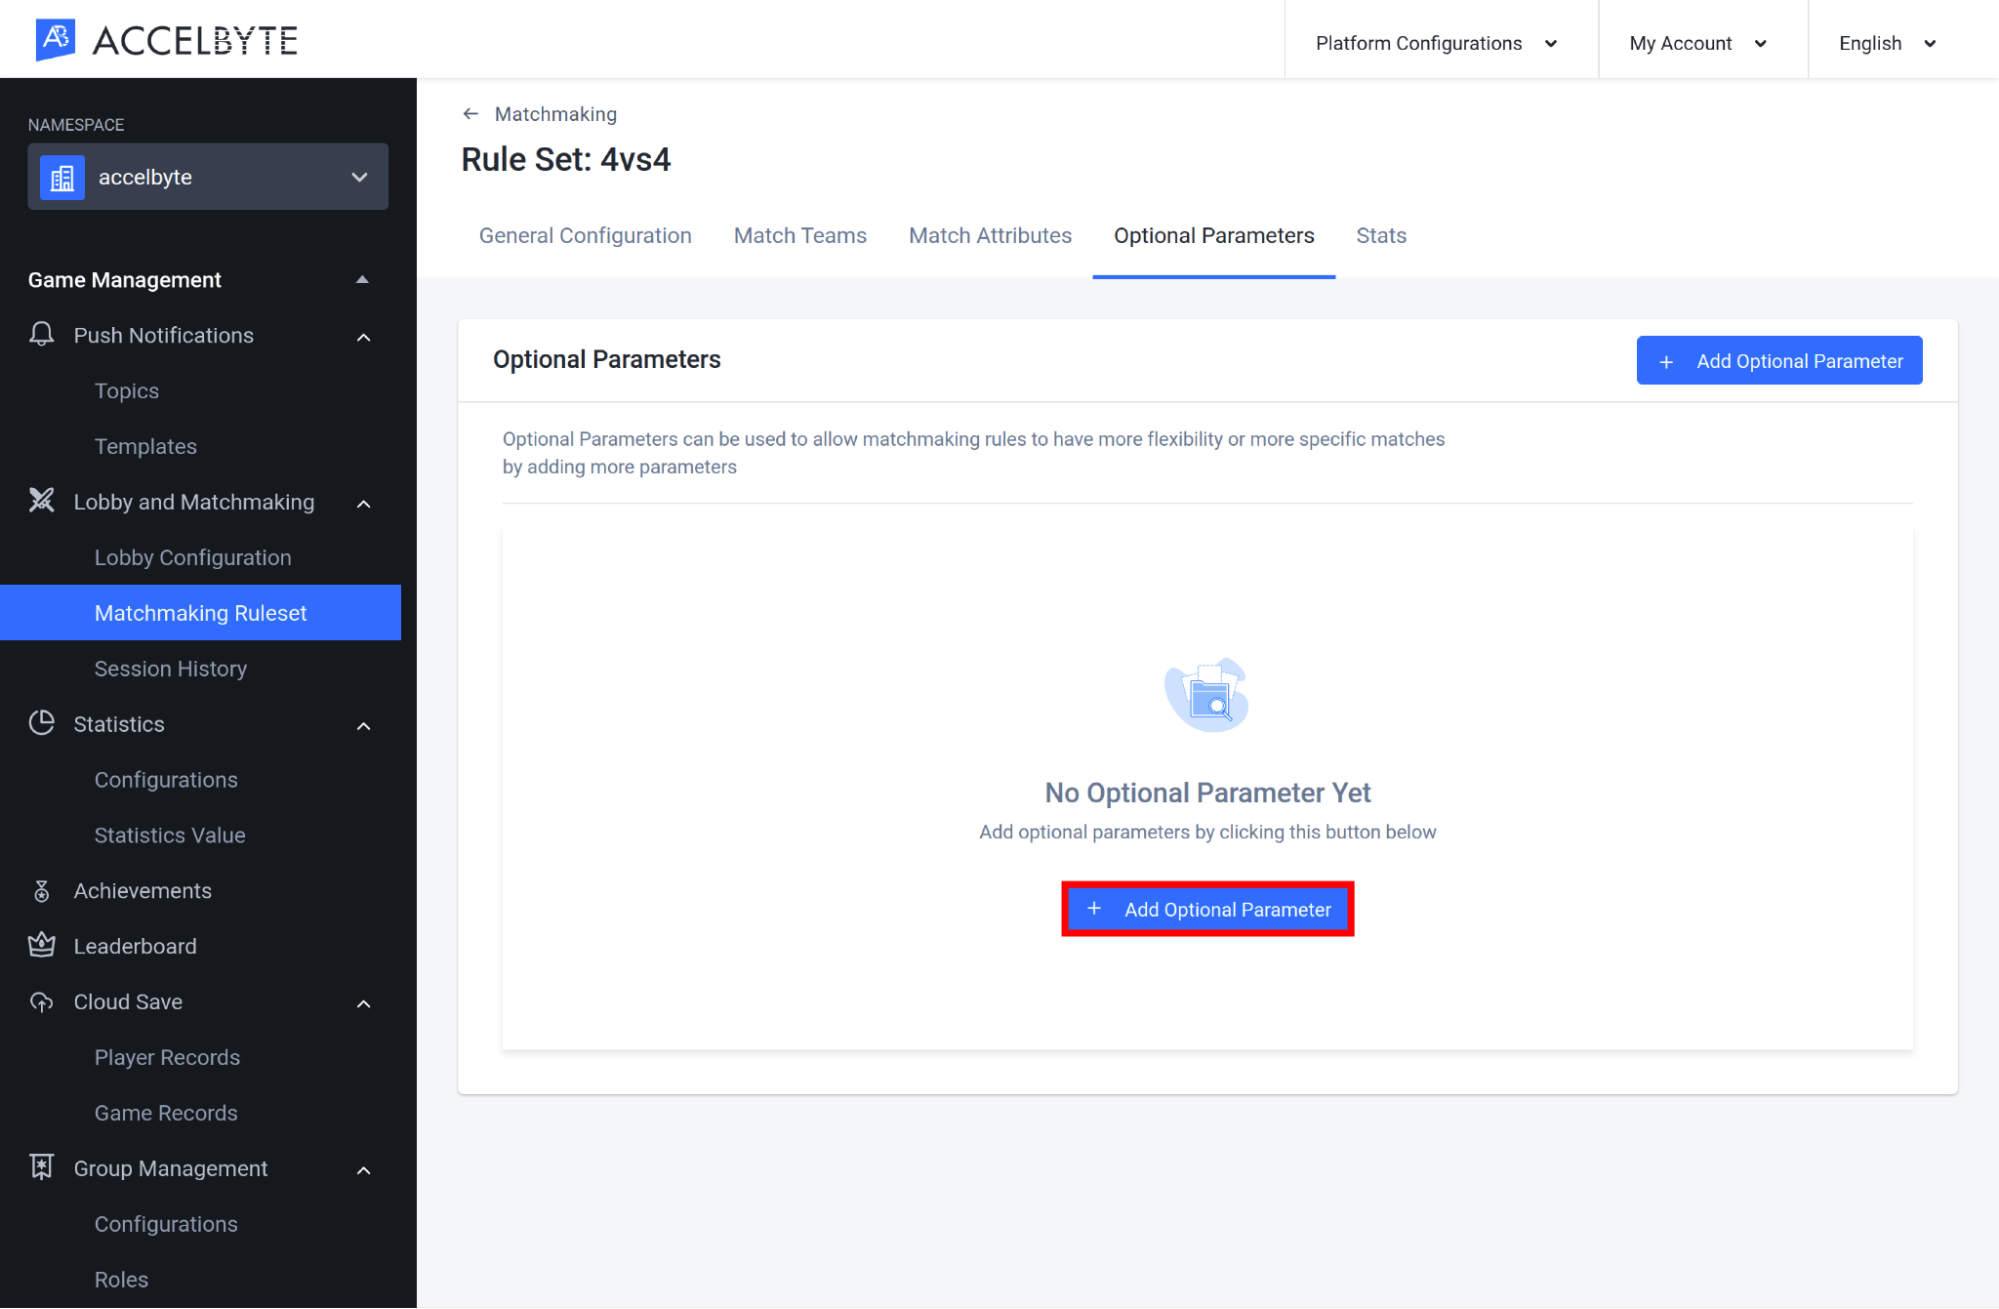
Add Optional Parameters
You can add optional parameters to your matchmaking rules by first defining the parameters you want, such as region or player level, and then define whether players should be matched when all of the chosen parameters match, when any of them match, or when none of them match. To add optional parameters to your matchmaking rules, follow the steps below.
On the Matchmaking Ruleset page of the Admin Portal, scroll to the Optional Parameters section at the bottom of the page and click Add Optional Parameter to add a new parameter.
The Add Optional Parameters form will appear. Fill it in with the required information.
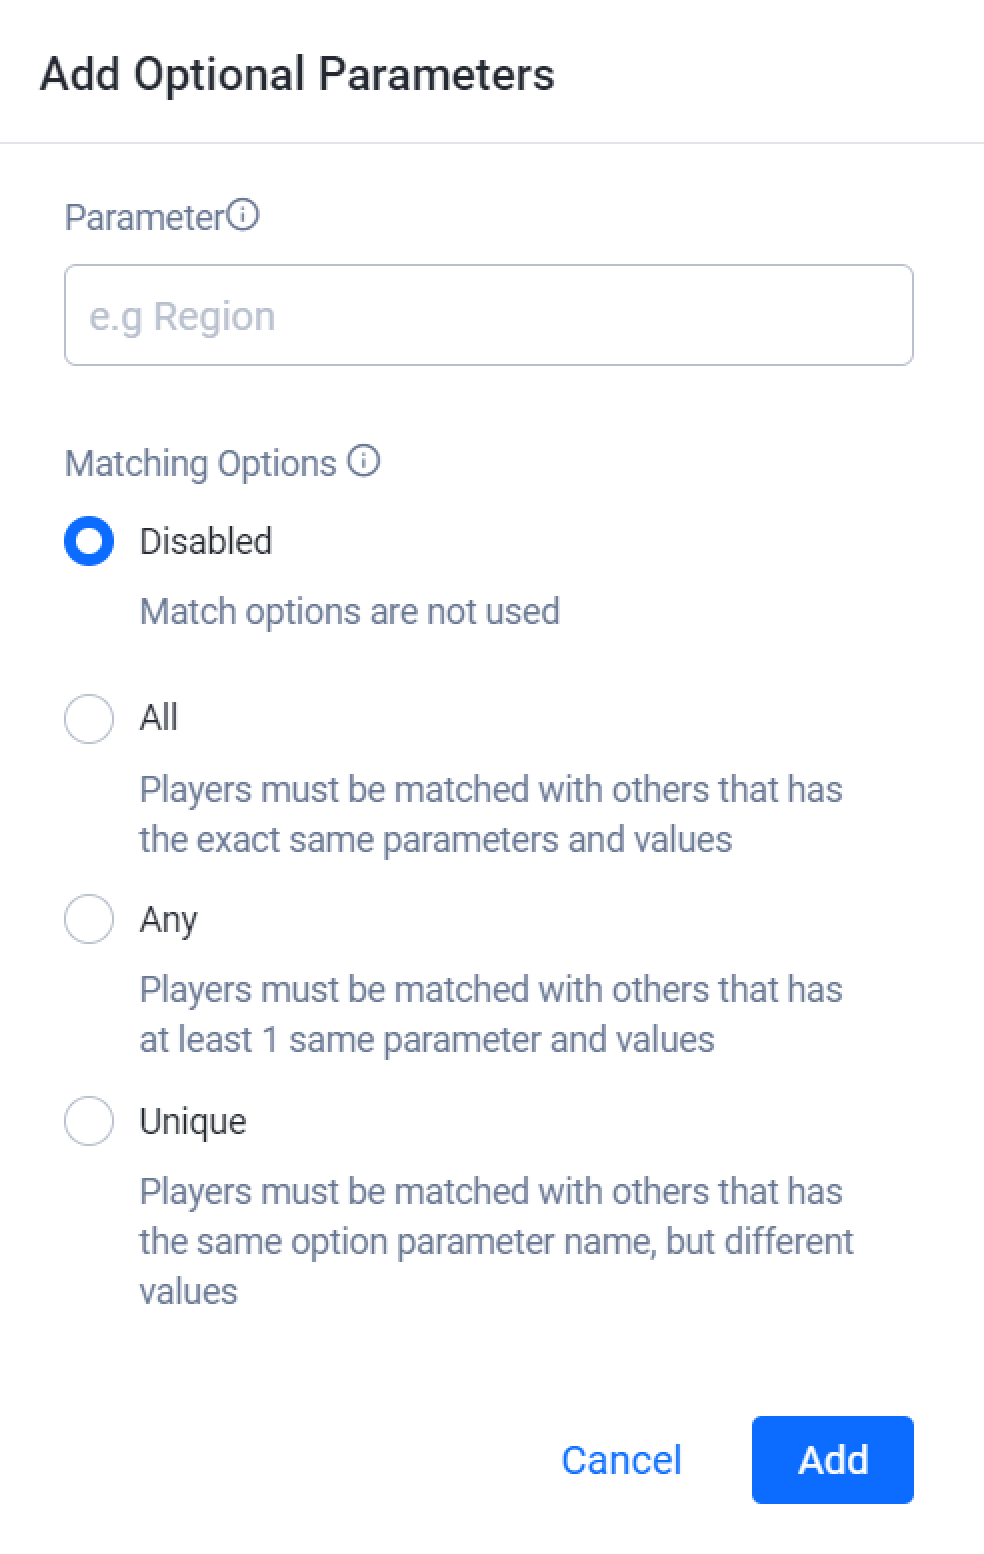
- Input the desired parameter in the Parameter field. This can be Region, Language, Player Level, or anything else.
- Select the desired Matching Option from the choices below:
- Select Disabled if you want to turn off optional parameters.
- Select All if you want players to be matched when all of the defined parameters match.
- Select Any if you want players to be matched when any single parameter is a match.
- Select Unique if you want players to be matched when none of the defined parameters match.
When you're done, click Add Parameter to add the new parameter.
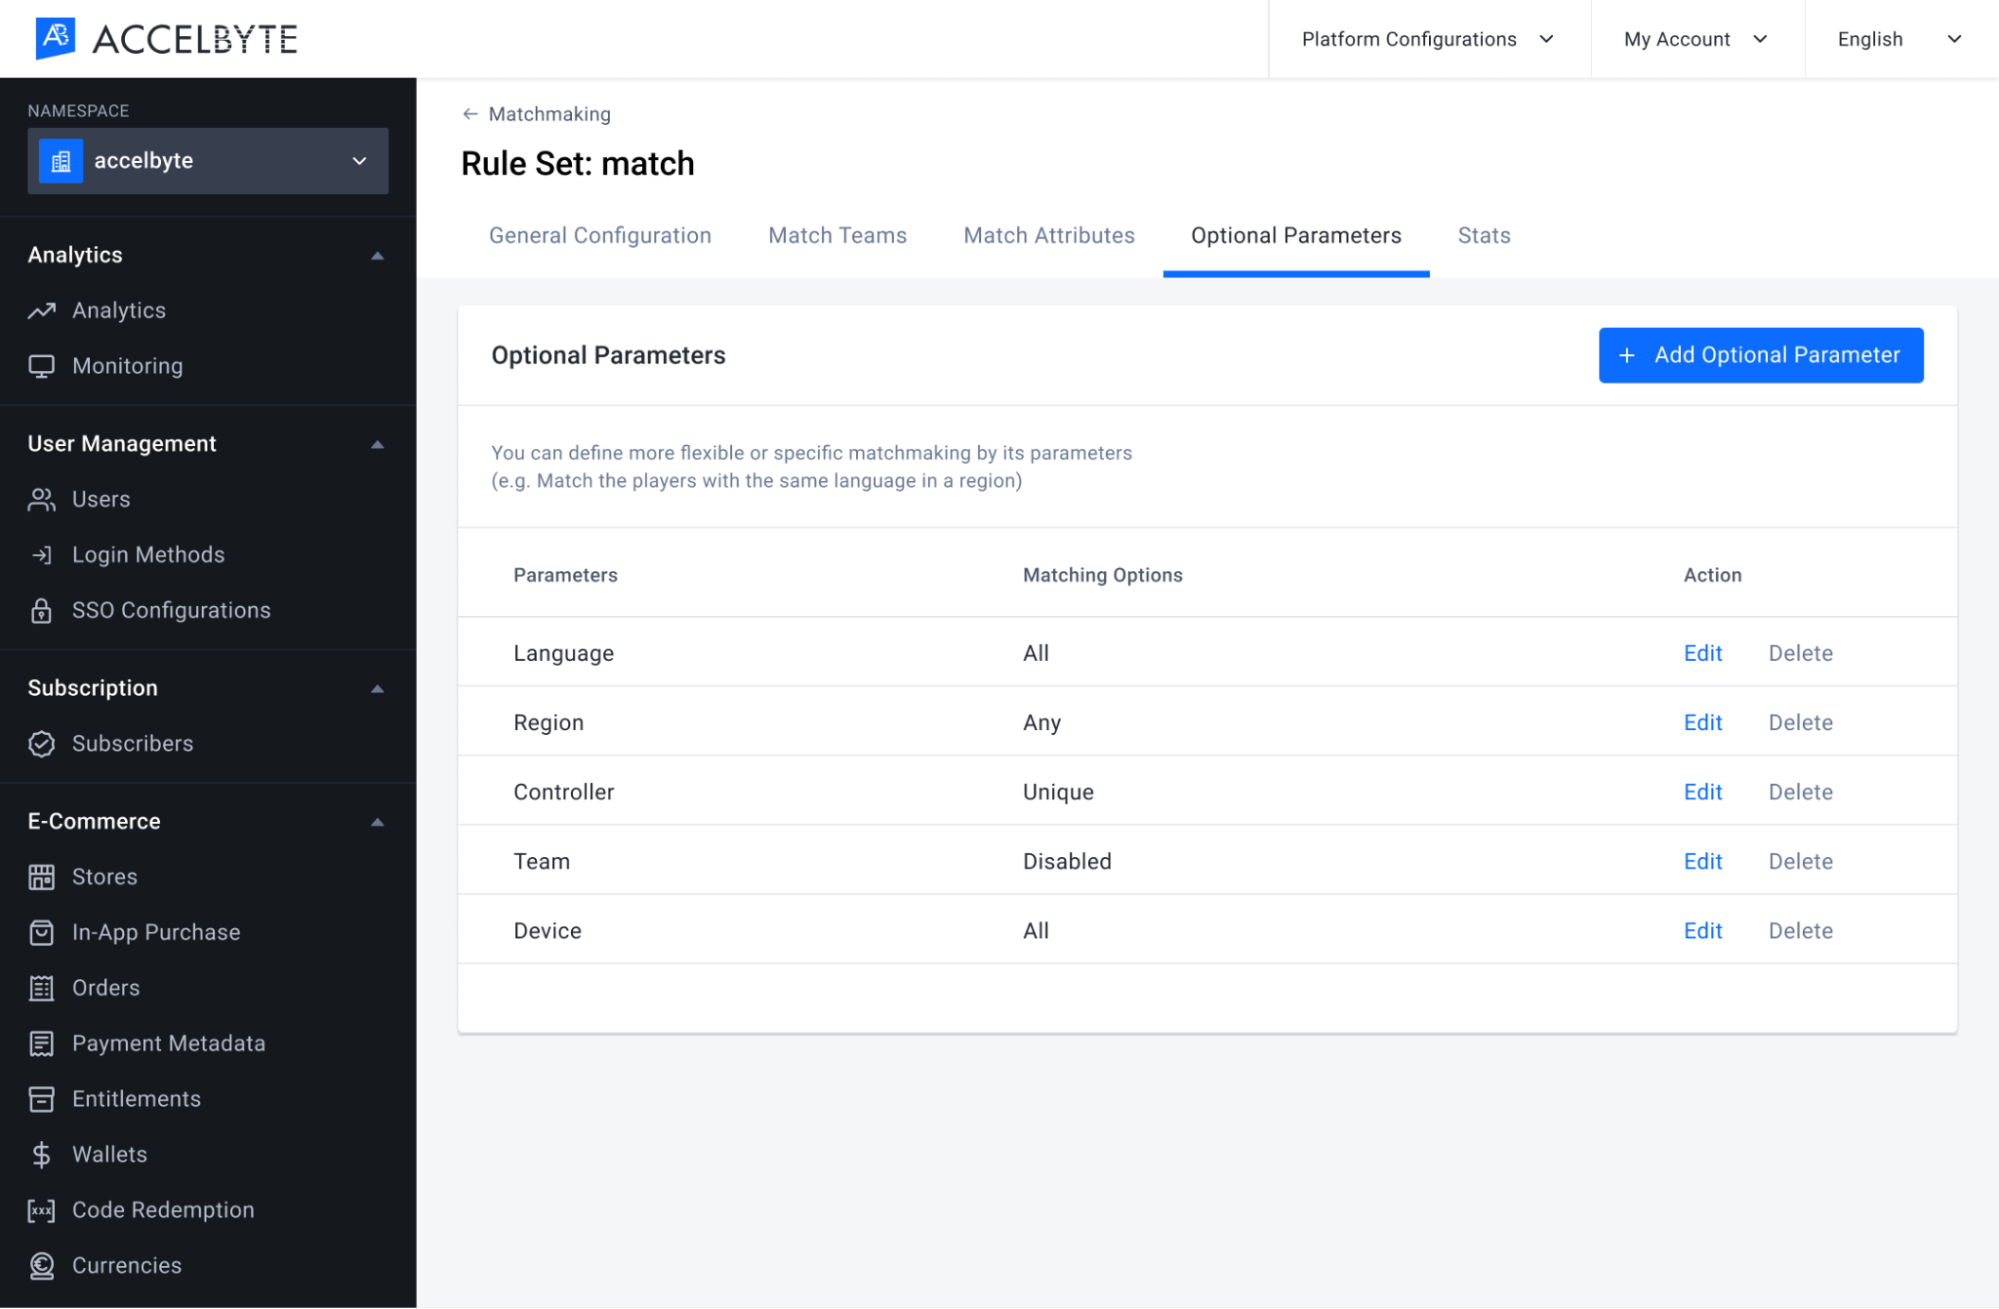
The parameter you created will appear in the Optional Parameters list in the Matching Rules panel at the bottom of the page. From here you can edit or delete any parameter.
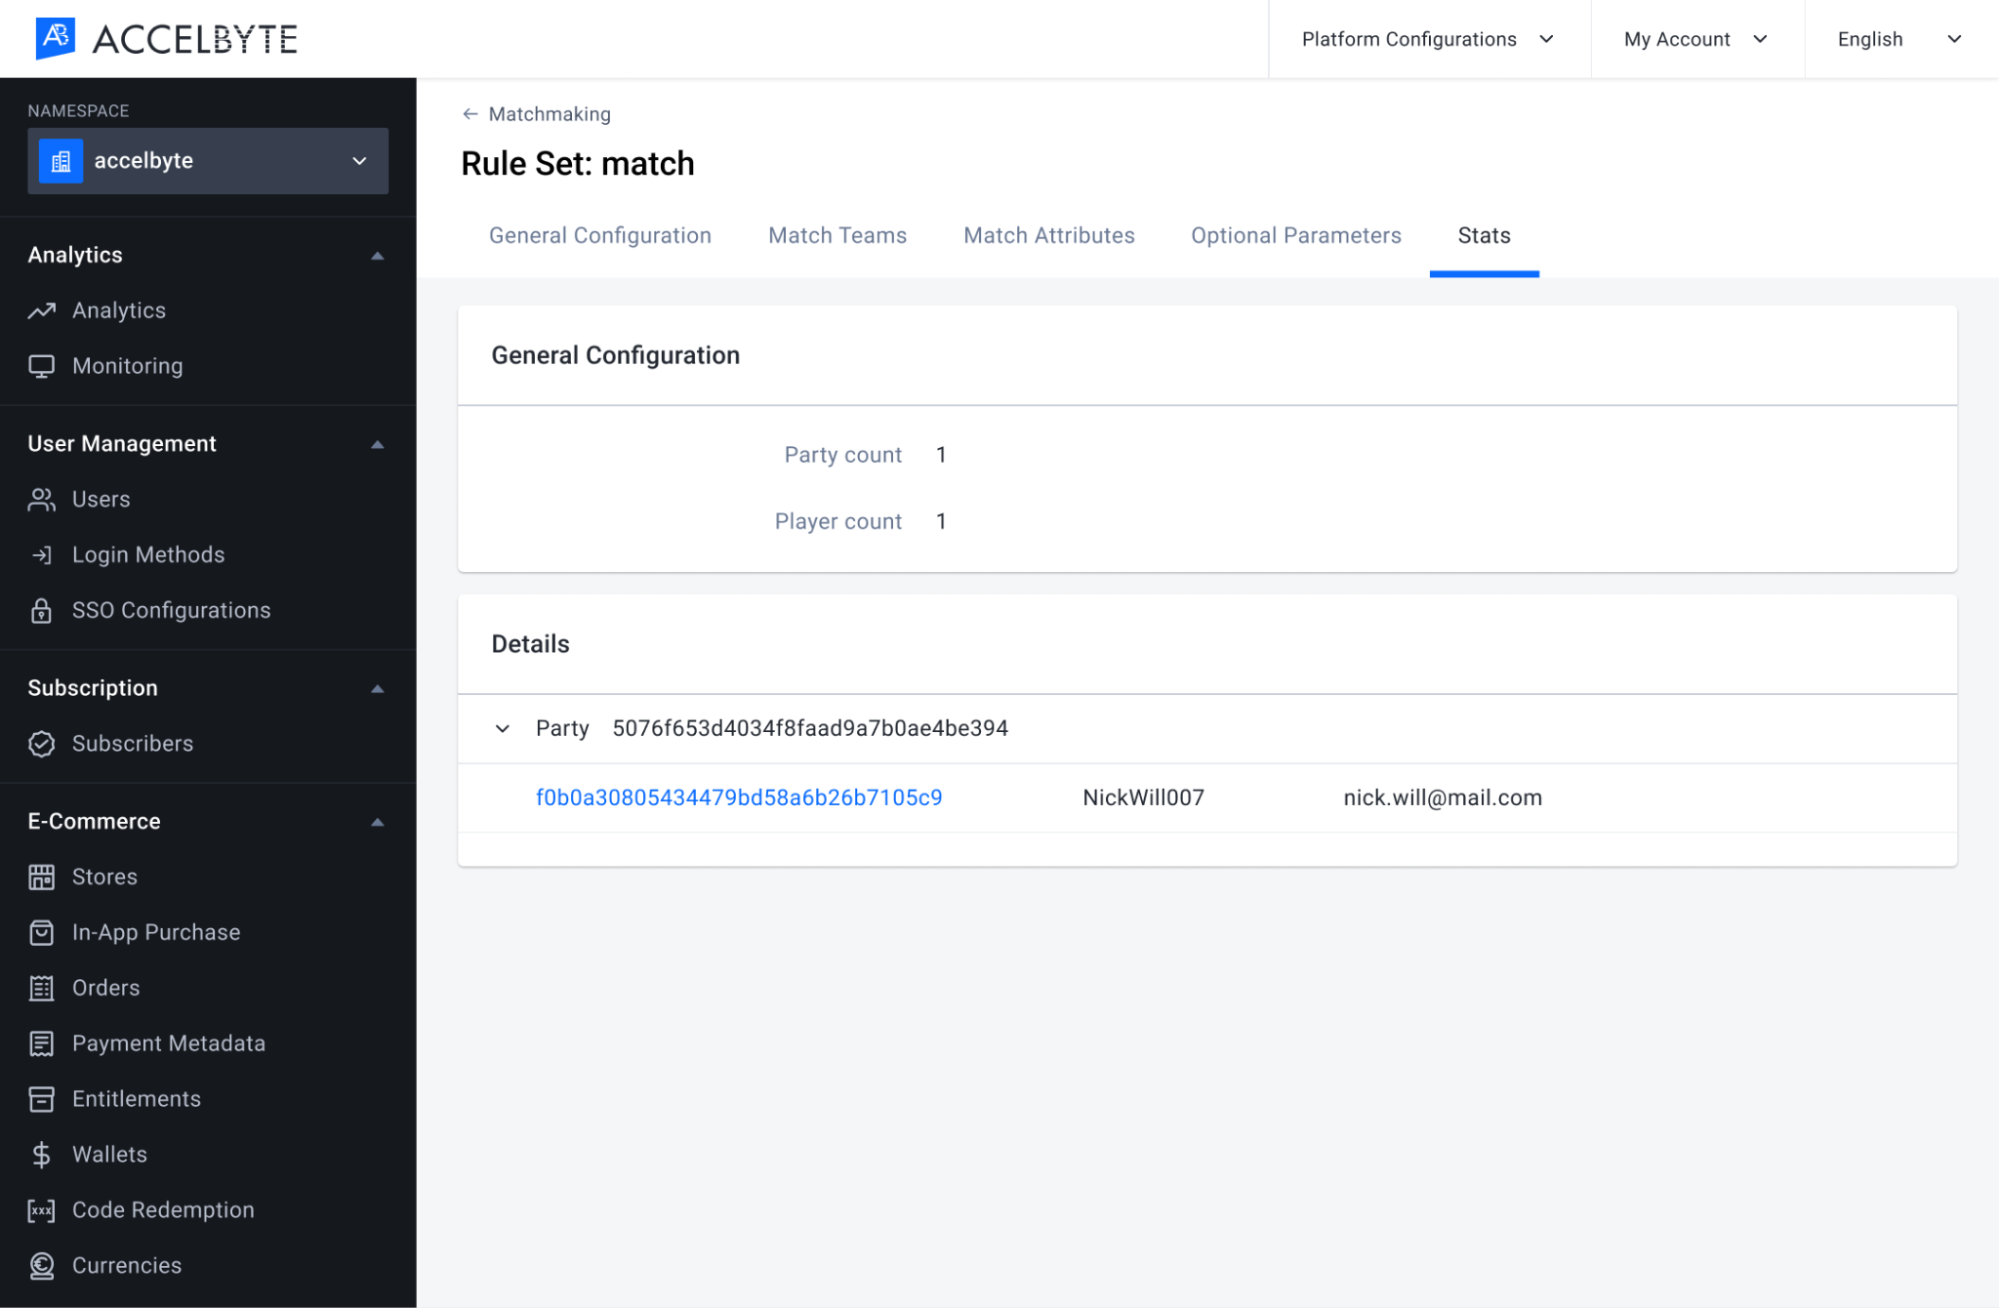
Matchmaking Statistics
From this panel you can see all the detailed information about matchmaking. This is real-time data, so you need to let the player start matchmaking, and then you can see the details of information on the panel.
In the matchmaking detail page, find the Stats tab section and click the Stats tab button to go to the matchmaking stats. Here you can see by default all the panel of the matchmaking statistics is something like this If no one player has been in a match through your game.
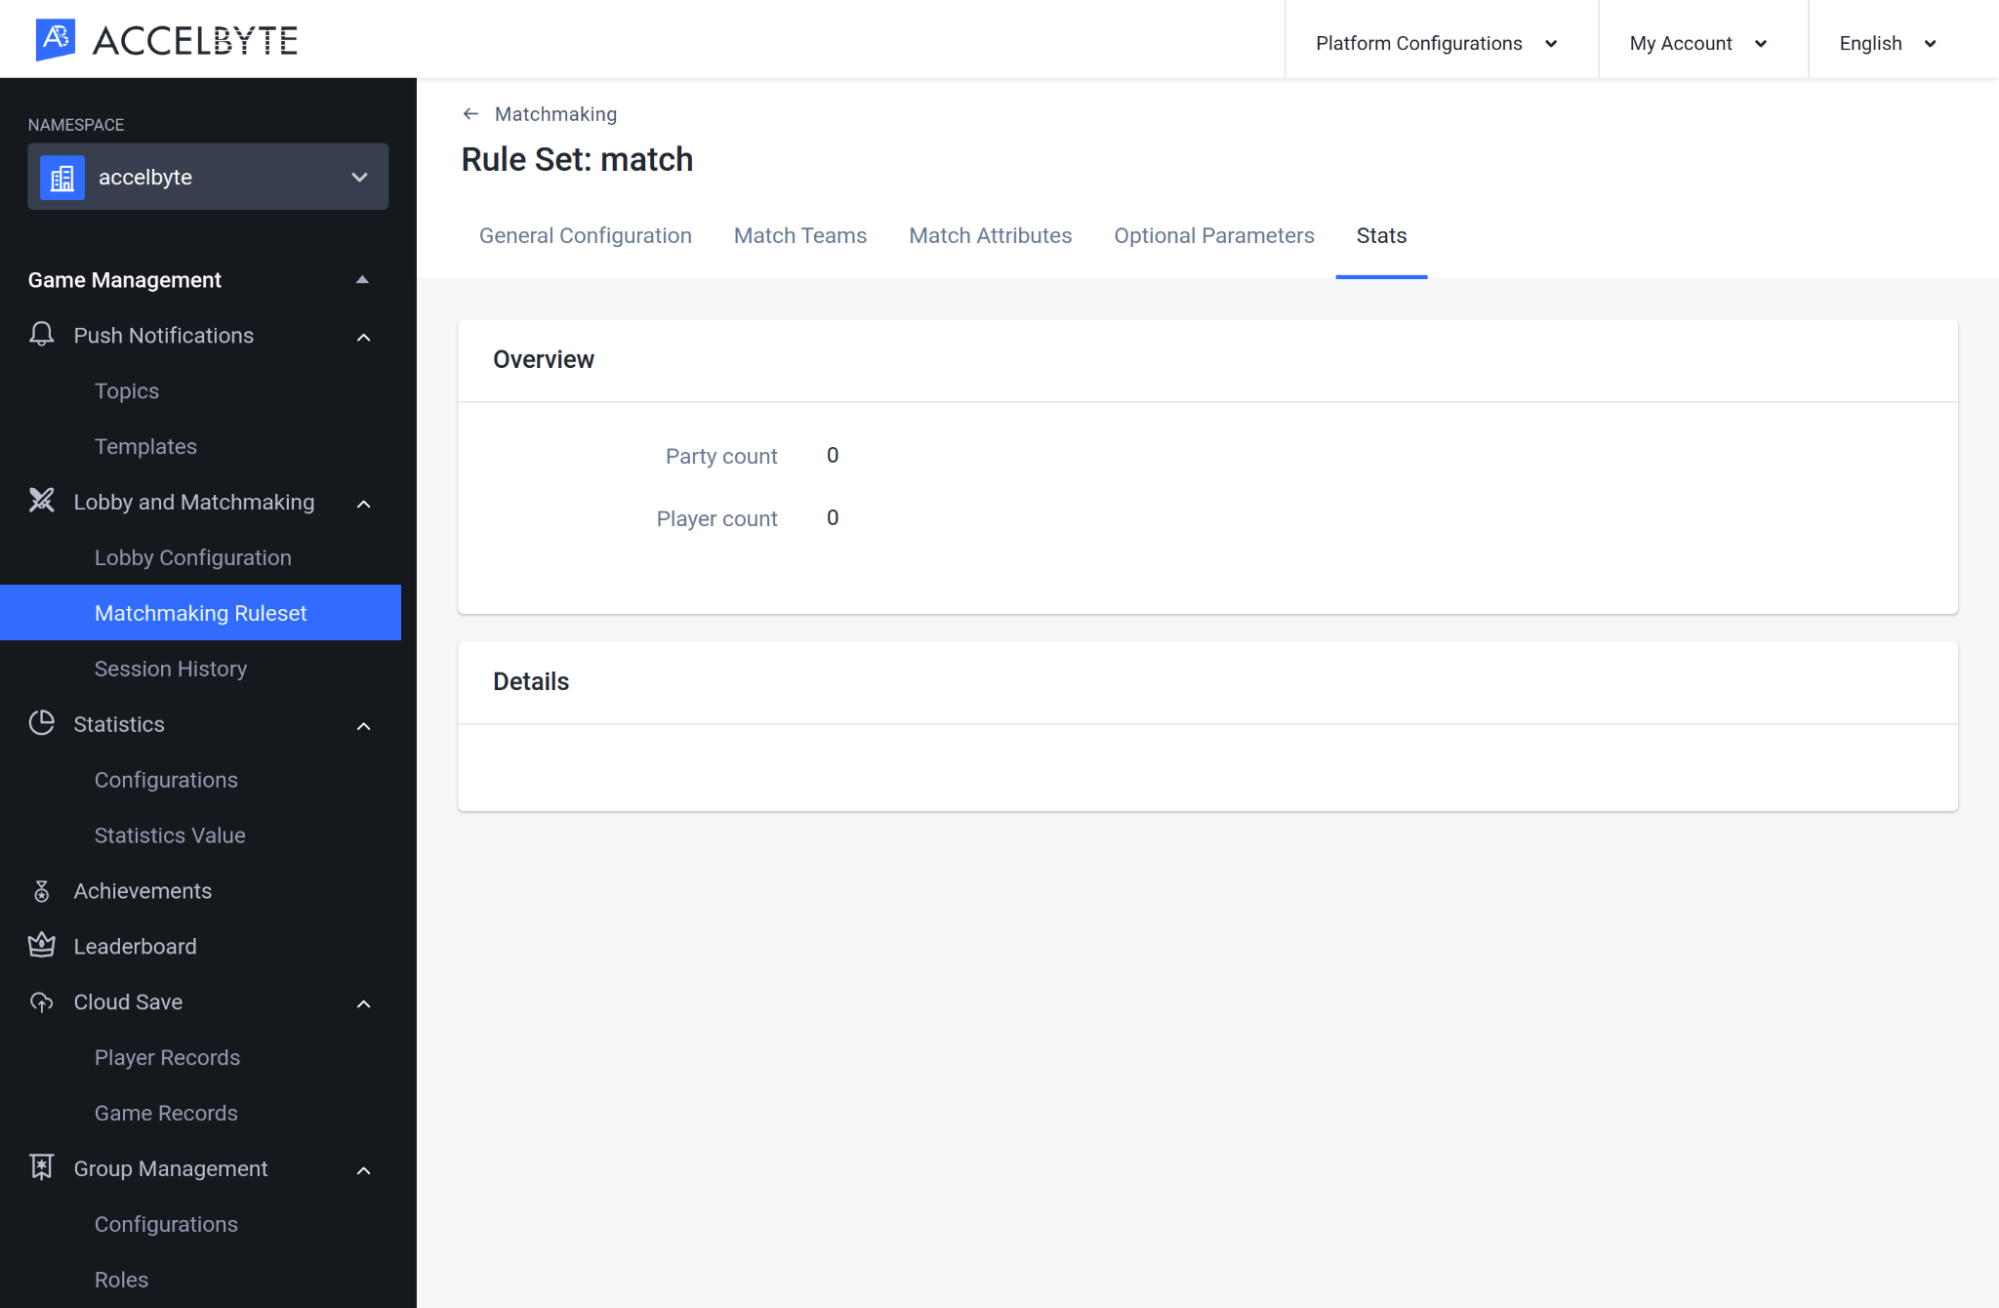
Now if you can see it here. There is some information about the party information, such as party ID, user ID, and some user info. You can click the user id to see the detailed information about the player. This matchmaking statistics only happens when the party starts the matchmaking and the current situation is in a queue of matchmaking. If matchmaking is found, then the matchmaking stats or the counter data here will disappear.
Export and Import Matchmaking Configurations
Export a Matchmaking Configuration
Follow the steps below to export a Matchmaking Configuration from a game namespace.
In the Admin Portal, open the game namespace that contains the configuration you want to export. On the Matchmaking page, open the Add Configuration dropdown menu and select Export Configuration.

Your matchmaking configuration will be exported in a JSON file. Here is an example of the contents:
matchmaking_autochess_config.json[
{
"slug": "accelbyte:vs",
"ruleSet": {
"alliance": {
"minNumber": 2,
"maxNumber": 2,
"playerMinNumber": 1,
"playerMaxNumber": 3
},
"matchingRules": [
{
"attribute": "accel",
"criteria": "distance",
"reference": 1
}
],
"flexingRules": [],
"match_options": {
"options": null,
"type": ""
},
"sub_game_modes": null
},
"namespace": "autochess",
"gameMode": "vs",
"updatedAt": "2021-08-19T04:31:22Z",
"description": "1v1",
"findMatchTimeoutSeconds": 300,
"sessionQueueTimeoutSeconds": 30,
"joinable": true,
"socialMatchmaking": false,
"use_sub_gamemode": false,
"deployment": "default",
"max_delay_ms": 0
}
]
IMPORTANT
If you use our Dedicated Server Manager Armada, don't forget to also export your Dedicated Server Configuration. You will need both configurations if you want to use them in a different game namespace.
Import a Matchmaking Configuration
Follow the steps below to import a Matchmaking Configuration into a game namespace.
In the Admin Portal, go to the game namespace where you want to import the configuration. On the Matchmaking page, open the Add Configuration dropdown menu and select Import Configuration.
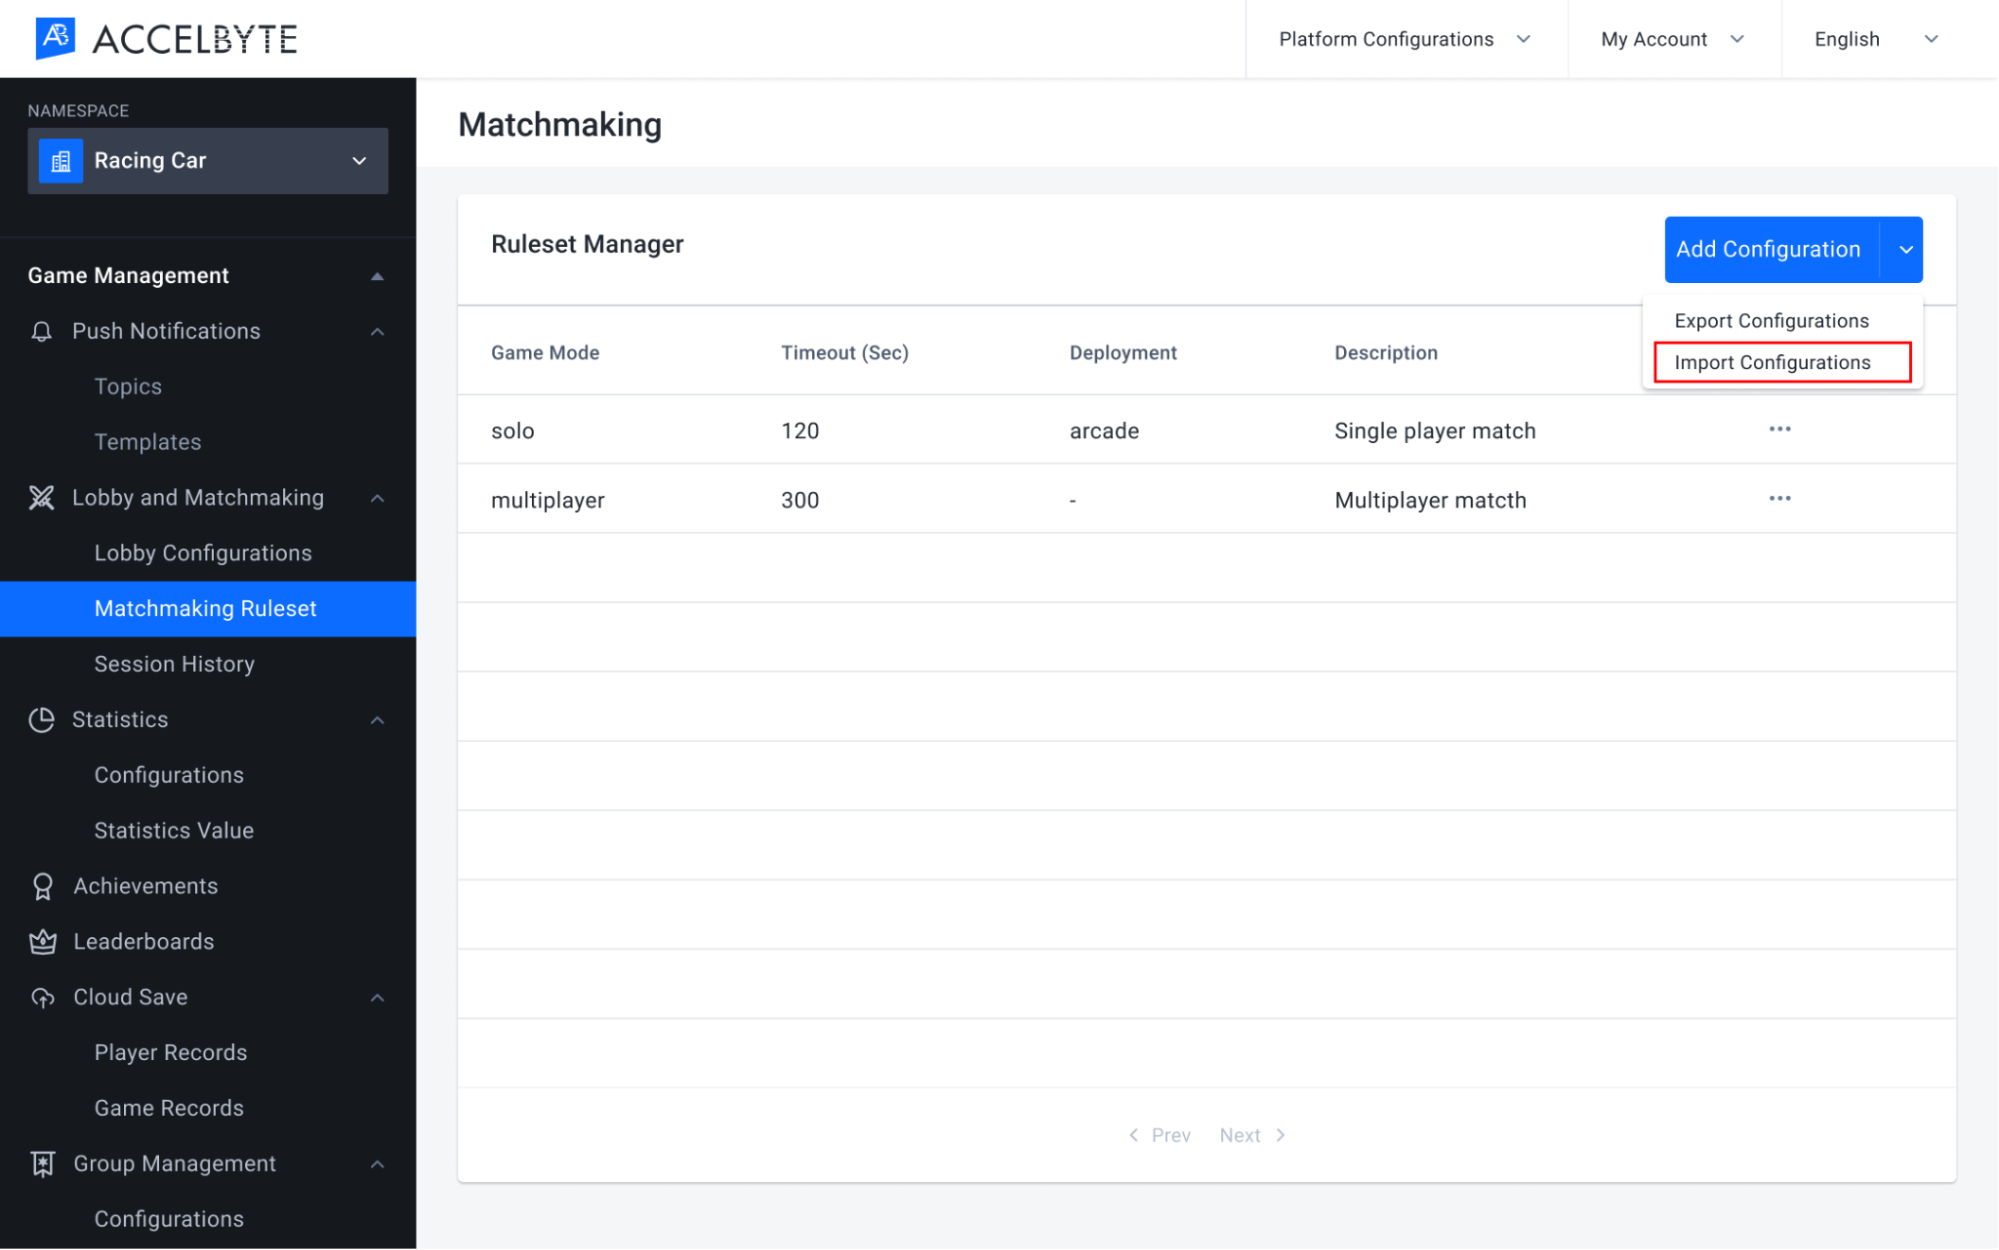
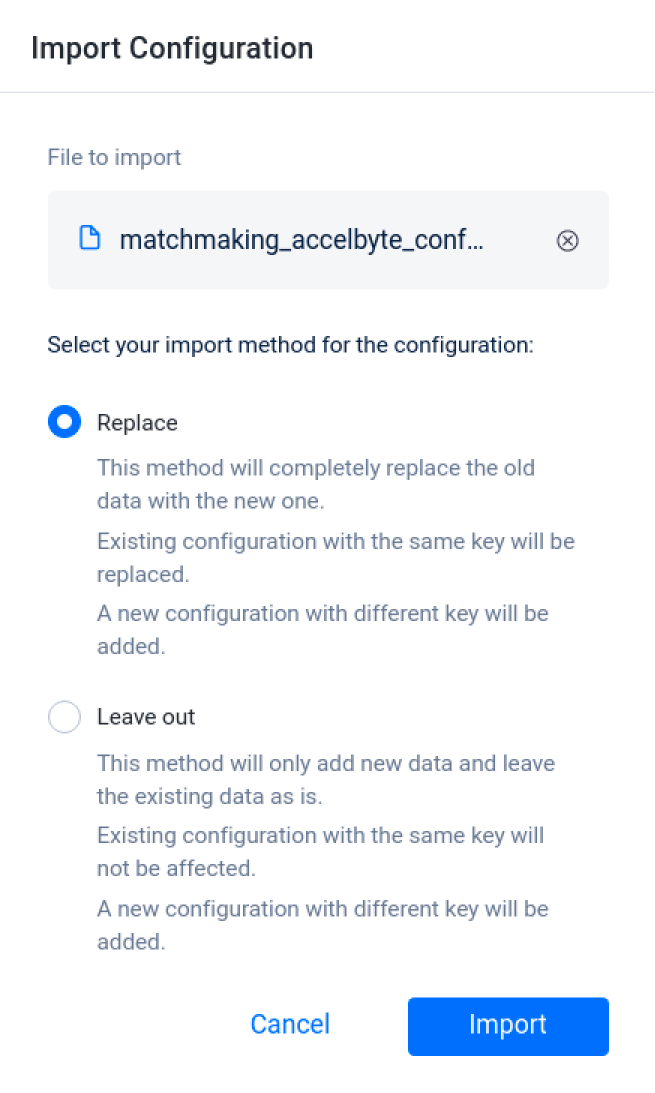
The Import Configuration form will appear. Here, select the configuration file you want to import and choose the import method from the options below:
Choose Replace if you want to completely replace the old configuration data for this namespace with the new data. Existing configurations with the same key will be replaced. New configurations with different keys will be added.
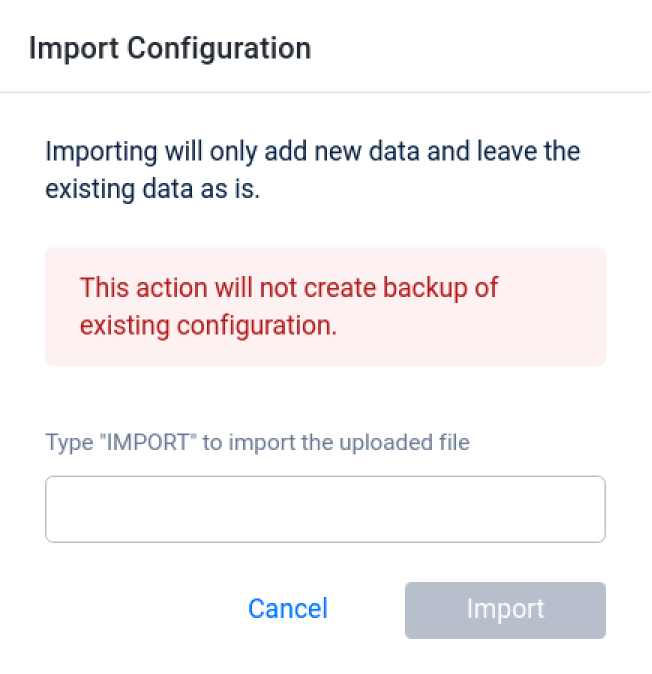
Choose Leave Out if you only want to add new data and leave the existing data as is. Existing configurations with the same key will not be changed. New configurations with different keys will be added to the existing data.
A confirmation window will appear. To confirm your selection, type IMPORT in the text box and click the Import button.
Here you can see the configuration has been added to the namespace.
IMPORTANT
If you use our Dedicated Server Manager Armada, don't forget to also import your Dedicated Server Configuration. You will need both configurations in this namespace to use Armada.
Implement Matchmaking using the Client SDKs
Start the Matchmaking Process
The matchmaking can be started after the party leader invites another player to the party. The number of party members should match the configuration used when creating the matchmaking channel.
- Unreal Engine
- Unity
FRegistry::Lobby.SetStartMatchmakingResponseDelegate(Lobby::FMatchmakingResponse::CreateLambda([](FAccelByteModelsMatchmakingResponse Result)
    {
        // Start Matchmaking success
    }), FErrorHandler::CreateLambda([](const int32 code, const FString& message)
    {
        // Start matchmaking error
    }));

    const FString ChannelName = "1vs1";
    FRegistry::Lobby.SendStartMatchmaking(ChannelName);
var channelName = "1vs1"; //a.k.a game_mode
Result startMatchmakingResult = null;
lobby.StartMatchmaking(channelName, result => startMatchmakingResult = result);
Matchmaking Notifications
Once the matchmaking is finished, the matchmaking service will send a notification to the players to inform them that they've been matched. To implement this feature, use the function below.
- Unreal Engine
- Unity
FRegistry::Lobby.SetMatchmakingNotifDelegate(Lobby::FMatchmaking::CreateLambda([](const FAccelByteModelsMatchmakingNotice& Notice)
{
    if (Notice.Status == "done")
    {
        UE_LOG(LogAccelByteLobbyTest, Log, TEXT("Match found"));
    }
}));
lobby.MatchmakingCompleted +=  (Result<MatchmakingNotif> result)=>
{
    if (result.Value.status == "done")
    {
        Debug.Log("Match found");
    }
};
Cancel Matchmaking
The party leader can cancel matchmaking before a match is found. The players will also be notified that the matchmaking process is canceled. To implement this feature, refer to the function below.
- Unreal Engine
- Unity
FRegistry::Lobby.SetCancelMatchmakingResponseDelegate(Lobby::FMatchmakingResponse::CreateLambda([](FAccelByteModelsMatchmakingResponse result)
    {
        // Cancel Matchmaking Success
    }), FErrorHandler::CreateLambda([](const int32 code, const FString& message)
    {
        // Start Matchmaking Error
    }));
    const FString ChannelName = "1vs1";
    FRegistry::Lobby.SendCancelMatchmaking(ChannelName);
var channelName = "1vs1";
Result<MatchmakingCode> cancelMatchmakingResponse = null;
lobby.CancelMatchmaking(channelName,result =>
    {
        Debug.Log(string.Format("Cancel matchmaking response {0}", 0));
        cancelMatchmakingResponse = result;
    });
Ready Consent
After the matchmaking process is completed, every player in each party needs to confirm their readiness to start the game. To implement this feature, refer to the function below. You'll need match Id to run the ready consent function, the match id will be received by the matchmaking notification after the start of matchmaking.
- Unreal Engine
- Unity
FRegistry::Lobby.SetReadyConsentResponseDelegate(Lobby::FReadyConsentResponse::CreateLambda([](FAccelByteModelsReadyConsentRequest result)
    {
        // Set Ready Consent Success
    }), FErrorHandler::CreateLambda([](const int32 code, const FString& message)
    {
        // Set Ready Consent Error
    }));

    FRegistry::Lobby.SetReadyConsentNotifDelegate(Lobby::FReadyConsentNotif::CreateLambda([](FAccelByteModelsReadyConsentNotice result)
    {
        UE_LOG(LogAccelByteLobbyTest, Log, TEXT("Get Ready Consent Notice!"));
        UE_LOG(LogAccelByteLobbyTest, Log, TEXT("User %s is ready for match."), *result.UserId);
    }));

    const FString MatchId = "a1b2c3d4e5";
    FRegistry::Lobby.SendReadyConsentRequest(MatchId);
lobby.ReadyForMatchConfirmed += result =>
{
    Debug.Log(string.Format("User {0} confirmed ready for match.",result.Value.userId));
};

var matchId = "a1b2c3d4e5"; //should get this from matchmakingNotif
lobby.ConfirmReadyForMatch(matchId,result =>
{
    Debug.Log(string.Format("Ready Consent {0}", index));
});
Ready to Play Notifications
Once a player confirms they are ready to play, the other players in the party will receive a ready to play notification. The pass data of the user id who ready the match will be retrieved by the player when the notification arrives.
- Unreal Engine
- Unity
FRegistry::Lobby.Connect();
FRegistry::Lobby.SetReadyConsentNotifDelegate(AccelByte::Api::Lobby::ReadyConsentNotif.CreateLambda([](const FAccelByteModelsReadyConsentNotice& Result)
{
    // Do something if ReadyConsentNotifDelegate has been successful
}));
AccelBytePlugin.GetLobby().Connect();
        AccelBytePlugin.GetLobby().ReadyForMatchConfirmed += result =>
        {
            if (result.IsError)
            {
                // Do something if ReadyForMatchConfirmed has an error
                Debug.Log($"Error ReadyForMatchConfirmed, Error Code: {result.Error.Code} Error Message: {result.Error.Message}");
            }
            else
            {
                // Do something if ReadyForMatchConfirmed has been successful
            }
        };
Restart Matchmaking
If a player doesn't confirm their readiness for play, the matchmaking process will be repeated from the beginning. The team that contains a non-confirming player will be banned from matchmaking for 30 seconds. You will get a banned time value from the response when you successfully get matchmaking notification. This banned time is not configurable by default. To implement this feature, refer to the function below.
- Unreal Engine
- Unity
FRegistry::Lobby.SetRematchmakingNotifDelegate(Api::Lobby::FRematchmakingNotif::CreateLambda([](FAccelByteModelsRematchmakingNotice result)
{
    UE_LOG(LogAccelByteLobbyTest, Log, TEXT("Get Rematchmaking Notification!"));
    UE_LOG(LogAccelByteLobbyTest, Log, TEXT("User %s received: banned for %d secs"), *UserCreds[0].GetUserId(), result.BanDuration);
}));
lobby.RematchmakingNotif += delegate(Result<RematchmakingNotification> result)
{
    Debug.Log(string.Format("User {0} received: banned for {1} secs", index, result.Value.banDuration));
};
Joinable Sessions
Start Matchmaking for a Joinable Session
The following function is used to start matchmaking for a joinable session.
- Unreal Engine
- Unity
// make sure lobby is connected first and in a party.

// this flow is for when matched to a new session
FRegistry::Lobby.SetMatchmakingNotifDelegate(THandler < FAccelByteModelsMatchmakingNotice > ::CreateLambda([ & lobby](const FAccelByteModelsMatchmakingNotice & Result) {
  // matchmaking is completed when it's notif status is done, then send ready consent.
  if (Result.Status == EAccelByteMatchmakingStatus::Done)
    FRegistry::Lobby.SendReadyConsentRequest(Result.MatchId);
}));

// When matched to a new session, Lobby will give DS notification after all matched player give ready consent.
// when matched to an existing session, lobby will directly give DS Notification, no ready consent required.
FRegistry::Lobby.SetDsNotifDelegate(THandler < FAccelByteModelsDsNotice > ::CreateLambda([ & lobby](const FAccelByteModelsDsNotice & Result) {
  if (Result.Status == "READY" || Result.Status == "BUSY") {
    // DS is ready to be joined
  }
}));

FRegistry::Lobby.SendStartMatchmaking("game_mode");
Lobby lobby = AccelBytePlugin.GetLobby();

// ensure lobby connected and in a party to start matchmaking

// this flow is for when matched to a new session
lobby.MatchmakingCompleted += (response) => {
  if (response.Value.status.ToLower() == "done") {
    lobby.ConfirmReadyForMatch(response.Value.matchId, result => Debug.Log("sending ready consent"));
  }
};

// When matched to a new session, Lobby will give DS notification after all matched player give ready consent.
// when matched to an existing session, lobby will directly give DS Notification, no ready consent required.
lobby.DSUpdated += (dsUpdate) => {
  string dsStatus = dsUpdate.Value.status.ToLower();
  if (dsStatus == "ready" || dsStatus == "busy") {
    // DS is ready to be joined
  }
};

lobby.StartMatchmaking("game_mode", result => Debug.Log("starting matchmaking"));
Check a Joinable Session's Status
When a server is claimed, it will query the session details from the Matchmaking service. The game server will determine whether the session is joinable or not by calling the following function.
- Unreal Engine
- Unity
FString MatchId = "testMatchId";
FAccelByteMatchmakingResult SessionData;
AccelByte::FRegistry::ServerDSM.QuerySessionStatus(
  MatchId,
  THandler < FAccelByteMatchmakingResult > ::CreateLambda(
    [ & SessionData](const FAccelByteMatchmakingResult & Result) {
      SessionData = Result;
      if (Result.joinable) {
        UE_LOG(LogTemp, Log, TEXT("Session is joinable"));
      } else {
        UE_LOG(LogTemp, Log, TEXT("Session is joinable"));
      }
    }),
  FErrorHandler::CreateLambda([](int32 ErrorCode, FString ErrorMessage) {
    UE_LOG(LogTemp, Log, TEXT("Error query session status"));
  }));
var mm = AccelByteServerPlugin.GetMatchmaking();
string matchId = "placeholderMatchId";

mm.QuerySessionStatus(matchId, result => {
  Debug.Log("Session is " + (result.Value.joinable ? "JOINABLE" : "NonJoinable"));
});
Enqueue a Session
When receiving a joinable session, the game server will enqueue the session to the Matchmaking service as soon as it is ready to accept more players. To enqueue a session, use the following function.
- Unreal Engine
- Unity
AccelByte::FRegistry::ServerDSM.EnqueueJoinableSession(
  SessionData,
  FVoidHandler::CreateLambda([]() {
    UE_LOG(LogTemp, Log, TEXT("Enqueue Session Success"));
  }),
  FErrorHandler::CreateLambda([](int32 ErrorCode, FString ErrorMessage) {
    UE_LOG(LogTemp, Log, TEXT("Enqueue Session Failed"));
  }));
var mm = AccelByteServerPlugin.GetMatchmaking();
MatchmakingResult sessionData = null; //get session data using QuerySessionStatus

mm.EnqueueJoinableSession(sessionData, result => {
  if (result.IsError) {
    Debug.Log("Enqueue joinable session error " + result.Error.Code + " with message " + result.Error.Message);
  } else {
    Debug.Log("Enqueue joinable session success");
  }
});
After the game server enqueues a session, players who are already matched into the session can connect to the Lobby.
Update a Session
To ensure that the session in the queue is accurate, any time a player leaves during the Lobby phase, the server will update the session in the queue. To make this update, use the function below.
- Unreal Engine
- Unity
// get session query value from QuerySessionStatus() method
var sessionQueryResult = sessionQuery.Value;
string leavingUserId = "UserId";
mm.RemoveUserFromSession(sessionQueryResult.channel, sessionQueryResult.match_id, leavingUserId, result => {
  if (result.IsError) {
    Debug.Log("Remove User failed with code " + result.Error.Code + " message " + result.Error.Message);
  } else {
    Debug.Log("Remove User Success");
  }
});
FString gameMode = sessionQueryResult.Game_mode;
FString matchId = sessionQueryResult.Match_id;
FString userId;
FRegistry::ServerMatchmaking.RemoveUserFromSession(gameMode, matchId, userId, FVoidHandler::CreateLambda([]() {
  UE_LOG(LogTemp, Log, TEXT("Remove user success"));
}), FErrorHandler::CreateLambda([](int32 ErrorCode, FString ErrorMessage) {
  UE_LOG(LogTemp, Log, TEXT("Remove user Failed"));
}));
Dequeue a Session
When the game is about to start, the game server will dequeue the session to prevent the Matchmaking service from matching a new player into it. To dequeue a session, use the following function.
- Unreal Engine
- Unity
FString matchId;
AccelByte::FRegistry::ServerDSM.DequeueJoinableSession(
  matchId,
  FVoidHandler::CreateLambda([]() {
    UE_LOG(LogTemp, Log, TEXT("Dequeue Session Success"));
  }),
  FErrorHandler::CreateLambda([](int32 ErrorCode, FString ErrorMessage) {
    UE_LOG(LogTemp, Log, TEXT("Dequeue Session Failed"));
  }));
var mm = AccelByteServerPlugin.GetMatchmaking();
string matchId = "placeholderMatchId";

mm.DequeueJoinableSession(matchId, result => {
  if (result.IsError) {
    Debug.Log("session dequeue error " + result.Error.Code + " with message " + result.Error.Message);
  } else {
    Debug.Log("session dequeue success");
  }
});
Sub-Game Modes
Matchmake into a Sub-Game Mode
You can use sub-game modes to allow players to choose from multiple game modes within your game. The following function is used to matchmake a player into a sub-game mode.
- Unreal Engine
- Unity
FRegistry::Lobby.SetStartMatchmakingResponseDelegate(Api::Lobby::FMatchmakingResponse::CreateLambda(
  [](const FAccelByteModelsMatchmakingResponse & result) {
    if (result.Code == "0") {
      UE_LOG(LogTemp, Display, TEXT("Matchmaking started successfully"));
    } else {
      UE_LOG(LogTemp, Display, TEXT("Matchmaking start error with code %s"), * result.Code);
    }
  }));

Api::FMatchmakingOptionalParams OptionalParams;
OptionalParams.SubGameModes = {
  "1v1",
  "ffa"
};
FRegistry::Lobby.SendStartMatchmaking("deathmatch", OptionalParams);
MatchmakingOptionalParam optionalParam = new MatchmakingOptionalParam {
  subGameModes = new string[] {
    "1v1",
    "ffa"
  }
};

AccelBytePlugin.GetLobby().StartMatchmaking("deathmatch", optionalParam, result => {
  if (!result.IsError) {
    Debug.Log("Matchmaking started succesfully");
  } else {
    Debug.Log($"Start matchmaking error with code {result.Error.Code}, message is {result.Error.Message}");
  }
});
Connect Custom Services to Matchmaking using the Server SDKs
SDK Initialization
Before using the Matchmaking service from the SDK, you will need to initialize your server-side SDK to ensure that you authorized and able to perform create, read, update, and delete actions.
Golang SDK Initialization
Before using the Matchmaking service from the Golang SDK, you will need to initialize the SDK by following the steps below:
- Create your OAuth Client and assign the necessary permissions to access the Matchmaking service.
- Log in as a Client using the SDK.
- Initialize the Matchmaking service using the following function:
- Golang
matchmakingService := &m.MatchmakingService{
    Client:          factory.NewMatchmakingClient(&repository.ConfigRepositoryImpl{}),
    TokenRepository: &repository.TokenRepositoryImpl{},
}
Once completed, you can use the Golang SDK to create, read, update, or delete Matchmaking from your serverless app.
Python SDK Initialization
Before using the Matchmaking service from the Python SDK, you will need to initialize the SDK by following the steps below:
- Create your OAuth Client and assign the necessary permissions to access the Matchmaking service.
- Log in as a Client using the SDK.
Once completed, you can use the Python SDK to create, read, update, or delete Matchmaking from your serverless app.
.NET (C#) SDK Initialization
Before using the Matchmaking service, you will need to set some permissions. Use the following .NET namespaces:
using AccelByte.Sdk.Api.Matchmaking.Model;
using AccelByte.Sdk.Api.Matchmaking.Operation;
using AccelByte.Sdk.Api.Matchmaking.Wrapper;
Java SDK Initialization
Before using the Matchmaking service, you will need to set some permissions. Initialize the Matchmaking wrapper from the Matchmaking service using the following code:
Matchmaking wMatchmaking = new Matchmaking(sdk);
Once completed, you can use the SDK to create, read, update, or delete matchmaking.
Add a Player to the Session in a Channel
Use the following function to add a player to the session in a channel:
- Golang
- Python
- Java
err := matchmakingService.AddUserIntoSessionInChannel(input)
if err != nil {
  return err
}
return nil
from accelbyte_py_sdk.api.matchmaking import add_user_into_session_in_channel
from accelbyte_py_sdk.api.matchmaking.models import ModelsMatchAddUserIntoSessionRequest

result, error = add_user_into_session_in_channel(
    body=ModelsMatchAddUserIntoSessionRequest.create(
        user_id="<user-id>"
    ),
    channel_name="<channel-name>",
    match_id="<match_id>"
)
if error:
    print(error)
ModelsMatchAddUserIntoSessionRequest body = ModelsMatchAddUserIntoSessionRequest.builder()
                                .userId("")
                                .partyId("")
                                .build();

wMatchmaking.addUserIntoSessionInChannel(AddUserIntoSessionInChannel.builder()
                                .namespace(namespace)
                                .channelName(channelName)
                                .matchID("")
                                .body(body)
                                .build());
Remove a Player from a Session in a Channel
Use the following function to remove a player from a session in a channel:
- Golang
- Python
- Java
err := matchmakingService.DeleteUserFromSessionInChannel(input)
if err != nil {
  return err
}
return nil
from accelbyte_py_sdk.api.matchmaking import delete_user_from_session_in_channel

result, error = delete_user_from_session_in_channel(
   channel_name="<channel-name>",
   match_id="<match_id>",
   user_id="<user-id>"
)
if error:
   print(error)
wMatchmaking.deleteUserFromSessionInChannel(DeleteUserFromSessionInChannel.builder()
                        .namespace(namespace)
                        .channelName(channelName)
                        .matchID(matchId)
                        .userID(userId)
                        .build());
Create a Matchmaking Channel
Use the following function to create a matchmaking channel:
- Golang
- Python
- C#
ok, err := matchmakingService.CreateChannelHandler(input)
if err != nil {
  return err
}
return nil
from accelbyte_py_sdk.api.matchmaking import create_channel_handler
from accelbyte_py_sdk.api.matchmaking.models import ModelsAllianceRule
from accelbyte_py_sdk.api.matchmaking.models import ModelsAllianceFlexingRule
from accelbyte_py_sdk.api.matchmaking.models import ModelsChannelRequest
from accelbyte_py_sdk.api.matchmaking.models import ModelsFlexingRule
from accelbyte_py_sdk.api.matchmaking.models import ModelsMatchOption
from accelbyte_py_sdk.api.matchmaking.models import ModelsMatchOptionRule
from accelbyte_py_sdk.api.matchmaking.models import ModelsMatchingRule
from accelbyte_py_sdk.api.matchmaking.models import ModelsRuleSet
from accelbyte_py_sdk.api.matchmaking.models import ModelsSubGameMode

result, error = create_channel_handler(
   body=ModelsChannelRequest.create(
       deployment="<deployment>",
       description="<description>",
       find_match_timeout_seconds=300,
       game_mode="<game-mode>",
       max_delay_ms=300,
       rule_set=ModelsRuleSet.create(
           alliance=ModelsAllianceRule.create(
               max_number=2,
               min_number=2,
               player_max_number=2,
               player_min_number=2
           ),
           alliance_flexing_rule=[
               ModelsAllianceFlexingRule.create(
                   duration=300,
                   max_number=2,
                   min_number=2,
                   player_max_number=2,
                   player_min_number=2
               )
           ],
           flexing_rule=[
               ModelsFlexingRule.create(
                   attribute="<attribute>",
                   criteria="<criteria>",
                   duration=300,
                   reference=10
               )
           ],
           match_options=ModelsMatchOptionRule.create(
               options=[
                   ModelsMatchOption.create(
                       name="<name>",
                       type_="<type>"
                   )
               ]
           ),
           matching_rule=[
               ModelsMatchingRule.create(
                   attribute="<attribute>",
                   criteria="<criteria>",
                   reference=10
               )
           ],
           sub_game_modes={
               "<game_mode>": ModelsSubGameMode.create(
                   alliance=ModelsAllianceRule.create(
                       max_number=2,
                       min_number=2,
                       player_max_number=2,
                       player_min_number=2
                   ),
                   alliance_flexing_rule=[
                       ModelsAllianceFlexingRule.create(
                           duration=300,
                           max_number=2,
                           min_number=2,
                           player_max_number=2,
                           player_min_number=2
                       )
                   ],
                   name="<game_mode>"
               )
           }
       ),
       session_queue_timeout_seconds=10000
   )
)
if error:
   print(error)
Matchmaking wMatchmaking = new Matchmaking(sdk);

ModelsChannelRequest channelReq = new ModelsChannelRequest()
{
    Deployment = "<deployment_name>",
    Description = "<channel_description>",
    FindMatchTimeoutSeconds = 3600,
    GameMode = "<channel_name>",
    Joinable = false,
    MaxDelayMs = 0,
    SessionQueueTimeoutSeconds = 0,
    SocialMatchmaking = false,
    UseSubGamemode = false,
    RuleSet = new ModelsRuleSet()
    {
        Alliance = new ModelsAllianceRule()
        {
            MaxNumber = 2,
            MinNumber = 2,
            PlayerMaxNumber = 1,
            PlayerMinNumber = 1
        },
        AllianceFlexingRule = new List<ModelsAllianceFlexingRule>(),
        FlexingRule = new List<ModelsFlexingRule>(),
        MatchOptions = new ModelsMatchOptionRule()
        {
            Options = new List<ModelsMatchOption>()
        },
        MatchingRule = new List<ModelsMatchingRule>(),
        SubGameModes = new Dictionary<string, ModelsSubGameMode>()
    }
};

ModelsCreateChannelResponse? cResp = wMatchmaking.CreateChannelHandler(CreateChannelHandler.Builder
    .Build(channelReq, sdk.Namespace));
Retrieve a Matchmaking Channel
Use the following function to retrieve a channel:
- Golang
- Python
- C#
- Java
ok, err := matchmakingService.GetSingleMatchmakingChannel(input)
if err != nil {
  return err
}
return nil
from accelbyte_py_sdk.api.matchmaking import get_single_matchmaking_channel

result, error = get_single_matchmaking_channel(
   channel_name="<channel_name>"
)
if error:
   print(error)
Matchmaking wMatchmaking = new Matchmaking(sdk);

ModelsChannelV1? gResp = wMatchmaking.GetSingleMatchmakingChannel(GetSingleMatchmakingChannel.Builder
    .Build("<channel_name>", sdk.Namespace));
ModelsChannelV1 gResp = wMatchmaking.getSingleMatchmakingChannel(GetSingleMatchmakingChannel.builder()
                                .namespace(namespace)
                                .channelName(channelName)
                                .build());
Update a Matchmaking Channel
Use the following function to update a matchmaking channel:
- Golang
- Python
- C#
- Java
err := matchmakingService.UpdateMatchmakingChannel(input)
if err != nil {
  return err
}
return nil
from accelbyte_py_sdk.api.matchmaking import update_matchmaking_channel
from accelbyte_py_sdk.api.matchmaking.models import ModelsUpdateChannelRequest
from accelbyte_py_sdk.api.matchmaking.models import ModelsUpdateAllianceRule
from accelbyte_py_sdk.api.matchmaking.models import ModelsAllianceFlexingRule
from accelbyte_py_sdk.api.matchmaking.models import ModelsUpdateRuleset


result, error = update_matchmaking_channel(
   body=ModelsUpdateChannelRequest.create(
       deployment="<deployment>",
       description="<description>",
       find_match_timeout_seconds=300,
       joinable=False,
       max_delay_ms=300,
       rule_set=ModelsUpdateRuleset.create(
           alliance=ModelsUpdateAllianceRule.create(
               max_number=2
           ),
           alliance_flexing_rule=[
               ModelsAllianceFlexingRule.create(
                   duration=300,
                   max_number=2,
                   min_number=2,
                   player_max_number=2,
                   player_min_number=2
               )
           ]
       ),
       session_queue_timeout_seconds=10000,
       social_matchmaking=False,
       use_sub_gamemode=False
   ),
   channel_name="<channel_name>"
)
if error:
   print(error)
Matchmaking wMatchmaking = new Matchmaking(sdk);

ModelsUpdateChannelRequest updateChannel = new ModelsUpdateChannelRequest()
{
    Description = "Updated description."
};

wMatchmaking.UpdateMatchmakingChannel(UpdateMatchmakingChannel.Builder
    .Build(updateChannel, "<channel_name>", sdk.Namespace));
ModelsUpdateChannelRequest body = ModelsUpdateChannelRequest.builder()
                        .description(description)
                        .build();

                wMatchmaking.updateMatchmakingChannel(UpdateMatchmakingChannel.builder()
                                .namespace(namespace)
                                .channelName(channelName)
                                .body(body)
                                .build());
Delete a Matchmaking Channel
Use the following function to delete a matchmaking channel:
- Golang
- Python
- C#
err := matchmakingService.DeleteChannelHandler(input)
if err != nil {
  return err
}
return nil
from accelbyte_py_sdk.api.matchmaking import delete_channel_handler

result, error = delete_channel_handler(
   channel="<channel>"
)
if error:
   print(error)
Matchmaking wMatchmaking = new Matchmaking(sdk);

wMatchmaking.DeleteChannelHandler(DeleteChannelHandler.Builder
    .Build("<channel_name>", sdk.Namespace));
Related Concepts
- If you subscribe to Armada, you can learn how to implement Matchmaking with Armada.
- Golang test case files
- Python test case files
- .NET (C#) test case files
- Java test case files