User Accounts
Overview
AccelByte Cloud's User Accounts allow people to access your platform. This includes not only your players, but also everyone at your organization who has access to the Admin Portal.
There are two types of users: admin and non-admin. Admin users are allowed to access the Admin Portal, so this includes your colleagues at your organization. Non-admin users, on the other hand, cannot access the Admin Portal. Non-admin users are players. Player accounts can be managed by admin users in the Admin Portal.
Permissions
Permissions are used to grant access to specific resources within our services. Here are some of the basic permissions you'll need to work with accounts, but there are many other aspects of account management. For a full list of permissions that impact account management, see the IAM tab of the Permissions Reference.
| Usage | Resource | Action |
|---|---|---|
| Find/Update/Delete a User | NAMESPACE:{namespace}:USER | Read/Update/Delete |
| Invite a Player/Admin User | ADMIN:NAMESPACE:{namespace}:USER:INVITE | CREATE |
| Get User by ID | NAMESPACE:{namespace}:USER:{userId} | Read |
| Get User's Information | NAMESPACE:{namespace}:INFORMATION:USER:{userId} | Read |
| Reset User's Password | ADMIN:NAMESPACE:{namespace}:PASSWORD:USER | Update |
| Get User's Login Histories | ADMIN:NAMESPACE:{namespace}:HISTORY:LOGIN:USER:{userId} | Read |
Permissions work slightly differently depending on whether they are assigned to IAM Clients or Roles assigned to users. For more information, read the Authentication and Authorization Cloud documentation.
Manage Accounts in the Admin Portal
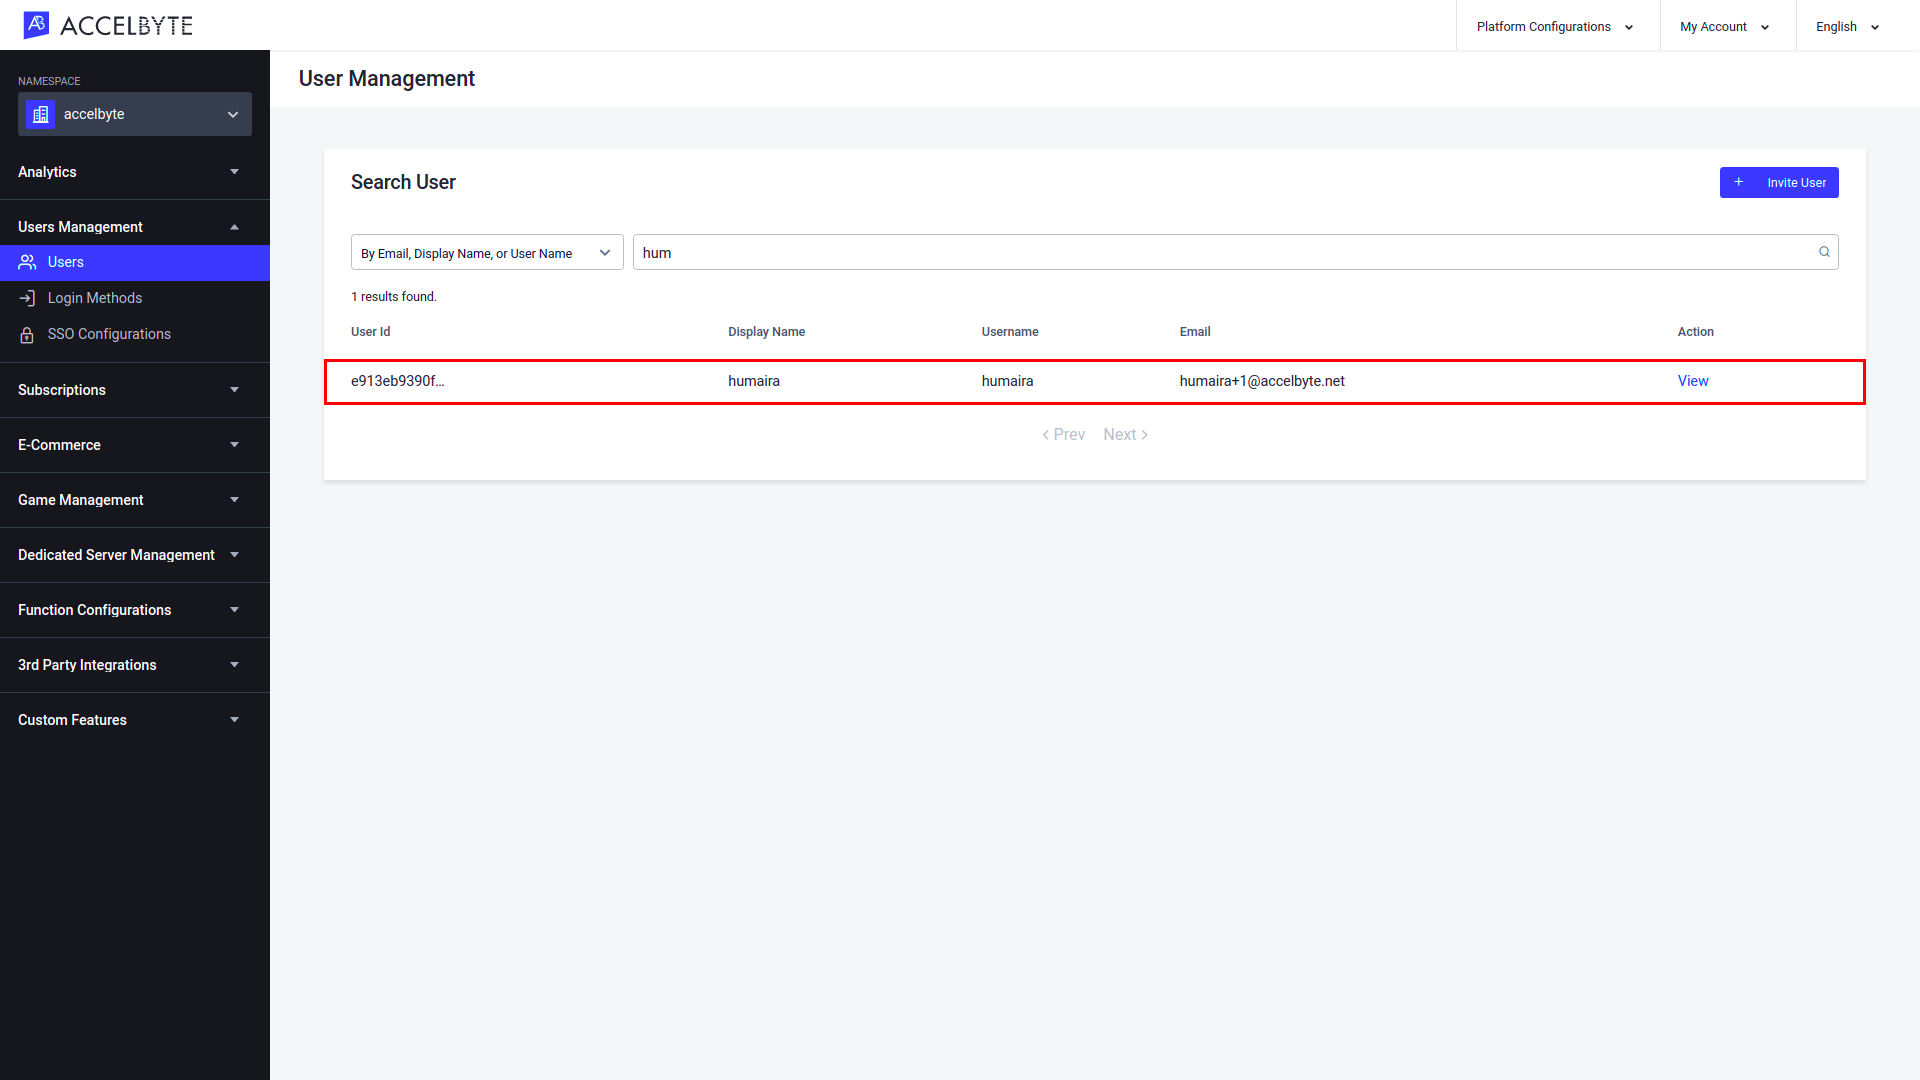
Search for a User
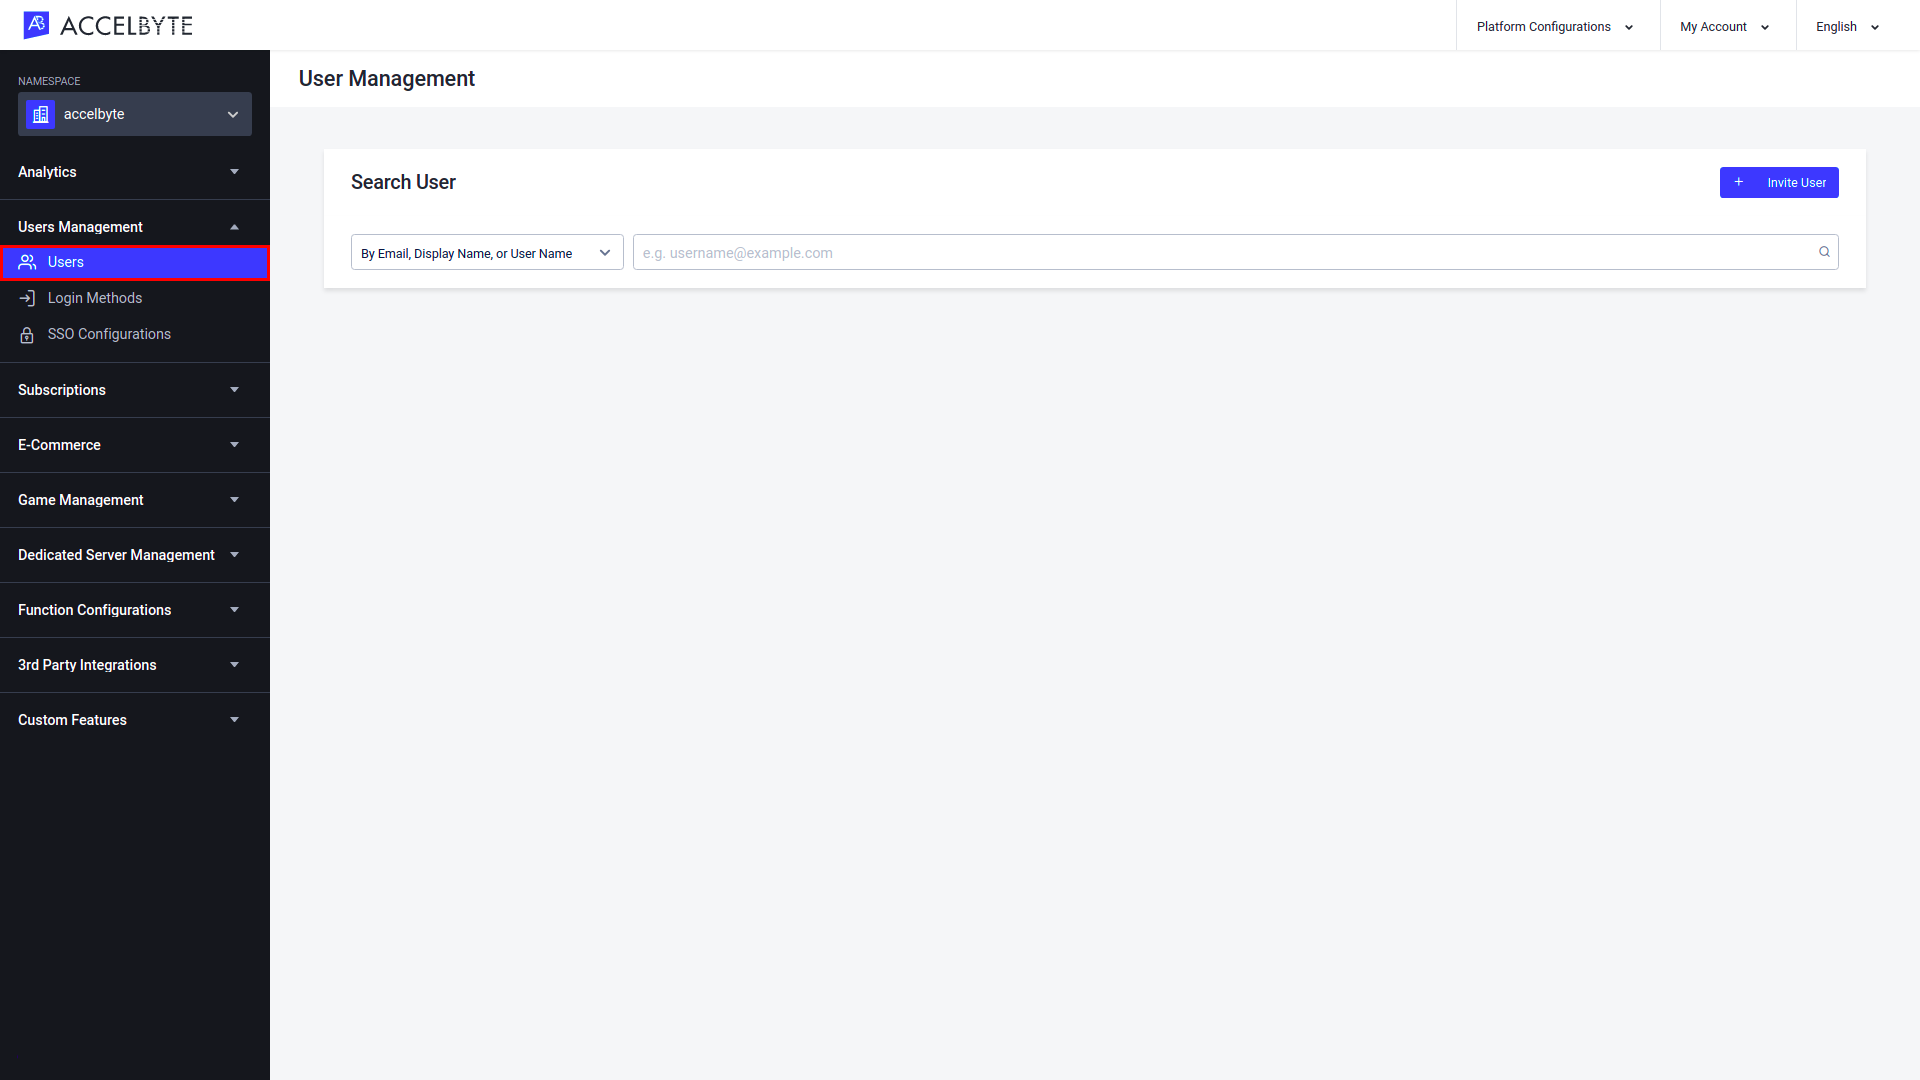
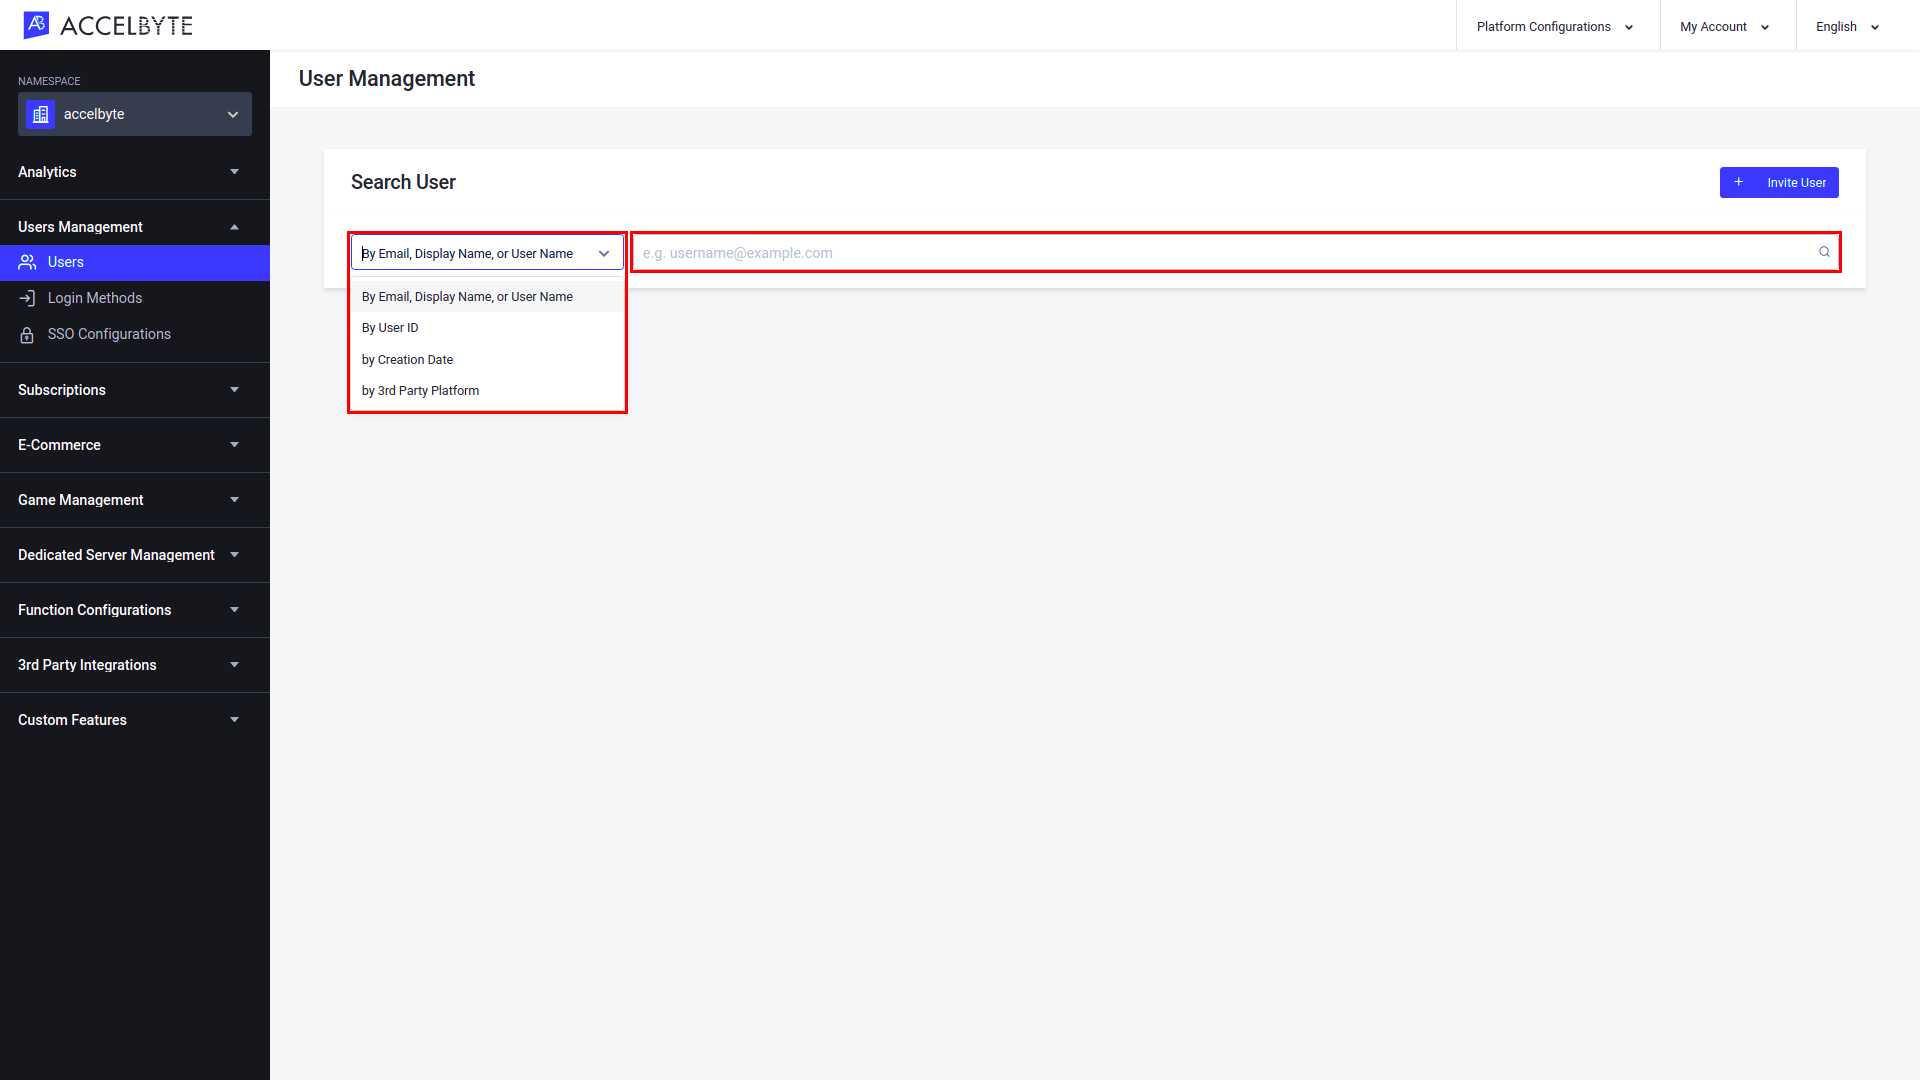
In the desired namespace of the Admin Portal, expand the Users Management section and click Users.

Select the search filter from the dropdown menu in the Search User panel that corresponds to the user's account information that you have on hand.

Type the user's credential into the text box and press Enter to search. The search results will appear.
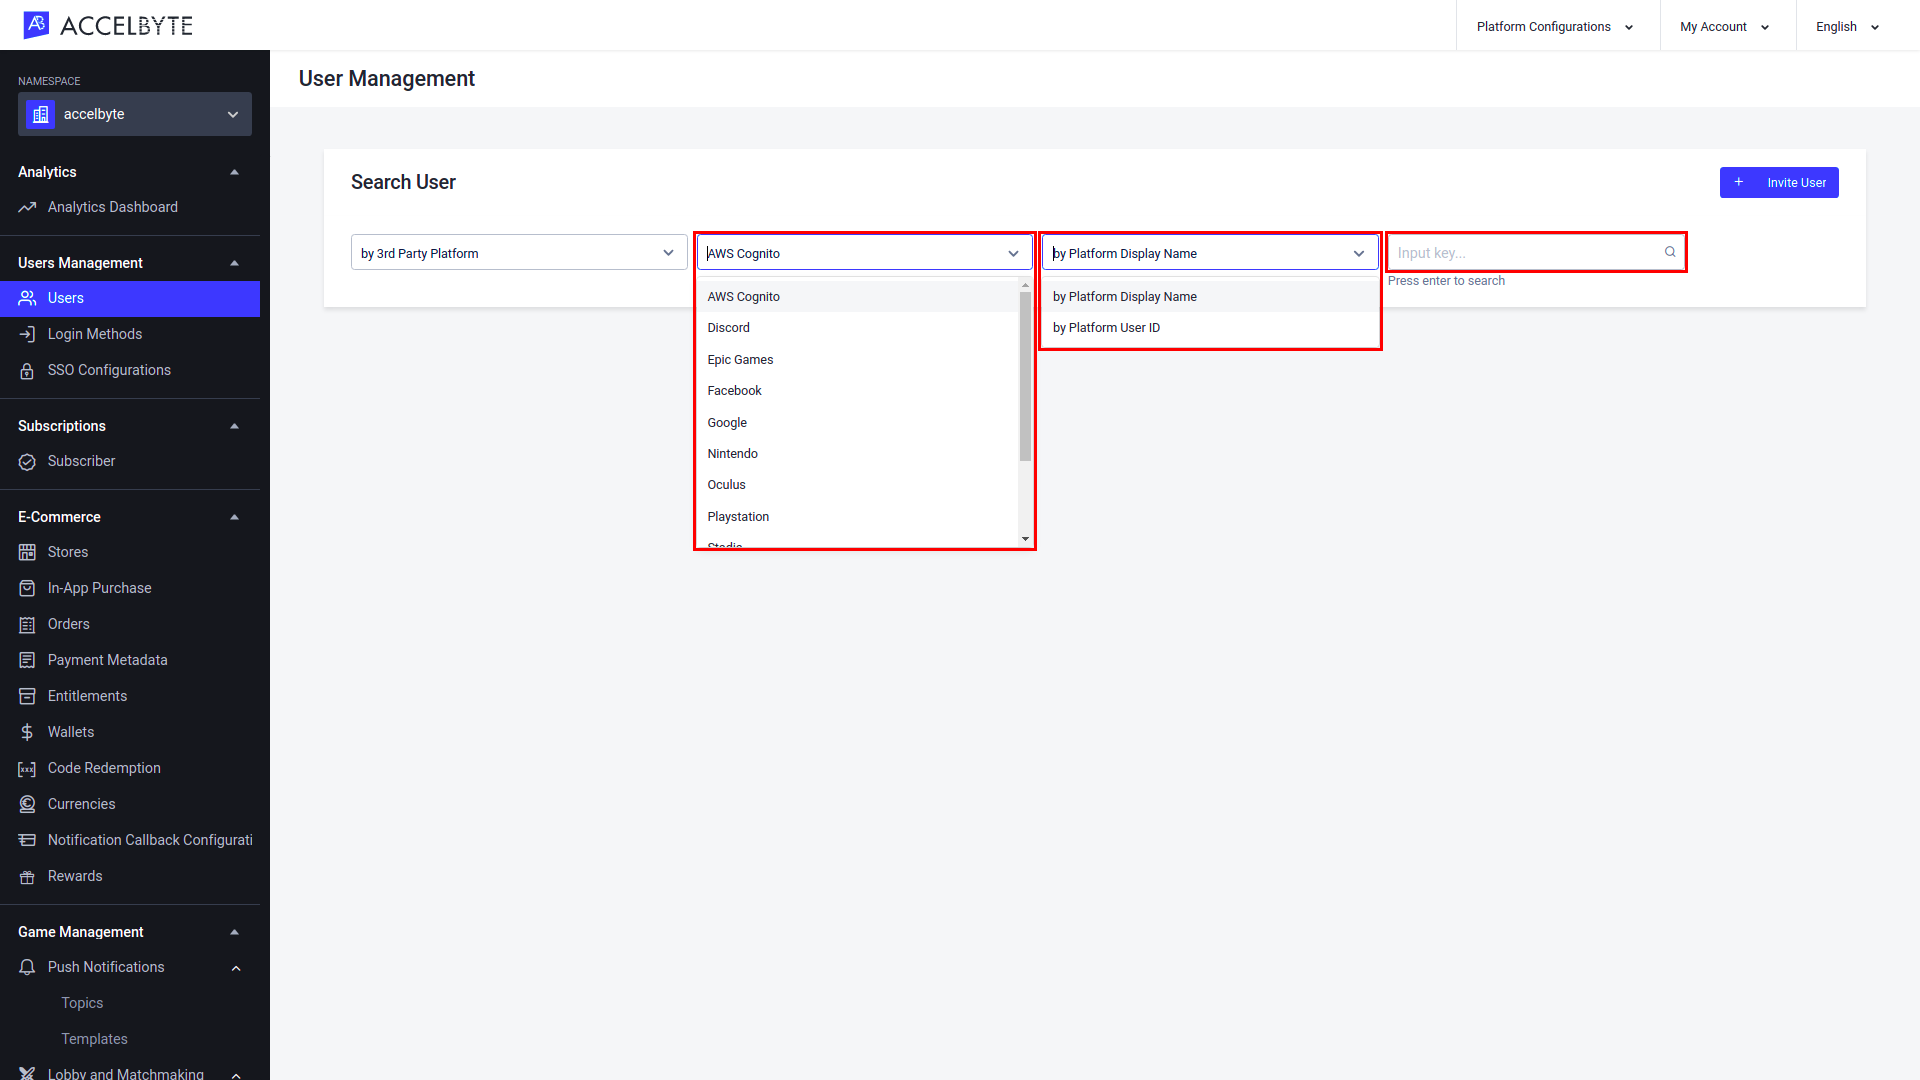
If you choose to search for a player using a Third-party Platform credential, two new dropdown menus will appear. From the first dropdown menu, select the third-party platform your player comes from, just as Steam or Epic Games. In the second dropdown menu select either Platform Display Name or Platform User ID, depending on which credentials you have.
Invite a Player
You can also quickly invite your colleagues to create player accounts from the Admin Portal. This can be useful for play testing purposes. To invite your team to create player accounts for your game, follow the steps below:
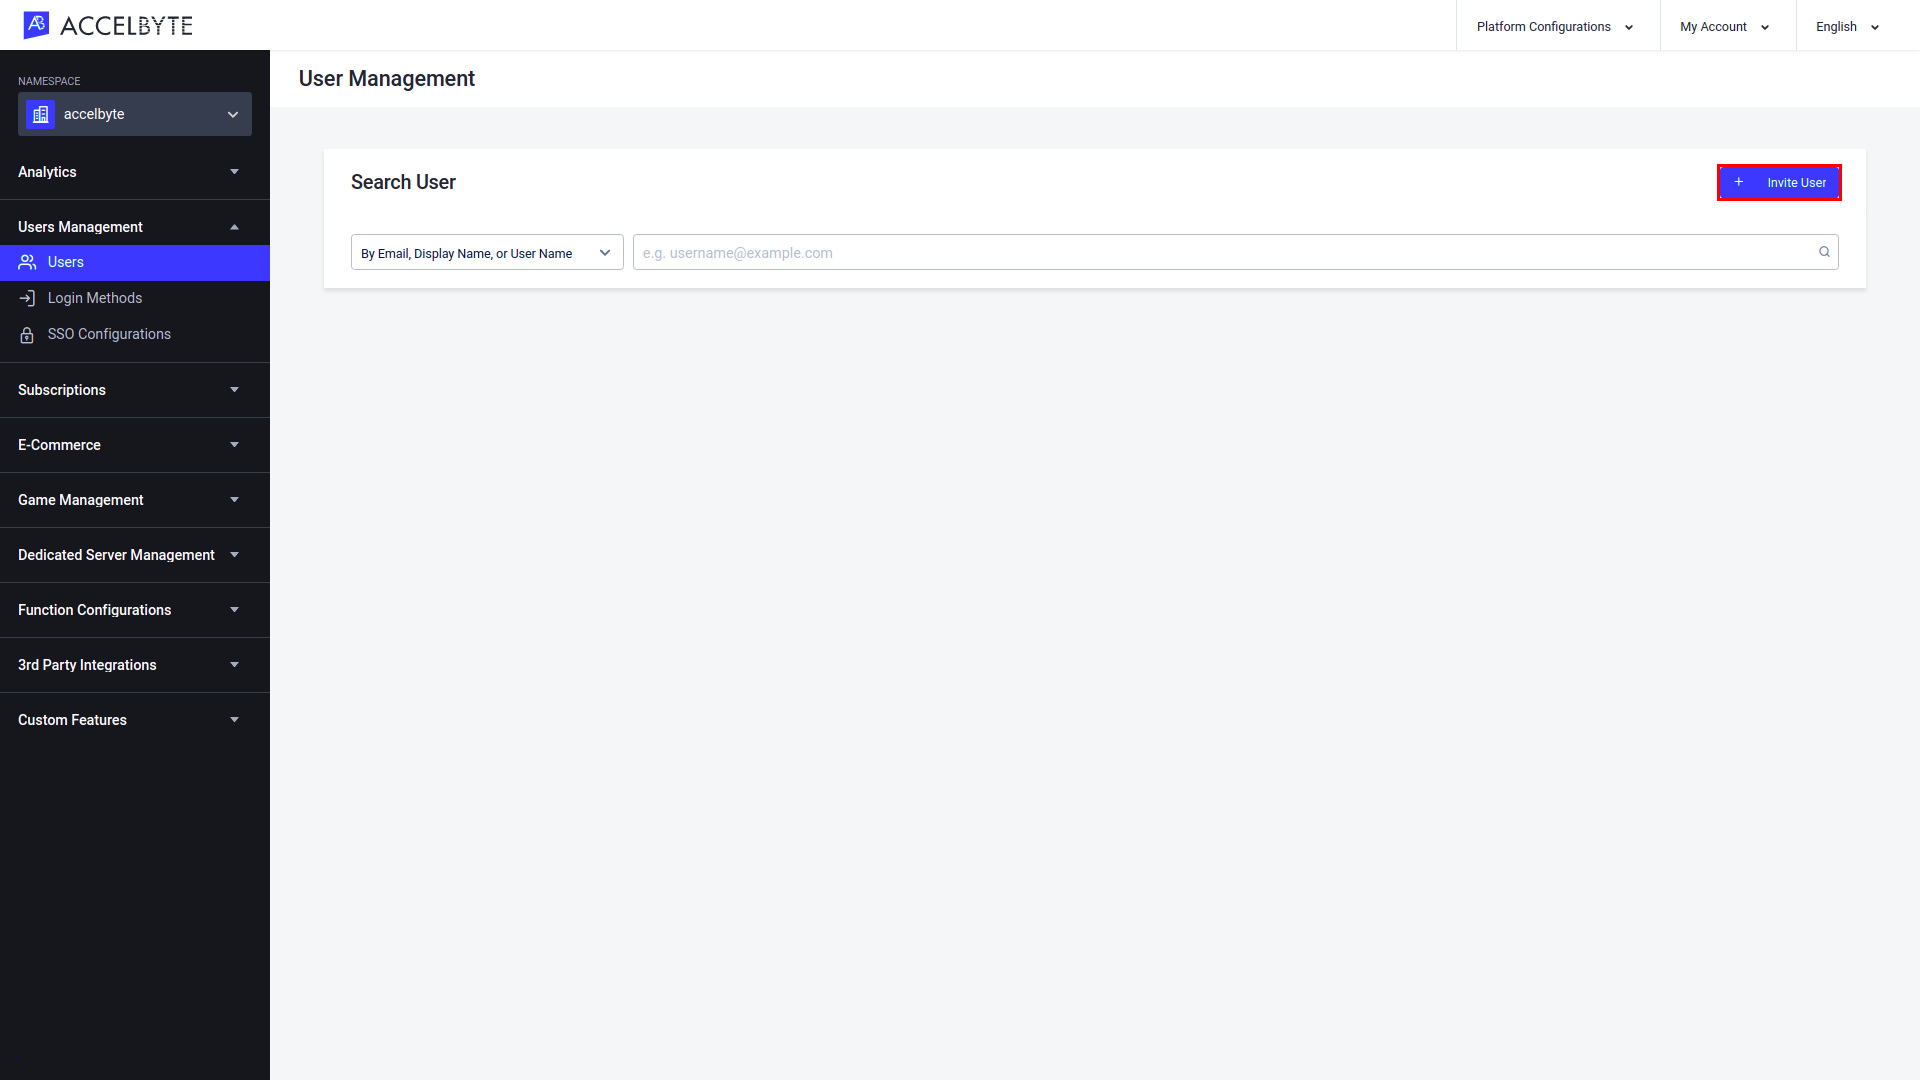
In the desired namespace of the Admin Portal, expand the Users Management section and click Users.

Click the Invite User button in the top-right corner of the page.
The Invite User form appears. Input the users' email address that you want to invite. You can invite more than one user at once by pressing Enter, Tab, or Comma on your keyboard to separate each email address.
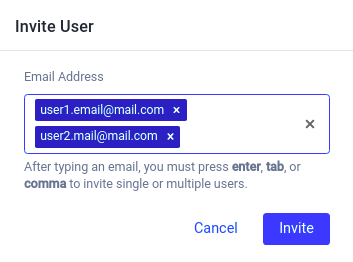
Once completed, click the Invite button. Invitations will be sent to the email addresses you provided.
IMPORTANT
The invitation email is only valid for 60 minutes. If the invited user does not complete account registration within 60 minutes of receiving the email, you'll need to send them a new invitation.
Invite an Admin User
You can also quickly invite your colleagues or community managers from your game to the Admin Portal. To do so, follow the steps below:
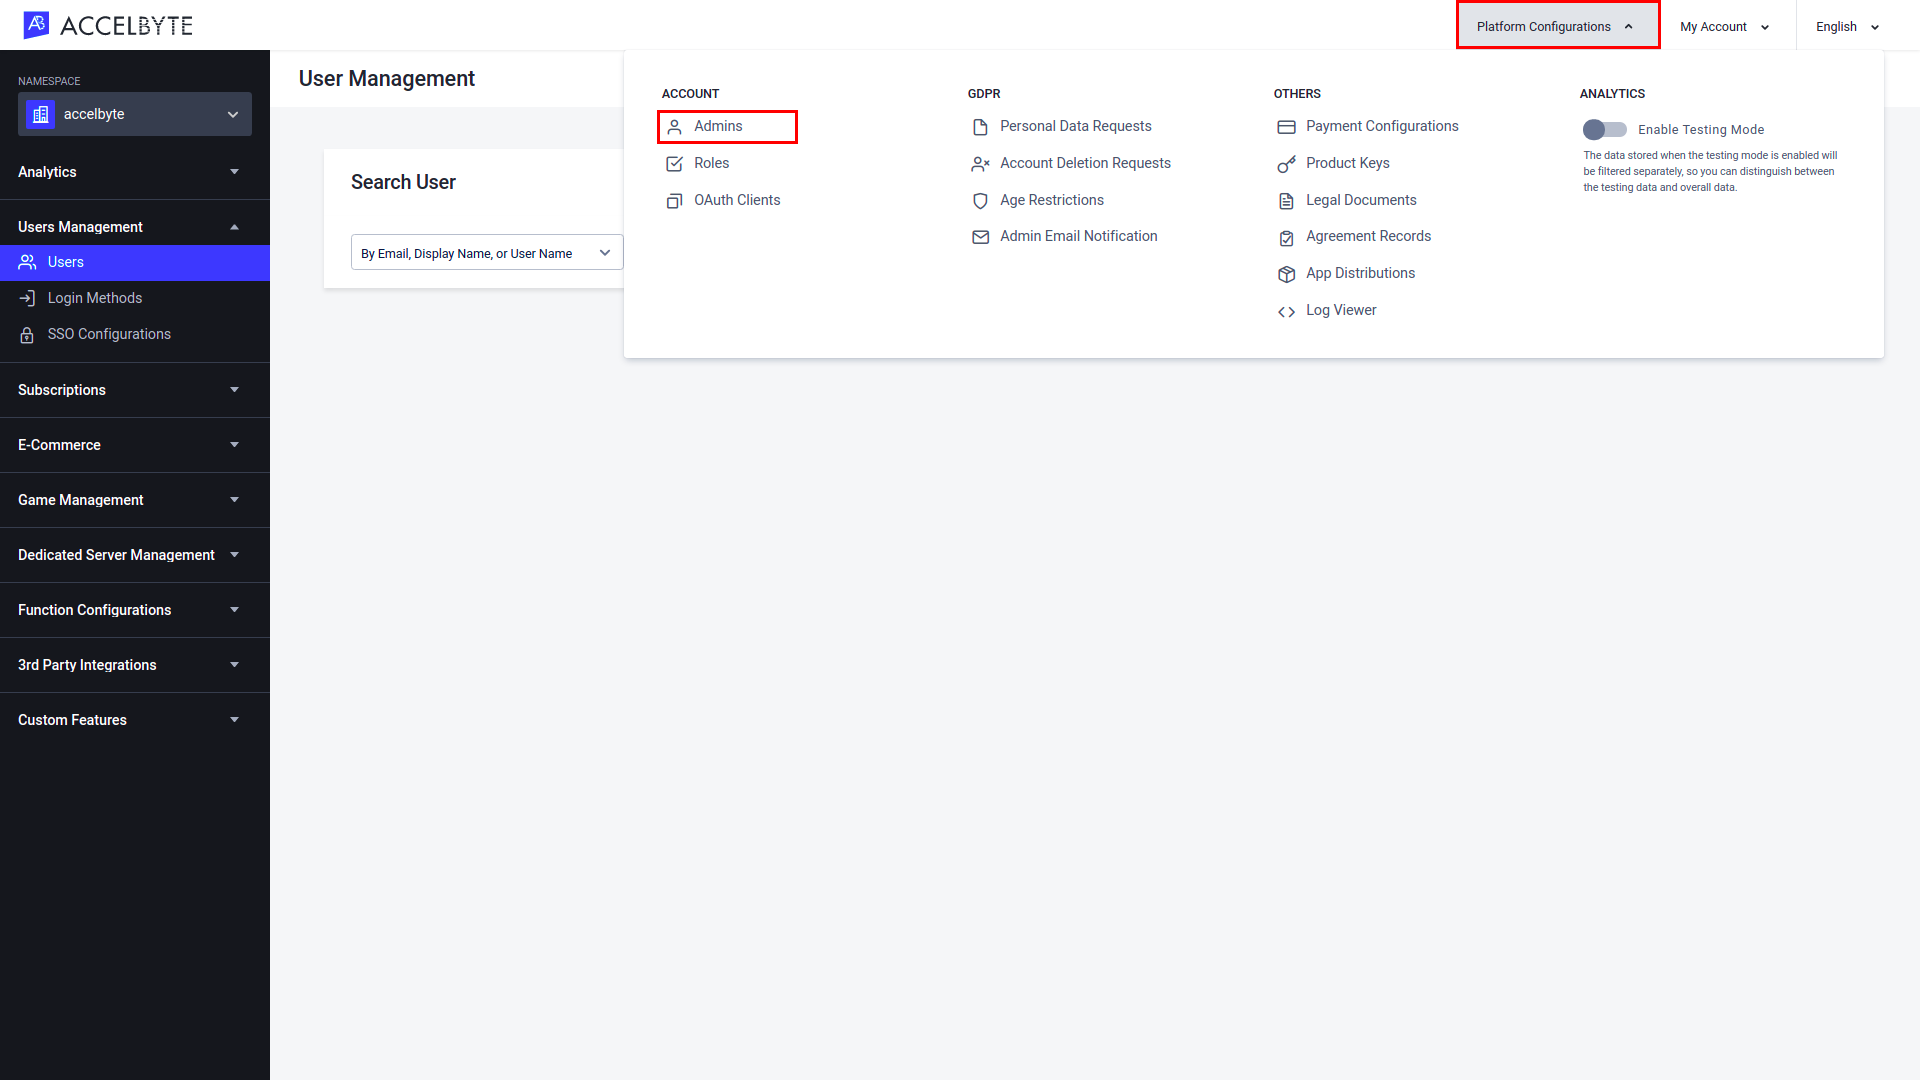
In the Admin Portal, open the Platform Configurations menu in the top-right corner of the page and click Admins.
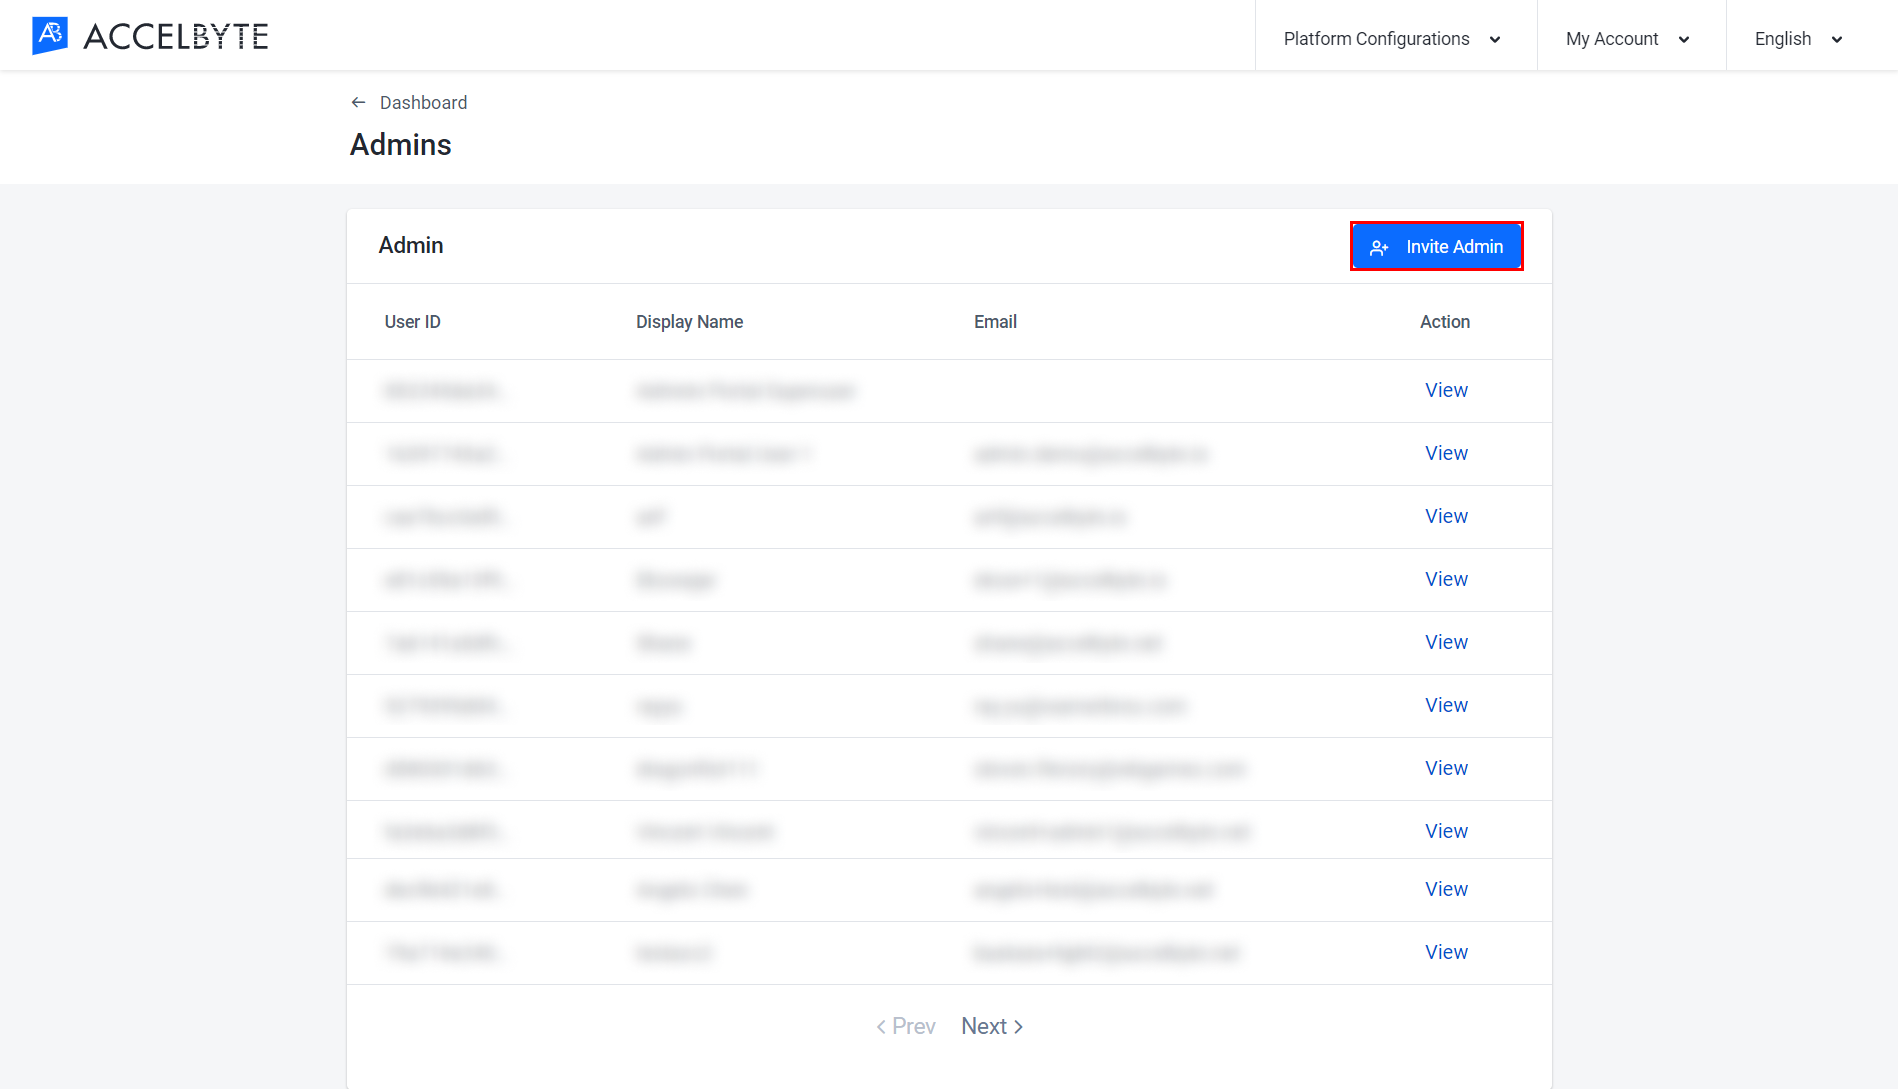
On the Admin page, click the Invite Admin button.
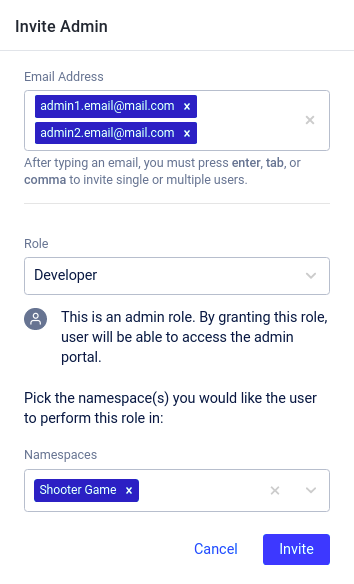
The Invite Admin form appears. Fill in the fields with the following information:
In the Assigner Email field, enter the email address for each person that you wish to give admin access to. You can invite more than one user at once by pressing Enter, Tab, or Comma on your keyboard to separate each email address.
In the Roles field, choose the roles that you want the new admins to have.
NOTE
You can also add other roles to the user later by following the steps in the Roles documentation.
The Namespace field appears after you select your roles. In the Namespace field, select the checkbox next to each namespace you want the new admins to have access to.
NOTE
The Namespace field won't appear if you chose a global role in the previous step, because global roles can access all namespaces.
Once completed, click the Invite button. Invitations will be sent to the email addresses you provided.
IMPORTANT
The invitation email is only valid for 60 minutes. If the invited admin user does not complete account registration within 60 minutes of receiving the email, you'll need to send them a new invitation.
Change a User's Email Address
You can follow the procedure below to change any user's email address, including your own:
In the Admin Portal, expand the Users Management section and click Users.
Search for the user whose email address you want to change.

The results of your search will appear. Browse the list to find the account you're looking for and click View in the Action column of the account listing to open it.

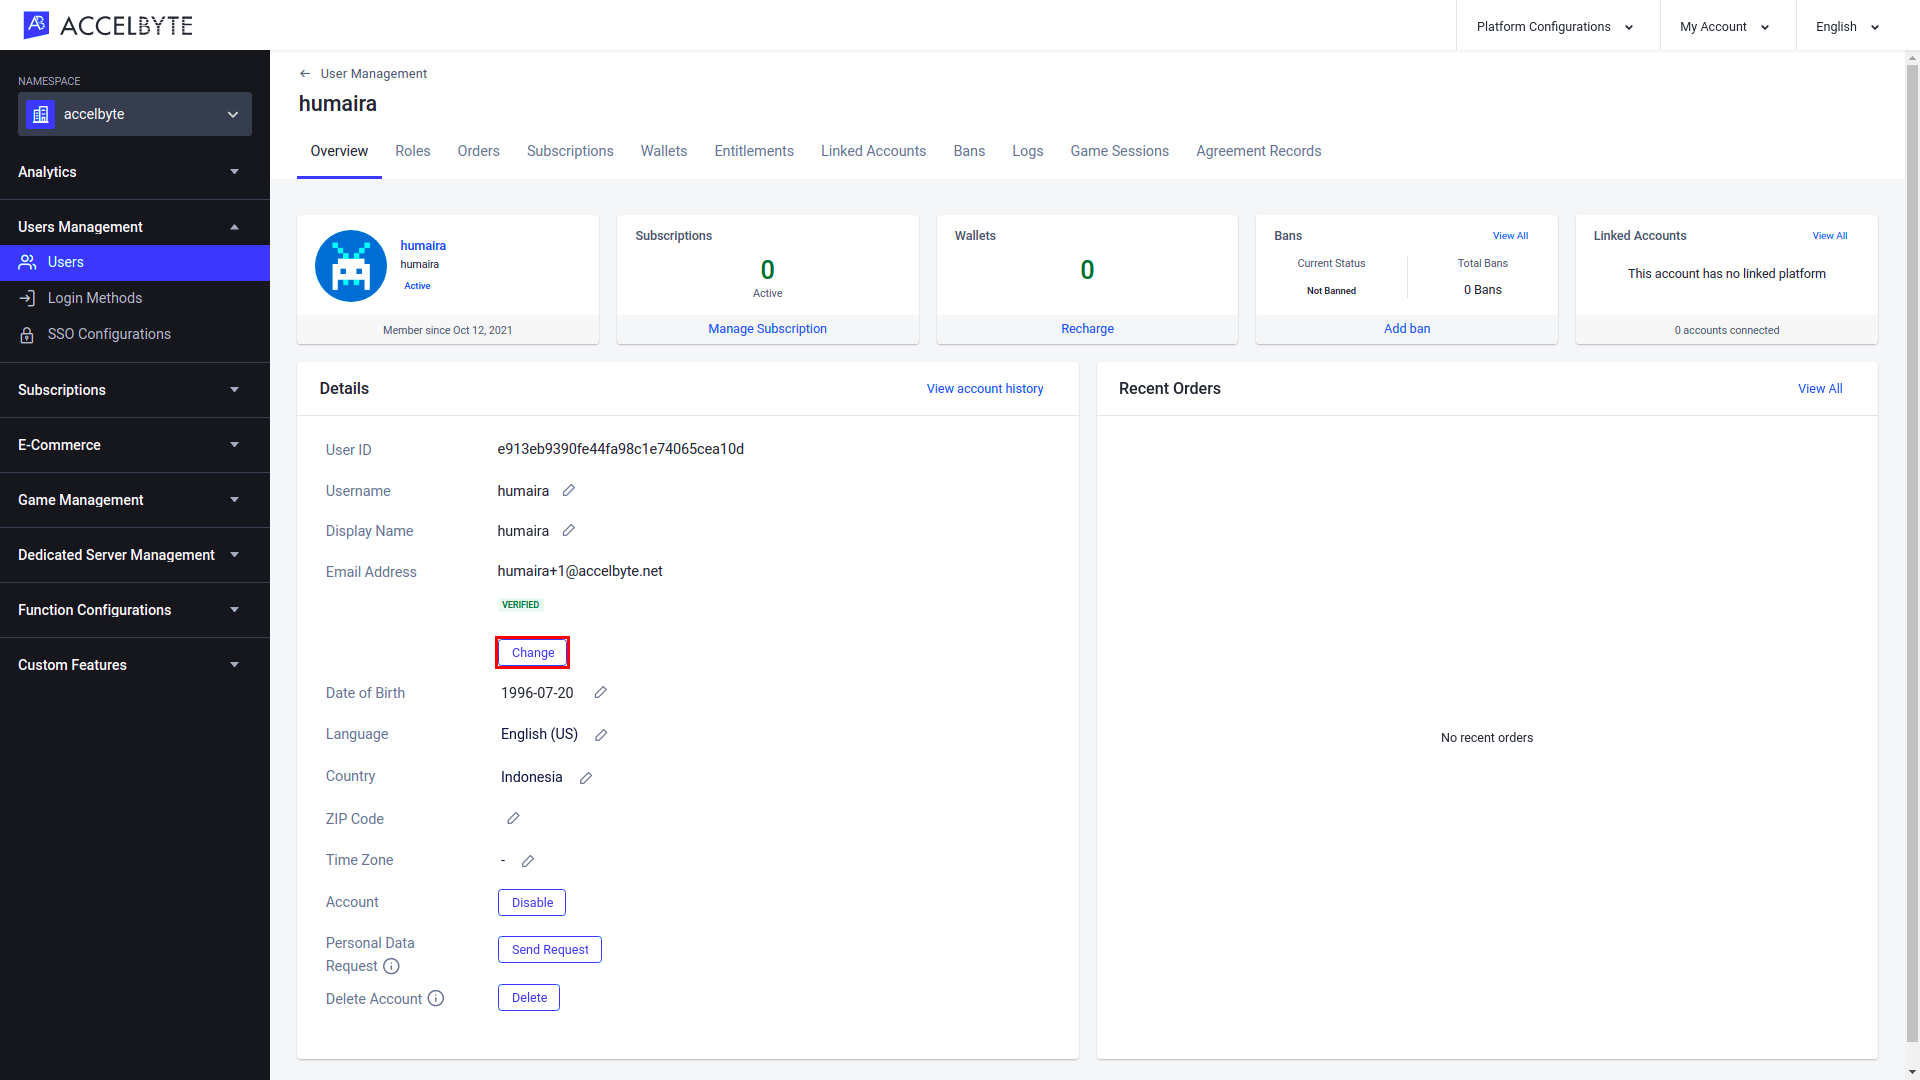
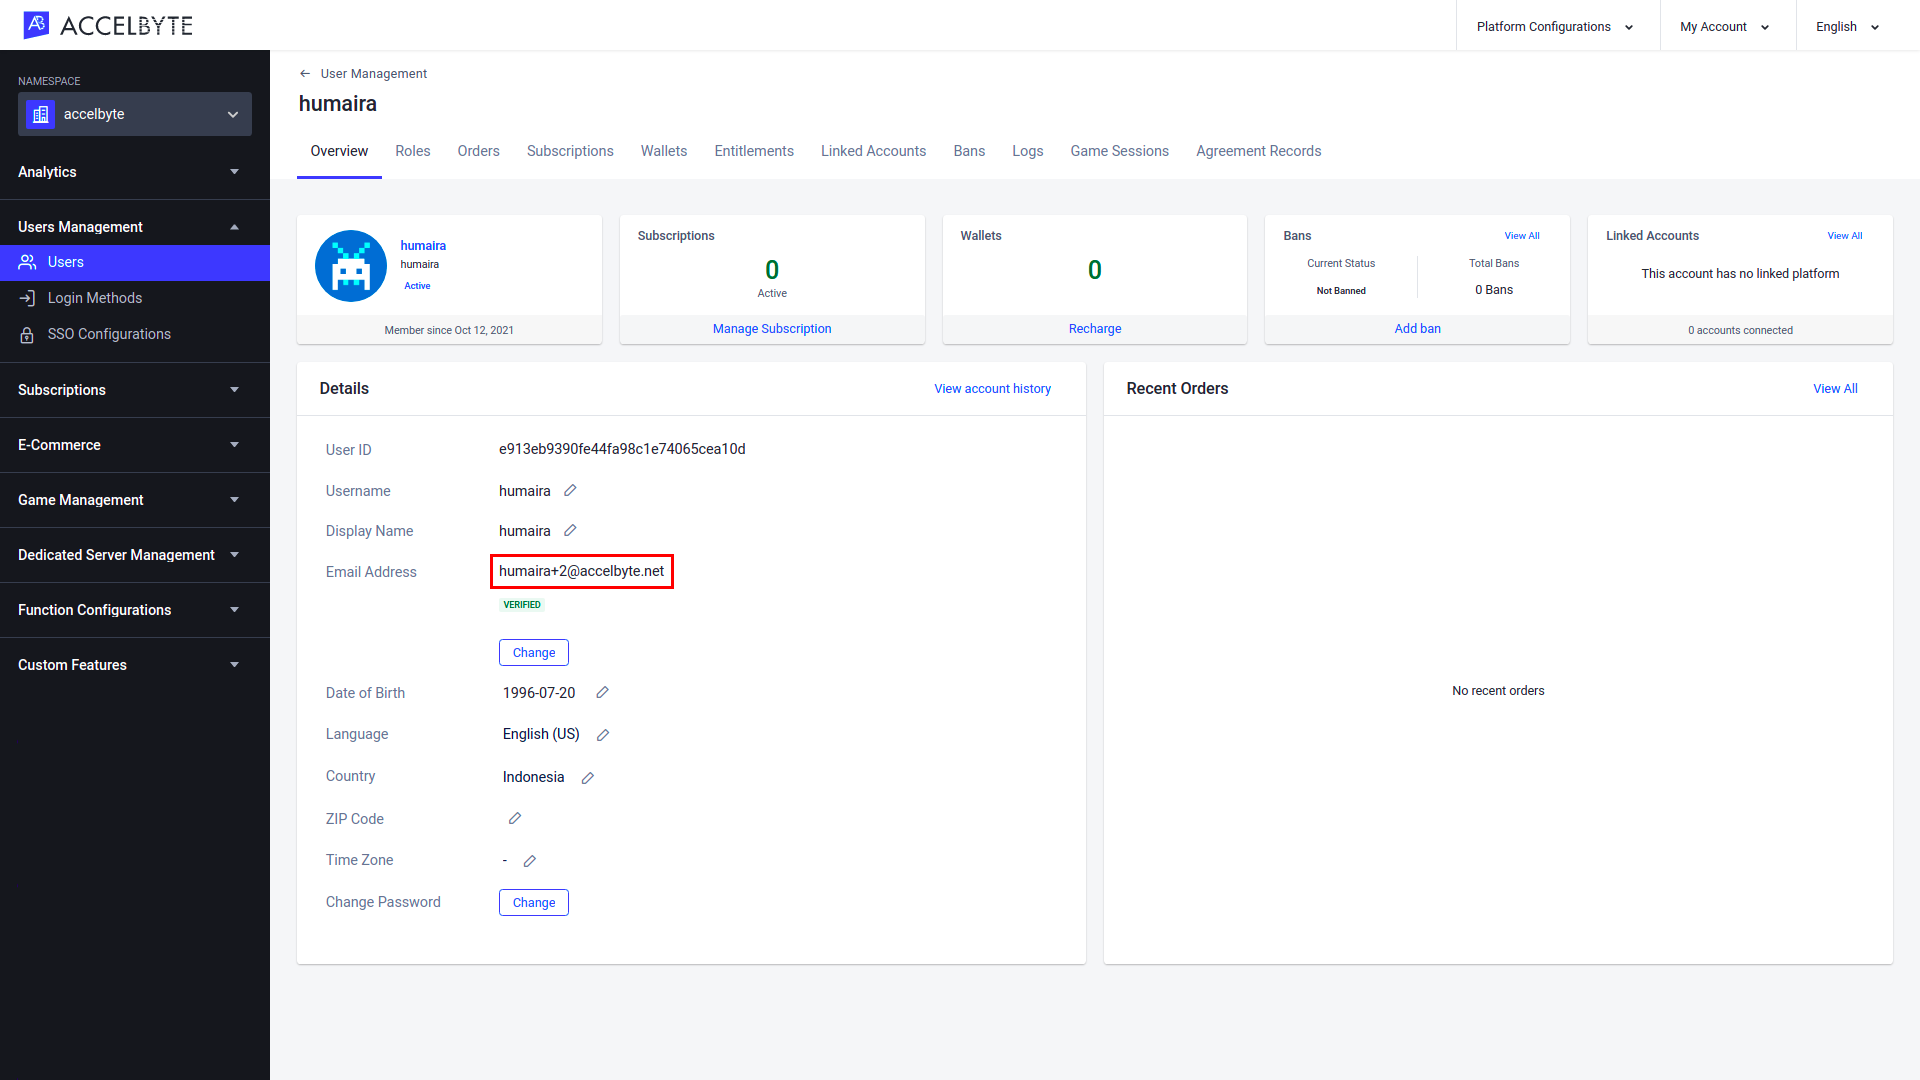
The User Overview will appear, giving you a quick look at the user's account data. Click Change under the user's email address to change it.
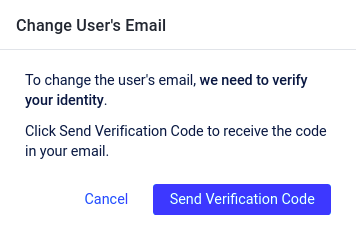
To change a user's email address, first you'll need to verify your identity. In the Change User's Email confirmation box that appears, click the Send Verification Code button to send a verification code to the email address with which you're logged into the Admin Portal.
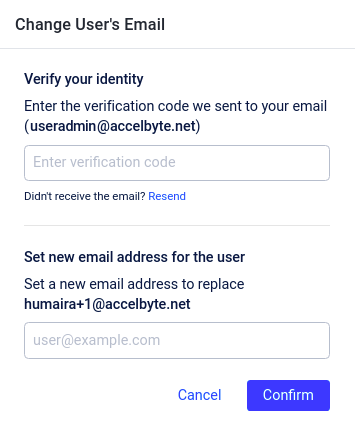
The Change User's Email confirmation box changes to show two forms. Enter the verification code that was sent to your email address in the Verify your identity field, and enter a new email address for the user in the Set new email address for the user field. Once you're done, click the Confirm button.
You'll be redirected back to the User Overview page. The user will be sent a verification message to their old email address.
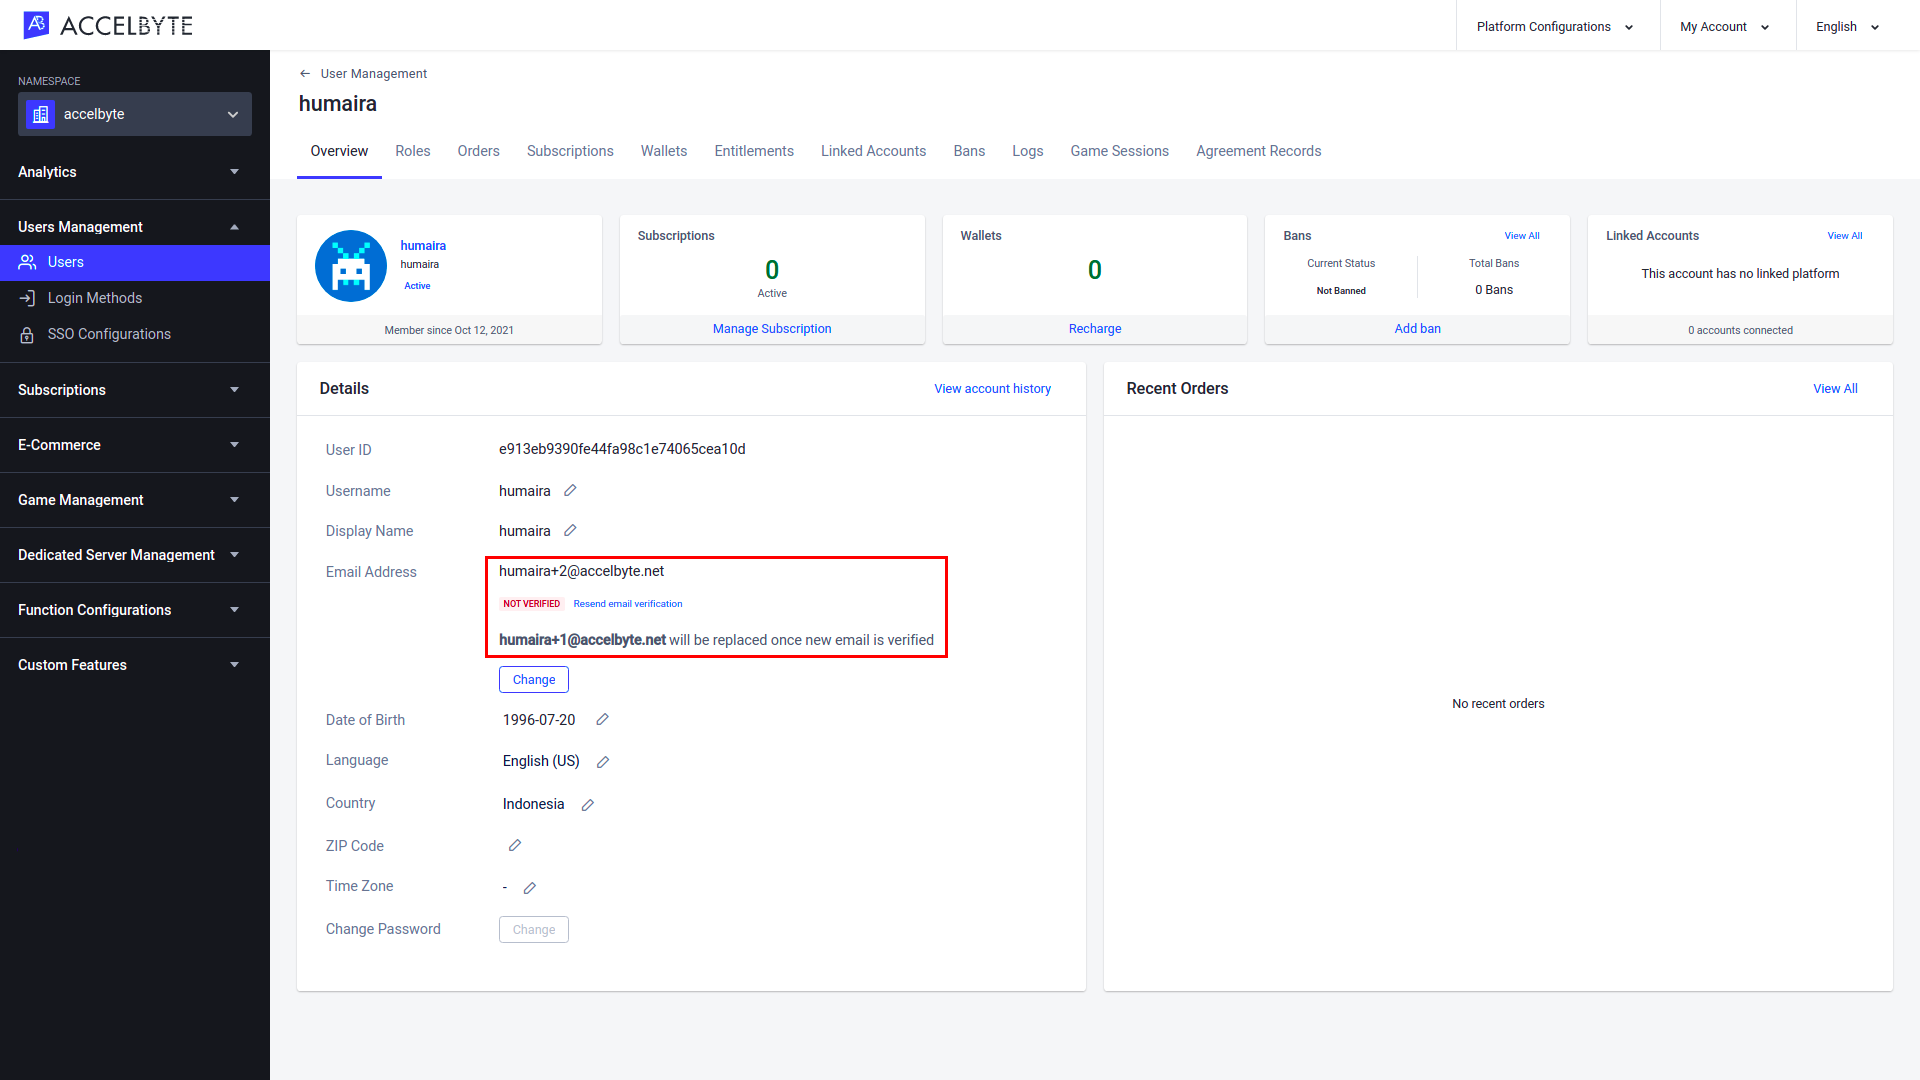
After the user confirms the update, their email address will be changed automatically.
View a User's Event Log
The User Event Log shows you the history of any changes or actions made by a user, such as when a user logged into the portal or downloaded their personal data. You will only be able to see events from namespaces for which you have permission to view users' login histories.
In the desired namespace of the Admin Portal, expand the Users Management section and click Users.

Search for the user whose event log you want to view.

The results of your search will appear. Browse the list to find the account you're looking for and click View in the Action column of the account listing to open it.

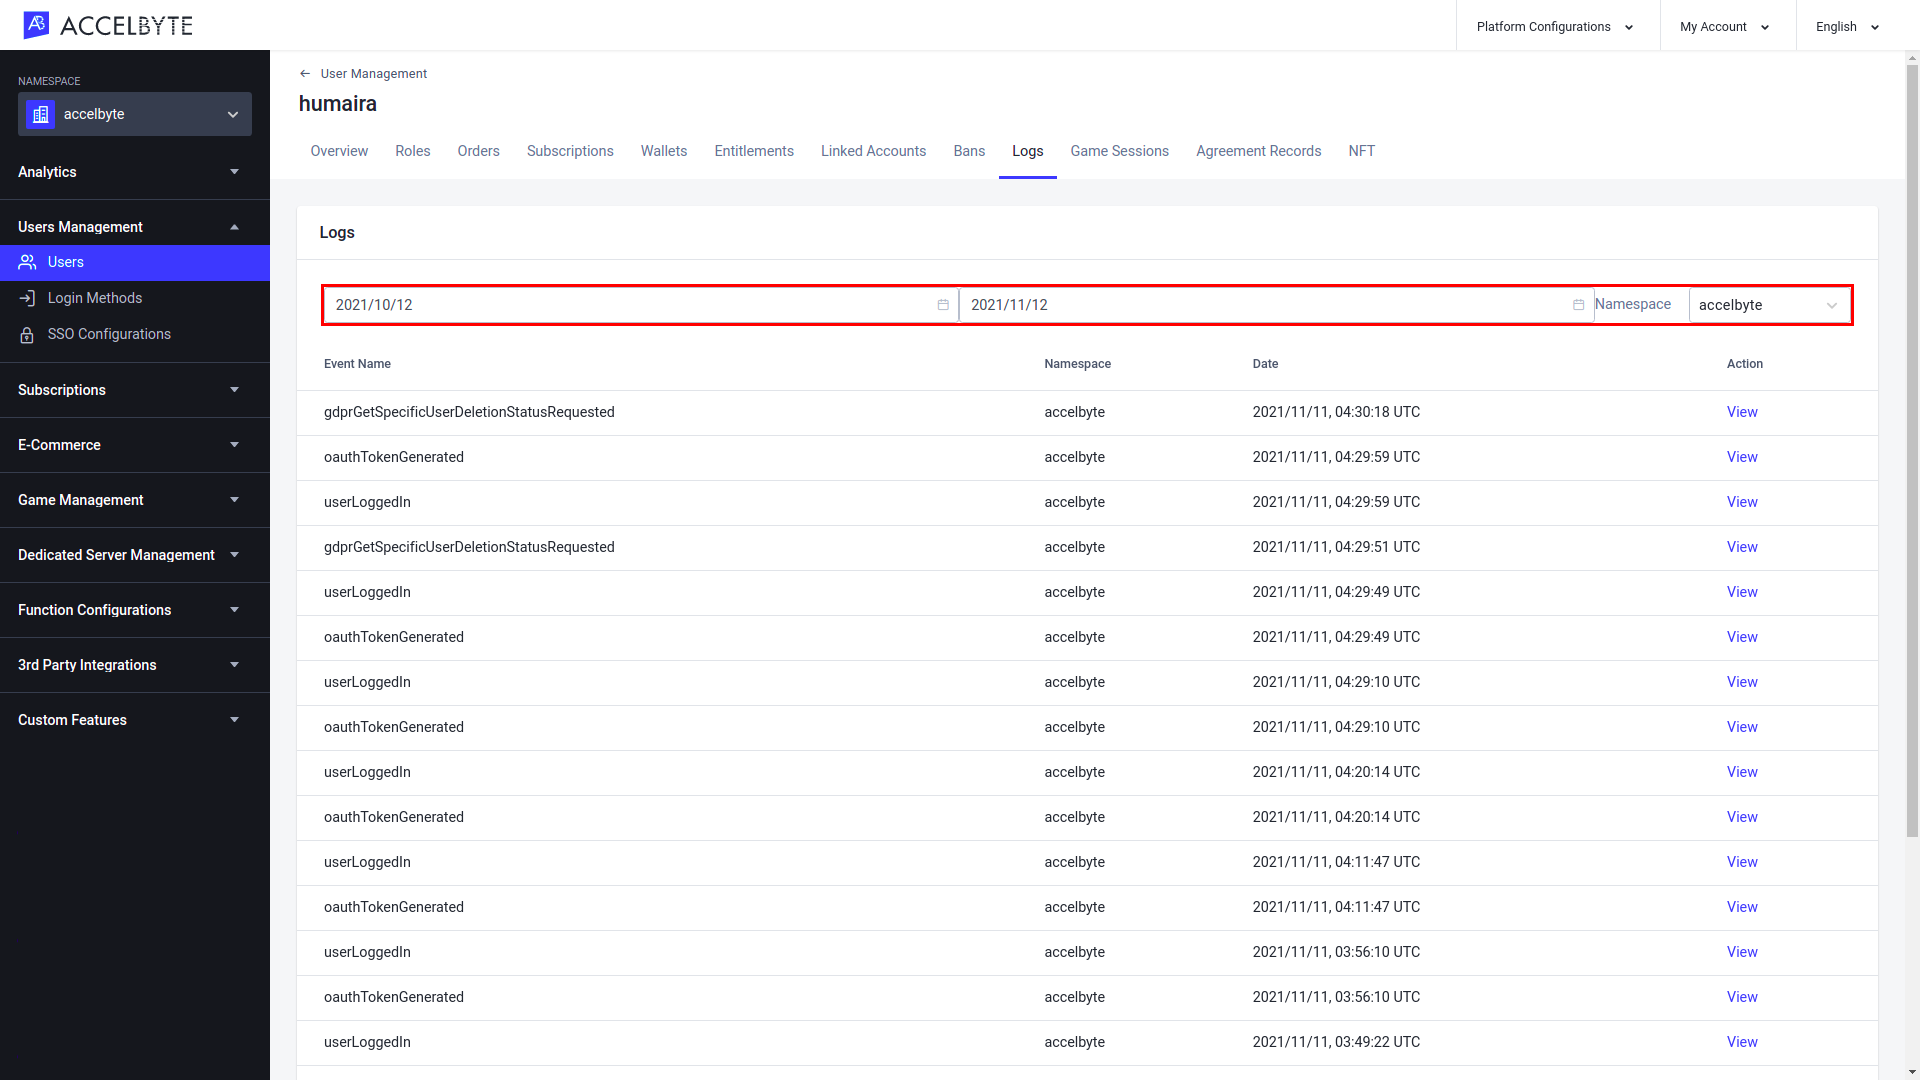
The User Overview will appear, giving you a quick look at the user's account data. Click the Log tab.

On the Logs tab, you will see a list of user logs, the namespace they belong to, and the time each log was created. You can sort the logs by creation time and or namespace to help you find a particular log.
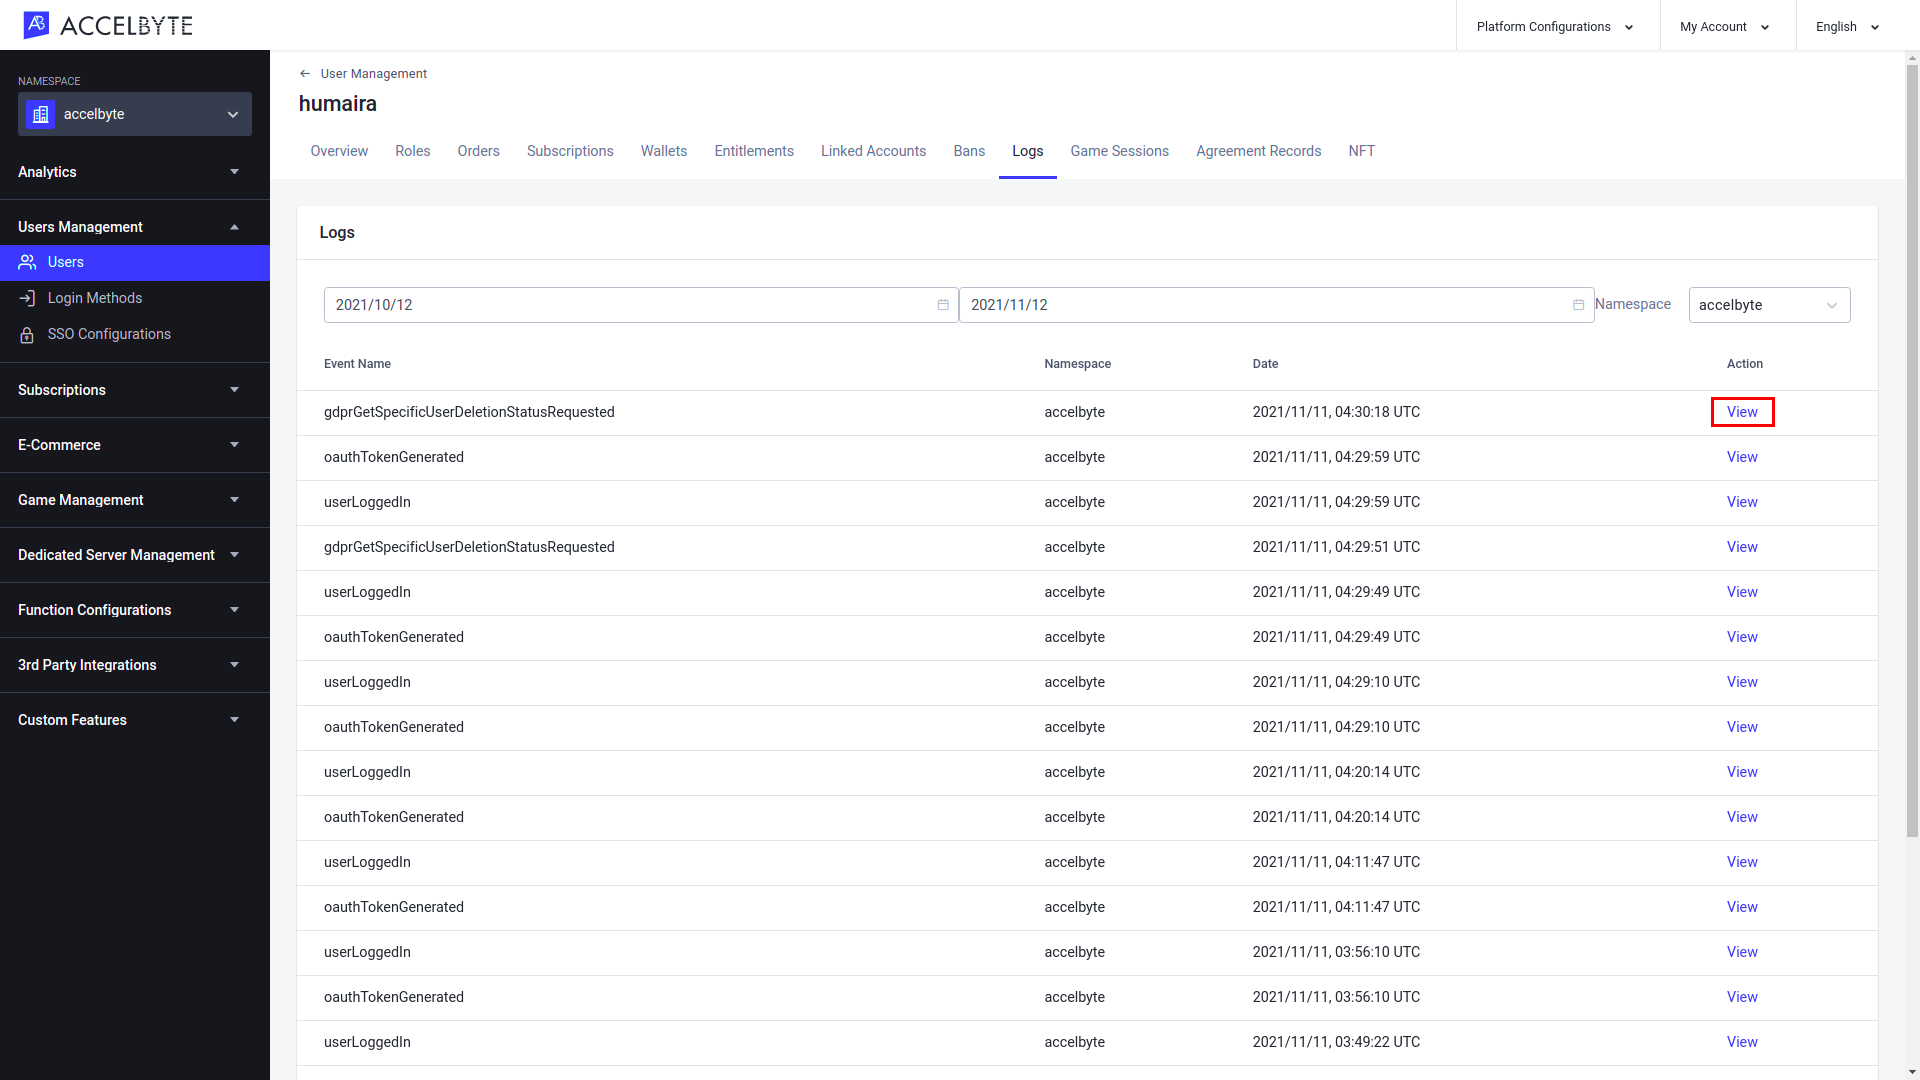
To open a log, click View in that log's Action column.
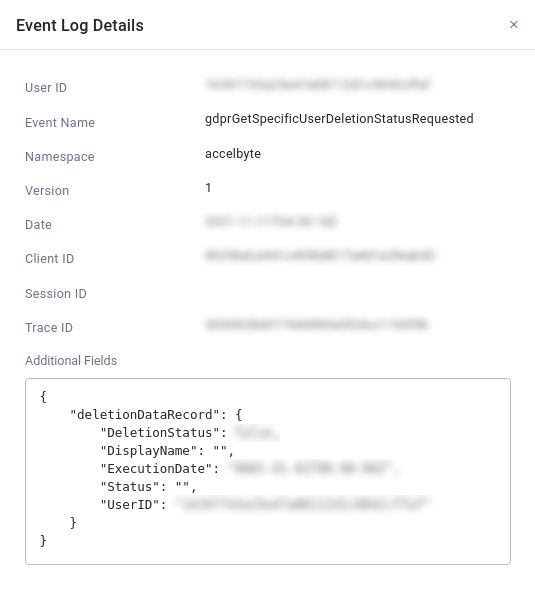
The Event Log Details window appears. Here you can see the log's contents.
View a User's Edit History
The account history feature allows you to see changes made to account data by users. The information available includes changes made to a user's Display Name, Email Address, Password, or Date of Birth.
In the Admin Portal, expand the Users Management section and click Users.

Search for the user whose edit history you want to view.

The results of your search will appear. Browse the list to find the account you're looking for and click View in the Action column of the account listing to open it.

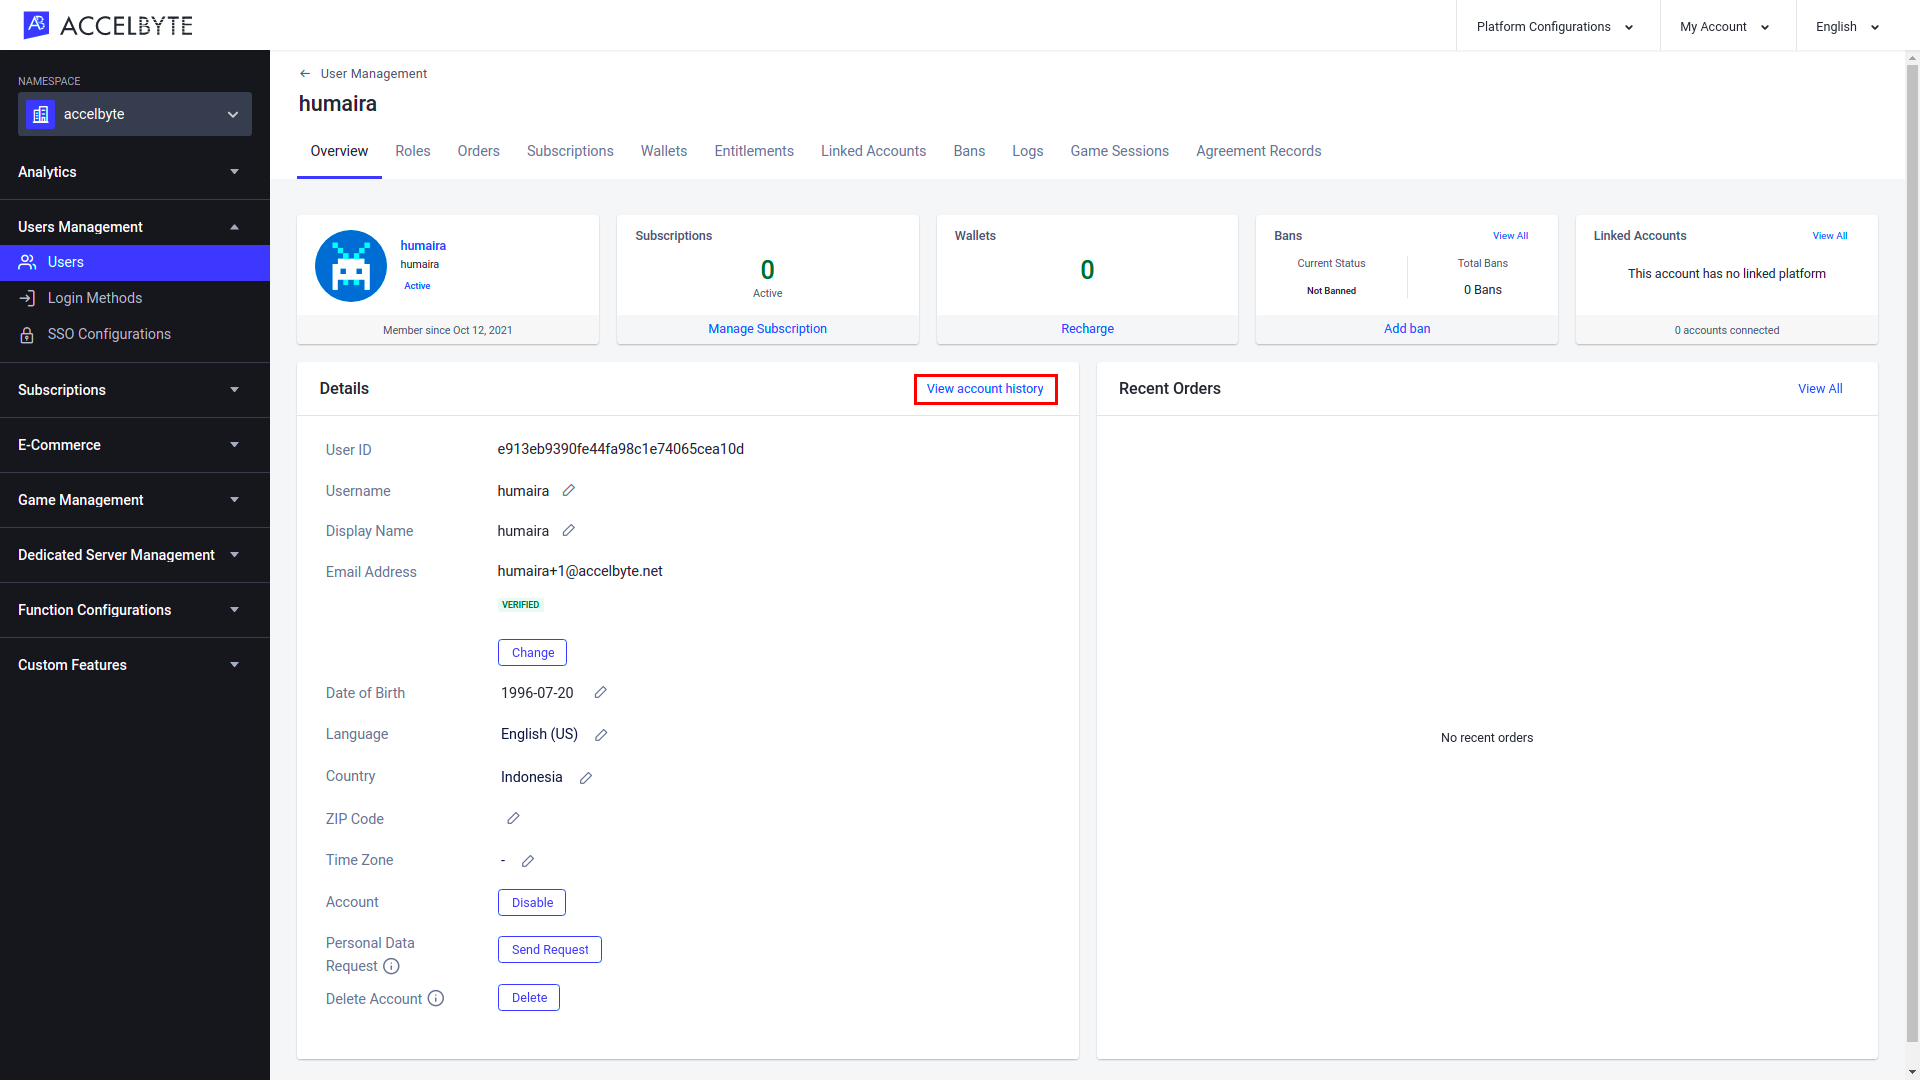
The User Overview will appear, giving you a quick look at the user's account data. Click View Account History to get their edit history.
Input the Start and End Date of the time period for which you want to retrieve the history. For example, here we input 2020-07-27 to 2020-08-04 to see the changes the user made to their Display Name within that time period.
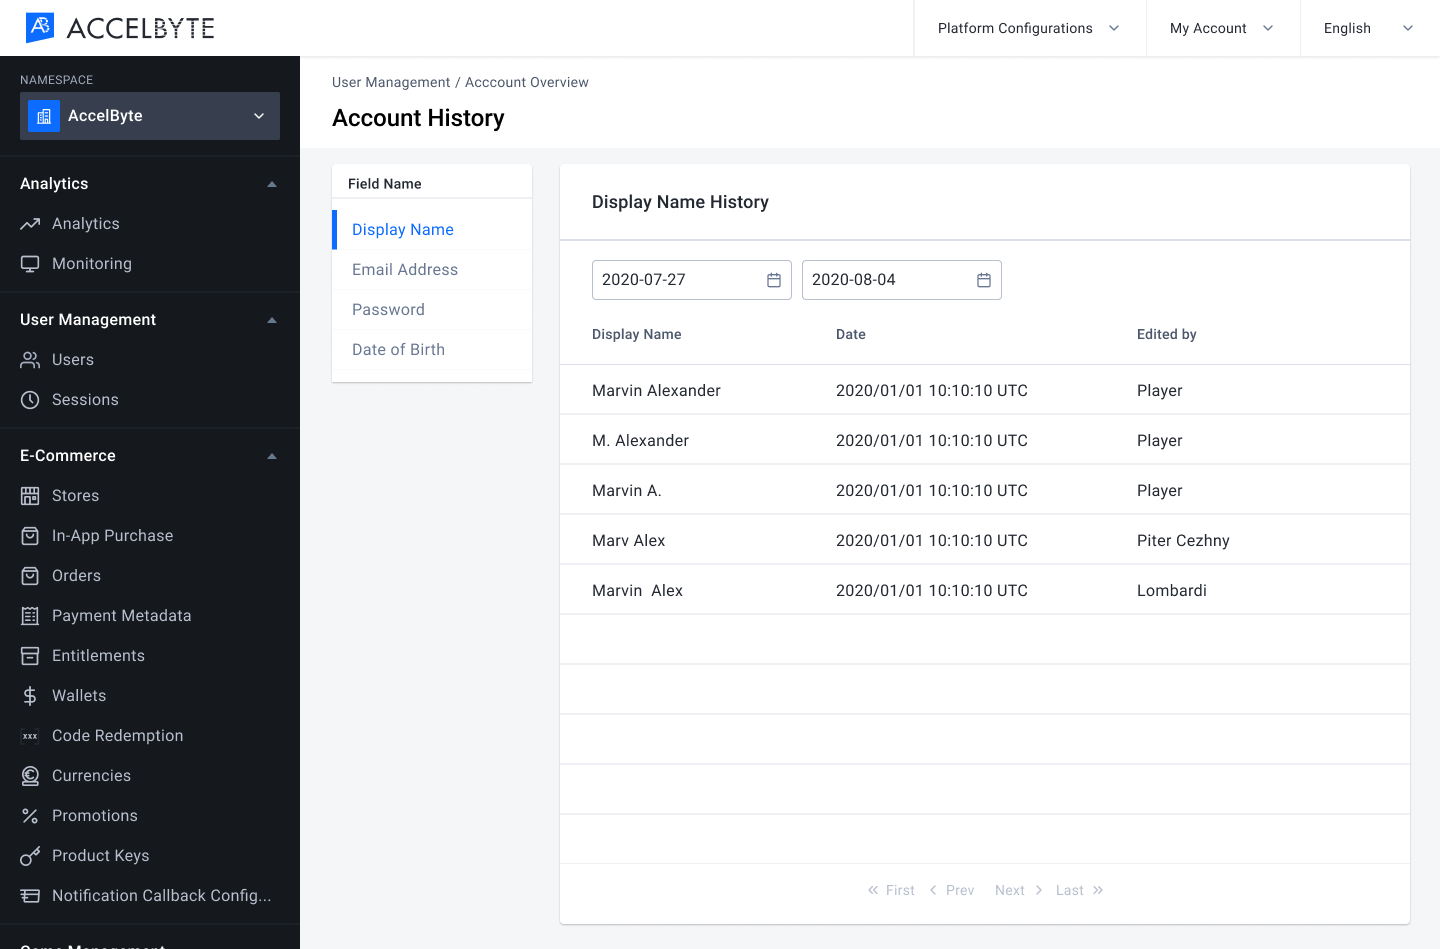
You can also view the edit history for other fields, such as Email Address, Password, or Date of Birth.

See User's Experience Advancement History
NOTE
See our Cloud Season Pass documentation to find out how to advance a user's experience in the Admin Portal.
On the Season Pass Details section of the User page, click View History beside the Total Exp.
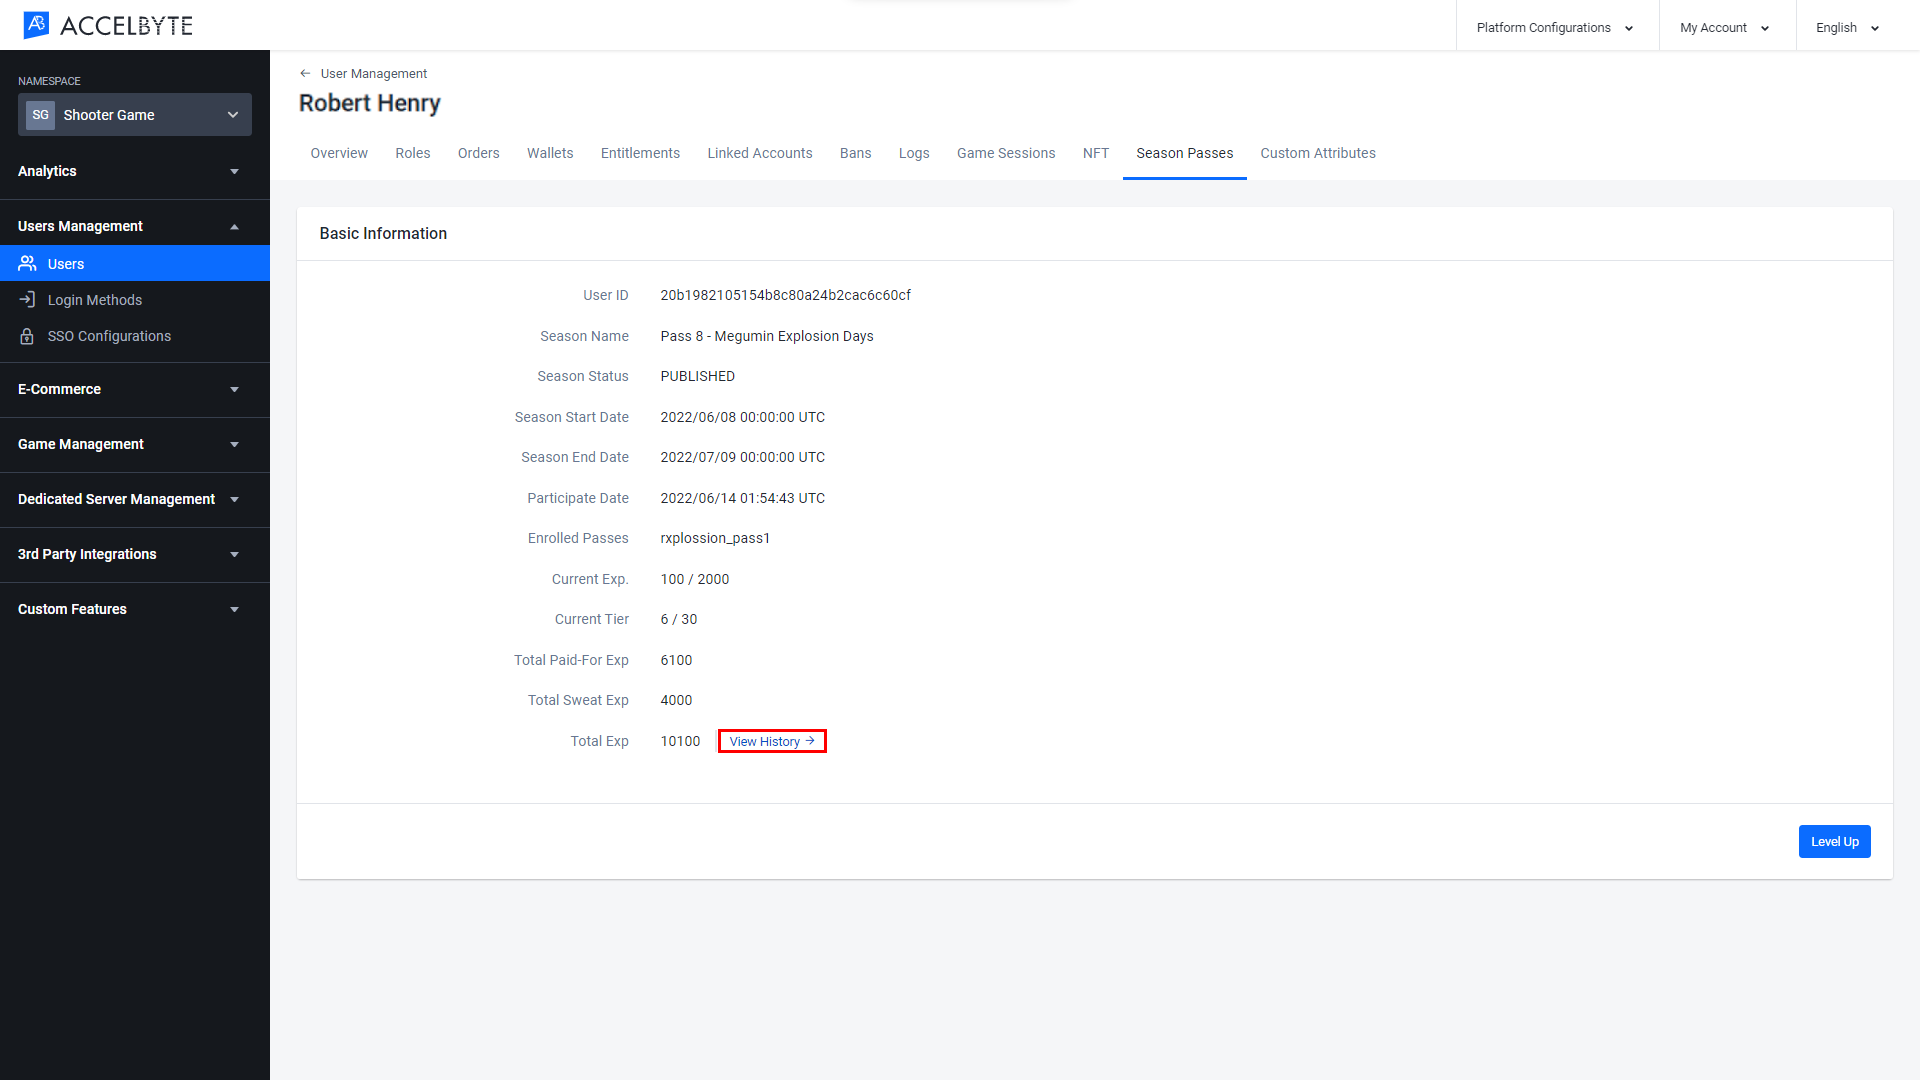
The Exp Acquisition History page will appear. Here, you can view the advancement history of the selected user.

Link a Third-party Account
Use the following procedure to link third-party accounts.
In the Admin Portal, select Users under the Users Management section.

Search for the player whose account you want to link.

Once you have found the desired account, select View in the Action column of the account listing to open it.

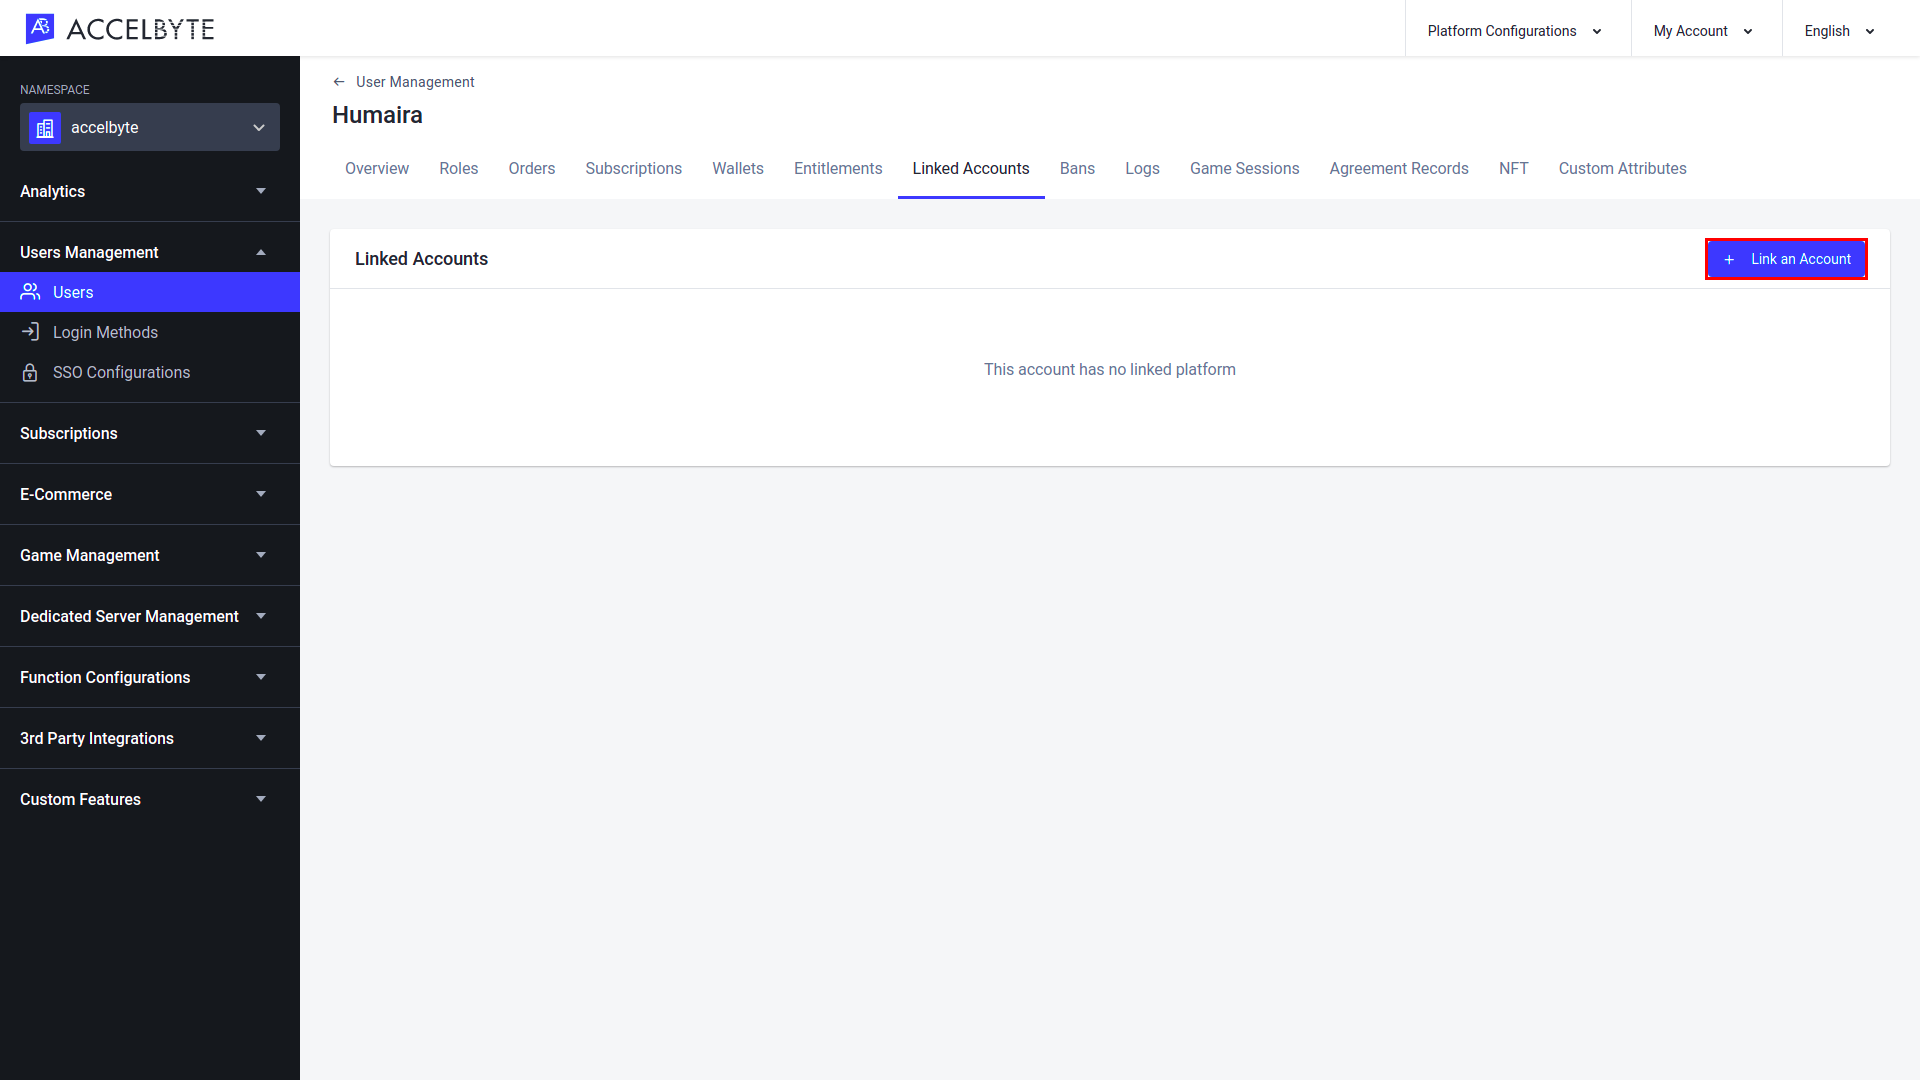
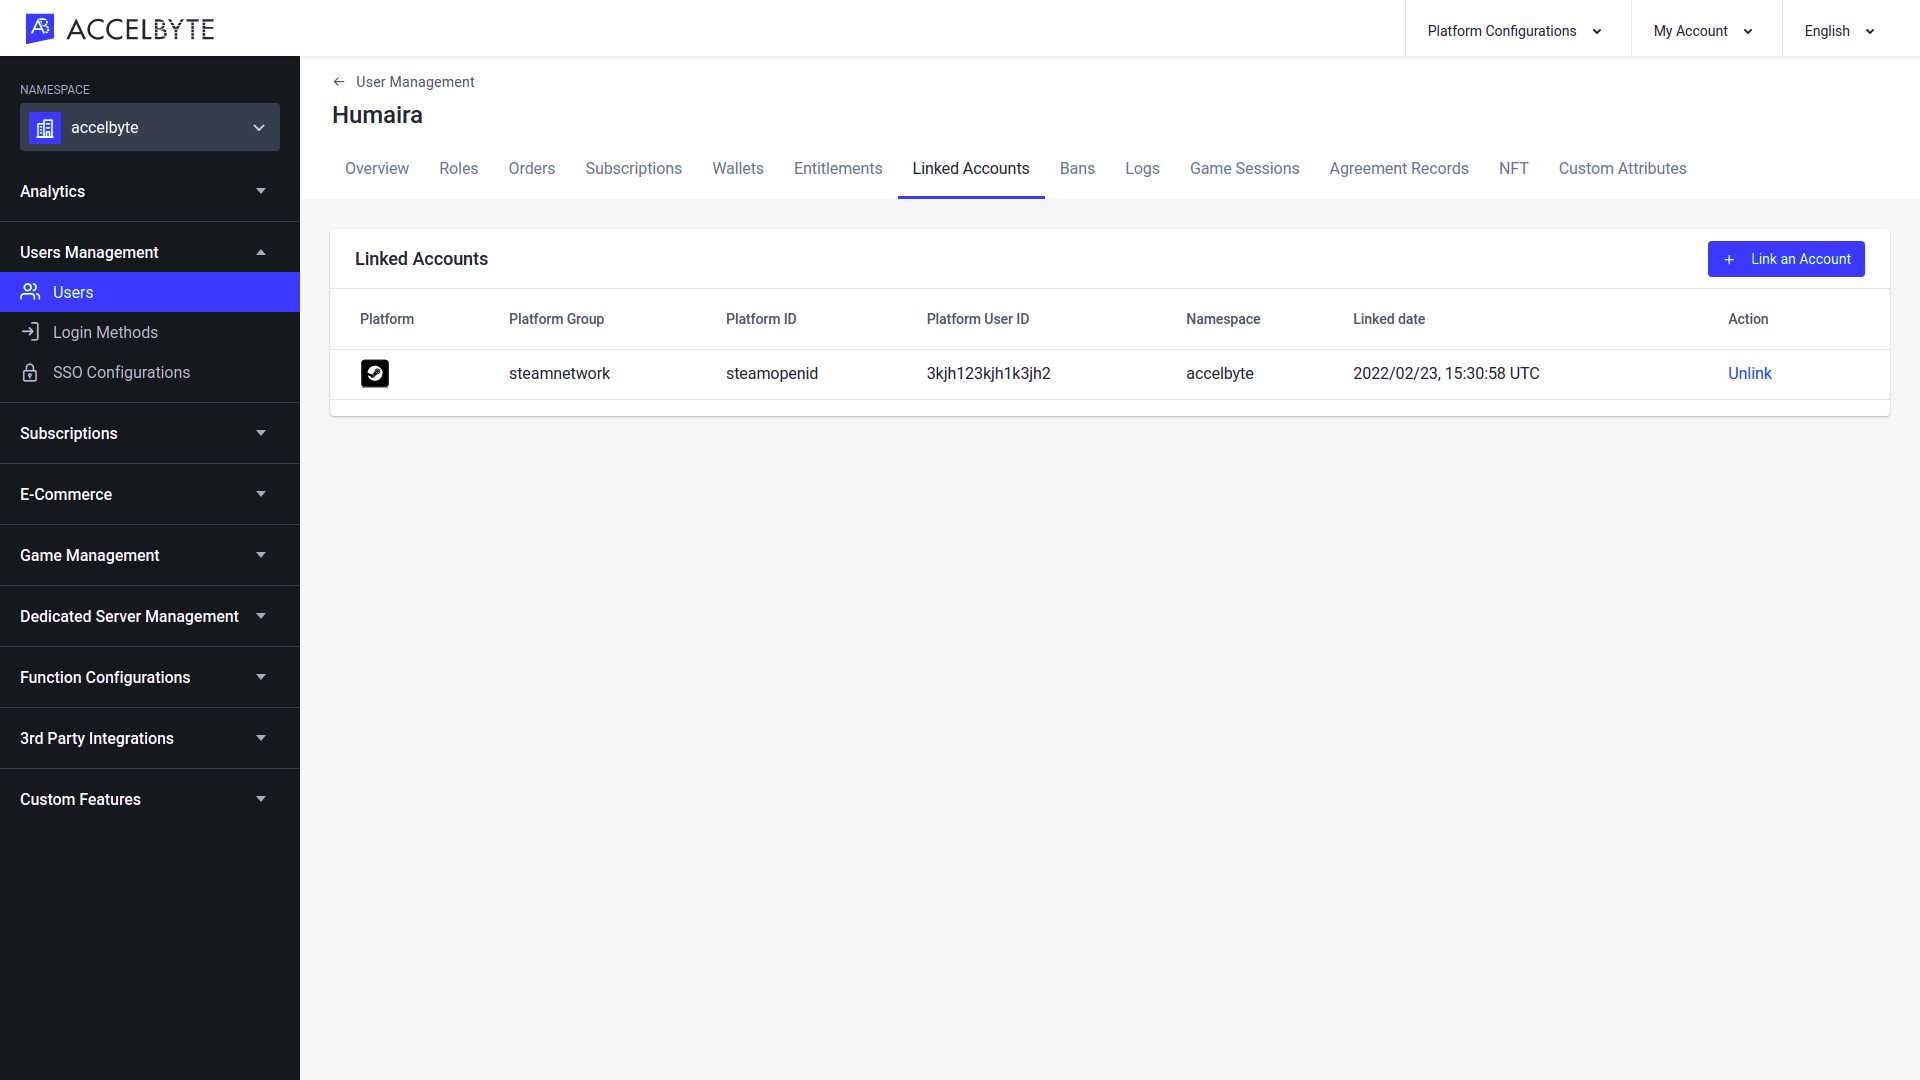
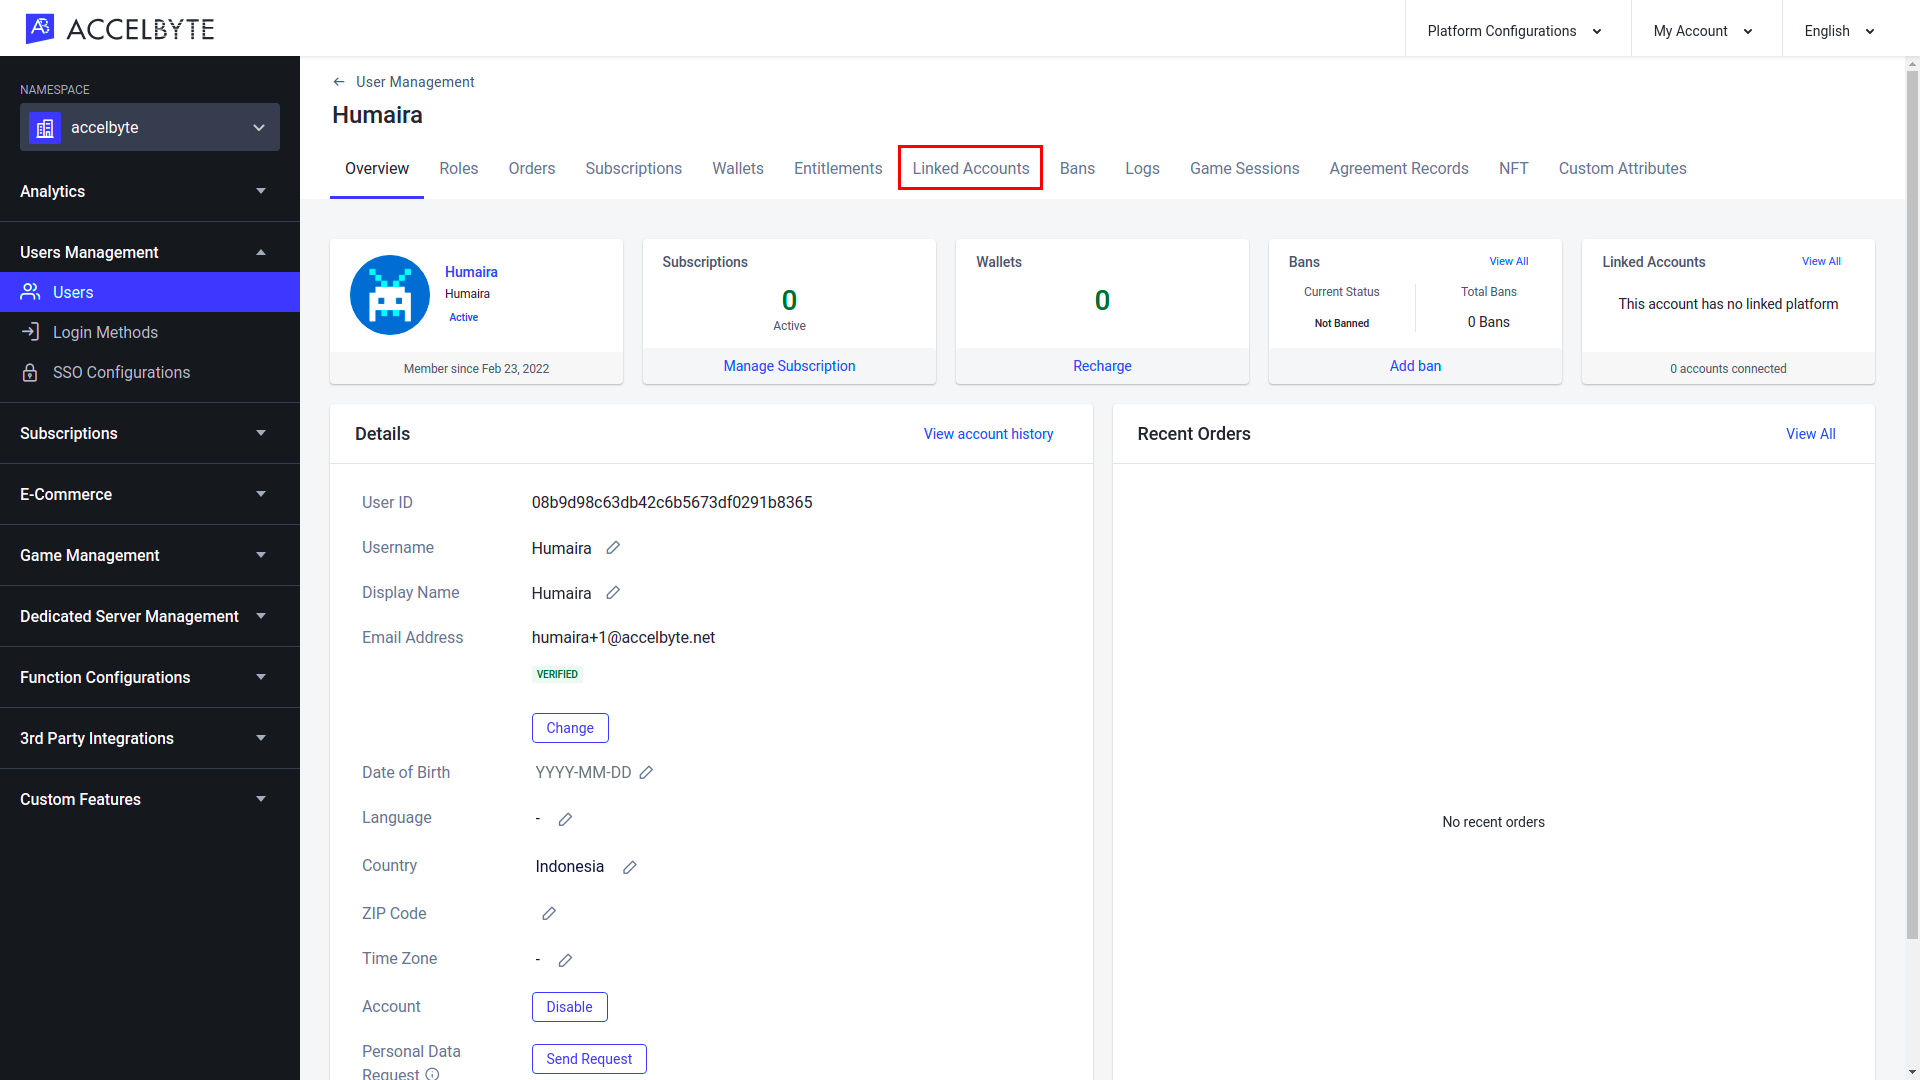
The User Overview page will appear with an overview of the player's account data. Select the Linked Accounts tab.

On the Linked Accounts tab, click the Link an Account button.
The Link an Account popup will appear. Fill in the following information:
- In the Platform ID field, select the desired third-party platform from the dropdown menu. The third-party platforms currently available are:
- XBox Web
- PSN Web
- Epic Games
- Stadia
- Steam Web
- Apple
- Twitch
- Fill the Platform User ID with the player's account ID.
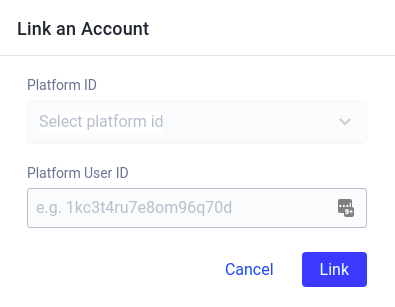
Once completed, click Link.
- In the Platform ID field, select the desired third-party platform from the dropdown menu. The third-party platforms currently available are:
A confirmation message will appear. Check the information you have entered is correct and click Confirm to proceed.
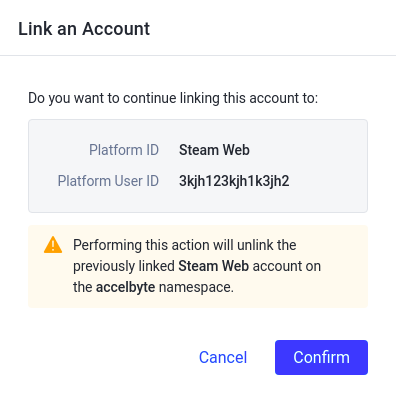
The new linked account will be added to the Linked Accounts list.
Unlink a Third-party Account
In the Admin Portal, select Users under the Users Management section.

Search for the player whose account you want to unlink.
Once you have found the desired account, select View in the Action column of the account listing to open it.

The User Overview page will appear with an overview of the player's account data. Select the Linked Accounts tab.
On the Linked Accounts tab, select the third-party account you want to unlink and click Unlink under the Action column.
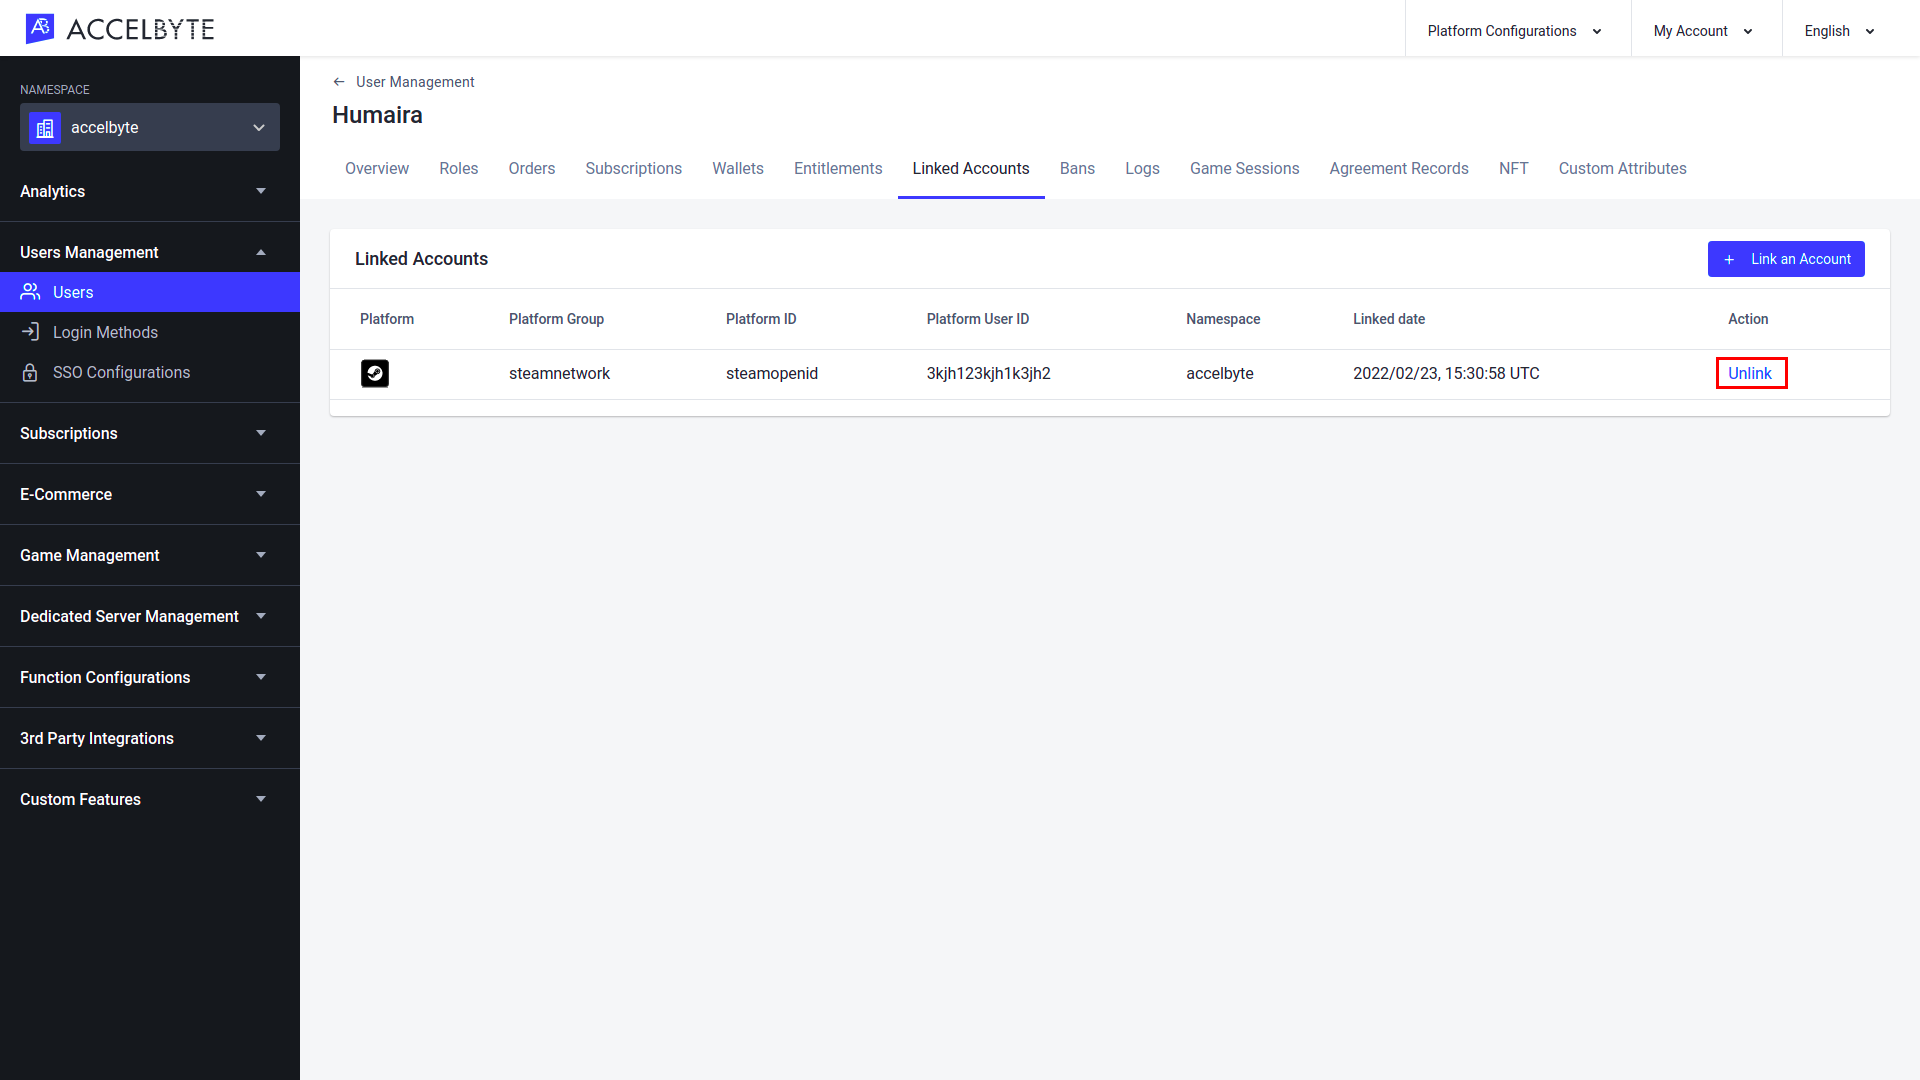
The Delete Item popup will appear. Click Unlink to proceed.
The selected third-party account will be removed from the list.

Implement Accounts Using the Client SDK
In-Game Player Registration
This function allows your players to register for an account in your game.
- Unreal Engine
- Unity
const FString OriginalEmail = TEXT("originalEmail@example.com");
const FString Username = TEXT("JohnDoe");
const FString Password = TEXT("password");
const FString DisplayName = TEXT("testName");
const FString Country = TEXT("US");
const FString DateOfBirth = TEXT("2000-12-20");
bool bUserAccountCreated = false;

FRegistry::User.Registerv2(OriginalEmail, Username, Password, DisplayName, Country, DateOfBirth,
    THandler<FUserData>::CreateLambda([&bUserAccountCreated](const FUserData& Result)
    {
        UE_LOG(LogAccelByteUserTest, Display, TEXT("Success."));
        bUserAccountCreated = true;
    }),
    FErrorHandler::CreateLambda([](int32 ErrorCode, const FString& ErrorMessage)
    {
        UE_LOG(LogAccelByteUserTest, Error, TEXT("Error. Code: %d, Reason: %s"), ErrorCode, *ErrorMessage)
    }));
private static void OnRegister(Result<UserData> result)
{
    if (result.IsError)
    {
        Debug.Log("Register failed:", result.Error.Message);
    }
    else
    {
        Debug.Log("Register successful.");
    }
}

public static void Main(string[] args)
{
    var user = AccelBytePlugin.GetUser();
    string email = "useremail@example.com";
    string username = "JohnDoe";
    string password = "password";
    string displayName = "displayed";
    string country = "US";
    string dateOfBirth = "1995-12-30";
    user.Registerv2(email, username, password, displayName, OnRegister, country, dateOfBirth);
}
Player Verifies Registration
This function allows a player to verify their account registration, which they must do before they can log into their account.
- Unreal Engine
- Unity
const FString VerificationCode = TEXT("verification-code-from-email");

FRegistry::User.Verify(VerificationCode, FVoidHandler::CreateLambda([&bVerifyUserSuccessful]()
  {
     UE_LOG(LogAccelByteUserTest, Display, TEXT("Success."));
  }),
FErrorHandler::CreateLambda([](int32 ErrorCode, const FString& ErrorMessage)
    {
        UE_LOG(LogAccelByteUserTest, Error, TEXT("Error. Code: %d, Reason: %s"), ErrorCode, *ErrorMessage)
    }));
//Let's assume that user has inputted verification code somehow after receiving email with verification code
private static void OnVerifyClicked(object sender, string verificationCode)
{
    var user = AccelBytePlugin.GetUser();

    user.Verify(verificationCode, OnVerify);
}

private static void OnVerify(Result result)
{
    if (result.IsError)
    {
        Debug.Log("Verify failed:", result.Error.Message);
    }
    else
    {
        Debug.Log("Verify successful. User verified");
    }
}
Player Upgrades a Headless Account
This function upgrades a headless account by linking the headless account with the email address and password. To upgrade a headless account, the player must log in with a third-party platform account first.
- Unreal Engine
- Unity
const FString OriginalEmail = TEXT("originalEmail@example.com");
const FString Password = TEXT("Password1");

FAccountUserData userData;
FRegistry::User.Upgrade(OriginalEmail, Password,
    THandler<FAccountUserData>::CreateLambda([&](const FAccountUserData& Result)
    {
        userData = Result;
        UE_LOG(LogAccelByteUserTest, Display, TEXT("Success."));
    }),
    FErrorHandler::CreateLambda([&](int32 ErrorCode, const FString& ErrorMessage)
    {
        UE_LOG(LogAccelByteUserTest, Error, TEXT("Error. Code: %d, Reason: %s"), ErrorCode, *ErrorMessage);
    }));

//log out
FRegistry::User.ForgetAllCredentials();
var user = AccelBytePlugin.GetUser();
string email = "johnDoe@example.com";
string password = "Password1";

//upgrade v1
Result<UserData> upgradeResult = null;
user.Upgrade(email, password, result =>
{
  upgradeResult = result;
});

Result logoutResult = null;
user.Logout(result =>
{
  logoutResult = result;
});
Player Login with Username and Password Without 2FA Enabled
This function shows how players can log into your game using a verified account.
- Unreal Engine
- Unity
const FString OriginalEmail = TEXT("originalEmail@example.com");
const FString Password = TEXT("Password1");
bool bUserLoggedIn = false;

FRegistry::User.LoginWithUsername(OriginalEmail, Password,
    FVoidHandler::CreateLambda([&bUserLoggedIn]()
    {
        UE_LOG(LogAccelByteUserTest, Display, TEXT("Success."));
        bUserLoggedIn = true;
    }),
    FErrorHandler::CreateLambda([](int32 ErrorCode, const FString& ErrorMessage)
    {
        UE_LOG(LogTemp, Error, TEXT("Error. Code: %d, Reason: %s"), ErrorCode, *ErrorMessage)
    }));
static string email = "johnDoe@example.com";
static string password = "Password1";

public static void OnLogin(Result result)
{
    if (!result.IsError)
    {
        // show the login result
        Debug.Log("Login successful");
    }
    else
    {
        Debug.Log("Login failed:" + result.IsError);
    }
}

public static void Main(string[] args)
{
    User user = AccelBytePlugin.GetUser();
    user.LoginWithUserName(email, password, OnLogin);
}
Get Account Data for the Currently Signed-in User
Getting user data retrieves all of the personal data for the player that's logged in.
- Unreal Engine
- Unity
bool bGetDataSuccessful = false;
FAccountUserData GetDataResult;
FRegistry::User.GetData(
    THandler<FAccountUserData>::CreateLambda([&](const FAccountUserData& Result)
    {
        UE_LOG(LogAccelByteUserTest, Log, TEXT("Success"));
        bGetDataSuccessful = true;
        GetDataResult = Result;
    }),
    FErrorHandler::CreateLambda([](int32 ErrorCode, const FString& ErrorMessage)
    {
        UE_LOG(LogAccelByteUserTest, Fatal, TEXT("Error. Code: %d, Reason: %s"), ErrorCode, *ErrorMessage)
    }));
public static void OnGetUserData(Result<UserData> result)
{
    if (result.IsError)
    {
        Debug.Log("Get data failed:", result.Error.Message);
    }
    else
    {
        Debug.Log("Get data successful.");
    }
}
public static void Main(string[] args)
{
    var user = AccelBytePlugin.GetUser();
    user.GetData(OnGetUserData);
}
Get User Data in Bulk
You can retrieve public player data by submitting user IDs for the desired players using the following function. Public player data includes the AvatarUrl of a player's avatar, their DisplayName, and their UserId.
- Unreal Engine
- Unity
TArray<FString> UserIds = {"userId1", "userId2", "userId3"};
bool bBulkUserInfoSuccess = false;
FListBulkUserInfo BulkUserInfoResult;

FRegistry::User.BulkGetUserInfo(UserIds, THandler<FListBulkUserInfo>::CreateLambda([&bBulkUserInfoSuccess, &BulkUserInfoResult](const FListBulkUserInfo& Result)
  {
     /* do something when succeed */
     BulkUserInfoResult = Result;
     bBulkUserInfoSuccess = true;
  }),FErrorHandler::CreateLambda([](int32 ErrorCode, const FString& ErrorMessage)
    {
     /* do something when failed */
    UE_LOG(LogAccelByteUserTest, Error, TEXT("Error. Code: %d, Reason: %s"), ErrorCode, *ErrorMessage)
    }));
string[] userIds = {"userId1", "userId2", "userId3"};
Result<ListBulkUserInfoResponse> listBulkUserInfoData = null;
AccelBytePlugin.GetUser().BulkGetUserInfo(userIds, result =>
{
   if(!result.IsError)
   {
    Debug.Log("Upload content request created");
    listBulkUserInfoData = result;
   }
   else
   {
     Debug.Log("Error: " + result.Error.Code + " | Message: " + result.Error.Message);
   }
});
Connect Custom Services to the Event Log using the Server SDKs
SDK Initialization
Before using the Event Log service from the SDK, you will need to initialize your server-side SDK to ensure that you are authorized and able to perform create, read, update, and delete actions.
Golang SDK Initialization
Before using the Event Log service from the Golang SDK, you will need to initialize the SDK by following the steps below:
- Create your OAuth Client and assign the necessary permissions to access the IAM service.
- Log in as a Client using the SDK.
- Initialize the OAuth 2.0 service using the following function:
- Golang
eventV2Service := &eventlog.EventV2Service{
    Client:          factory.NewEventLogClient(&repository.ConfigRepositoryImpl{}),
    TokenRepository: &repository.TokenRepositoryImpl{},
}
Once completed, you can use the Golang SDK to create, read, update, or delete the Event Log from your serverless app.
Python SDK Initialization
Before using the Event Log service from the Python SDK, you will need to initialize the SDK by following the steps below:
- Create your OAuth Client and assign the necessary permissions to access the Matchmaking service.
- Log in as a Client using the SDK.
Once completed, you can use the Python SDK to create, read, update, or delete the Event Log from your serverless app.
.NET (C#) SDK Initialization
Before using the Event Log service, you will need to set some permissions. Use the following .NET namespaces:
using AccelByte.Sdk.Api.Eventlog.Model;
using AccelByte.Sdk.Api.Eventlog.Operation;
using AccelByte.Sdk.Api.Eventlog.Wrapper;
Java SDK Initialization
Before using the Event Log service, you will need to set some permissions. Initialize the EventV2 wrapper from the Event Log service using the following code:
EventV2 wEvent = new EventV2(sdk);
Once completed, you can use the SDK to create, read, update, or delete event logs.
Retrieve a List of Events
Use the following function to retrieve a list of events:
- Golang
- Python
- C#
- Java
ok, err := eventV2Service.QueryEventStreamHandler(input)
if err != nil {
  return err
}
return nil
from accelbyte_py_sdk.api.eventlog import query_event_stream_handler
from accelbyte_py_sdk.api.eventlog.models import ModelsGenericQueryPayload

result, error = query_event_stream_handler(
   body=ModelsGenericQueryPayload.create(
       client_id="<client-id>",
       event_name="<event-name>",
       payload_query={},
       session_id="<session-id>",
       trace_id="<trace-id>",
       user_id="<user-id>",
       version=1
   )
)
if error:
   print(error)
EventV2 wEvent = new EventV2(sdk);

ModelsGenericQueryPayload eQueryPayload = new ModelsGenericQueryPayload()
{
    ClientId = sdk.Configuration.ConfigRepository.ClientId
};

ModelsEventResponseV2? eResp = wEvent.QueryEventStreamHandler(QueryEventStreamHandler.Builder
    .SetOffset(0)
    .SetPageSize(10)
    .Build(eQueryPayload, sdk.Namespace));
ModelsGenericQueryPayload eQueryPayload = ModelsGenericQueryPayload.builder()
                                .clientId(_sdk.getSdkConfiguration().getConfigRepository().getClientId())
                                .build();

ModelsEventResponseV2 eResp = wEvent.queryEventStreamHandler(QueryEventStreamHandler.builder()
                                .namespace(namespace)
                                .offset(0)
                                .pageSize(10)
                                .body(eQueryPayload)
                                .build());
Retrieve User's Events
Use the following function to retrieve a specific user's events.
- Golang
- Python
- C#
- Java
ok, err := eventV2Service.GetEventSpecificUserV2Handler(input)
if err != nil {
  return err
}
return nil
from accelbyte_py_sdk.api.eventlog import get_event_specific_user_v2_handler

result, error = get_event_specific_user_v2_handler(
   user_id="<user-id>"
)
if error:
   print(error)
EventV2 wEvent = new EventV2(sdk);

eResp = wEvent.GetEventSpecificUserV2Handler(GetEventSpecificUserV2Handler.Builder
        .SetOffset(0)
        .SetPageSize(10)
        .Build(sdk.Namespace, "<user_id>");
ModelsEventResponseV2 eResp = wEvent.getEventSpecificUserV2Handler(GetEventSpecificUserV2Handler.builder()
                                .namespace(namespace)
                                .userId(userId)
                                .offset(0)
                                .pageSize(10)
                                .build());
Connecting Custom Services to User Account using the Server SDK
SDK Initialization
Before using the IAM service from the SDK you need to initialize your server-side SDK to make you authorized and able to perform any action from create, read, update, and delete.
Golang SDK Initialization
To start using the IAM service from the Golang SDK, you need to initialize the SDK by making sure that you've done the following requirements.
- Create your OAuth Client and assign the necessary permissions to access the IAM service.
- Log in as a Client using the SDK.
- Initialize the OAuth 2.0 service using the following function:
- Golang
usersService := &iam.UsersService{
    Client:          factory.NewIamClient(&repository.ConfigRepositoryImpl{}),
    TokenRepository: &repository.TokenRepositoryImpl{},
}
On a successful initialization, you can use the Golang SDK to create, read, update and delete User from your serverless app.
.NET (C#) SDK Initialization
Before using the IAM service, you will need to set some permissions. Use the following .NET namespaces:
using AccelByte.Sdk.Api.Iam.Model;
using AccelByte.Sdk.Api.Iam.Operation;
using AccelByte.Sdk.Api.Iam.Wrapper;
Java SDK Initialization
Before using the IAM service, you will need to set some permissions. Initialize the UsersV4 wrapper from the IAM service using the following code:
UsersV4 wIamUserV4 = new UsersV4(sdk);
Once completed, you can use the SDK to create, read, update, or delete players.
Create a User
To create a user, use the following function.
- Golang
- Python
- C#
- Java
ok, err := usersService.CreateUser(input)
if err != nil {
  return err
}
return nil
from accelbyte_py_sdk.api.iam import create_user
from accelbyte_py_sdk.api.iam.models import ModelUserCreateRequest

result, error = create_user(
   body=ModelUserCreateRequest.create(
       auth_type="<auth-type>",
       country="<country>",
       display_name="<display-name>",
       login_id="<login-id>",
       password="<password>"
   )
)
if error:
   print(error)
UsersV4 wIamUserV4 = new UsersV4(sdk);

AccountCreateUserRequestV4 newUser = new AccountCreateUserRequestV4()
{
    AuthType = "EMAILPASSWD",
    EmailAddress = "<user_email>",
    Password = "<user_password>",
    DisplayName = "User Display Name",
    Username = "<user_name>",
    Country = "ID",
    DateOfBirth = "1995-01-10"
};

AccountCreateUserResponseV4? cuResp = wIamUserV4.PublicCreateUserV4(
    PublicCreateUserV4.Builder
    .Build(newUser, sdk.Namespace));
AccountCreateUserRequestV4 newUser = AccountCreateUserRequestV4.builder()
                                .authType("EMAILPASSWD")
                                .emailAddress(userEmail)
                                .password(userPassword)
                                .displayName(userDisplayName)
                                .username(userName)
                                .country("ID")
                                .dateOfBirth(userDateOfBirth)
                                .build();

AccountCreateUserResponseV4 cuResp = wIamUserV4.publicCreateUserV4(
                                PublicCreateUserV4.builder()
                                                .namespace(namespace)
                                                .body(newUser)
                                                .build());
Create Users in Bulk
If you need to create multiple user at once for testing purposes, you could create a loop statement based on the Create a User code as seen in the following snippet.
- Golang
- Python
body := &iamclientmodels.ModelUserCreateRequest{
  AuthType:          &authType,
  Country:             &country,
  DisplayName:    &displayName,
  LoginID:             &loginId,
  Password:          &password,
  PasswordMD5Sum: &passwordMD5Sum,
}

var allUsers []*string
for _, _ = range allUsers {
  input := &users.CreateUserParams{
     Body:      body,
     Namespace: namespace,
  }
  ok, err := usersService.CreateUser(input)
  if err != nil {
     return err
  }
  allUsers = append(allUsers, ok.UserID)
}
from accelbyte_py_sdk.api.iam import create_user
from accelbyte_py_sdk.api.iam.models import ModelUserCreateRequest

def create_users_in_bulk(count: int):
    """
    Creates multiple users and returns a list containing the
    user IDs of the created users.
    """
    user_ids = []
    for i in range(count):
        result, error = create_user(
            body=ModelUserCreateRequest.create(
                auth_type="EMAILPASSWD",
                country="US",
                display_name=f"user no {i}",
                login_id=f"user{i}@fakemail.me",
                password=f"thisisaBADpassword#{i}"
            )
        )
        if error is None:
            user_ids.append(result.user_id)
    return user_ids
Delete a User
To delete a user, use the following function.
- Golang
- Python
- C#
- Java
err := usersService.DeleteUser(input)
if err != nil {
  return err
}
return nil
from accelbyte_py_sdk.api.iam import delete_user

result, error = delete_user(
   user_id="<user-id>"
)
if error:
   print(error)
Users wIamUser = new Users(sdk);
wIamUser.DeleteUser(
    DeleteUser.Builder
    .Build(sdk.Namespace, "<user_id>"));
wIamUser.deleteUser(DeleteUser.builder()
                   .namespace(namespace)
                   .userId(user_id)
                   .build());
Delete Users in Bulk
If you need to delete multiple user at once for testing purposes, you could create a loop statement based on the Delete a User code as seen in the following snippet.
- Golang
- Python
var allUsers []string
for _, userId := range allUsers {
  input := &users.DeleteUserParams{
     Namespace: namespace,
     UserID: userId,
  }
  err := usersService.DeleteUser(input)
  if err != nil {
     return err
  }
}
from accelbyte_py_sdk.api.iam import delete_user

def delete_users_in_bulk(user_ids: list):
    """
    Deletes multiple users listed in the specified list of user IDs.
    """
    for user_id in user_ids:
        result, _ = delete_user(
            user_id=user_id
        )
Get a User By User ID
To get a user by their user ID, use the following function.
- Golang
- Python
- C#
- Java
ok, err := usersService.GetUserByUserID(input)
if err != nil {
  return err
}
return nil
from accelbyte_py_sdk.api.iam import get_user_by_user_id

result, error = get_user_by_user_id(
   user_id="<user-id>"
)
if error:
   print(error)
Users wIamUser = new Users(sdk);

ModelUserResponse? gUser = wIamUser.GetUserByUserID(
    GetUserByUserID.Builder
    .Build(sdk.Namespace, "<user_id>"));
ModelUserResponse gUser = wIamUser.getUserByUserID(
                                GetUserByUserID.builder()
                                                .namespace(namespace)
                                                .userId(user_id)
                                                .build());
Update a User
To update user's information, use the following function.
- Golang
- Python
- C#
- Java
ok, err := usersService.UpdateUser(input)
if err != nil {
  return err
}
return nil
from accelbyte_py_sdk.api.iam import update_user
from accelbyte_py_sdk.api.iam.models import ModelUserUpdateRequest

result, error = update_user(
   body=ModelUserUpdateRequest.create(
       country="<country>"
   ),
   user_id="<user-id>"
)
if error:
   print(error)
Users wIamUser = new Users(sdk);

ModelUserUpdateRequest updateUser = new ModelUserUpdateRequest()
{
    DateOfBirth = "1996-01-10"
};

ModelUserResponse? uuResp = wIamUser.UpdateUser(
    UpdateUser.Builder
    .Build(updateUser, sdk.Namespace, "<user_id>"));
ModelUserUpdateRequest updateUser = ModelUserUpdateRequest.builder()
                                .dateOfBirth(userDateOfBirthUpdated)
                                .build();
Related Concepts
- To learn how to enable 3rd party login for your players, read the 3rd Party Login Integration documentation.
- User access to resources is controlled by the roles assigned to that user. To learn more, read the Roles documentation.