User Bans
Overview
AccelByte Cloud's User Bans allow you to restrict access to your game, or to particular in-game features, from players that break your game's rules or otherwise act inappropriately. There are two ways to carry out a user ban:
- Account Bans restrict access to your game by revoking all of the banned player's access tokens.
- Feature Bans restrict access to specific in-game features by invalidating all access tokens for that feature.
Managing user bans includes two main actions: banning a player from your game and lifting an existing ban from a player. Banning and unbanning players can be done directly from the Admin Portal.
Permissions
Permissions are used to grant access to specific resources within our services. Make sure your account has the following permissions before you attempt to manage bans in the Admin Portal. For a full list of permissions that impact ban management, see the IAM tab of the Permissions Reference.
| Usage | Permissions | Action |
|---|---|---|
| Ban a Player | ADMIN:NAMESPACE:{namespace}:BAN:USER:{userId} | CREATE |
| Enable or Disable Player's Ban | ADMIN:NAMESPACE:{namespace}:BAN:USER:{userId} | UPDATE |
| Retrieve Ban Types and Reasons | ADMIN:BAN | READ |
Permissions work slightly differently depending on whether they are assigned to IAM Clients or Roles assigned to users. For more information, read the Authentication and Authorization documentation.
Manage Bans in the Admin Portal
Ban a Player
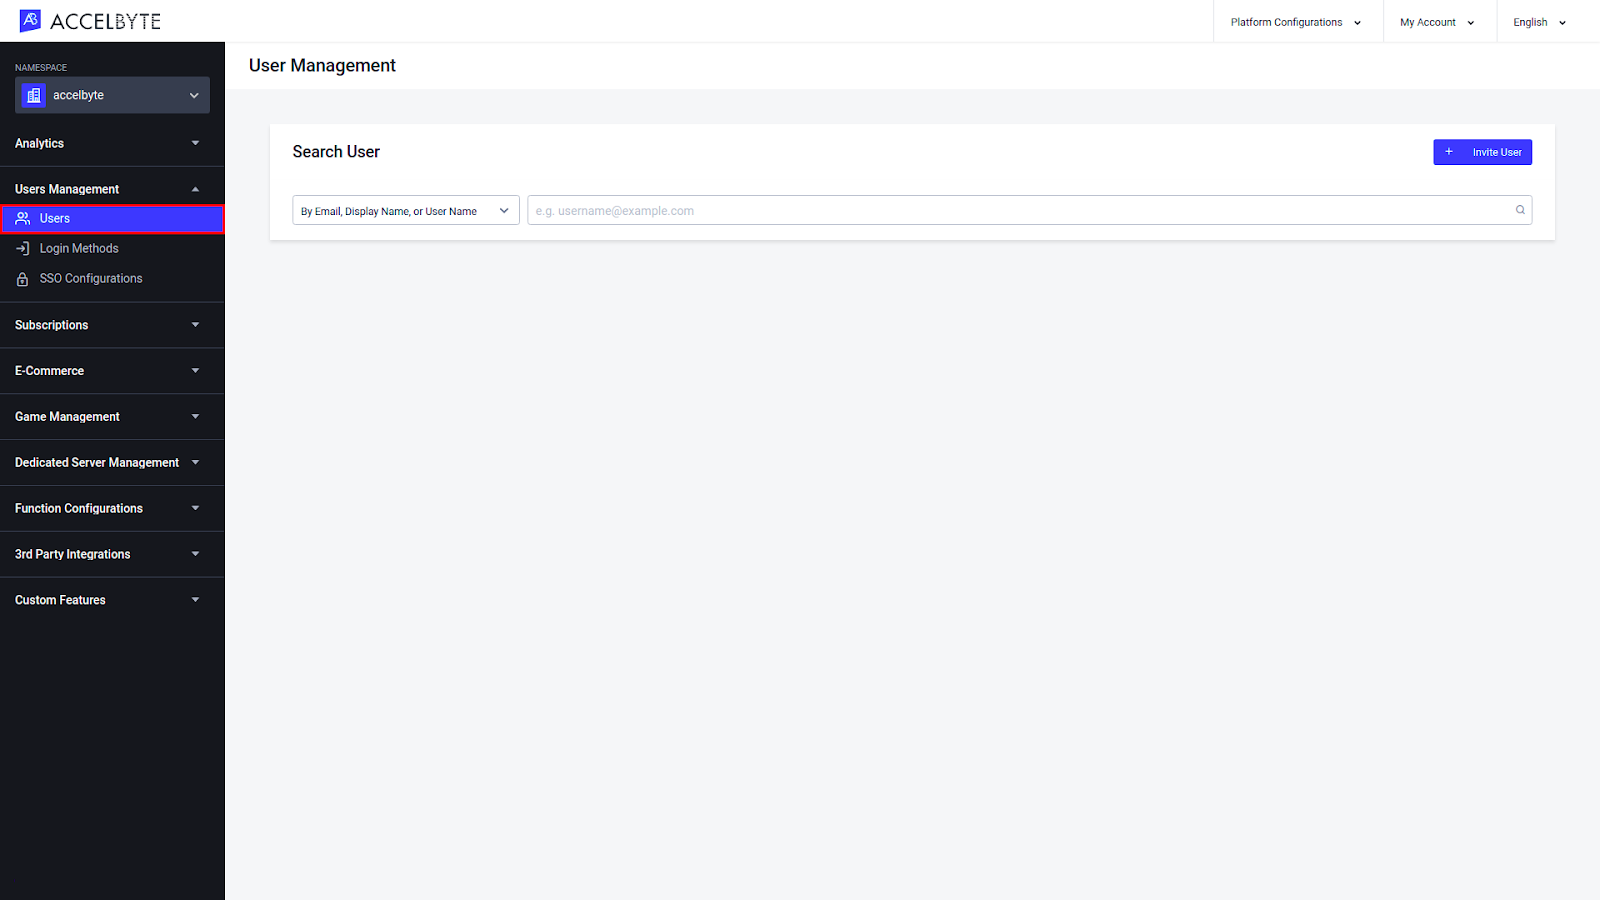
In the Admin Portal, expand the Users Management section and click Users.

Search for the player you have on hand using the credential for that player that you have on hand. For more information, see the Search for a User tutorial.
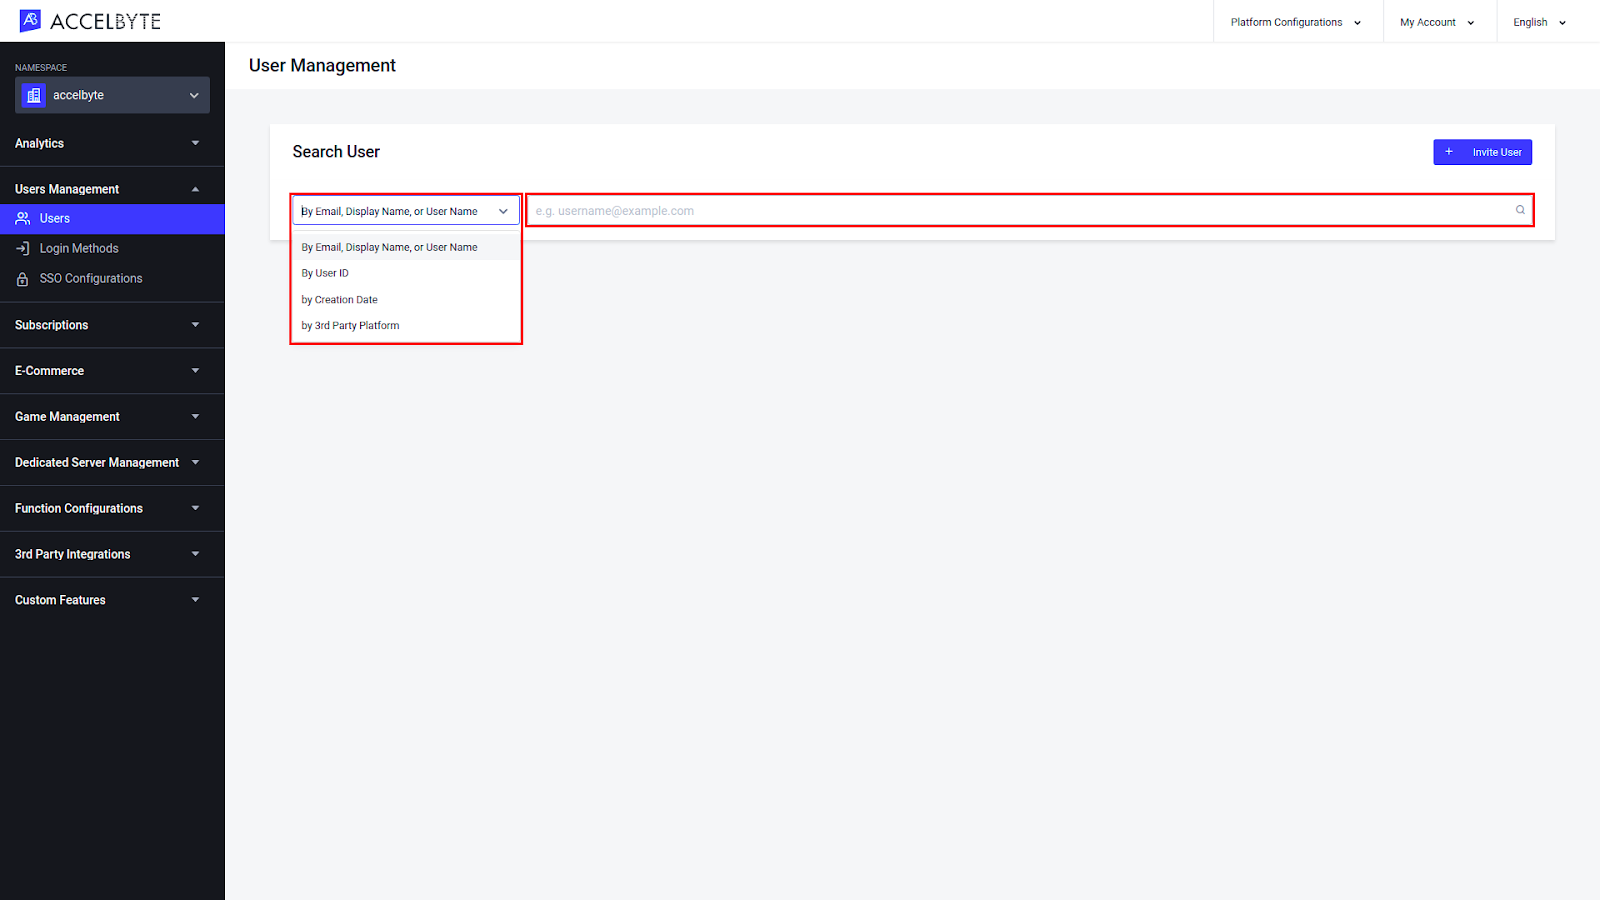
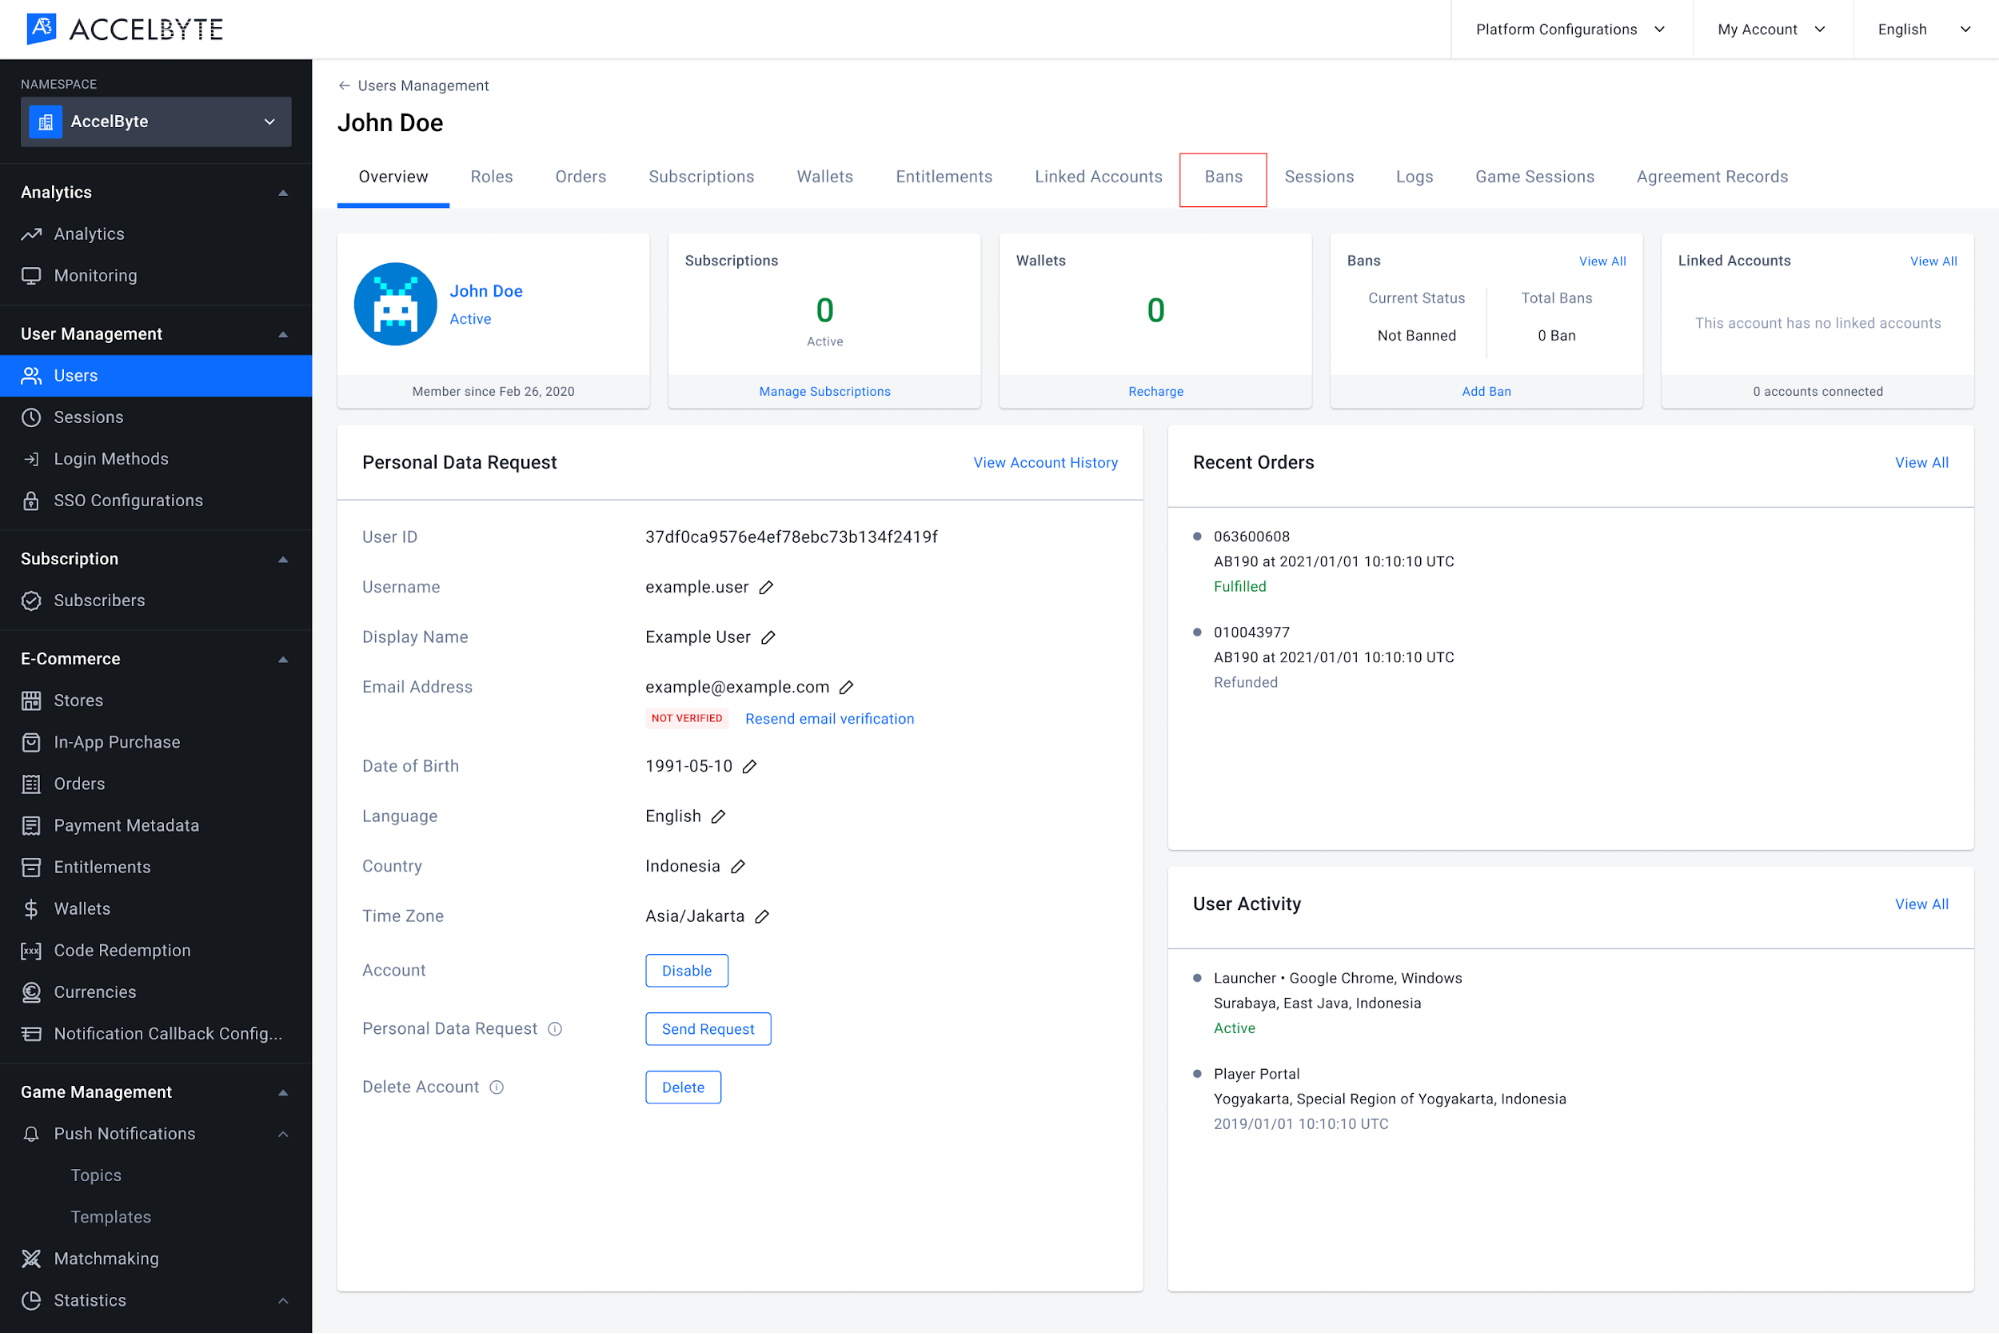
The results of your search will appear. Browse the list to find the account you're looking for and click View in the Action column of the account listing to open it.

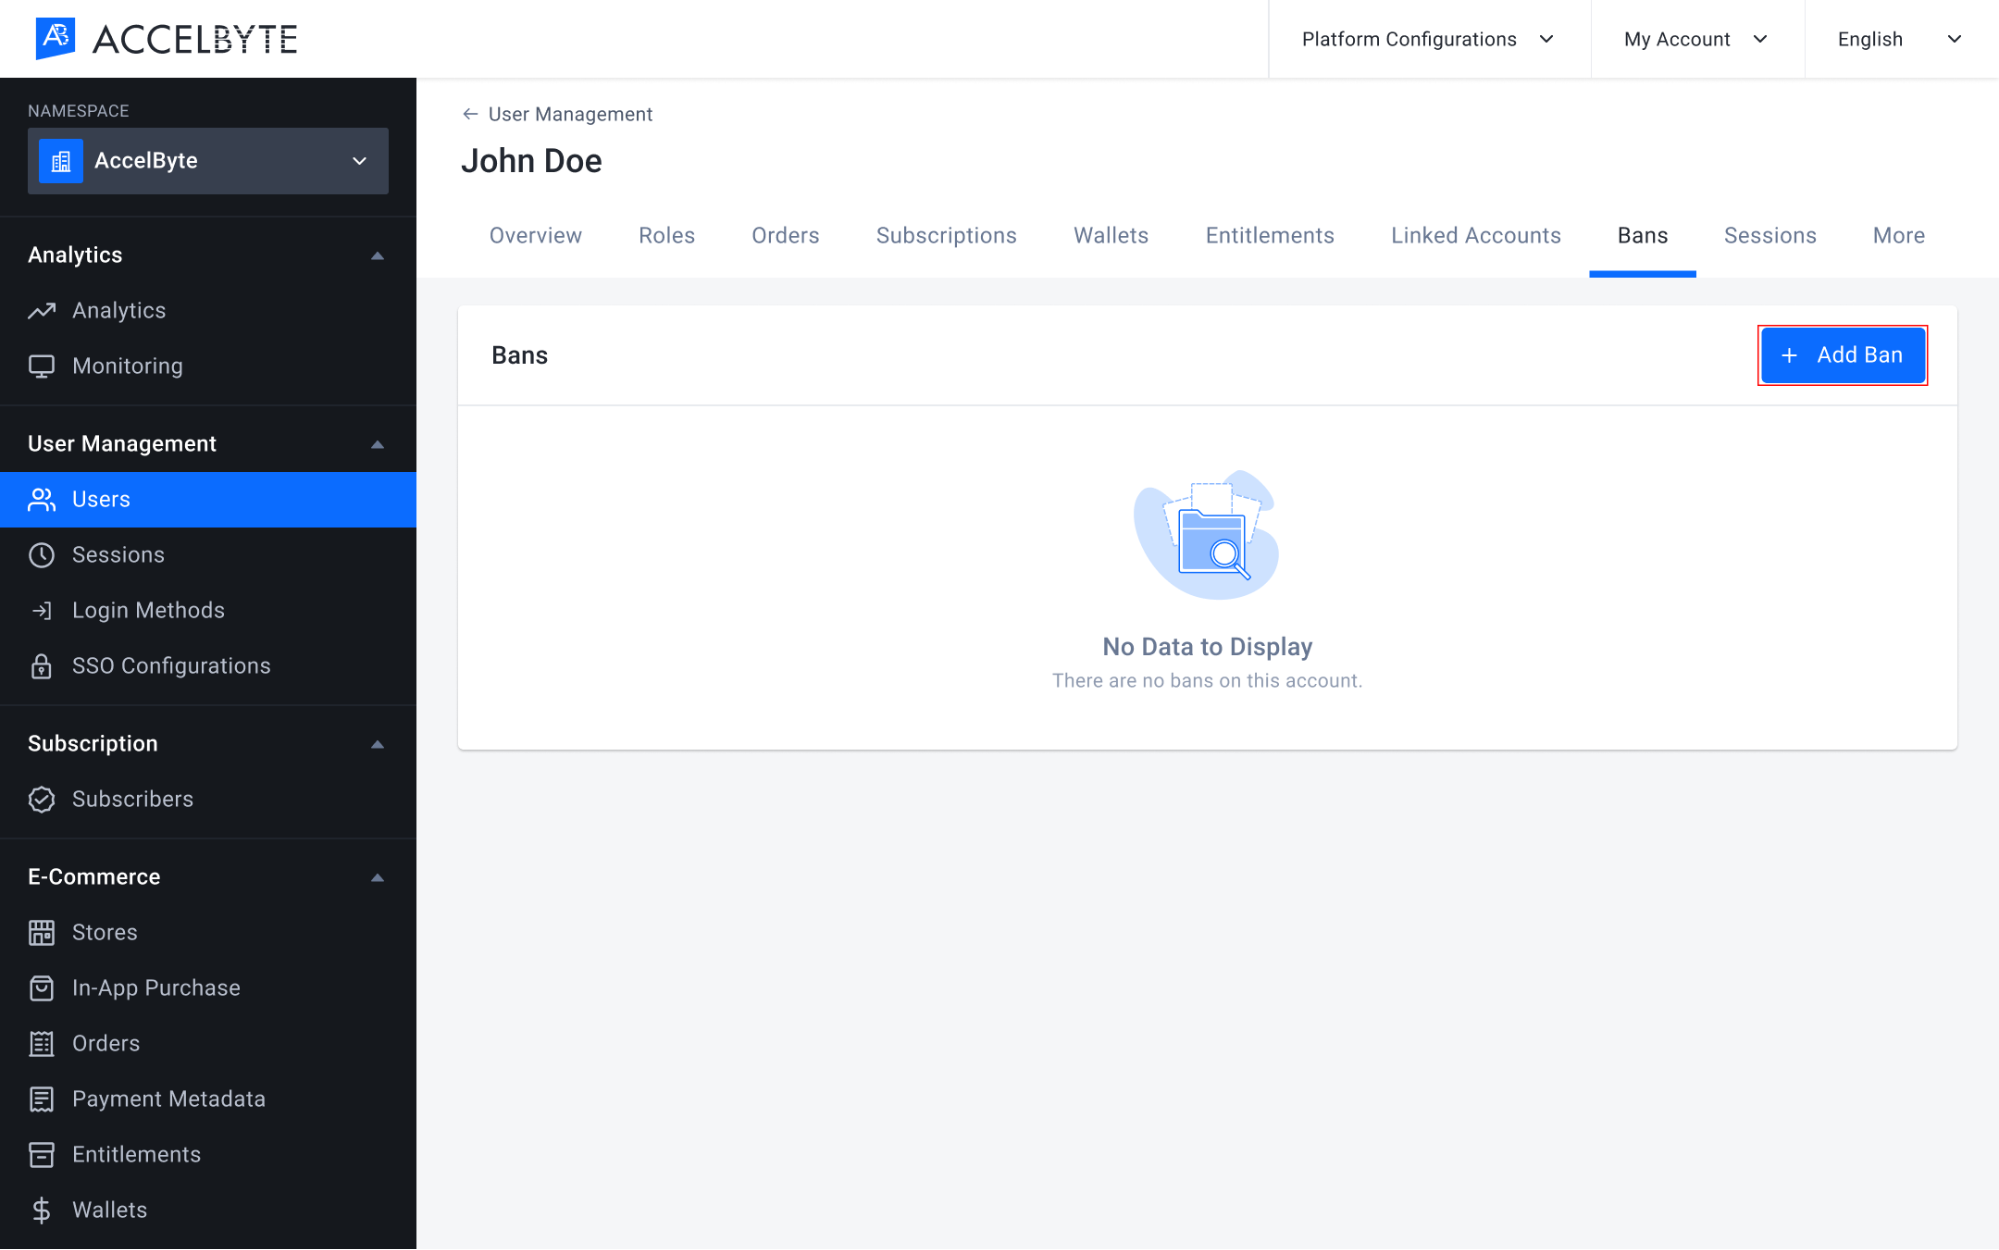
The User Overview will appear, giving you a quick look at the user's account data. Click Ban to ban selected user.

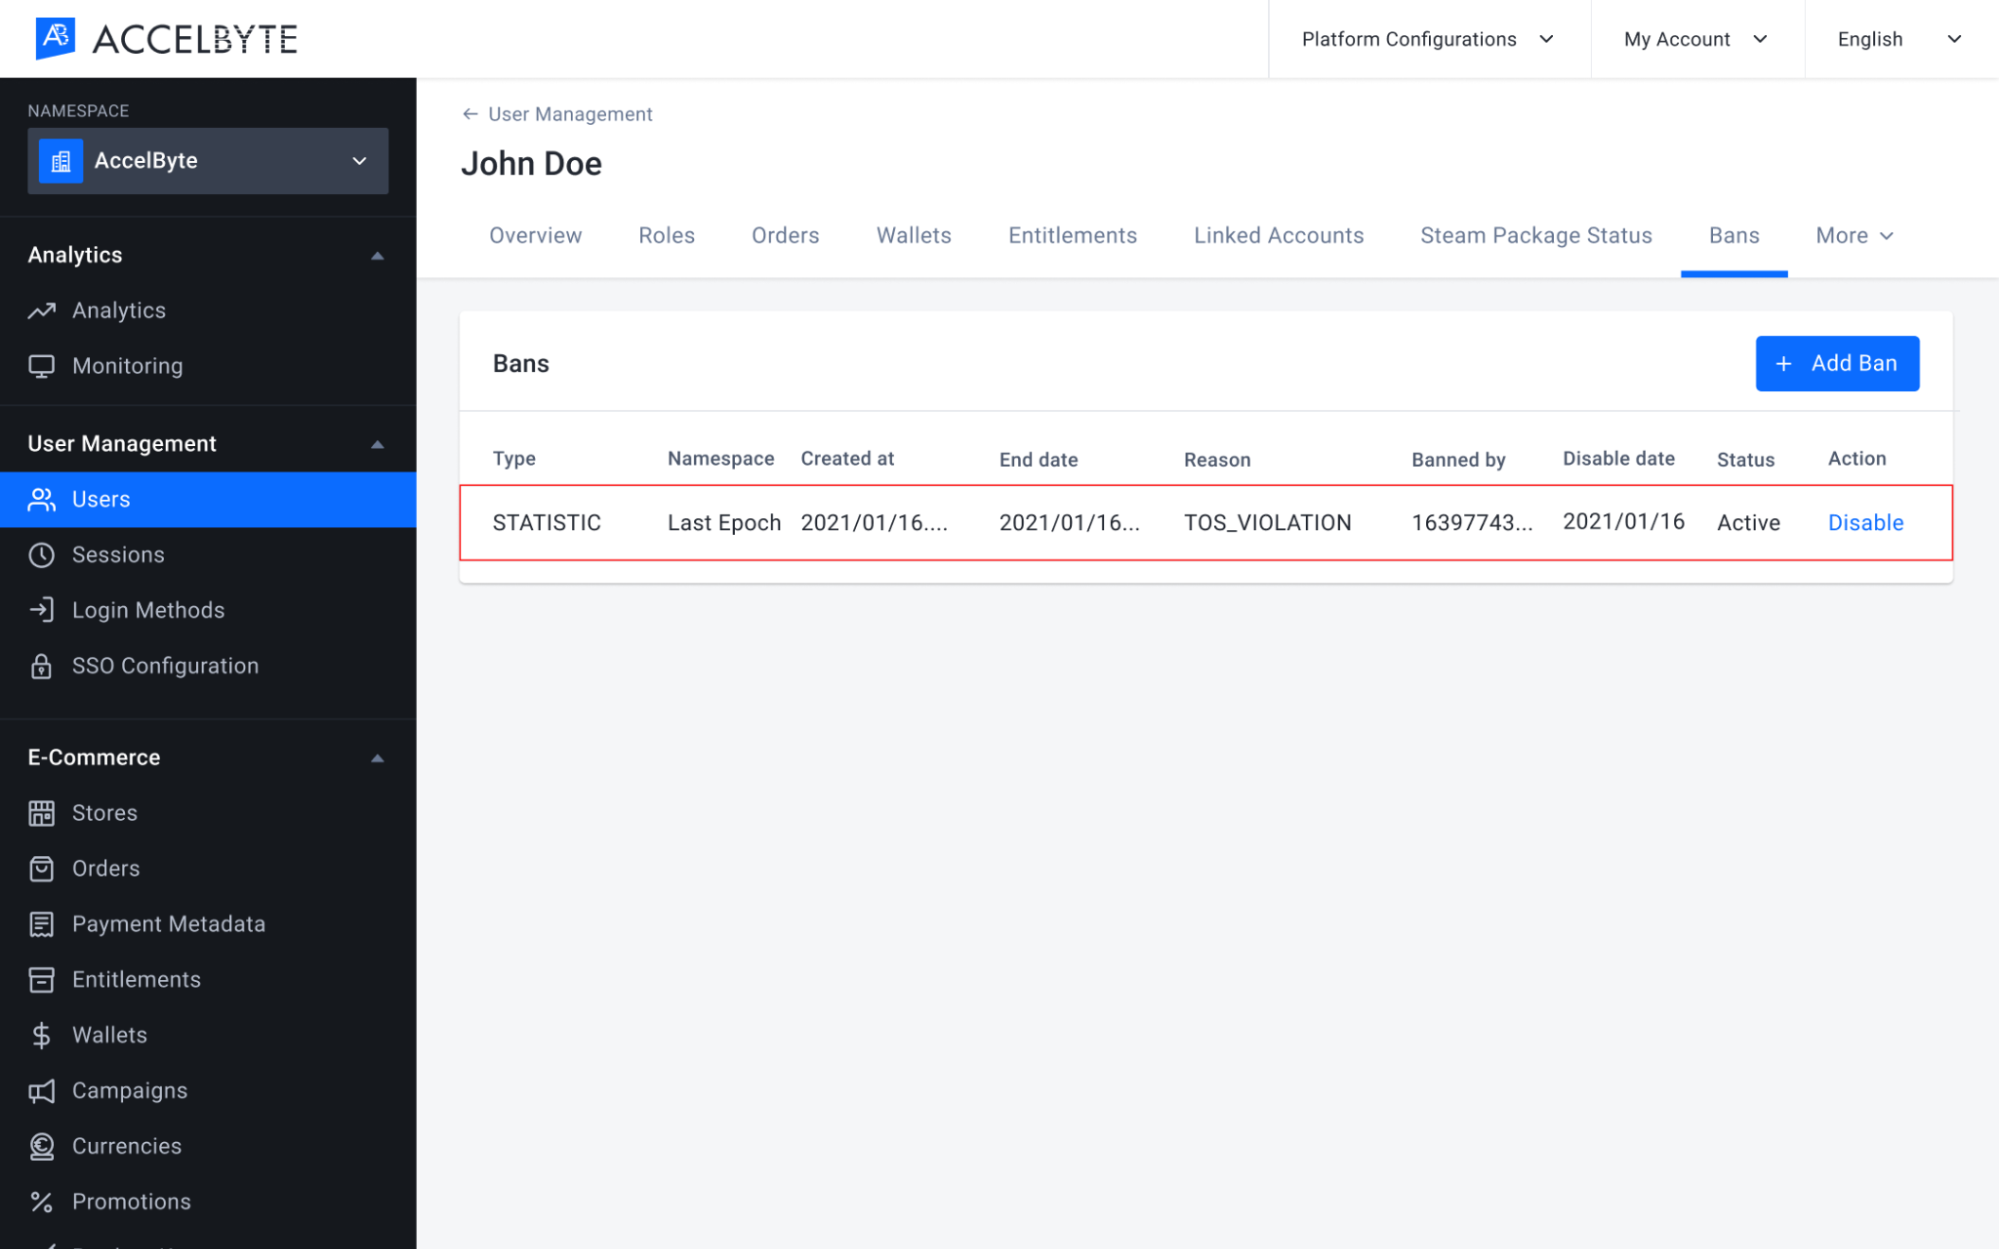
In the Bans tab, click the Add Ban button.
The Add Ban form appears. Fill in the required information:
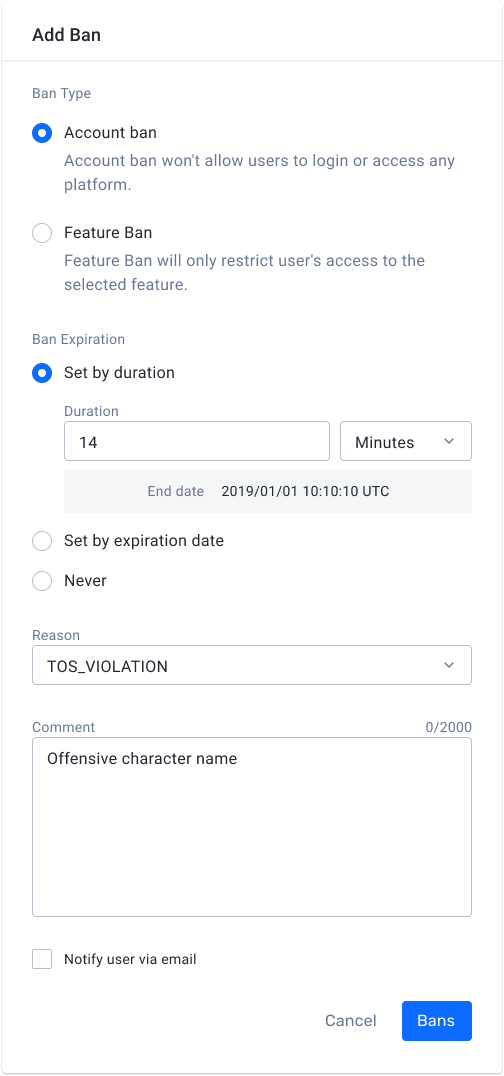
Choose the Ban Type. If you choose Feature Ban, you need to choose the feature you want to restrict. A list of the features that players can be banned from can be found in the table below.
Ban Type
Feature Restriction Description CHAT_SEND Player is banned from sending a message CHAT_ALL Player is banned from both sending and receiving messages ORDER_AND_PAYMENT Player is banned from making purchases in-game STATISTICS Player will not have their statistics recorded LEADERBOARD Player will not appear on any leaderboards MATCHMAKING Player is banned from matchmaking. 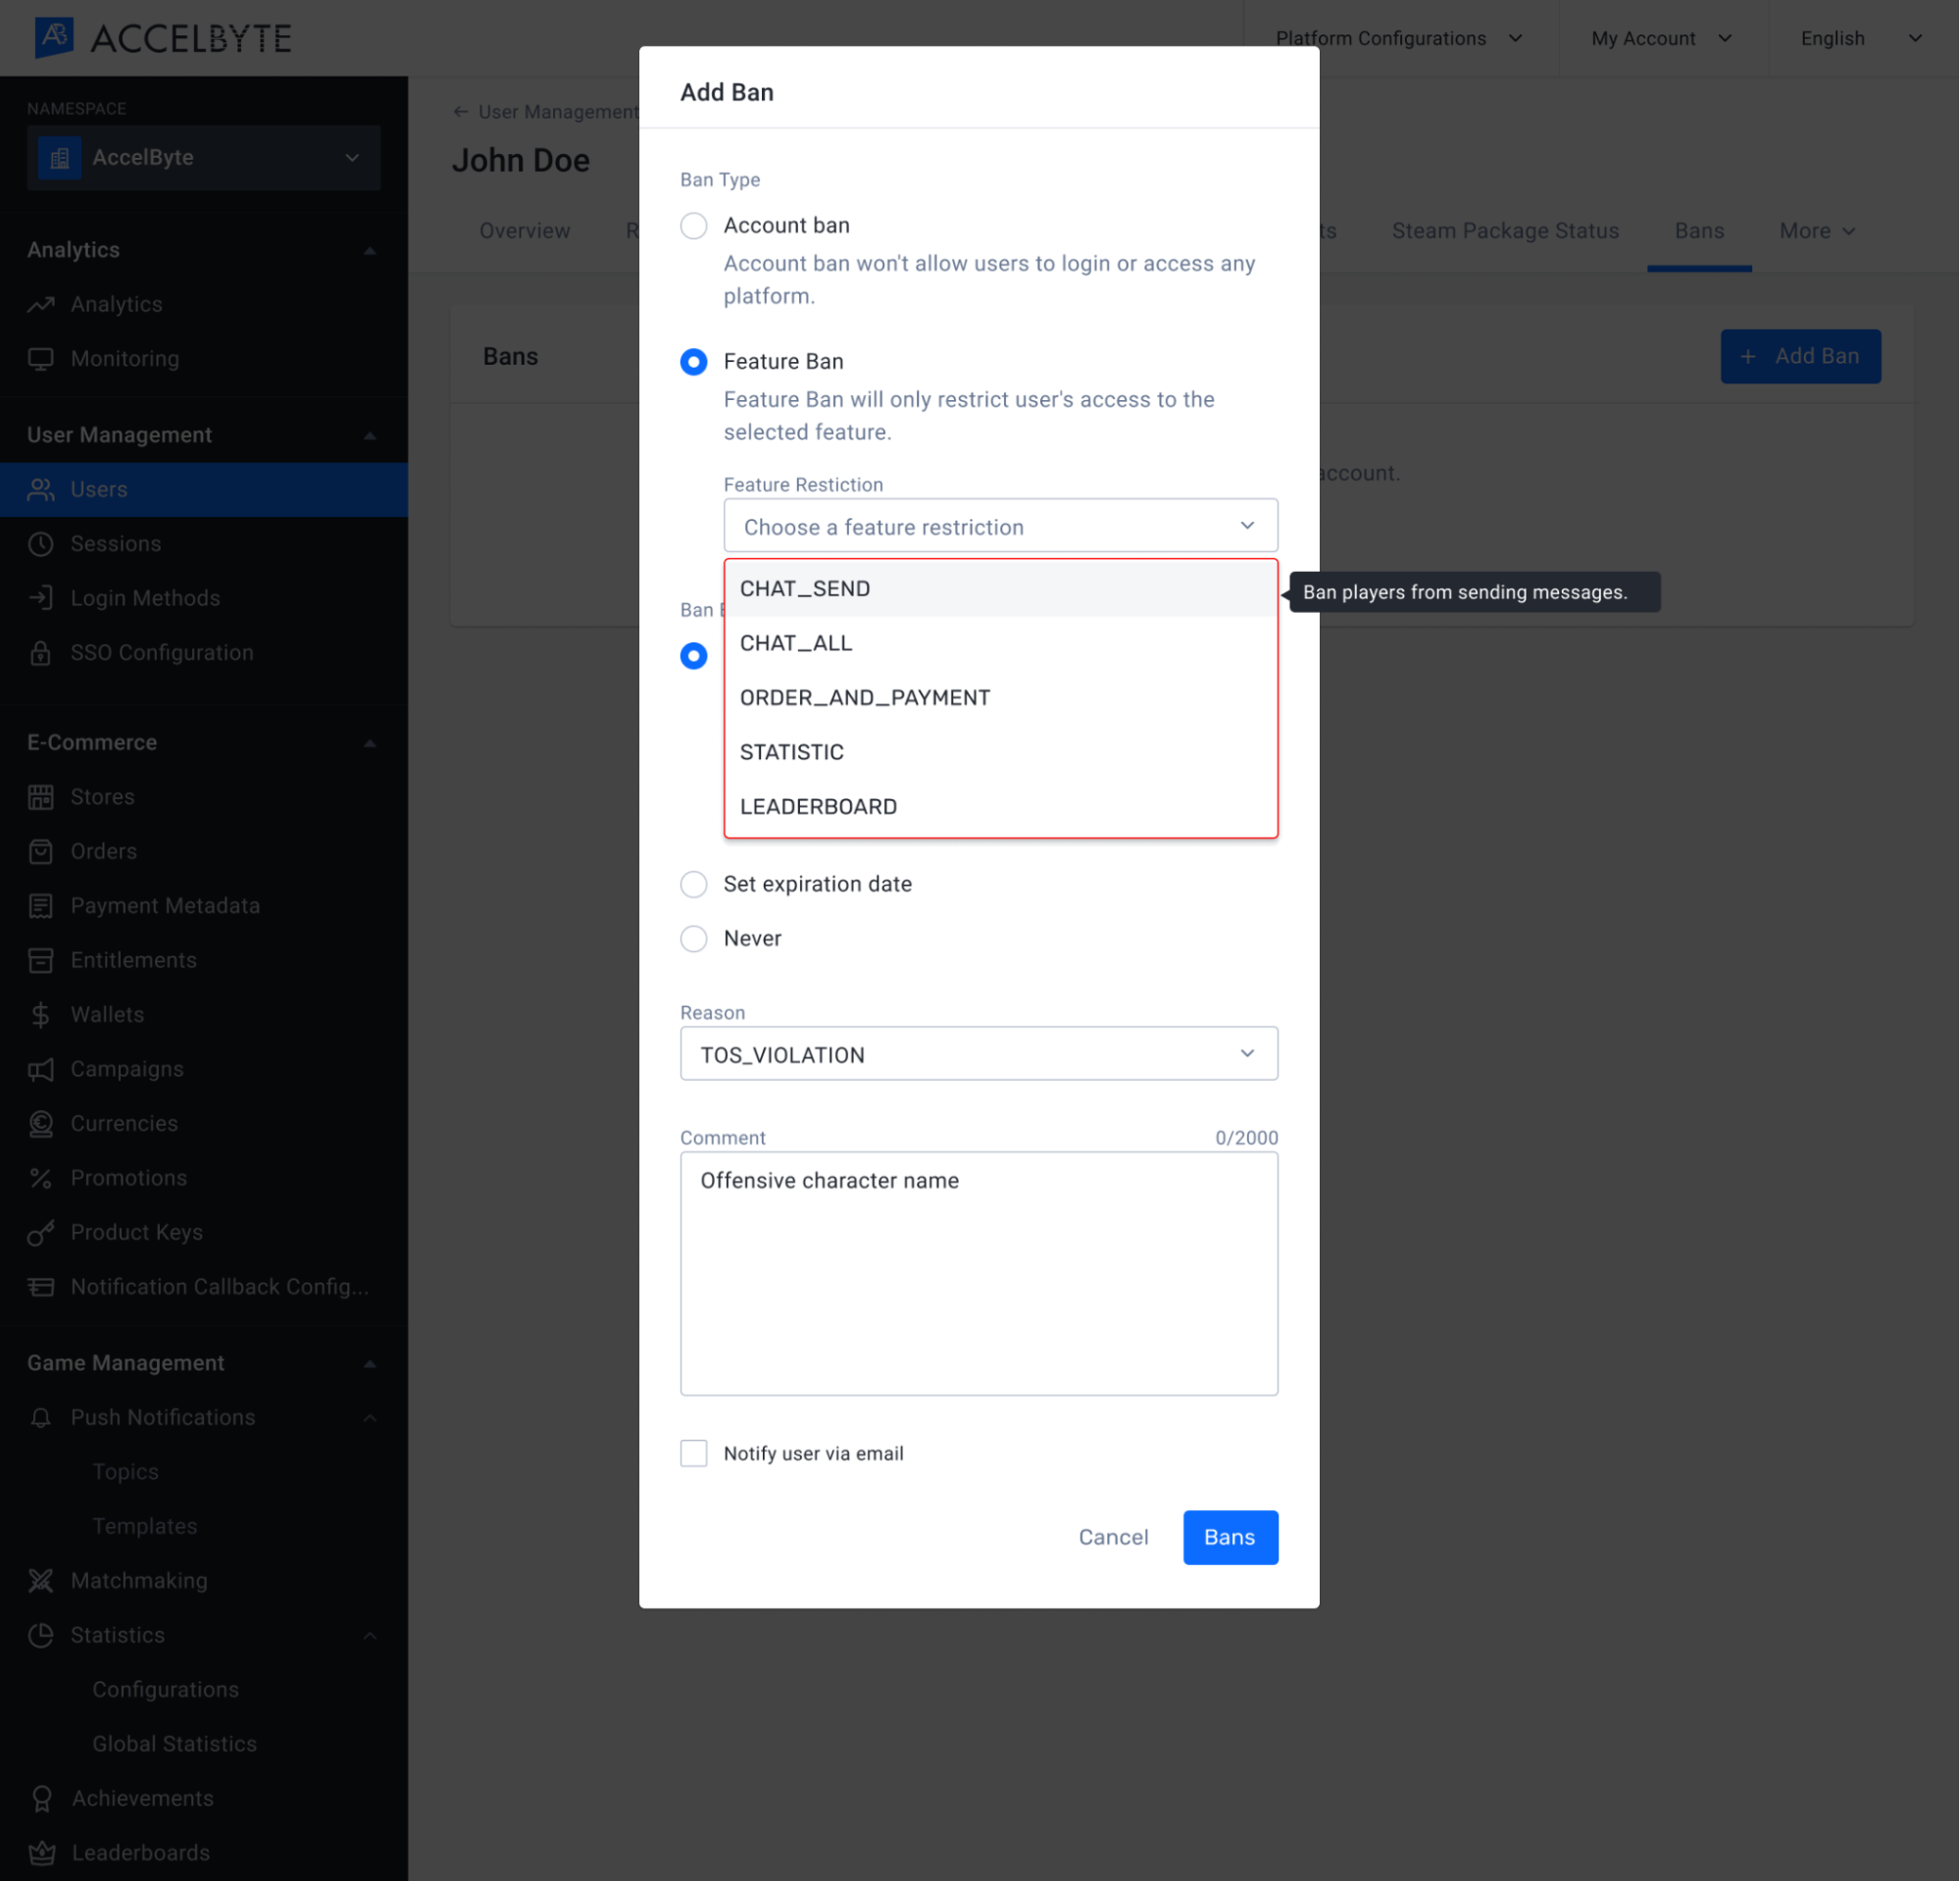
Define when the ban will expire in the Ban Expiration field:
- If you want the ban to expire after a certain amount of time, select Set by duration. Then enter the number of minutes, hours, or days you want the player to be banned for. After this amount of time passes, the ban will expire.
- If you want the ban to expire on a certain day and time, select Set by expiration date. Then enter the date and time you want the ban to expire.
- Choose Never if you want the ban to be permanent. Permanent bans can be disabled manually.
Select the reason for the ban from the Reason dropdown list. A list of the reasons players can be banned can be found in the table below.
Ban Reasons
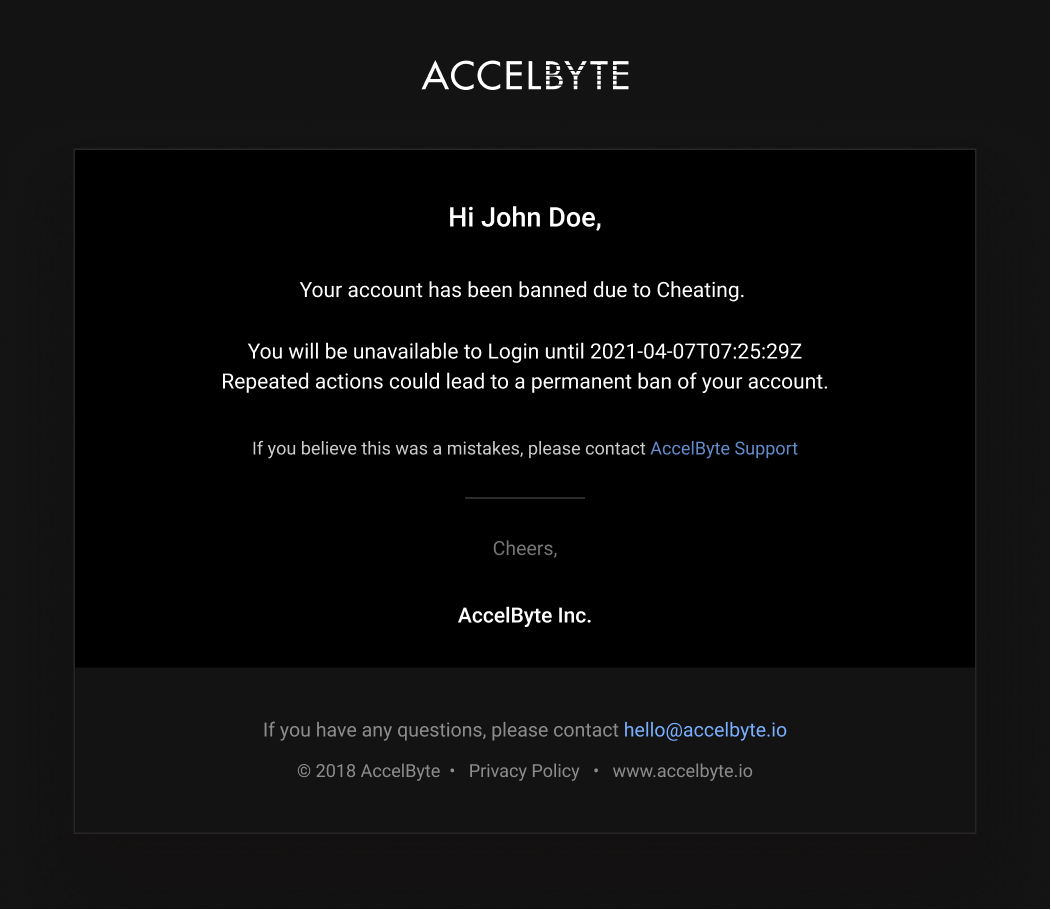
Reason Description VIOLENCE Player is banned for posting violent content. HARASSMENT Player is banned for harassing other players. HATEFUL_CONDUCT Player is banned for acting hatefully towards other players. OFFENSIVE_USERNAME Player is banned for having an offensive username. IMPERSONATION Player is banned for impersonating other players. MALICIOUS_CONTENT Player is banned for posting malicious content such as spam, scams, etc. SEXUALLY_SUGGESTIVE Player is banned for posting sexually explicit or suggestive content. SEXUAL_VIOLENCE Player is banned for acting sexually violent or exploiting other players. EXTREME_VIOLENCE Player is banned for extremely violent content, such as gore. UNDERAGE_USER Player is banned for being underage. CHEATING Player is banned for cheating. TOS_VIOLATION Player is banned for violating the Terms of Service. Type a Comment that includes any relevant information about the ban.
Select the Notify user via email checkbox if you want to send a ban notification to the player via email.
IMPORTANT
Players that log into your game using third-party credentials may only have a headless account in the Admin Portal, which means that their account will have no email address associated with it. Only players that have registered an account in your game or platform, or have upgraded their headless account by registering an email address in your game, will be able to receive an email notification if they're banned. For more information about headless accounts, see the [Third-party Login Integration](https:// docs.accelbyte.io/esg/uam/3rd-party-platform-integration.html) documentation.
When you're done, click the Ban button. The new ban will appear in the Bans list.

If you select the Notify user via email option and the banned player's email address is on record in the Admin Portal, they will receive an email saying that they have been banned, as well as the reason for the ban and how long the ban will be enforced.
Enable or Disable a Player's Ban
To re-enable an expired or disabled ban on a player, or lift an existing ban on a player, follow the steps below:
In the Admin Portal, expand the Users Management section and click Users.
Search the user account that you want to view its edit history to. Please refer to the Search a Player section to find out how to search for a user account.

The results of your search will appear. Browse the list to find the account you're looking for and click View in the Action column of the account listing to open it.

The User Overview will appear, giving you a quick look at the user's account data. Click Ban to ban the selected user.
In the Bans tab you can browse all of the bans that have ever been applied to the player. Click Disable under the Action column of the selected ban to disable the ban or click Enable under the Action column to enable the selected ban.
The Disable Ban confirmation message will appear. Click Enable or Disable again to ban or unban the player.

After you Disable the ban, the player will be able to access the game or the feature they were banned from. If you Enable a ban for a player, the player will now be banned from accessing the game or from the specific feature.
Manage Bans Using the Client SDKs
Ban a Player In-Game
Use the code below to implement in-game banning of players. This can be useful if you have moderators in your game who need to be able to ban players without being granted access to your Admin Portal.
NOTE
To enable in-game moderators to ban players, those moderators will need to be assigned a role that includes the Ban a Player permission, just like an admin who bans players from the Admin Portal. For more information about permissions, see the Permissions documentation.
- Unity
string PlayerUserID = "exampleuserid2434";
BanType banType = BanType.Login;
BanReason banReason = BanReason.CHEATING;
DateTime ban_EndDate = DateTime.UtcNow;
ban_EndDate = endDate.AddDays(365);
string comment = "This player caught cheating";
bool notifyUserEmail = false;

AccelBytePlugin.GetUser().BanUser(PlayerUserID, banType, banReason, ban_EndDate, comment, notifyUserEmail, result => {
  if (!result.isError) {
    Debug.Log("Success ban a player.");
  } else {
    Debug.Log("Failed to ban a player. Error : " + result.Error.ToString());
  }
});
Ban Notifications
Use the code below to implement ban notifications, so that players can be told that they have been banned and the reason why.
- Unity
AccelBytePlugin.GetLobby().UserBannedNotification += result => {
  Debug.Log("You have been banned. reason: " + result.Value.reason);
};
Related Concepts
- To learn more about user accounts, see the User Accounts documentation.
- To read how to implement terms of service agreements, see the Legal Agreements documentation.