Third-party Login Integration
Overview
AccelByte Cloud provides third-party login integration and Single Sign-On (SSO) to enable players to log into your game or platform with a credential from a third party. When a player uses third-party credentials to sign into your game or platform for the first time without first creating an account, a headless account (an account without an email address) will be created for that player. You can offer players the option to upgrade their headless account to a full account in your game or on your platform. Players need to provide an email address and date of birth to create full login credentials.
After players create a headed account, they can then link their accounts from other third-party platforms to it. This enables cross-progression, or the ability for players to access their game data and continue play from different platforms.
Supported Platforms
Here's a table showing the platforms we support, and the features they offer:
| Third-party Login | In-App Purchases | Entitlements | |
|---|---|---|---|
| Device ID* | Y | N | N |
| Apple | Y | Y | N |
| AWS Cognito | Y | N | N |
| Epic Online Services | Y | Y | Y |
| Y | N | N | |
| Google** | Y | Y | N |
| Microsoft Azure** | Y | N | N |
| Nintendo | Y | Y | Y |
| PlayStation 4 + 5 | Y | Y | Y |
| Stadia | Y | Y | Y |
| Steam | Y | Y | Y |
| Twitch | Y | Y | Y |
| Xbox Live | Y | Y | Y |
| OpenID Connect | Y | N | N |
info
*Device ID can refer to a computer's serial number, the IMEI of a mobile device, or some other unique identifier. Device ID can be used both for testing and as an easy way for players to log into mobile games without an account.
**3rd party login using Google and Microsoft Azure credentials is only for the Admin Portal. It's intended to give teams that already have Microsoft accounts a quick way to access the Admin Portal without having to first have an account created for them.
Prerequisites
Before implementing Third-party Login, make sure you've set up the following items:
- Create a Game Namespace
- Create an Admin Account
- Create Game Client Credentials
- Integrate the AccelByte SDK
Permissions
Permissions are used to grant access to specific resources within our services. Make sure your account has the following permissions before you attempt to integrate Third-party Login in the Cloud Admin Portal. For a full list of permissions that impact identity access management, see the IAM tab of the permissions reference.
| Usage | Permission Tag | Action |
|---|---|---|
| Add SSO Platform Credential | ADMIN:NAMESPACE:{namespace}:PLATFORM:{platformId}:SSO | Create |
| Add Third-party Platform Credential | ADMIN:NAMESPACE:{namespace}:PLATFORM:{platformId}:CLIENT | Create |
Permissions work slightly differently depending on whether they are assigned to IAM Clients or Roles assigned to users. For more information, read the Authentication and Authorization documentation.
Enable Login with Third-party Platforms
Enabling third-party login consists of configuring login from your chosen platform in the Admin Portal, then using our SDK to retrieve the Auth token for that platform and log players in with their third-party credentials.
Third-party login can either be configured in a game namespace, or in the publisher namespace. When you configure login from a third-party platform within a game namespace, only that game will be accessible using the credentials from the configured platform. If you make these configurations in the publisher namespace instead, they will not only apply to all of your games, but also Player Portal or Launcher.
Configure Logins with Third-party Platforms in the Admin Portal
Follow the steps below to set up the Third-party Store configuration in the Admin Portal.
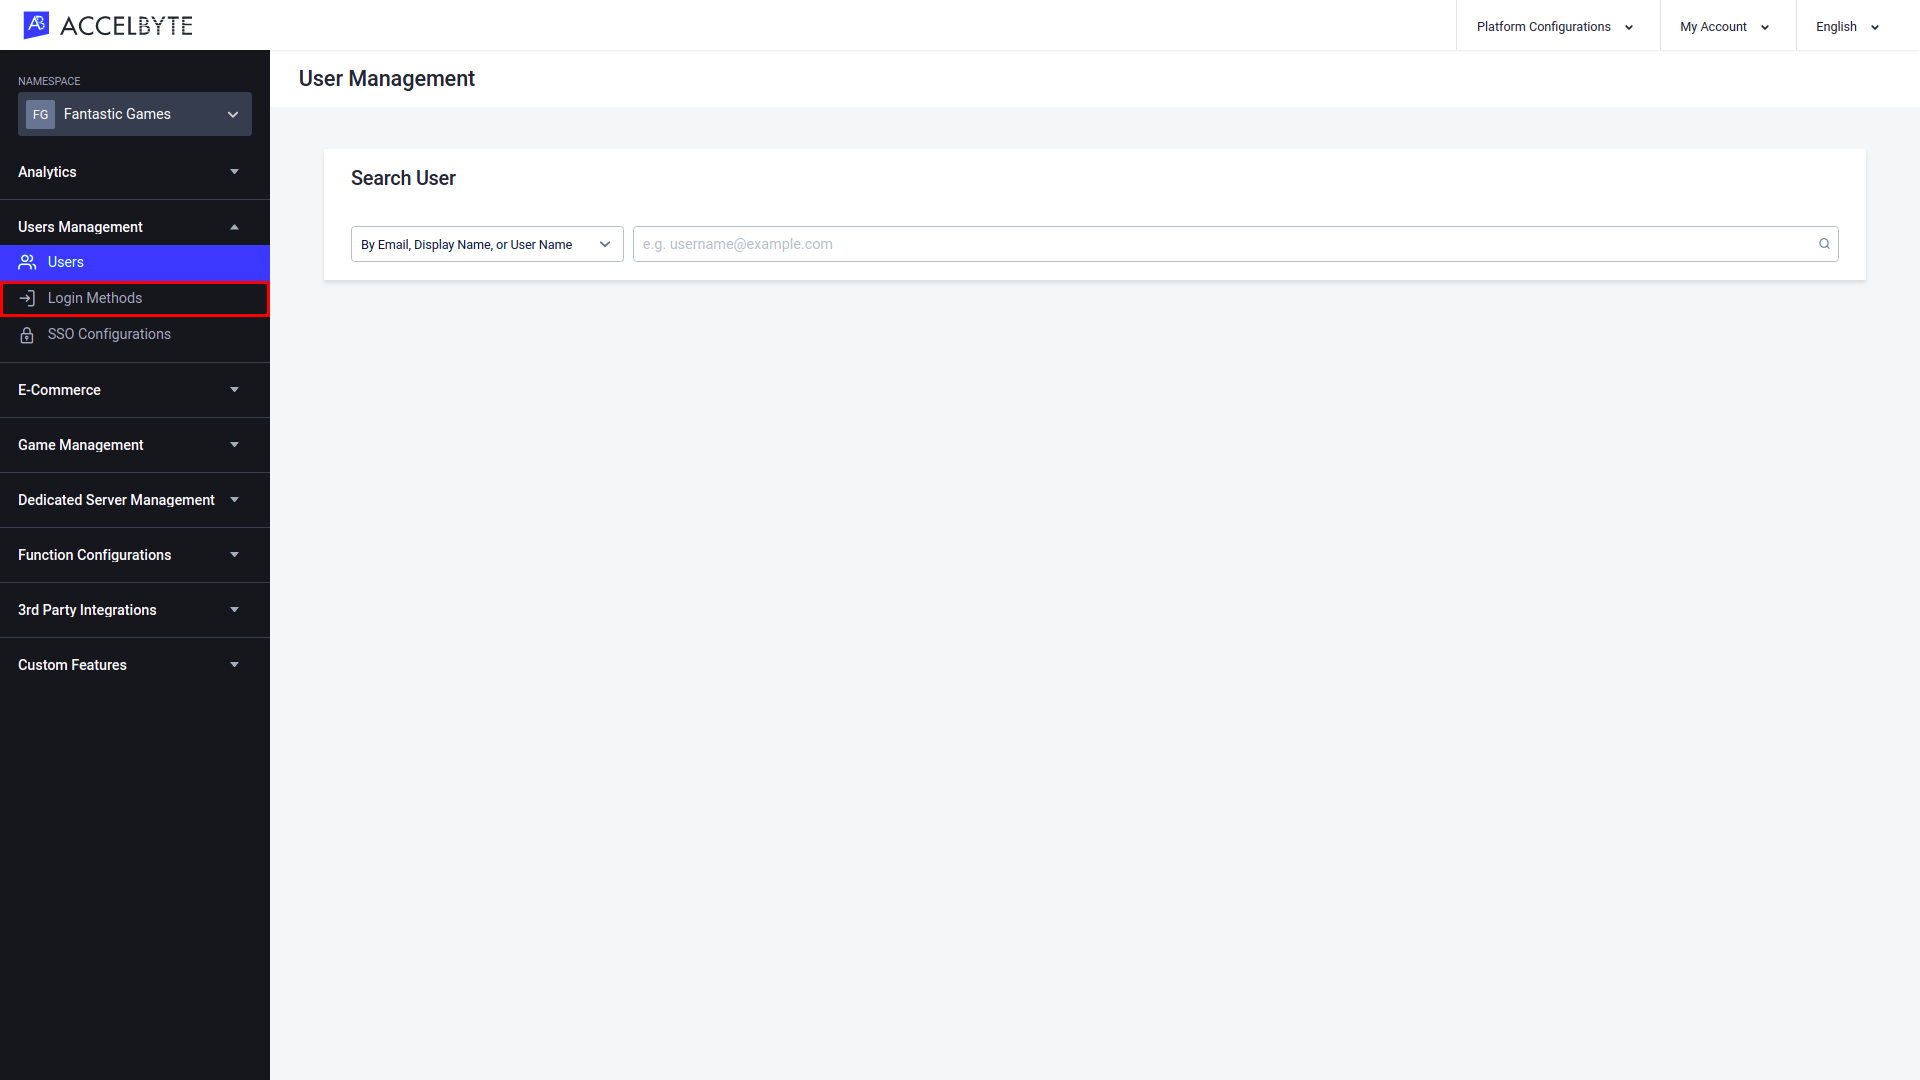
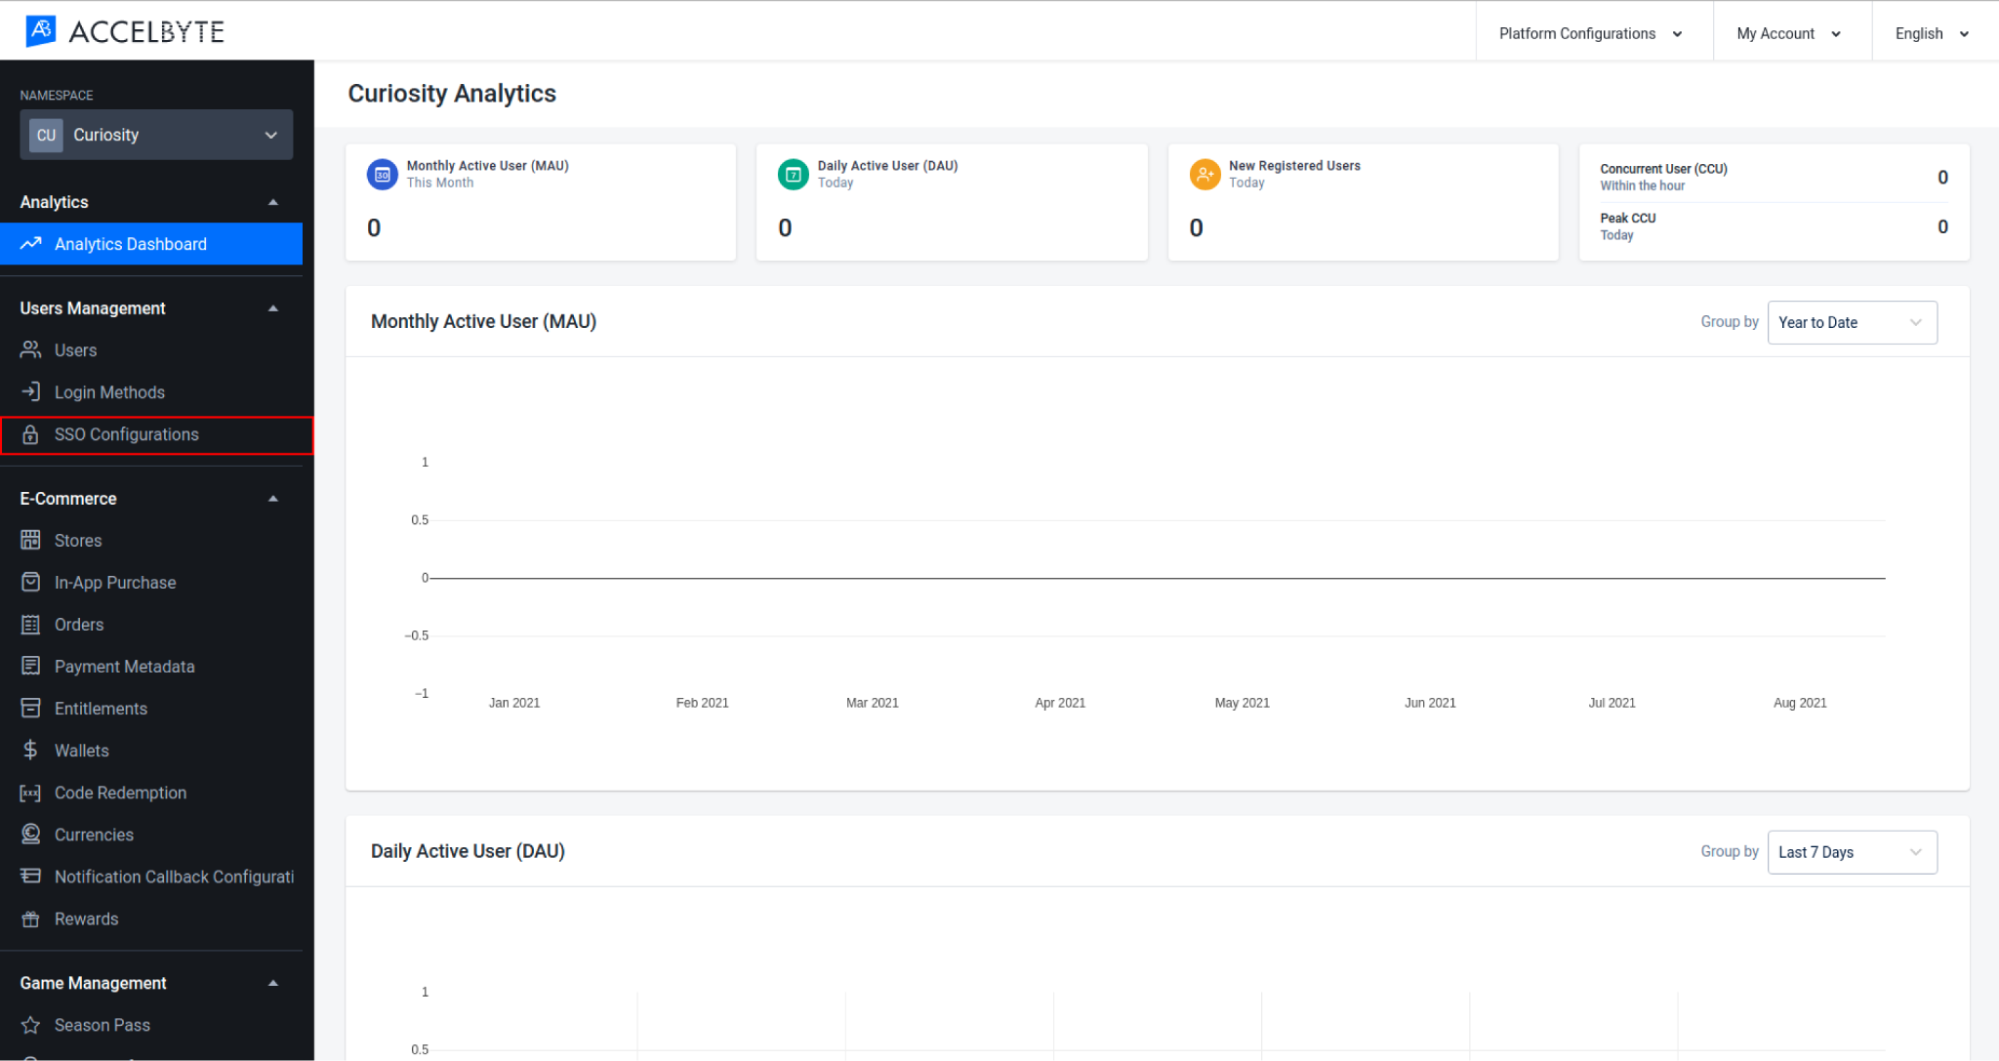
First make sure you are in the namespace you want to configure. Go to the User Management section of the main menu and select Login Methods.
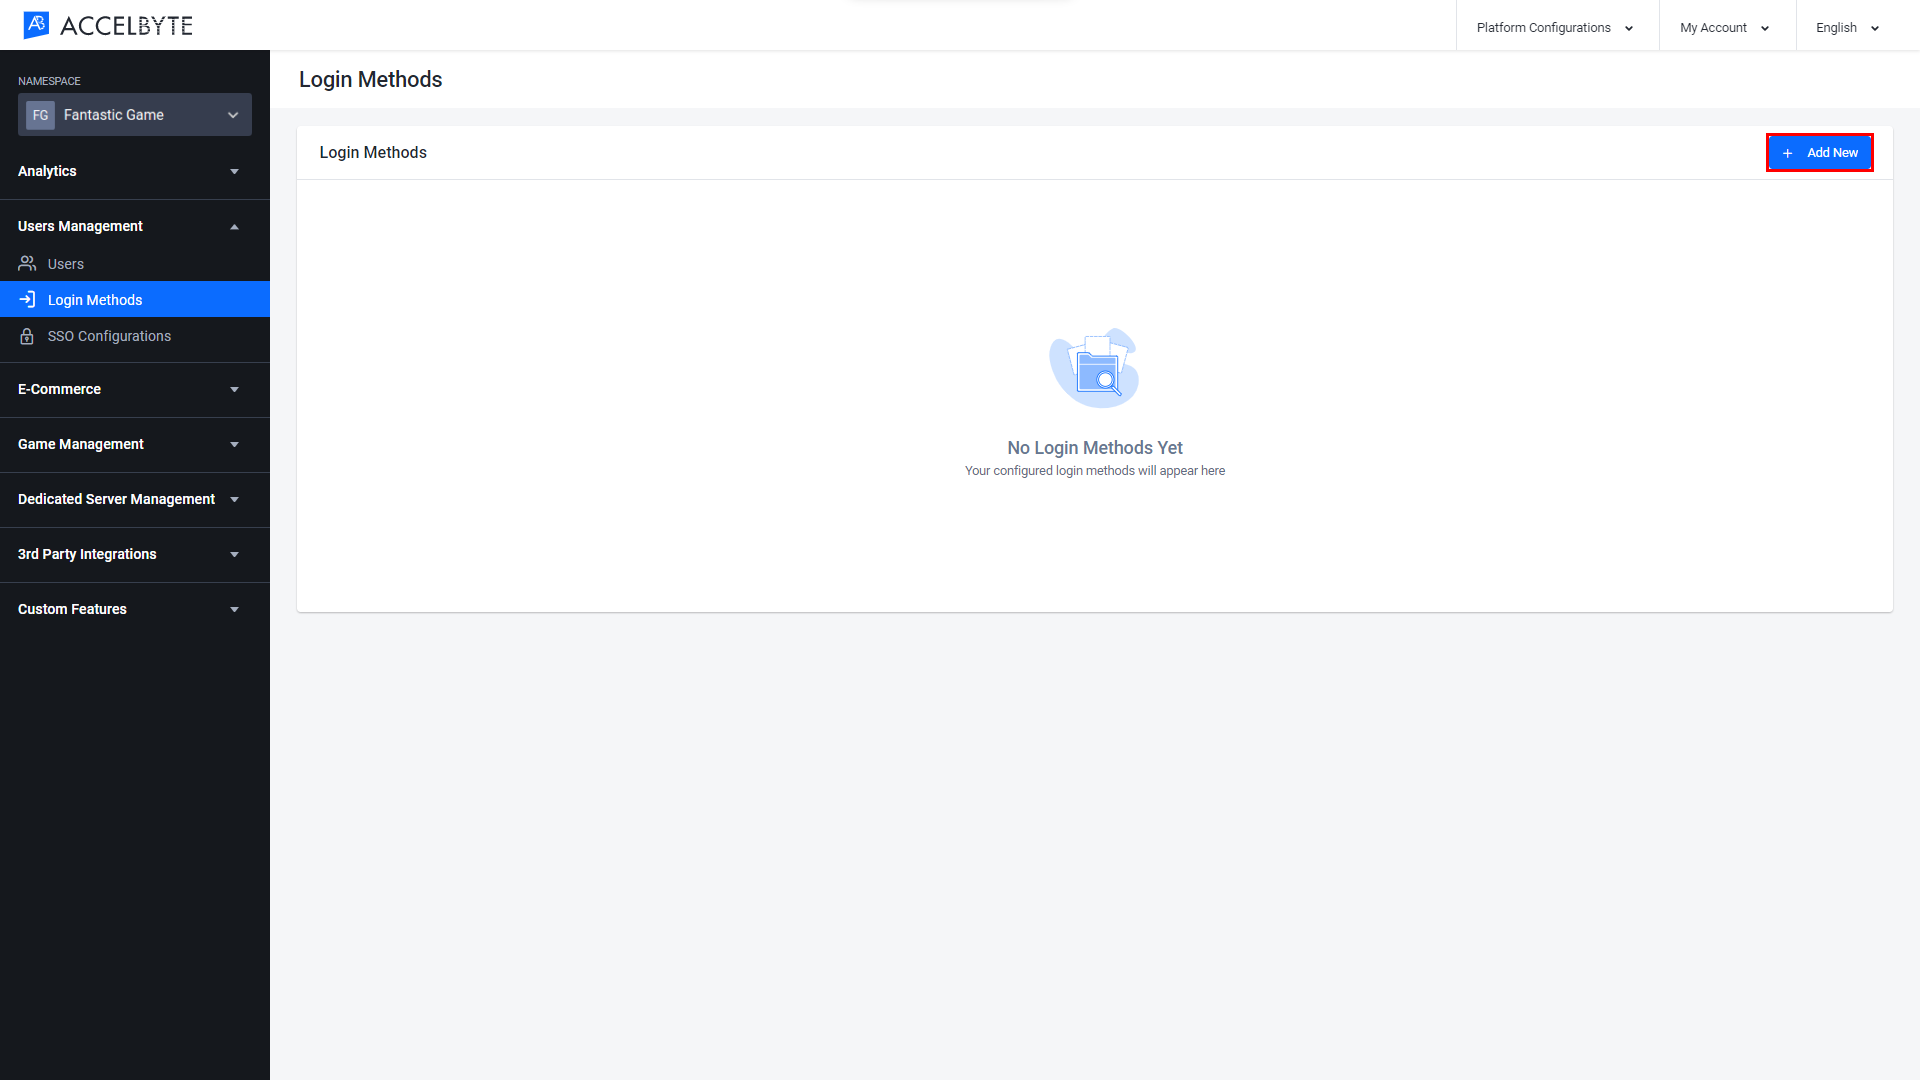
On the Login Methods page, click the Add New button.
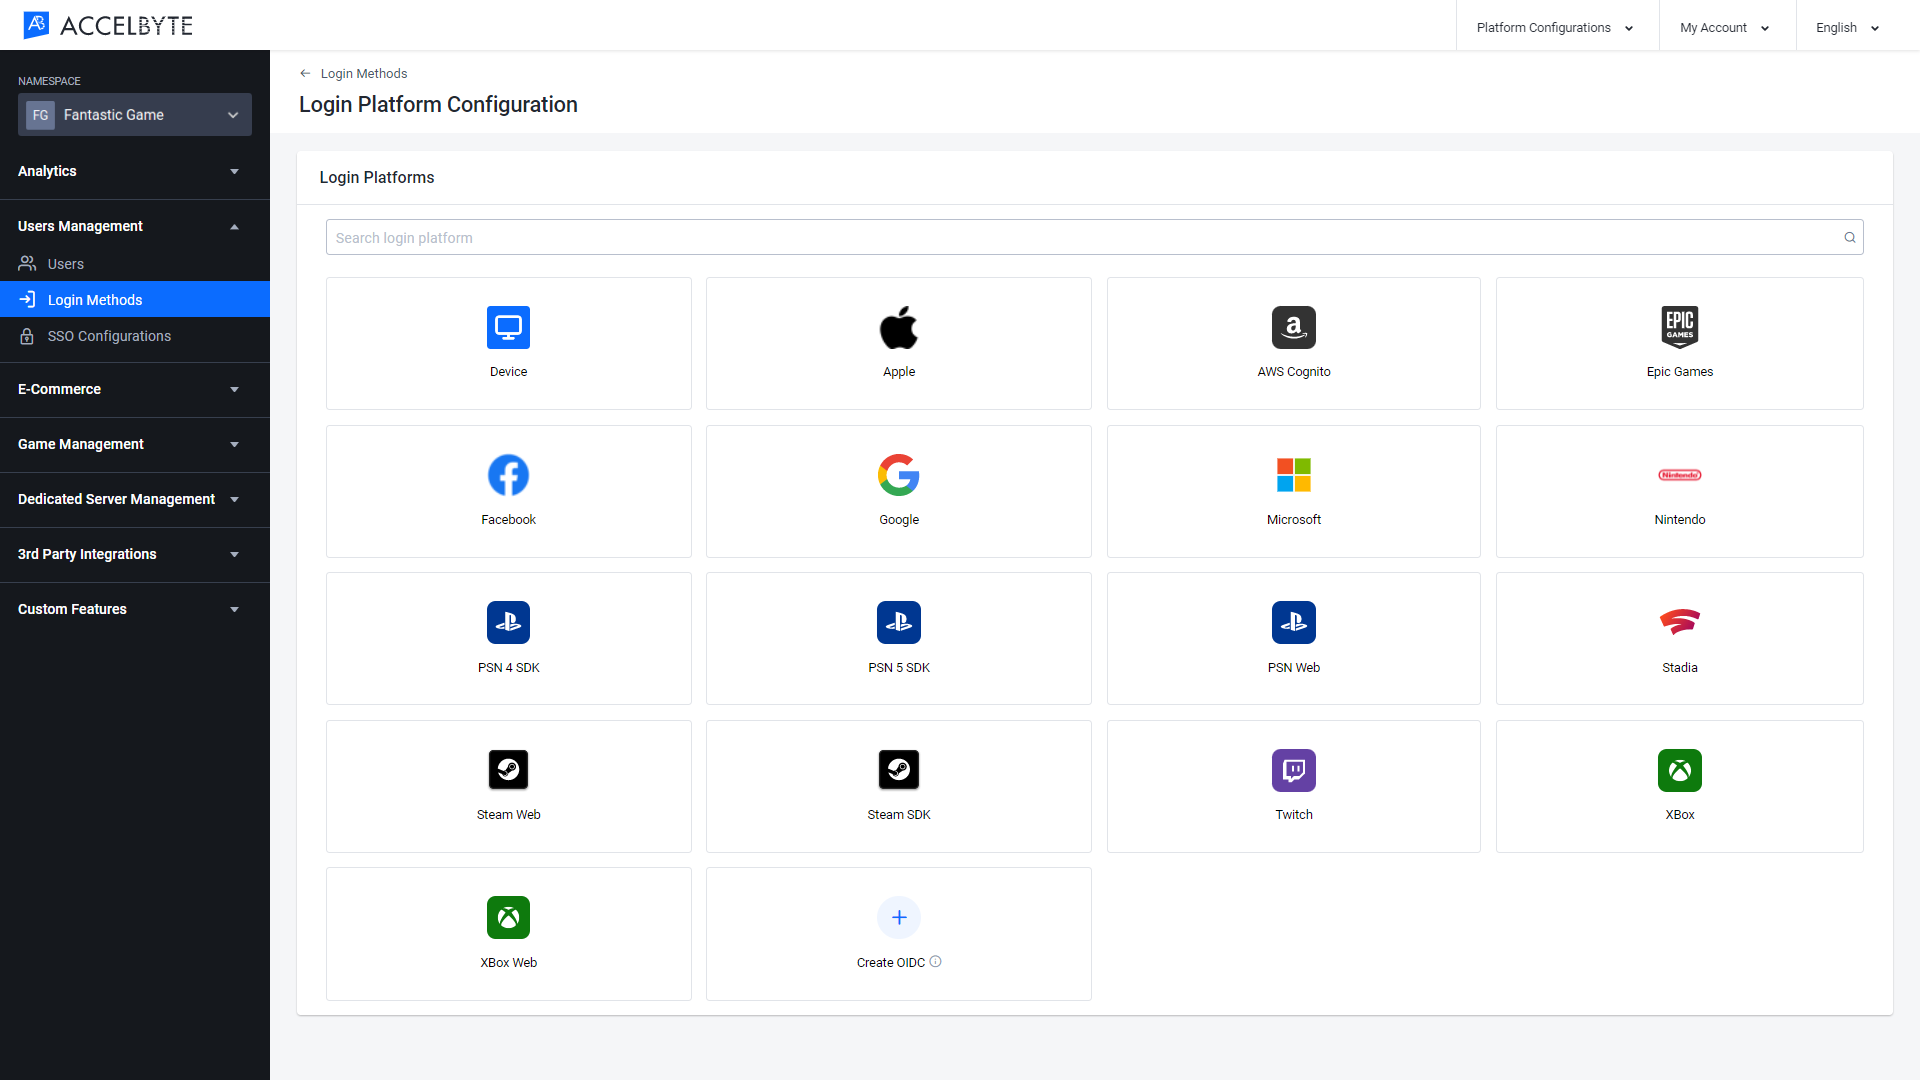
On the Login Platform Configuration page, select the platform you want to configure.
The Create Configuration form will appear. Fill in the required fields below:
Device ID
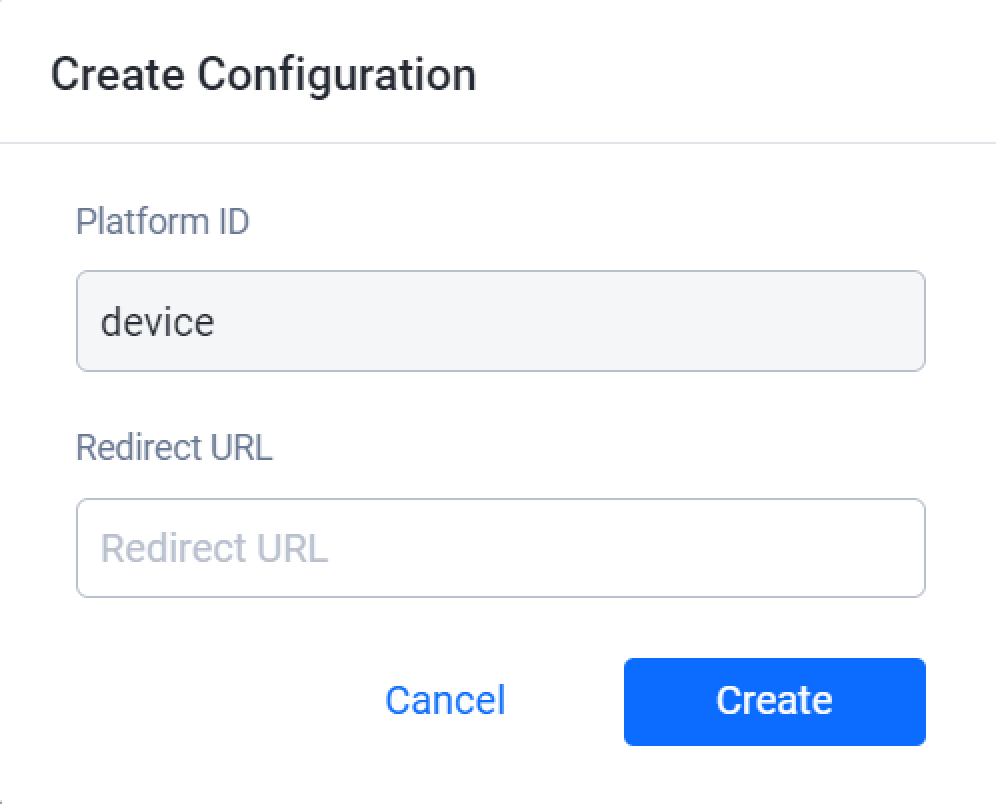
- In the Redirect URL field, input the URL where the user will be directed once the account authorization is successful. The default URL is http://127.0.0.1.
Apple
IMPORTANT
Currently we only support third-party login integration for your website or web platform using these credentials. In-game login is not yet supported.
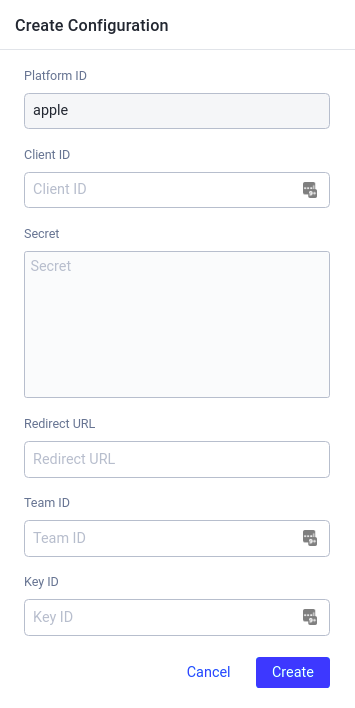
- Input the Client ID that you set in the Apple Developer Portal for your game in the Client ID field.
- Input the Client Secret that you set in the Apple Developer Portal for your game in the Secret field.
- Input the URL where the user will be directed once the account authorization is successful in the Redirect URL field. The Redirect URL should direct the player back to your server after they successfully log in.
- Input the Team ID that you set in the Apple Developer Portal for your game in the Team ID field.
- Input the Key ID that you set in the Apple Developer Portal for your game in the Key ID field.
AWS Cognito
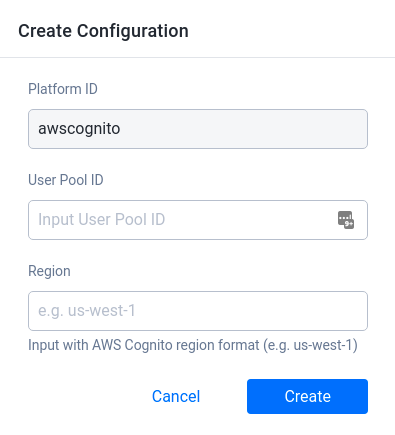
- Input the User Pool ID that you created in the AWS Cognito console for your game in the User Pool ID field.
- Input the desired AWS Cognito Region code in the Region field, e.g., us-west-1.
Epic Online Services

- Input the App ID that you've set in the Epic Developer Portal for your game in the App ID field.
- Input the Client ID that you set in the Epic Developer Portal for your game in the Client ID field.
- Input the Client Secret that you set in the Epic Developer Portal for your game in the Secret field.
- Input the URL where the user will be directed once the account authorization is successful in the Redirect URL field. The default URL for EOS is http://127.0.0.1.
Facebook
IMPORTANT
Currently we only support third-party login integration for your website or web platform using these credentials. In-game login is not yet supported.
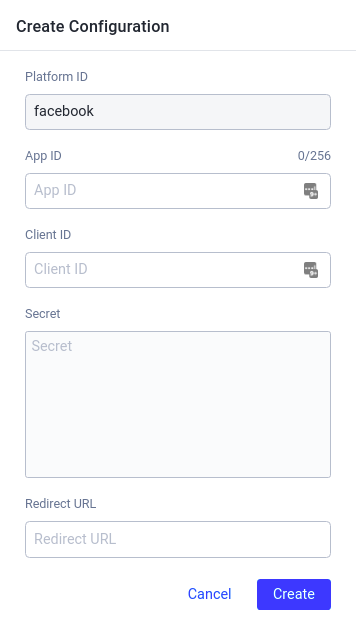
- Input the App ID that you set in the Facebook Developer Portal for your game in the App ID field.
- Input the App ID that you set in the Facebook Developer Portal for your app in the Client ID field.
- Input the Client Secret that you set in the Facebook Developer Portal for your game in the Secret field.
- Input the URL where the user will be directed once the account authorization is successful in the Redirect URL field. The default URL for Facebook is {baseURL}/iam/v3/platforms/facebook/authenticate.
NOTE
To complete the setup, you'll also have to configure the Redirect URL in the Facebook Developer Portal.
Google
IMPORTANT
Currently we only support third-party login integration for your website or web platform using these credentials. In-game login is not yet supported.
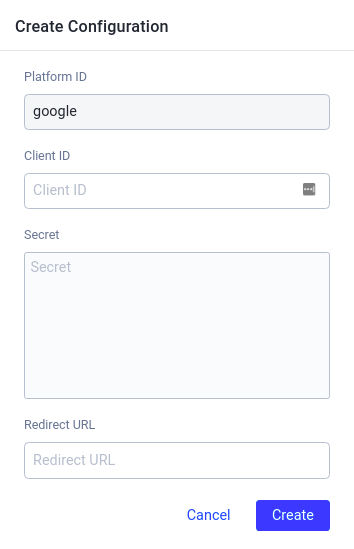
- Input the Client ID from your Google OAuth Client Google Developer Console account in the Client ID field.
- Input the Secret from your Google OAuth Client Google Developer Console account in the Secret field.
- Input the URL where the user will be directed once the account authorization is successful in the Redirect URL field. The Redirect URL should direct the player back to your server after they successfully log in.
Microsoft Azure
You can enable third-party login using Microsoft Azure credentials for the Admin Portal. This gives teams that use Microsoft accounts an easy way to access the Admin Portal without having to have an account created for them.
IMPORTANT
In addition to the steps below, there are some tasks that must be performed in the Azure Portal to enable third-party login using Microsoft Azure. Please contact AccelByte if you need assistance.
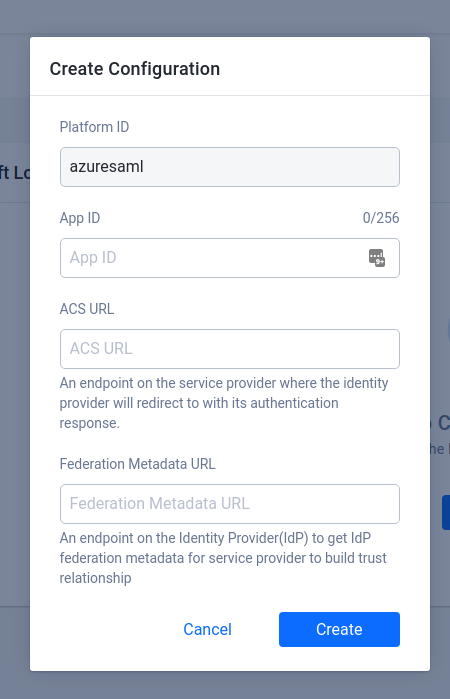
- Input the Entity ID from your Basic SAML Configuration in the App ID field.
- Input the Reply URL from your Basic SAML Configuration in the ACS URL field.
- Input the App Federation Metadata URL from the SAML Signing Certificate in the Federation Metadata URL field.
Nintendo
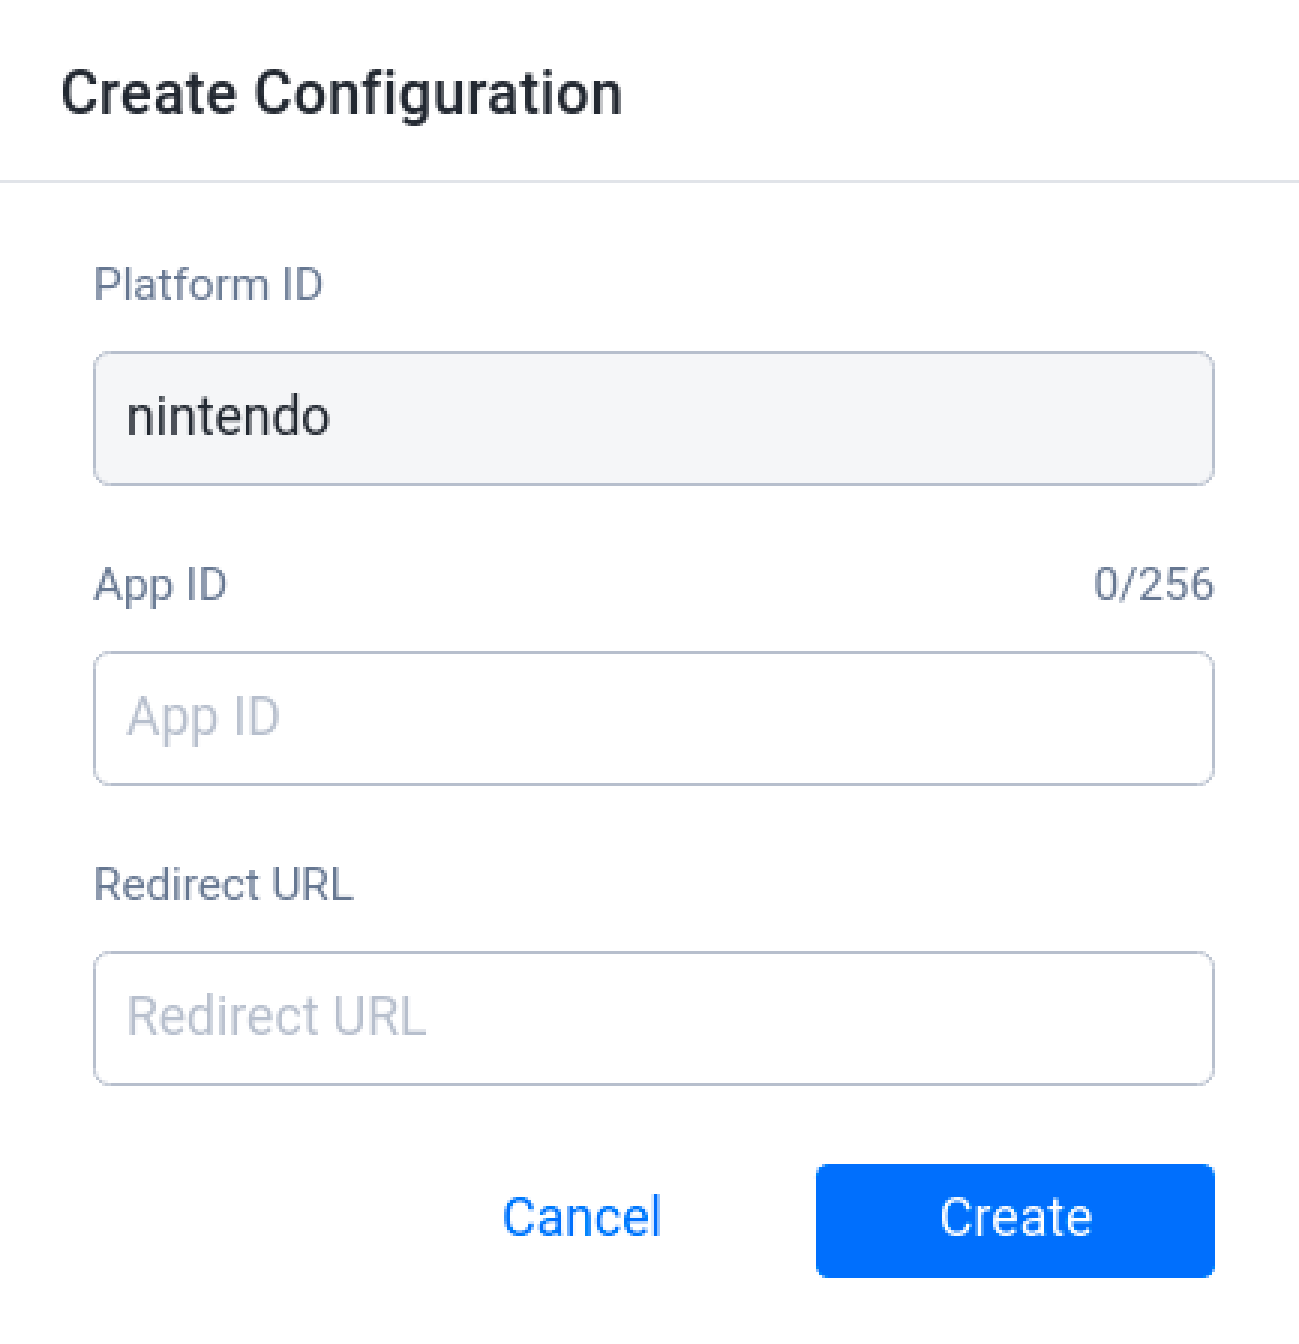
- Input the Application ID for your application in the App ID field. You can find your Application ID in your product information in the Nintendo Developer Portal.
- In the Redirect URL field, input http://127.0.0.1 for in-game login. Otherwise enter the desired destination on your website.
PSN Web Login
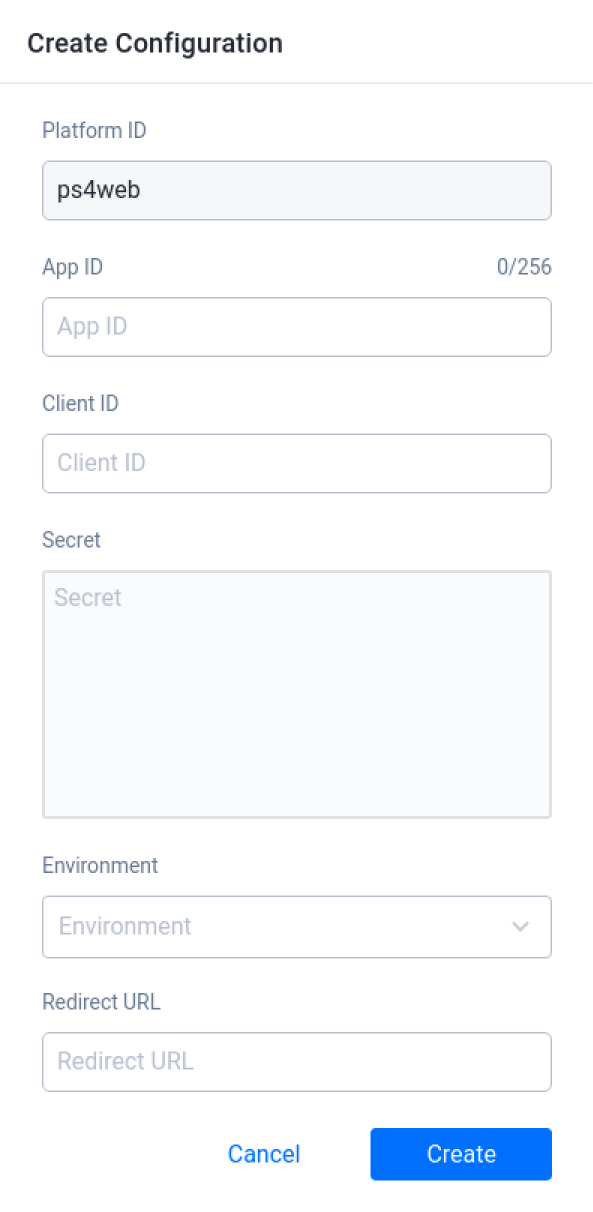
Input the Client ID for your game in the PlayStation App Server in the App ID field.
Input the Client ID for your game in the PlayStation App Server in the Client ID field.
Input the Client Secret for your game in the PlayStation App Server in the Secret field.
Select your environment type in the Environment field. You can choose from the below options:
Environment
Environment Purpose sp-int Development prod-qa QA np Live Environment Input the URL where the user will be directed once the account authorization is successful in the Redirect URL field. For PS4, the default URL is orbis://games.
PS4 SDK Login
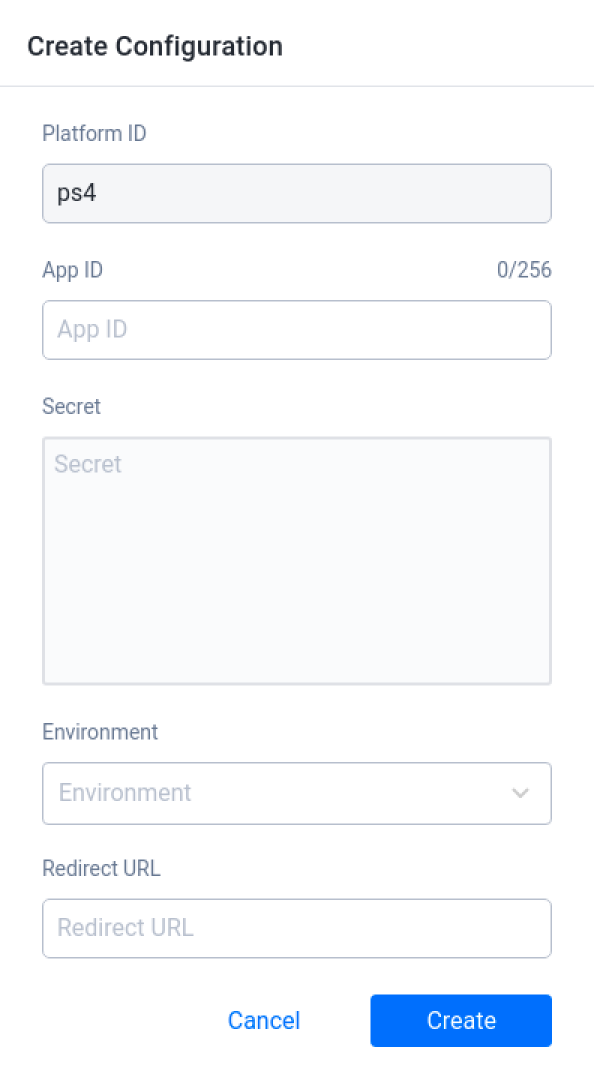
Input the Client ID for your game in the PlayStation App Server in the App ID field.
Input the Client Secret for your game in the PlayStation App Server in the Secret field.
Select your environment type in the Environment field. You can choose from the below options:
Environment
Environment Purpose sp-int Development prod-qa QA Input the URL where the user will be directed once the account authorization is successful in the Redirect URL field. For PS4, the default URL is orbis://games.
PS5 SDK Login

Input the Client ID for your game in the PlayStation App Server in the App ID field.
Input the Client Secret for your game in the PlayStation App Server in the Secret field.
Select your environment type in the Environment field. You can choose from the below options:
Environment
Environment Purpose sp-int Development prod-qa QA np Live Environment Input the URL where the user will be directed once the account authorization is successful in the Redirect URL field. For PS5, the default URL is orbis://games.
tip
This configuration can be used for both PS5 games and PS4 Cross-Gen games.
Stadia ID
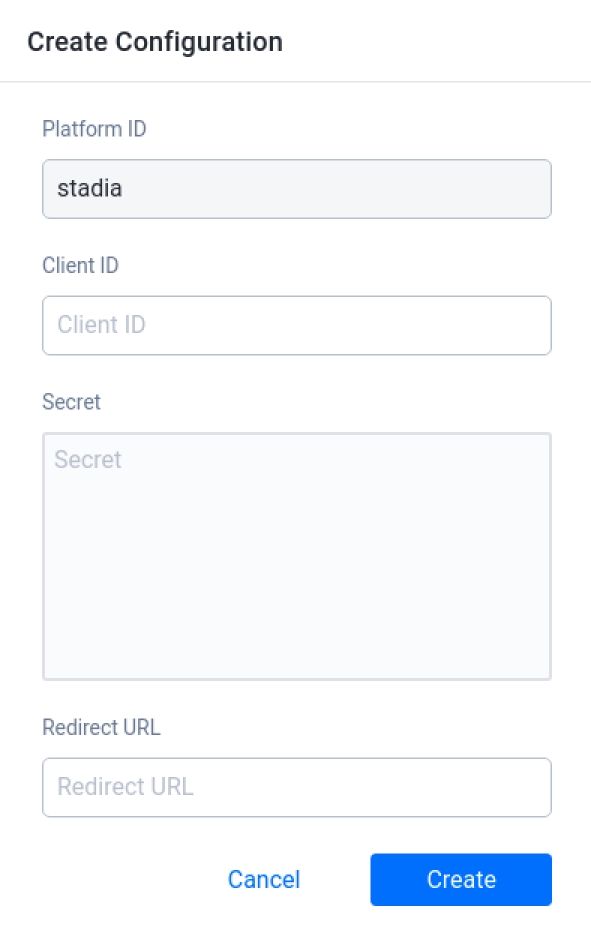
- Input your game's Stadia Account ID in the Client ID field.
- Input your game's secret in the Secret field.
- Input the URL where the user will be directed once the account authorization is successful in the Redirect URL field. For Stadia, the default URL is http://127.0.0.1.
When you're done, click Create.
Steam Web Login
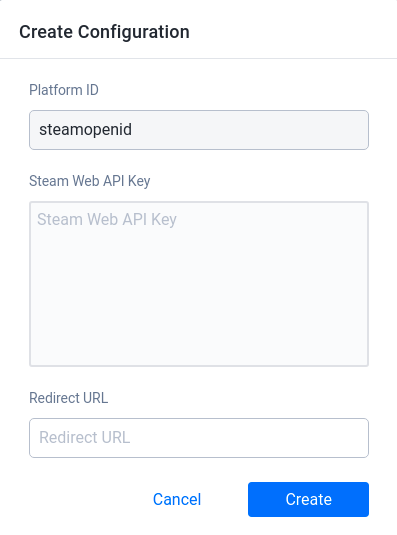
- Input your Publisher Web API Key in the Steam Web API Key field.
- Input the URL where the user will be directed once the account authorization is successful in the Redirect URL field. The default URL for Steam is http://127.0.0.1.
Steam SDK Login
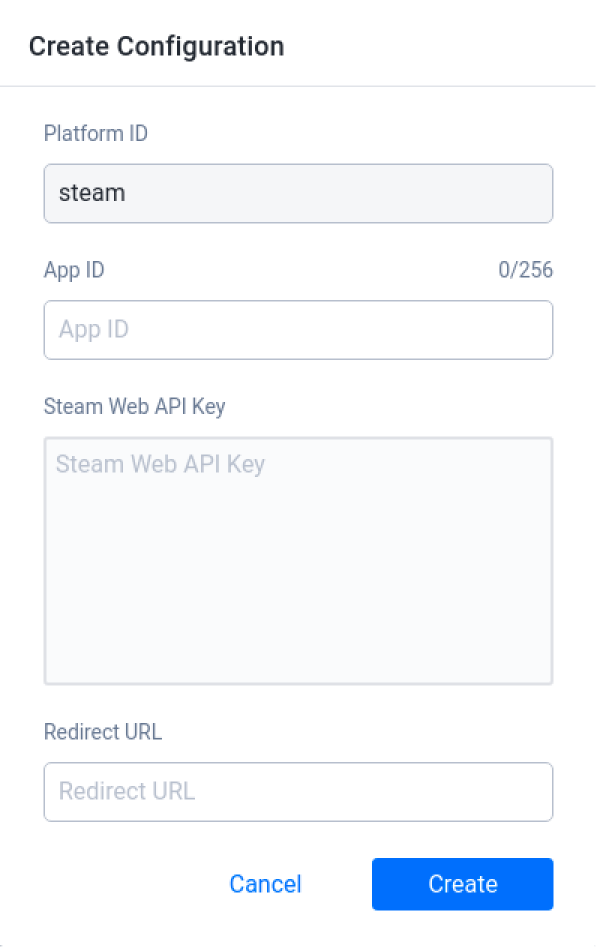
- Input Steam's App ID for your game in the App ID field. For testing purposes, you can also input 480 which is the ID for Steam's test game.
- Input your Publisher Web API Key in the Steam Web API Key field.
- Input the URL where the user will be directed once the account authorization is successful in the Redirect URL field. For in-game login, use the default URL which is http://127.0.0.1.
Twitch
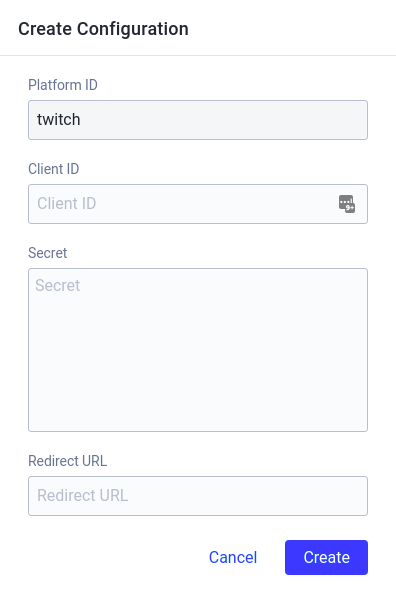
- Input the Client ID in the Client ID field.
- Input the Client Secret in the Secret field.
- Input the URL where the user will be directed once the account authorization is successful in the Redirect URL field. The Redirect URL should direct the player back to your server after they successfully log in.
Xbox SDK Login
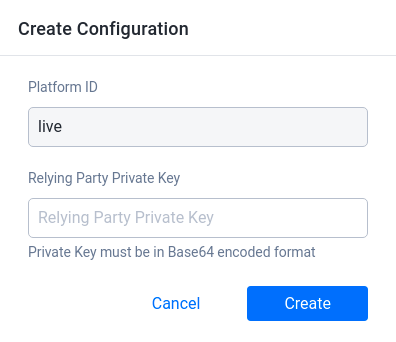
- Input the Relying Party Private Key for your game in Base64 format in the Relying Party Private Key field.
Xbox Web Login
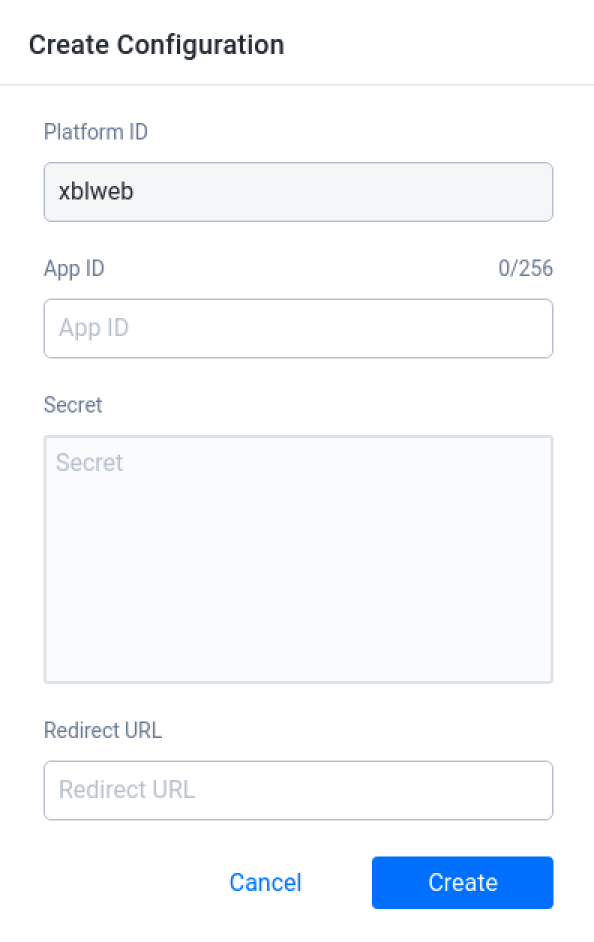
- Input the App ID that you've set in the Azure Portal for your game in the App ID field.
- Input the Client Secret that you set in the Azure Portal for your game in the Secret field.
- Input the URL where the user will be directed once the account authorization is successful in the Redirect URL field. For Xbox Live, the default URL is http://127.0.0.1.
OpenID Connect
Fill the Platform Identity Provider form with the following information:
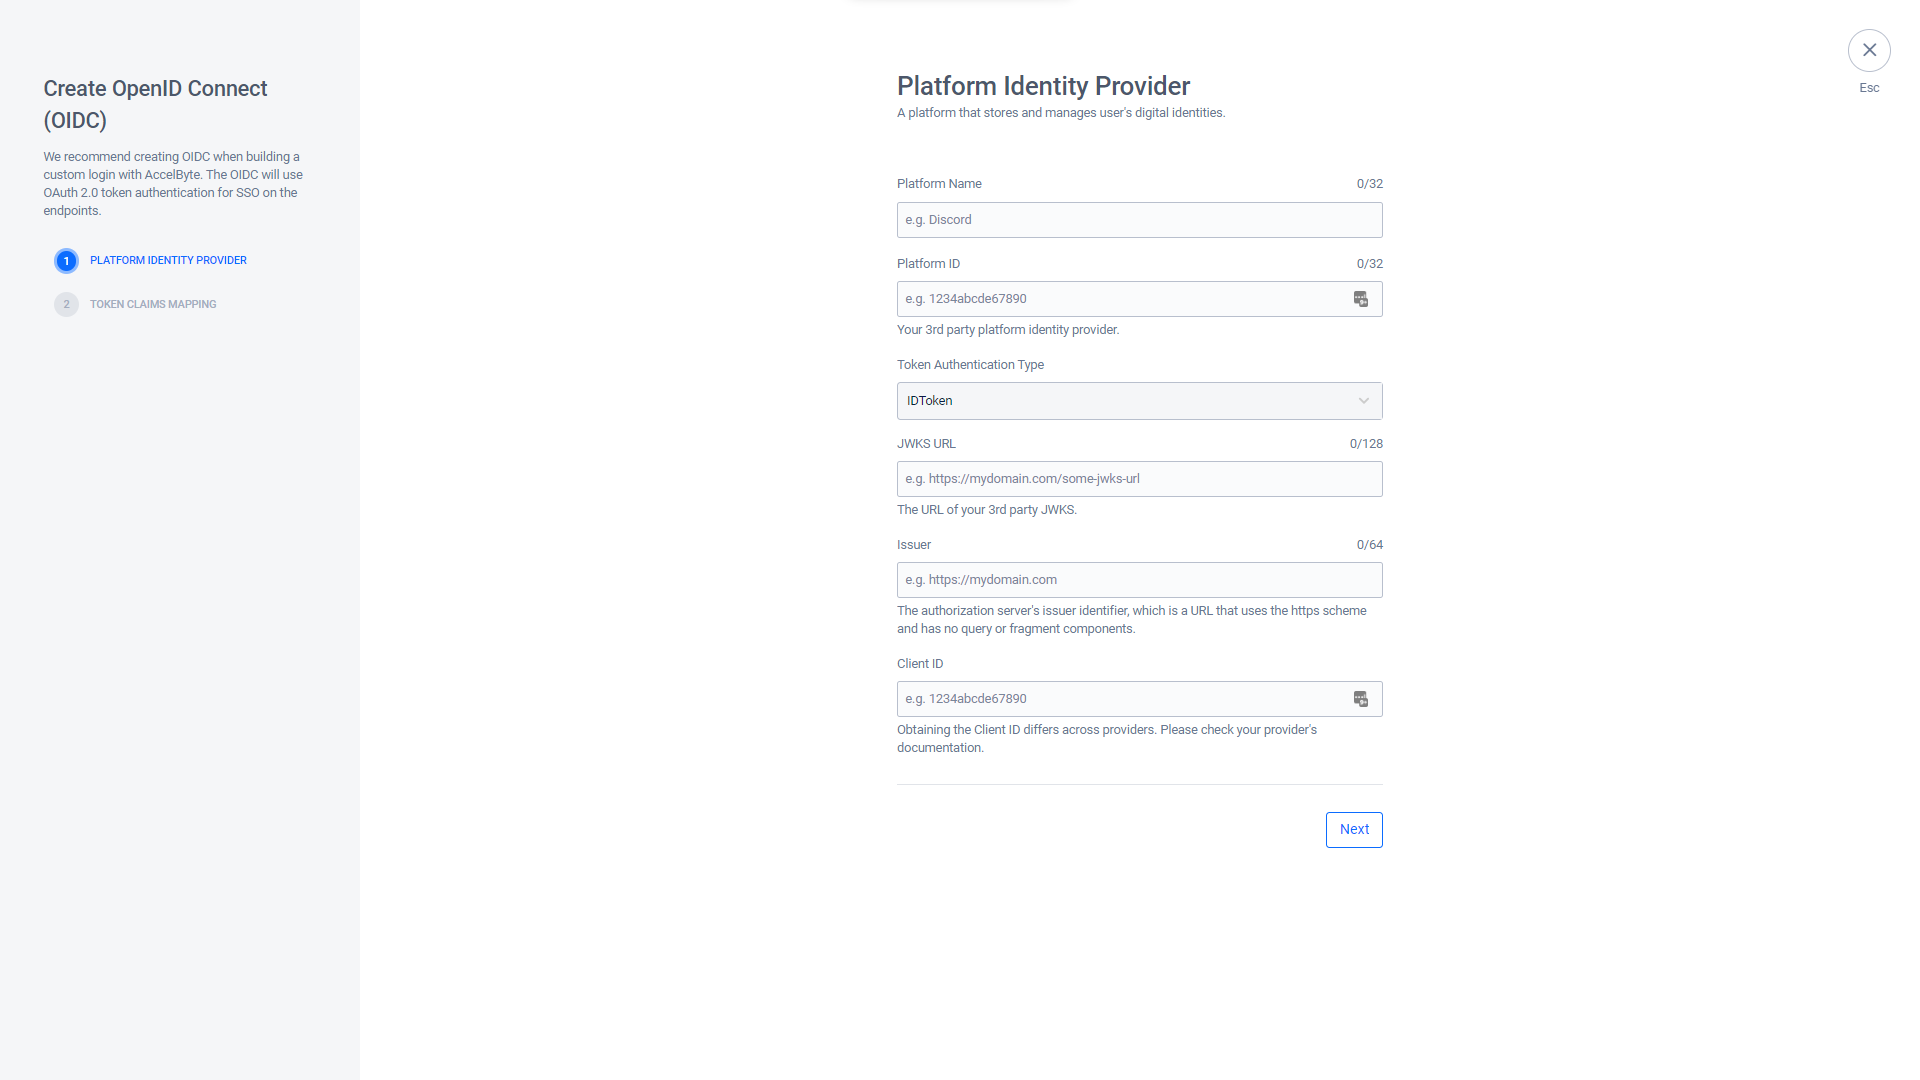
- Input the third-party platform name in the Platform Name field.
- Input the platform identity provider of your selected third-party platform in the Platform ID field .
- Input the third-party JWKS in the JWKS URL field.
- Input the authorization server's issuer identifier in the Issuer field. This identifier is an URL that uses the https scheme and has no query or fragment components.
- Input your Client ID of your selected platform in the Client ID field.
NOTE
The way in which you obtain your Client ID will differ across providers. Please check your provider's documentation for more information.
Once completed, click Next.
Fill the Token Claims Mapping form with the following information:
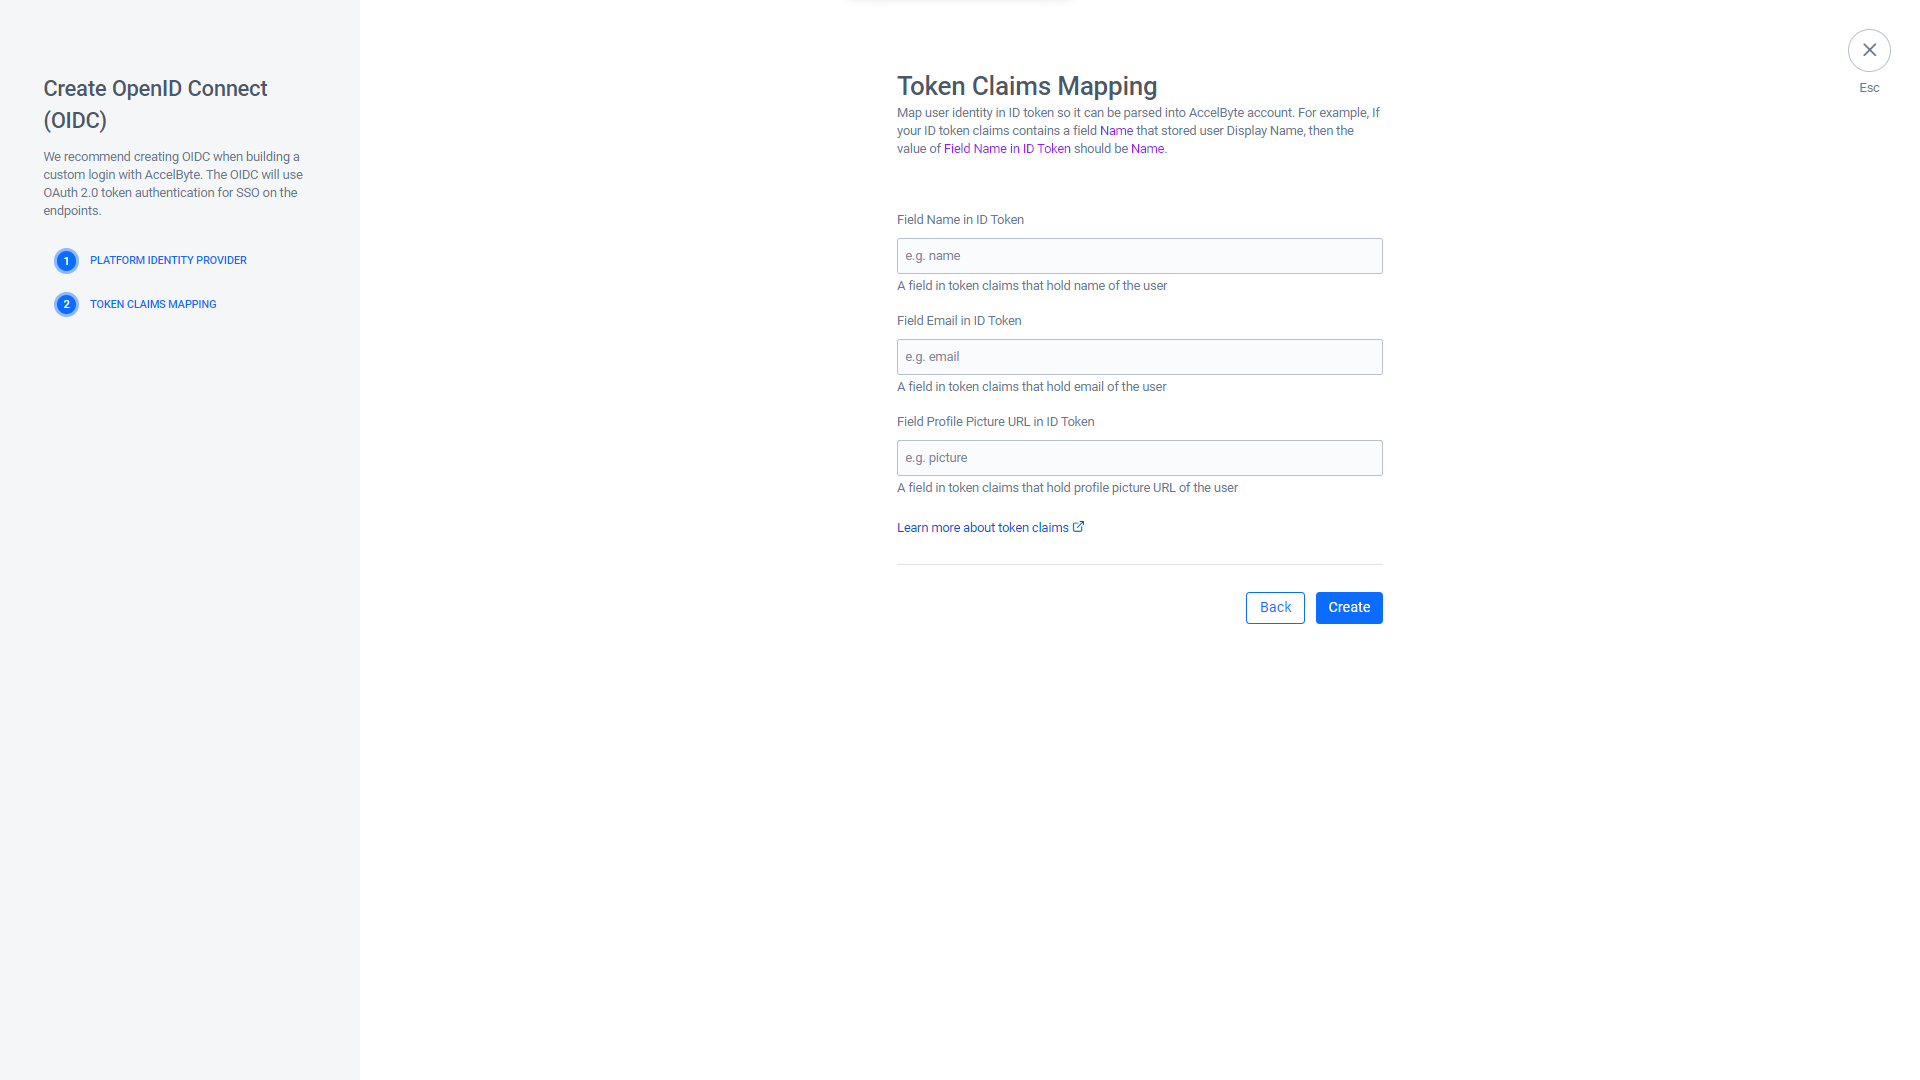
- Input the name of the ID Token Claim's field that contains the user's name in the Field Name in ID Token field.
- Input the email of the ID Token Claim's field that contains the user's email in the Field Email in ID Token field.
- Input the profile picture URL of the ID Token Claim's field that contains the user's profile picture URL in the Field Profile Picture URL in ID Token field.
tip
For more information on token claims, see OpenID's documentation page.
Once completed, click Create.
Log in with Third-party Platform Credentials with Two-factor Authentication Enabled
These functions allow your players to log into your game using a verified account linked with a third-party account. See our Two-factor Authentication documentation for more information about setting up authenticators.
Third-party Authentication App
Before a player can log in, you will need to enable two-factor authentication with your third party authentication app.
- Unreal Engine
- Unity
bool b3rdPtPlatformLoginSuccessful1 = false;
EAccelBytePlatformType Your3rdPtPlatformType = EAccelBytePlatformType::Steam;
FString Your3rdPtPlatformAuthCode;
FRegistry::User.LoginWithOtherPlatform(Your3rdPtPlatformType, Your3rdPtPlatformAuthCode,
   FVoidHandler::CreateLambda([&]()
   {
       UE_LOG(LogTemp, Log, TEXT("Success"));
       b3rdPtPlatformLoginSuccessful1 = true;
   }),
   FCustomErrorHandler::CreateLambda([&](int32 ErrorCode, const FString& ErrorMessage, const FJsonObject& ErrorJson)
  {
     FString Error = *ErrorJson.GetStringField("error");
     UE_LOG(LogTemp, Log, TEXT("Login Failed. Error Code: %d, Message: %s, Error: %s"), ErrorCode, *ErrorMessage, *Error);

     if(Error == "mfa_required")
     {
        const FString MfaToken = *ErrorJson.GetStringField("mfa_token");
        FString MfaCode = “code-from-3rd-party-apps”;
        FRegistry::User.VerifyLoginWithNewDevice2FAEnabled(MfaToken, EAccelByteLoginAuthFactorType::Authenticator, MfaCode,
           FVoidHandler::CreateLambda([&]()
           {
              bLoginPlatformSuccessful = true;
              UE_LOG(LogTemp, Log, TEXT("    Success"));
           }), FCustomErrorHandler::CreateLambda([](int32 Code, const FString& Message, const FJsonObject& ErrorJson)
           {
              FString Error = *ErrorJson.GetStringField("error");
              UE_LOG(LogTemp, Log, TEXT("Verify 2FA Failed. Error Code: %d, Message: %s, Error: %s"), Code, *Message, *Error);
           }));
     }
  }));
private string mfaToken;

    private void OnVerify2FACode(Result<TokenData, OAuthError> result)
    {
        if (!result.IsError)
        {
            // show the login result
            Debug.Log("Login successful");
        }
        else
        {
            Debug.Log("Login failed:" + result.Error.error);
        }
    }

    public void OnVerify2FA_AuthenticatorClicked()
    {
        // code got from 3rd party auth app
       string code = InputFieldGenerateKey.GetComponent<InputField>().text;
  AccelBytePlugin.GetUser().Verify2FACode(mfaToken, TwoFAFactorType.AUTHENTICATOR, code, OnVerify2FACode, true);
    }

    public void OnLogin(Result<TokenData, OAuthError> result)
    {
        if (!result.IsError)
        {
            // show the login result
Backup Code
Before a player can log in, you will need to enable two-factor authentication with the Backup Code method and save this backup code.
- Unreal Engine
- Unity
bool b3rdPtPlatformLoginSuccessful1 = false;
EAccelBytePlatformType Your3rdPtPlatformType = EAccelBytePlatformType::Steam;
FString Your3rdPtPlatformAuthCode;
FRegistry::User.LoginWithOtherPlatform(Your3rdPtPlatformType, Your3rdPtPlatformAuthCode,
   FVoidHandler::CreateLambda([&]()
   {
       UE_LOG(LogTemp, Log, TEXT("Success"));
       b3rdPtPlatformLoginSuccessful1 = true;
   }),
   FCustomErrorHandler::CreateLambda([&](int32 ErrorCode, const FString& ErrorMessage, const FJsonObject& ErrorJson)
  {
     FString Error = *ErrorJson.GetStringField("error");
     UE_LOG(LogTemp, Log, TEXT("Login Failed. Error Code: %d, Message: %s, Error: %s"), ErrorCode, *ErrorMessage, *Error);

     if(Error == "mfa_required")
     {
        const FString MfaToken = *ErrorJson.GetStringField("mfa_token");
        FString MfaBackupCode = “user-backup-code”;
        FRegistry::User.VerifyLoginWithNewDevice2FAEnabled(MfaToken, EAccelByteLoginAuthFactorType::BackupCode, MfaBackupCode,
           FVoidHandler::CreateLambda([&]()
           {
              bLoginPlatformSuccessful = true;
              UE_LOG(LogTemp, Log, TEXT("    Success"));
           }), FCustomErrorHandler::CreateLambda([](int32 Code, const FString& Message, const FJsonObject& ErrorJson)
           {
              FString Error = *ErrorJson.GetStringField("error");
              UE_LOG(LogTemp, Log, TEXT("Verify 2FA Failed. Error Code: %d, Message: %s, Error: %s"), Code, *Message, *Error);
           }));
     }
  }));
private string mfaToken;

    private void OnVerify2FACode(Result<TokenData, OAuthError> result)
    {
        if (!result.IsError)
        {
            // show the login result
            Debug.Log("Login successful");
        }
        else
        {
            Debug.Log("Login failed:" + result.Error.error);
        }
    }

    public void OnButtonClicked_Verify2FABackupCode()
    {
          // code/backupcode saved from player portal
          string code = InputFieldBackupCode.GetComponent<InputField>().text;
  AccelBytePlugin.GetUser().Verify2FACode(mfaToken, TwoFAFactorType.BACKUPCODE, code, OnVerify2FACode, true);
    }

    public void OnLogin(Result<TokenData, OAuthError> result)
    {
        if (!result.IsError)
        {
            // show the login result
            Debug.Log("Login successful");
        }
        else
        {
            Debug.Log("Login failed:" + result.Error.error);

            if (result.Error.error.Equals("mfa_required"))
            {
                Debug.Log("Login failed:" + result.Error.error);
                mfaToken = result.Error.mfa_token;
            }
        }
    }

    void Start()
    {
        AccelBytePlugin.GetUser().LoginWithOtherPlatform(PlatformType.Steam, steamTicket, OnLogin);
    }
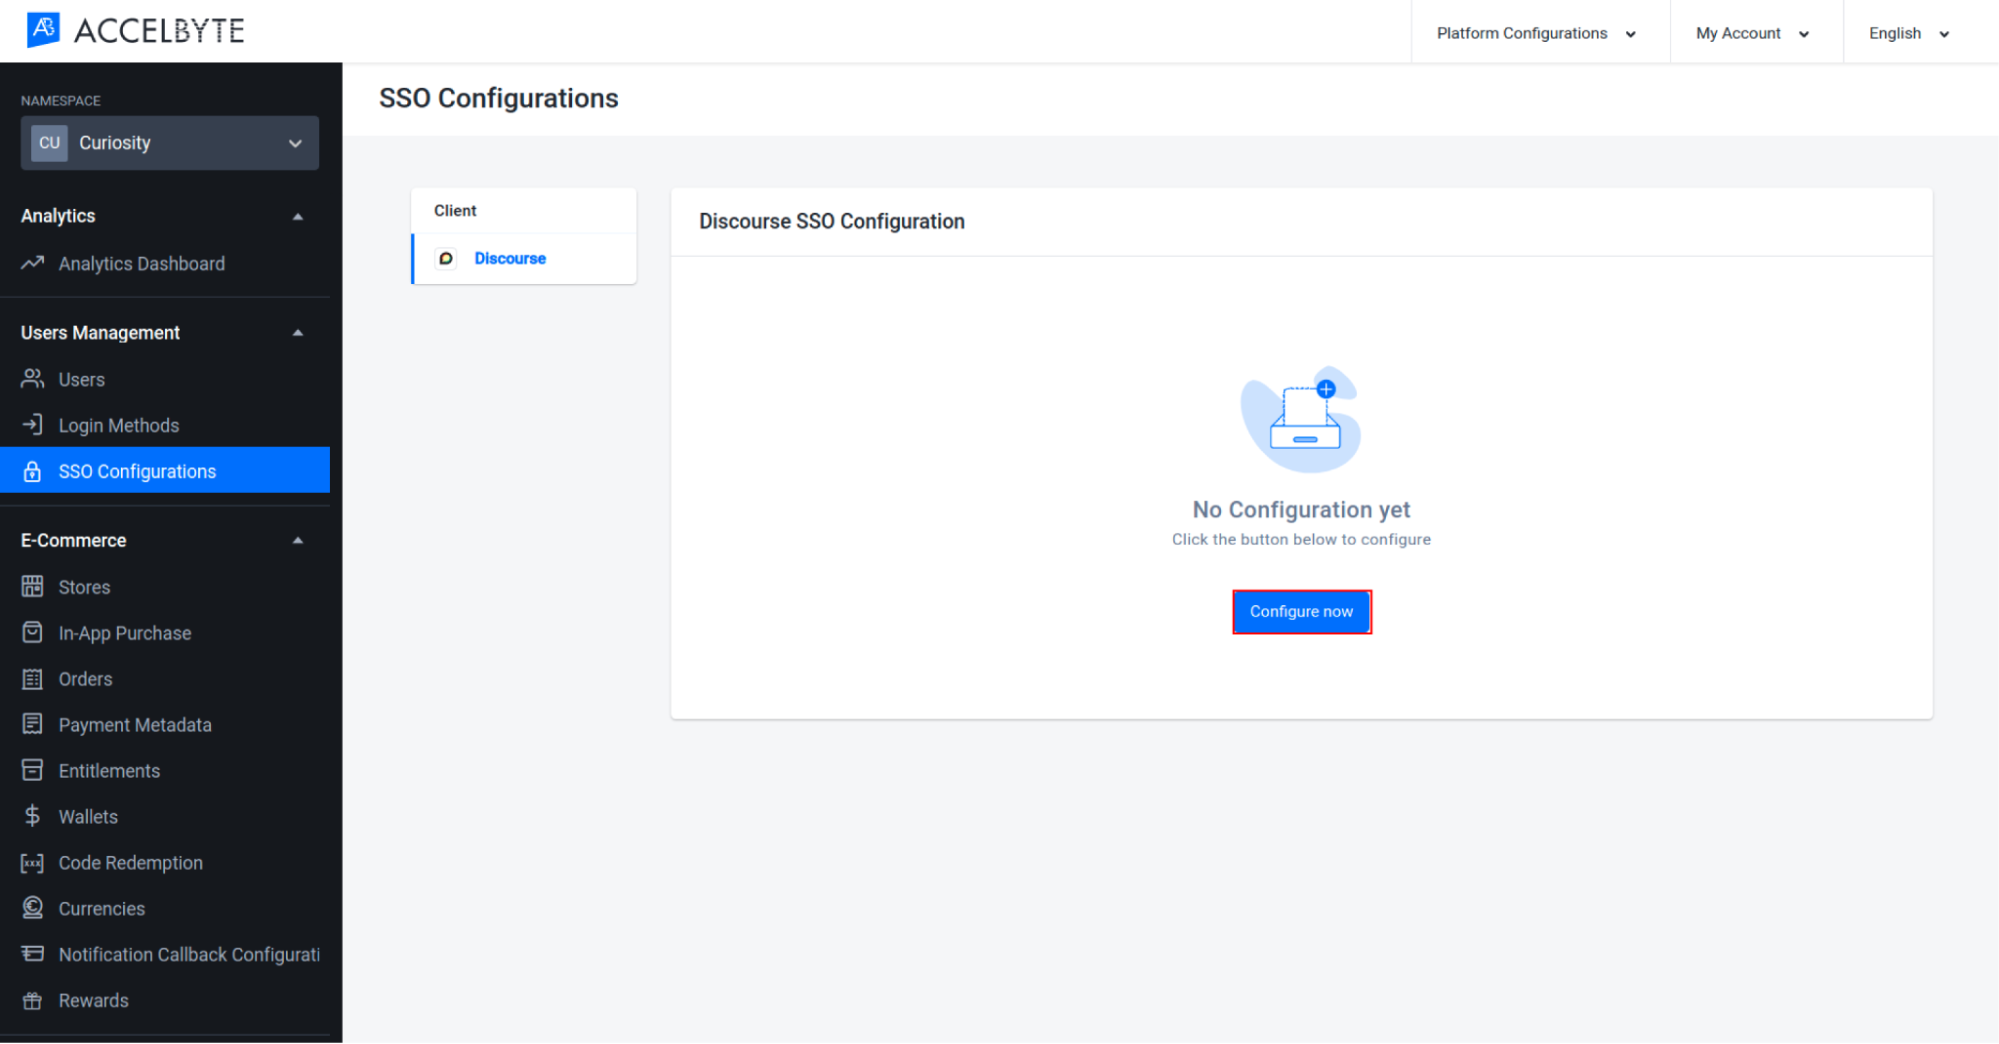
SSO Configurations
Single Sign-On (SSO) enables players to log in with a single credential to access several independent services. To enable SSO we use Discourse, which is an open-source discussion platform that can be used as a mailing list.
Create a New Discourse Configuration
Go to the Admin Portal, and click on the SSO Configurations menu.
Click the Configure Now button to add a new configuration.
The Add Discourse Configuration appears. Fill in the required information:
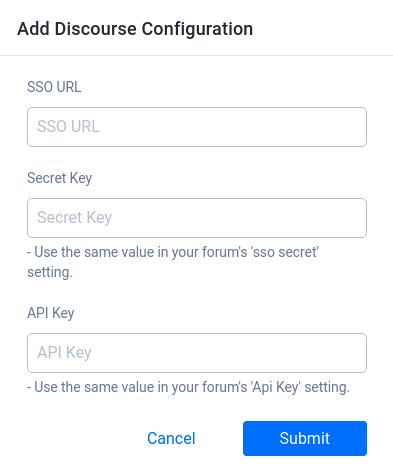
- Input the URL to which players will be redirected in the SSO URL field.
- Input the Secret Key from Discourse in the Secret Key field.
- Input the API Key from Discourse in the API Key field
When you're done, click Submit.
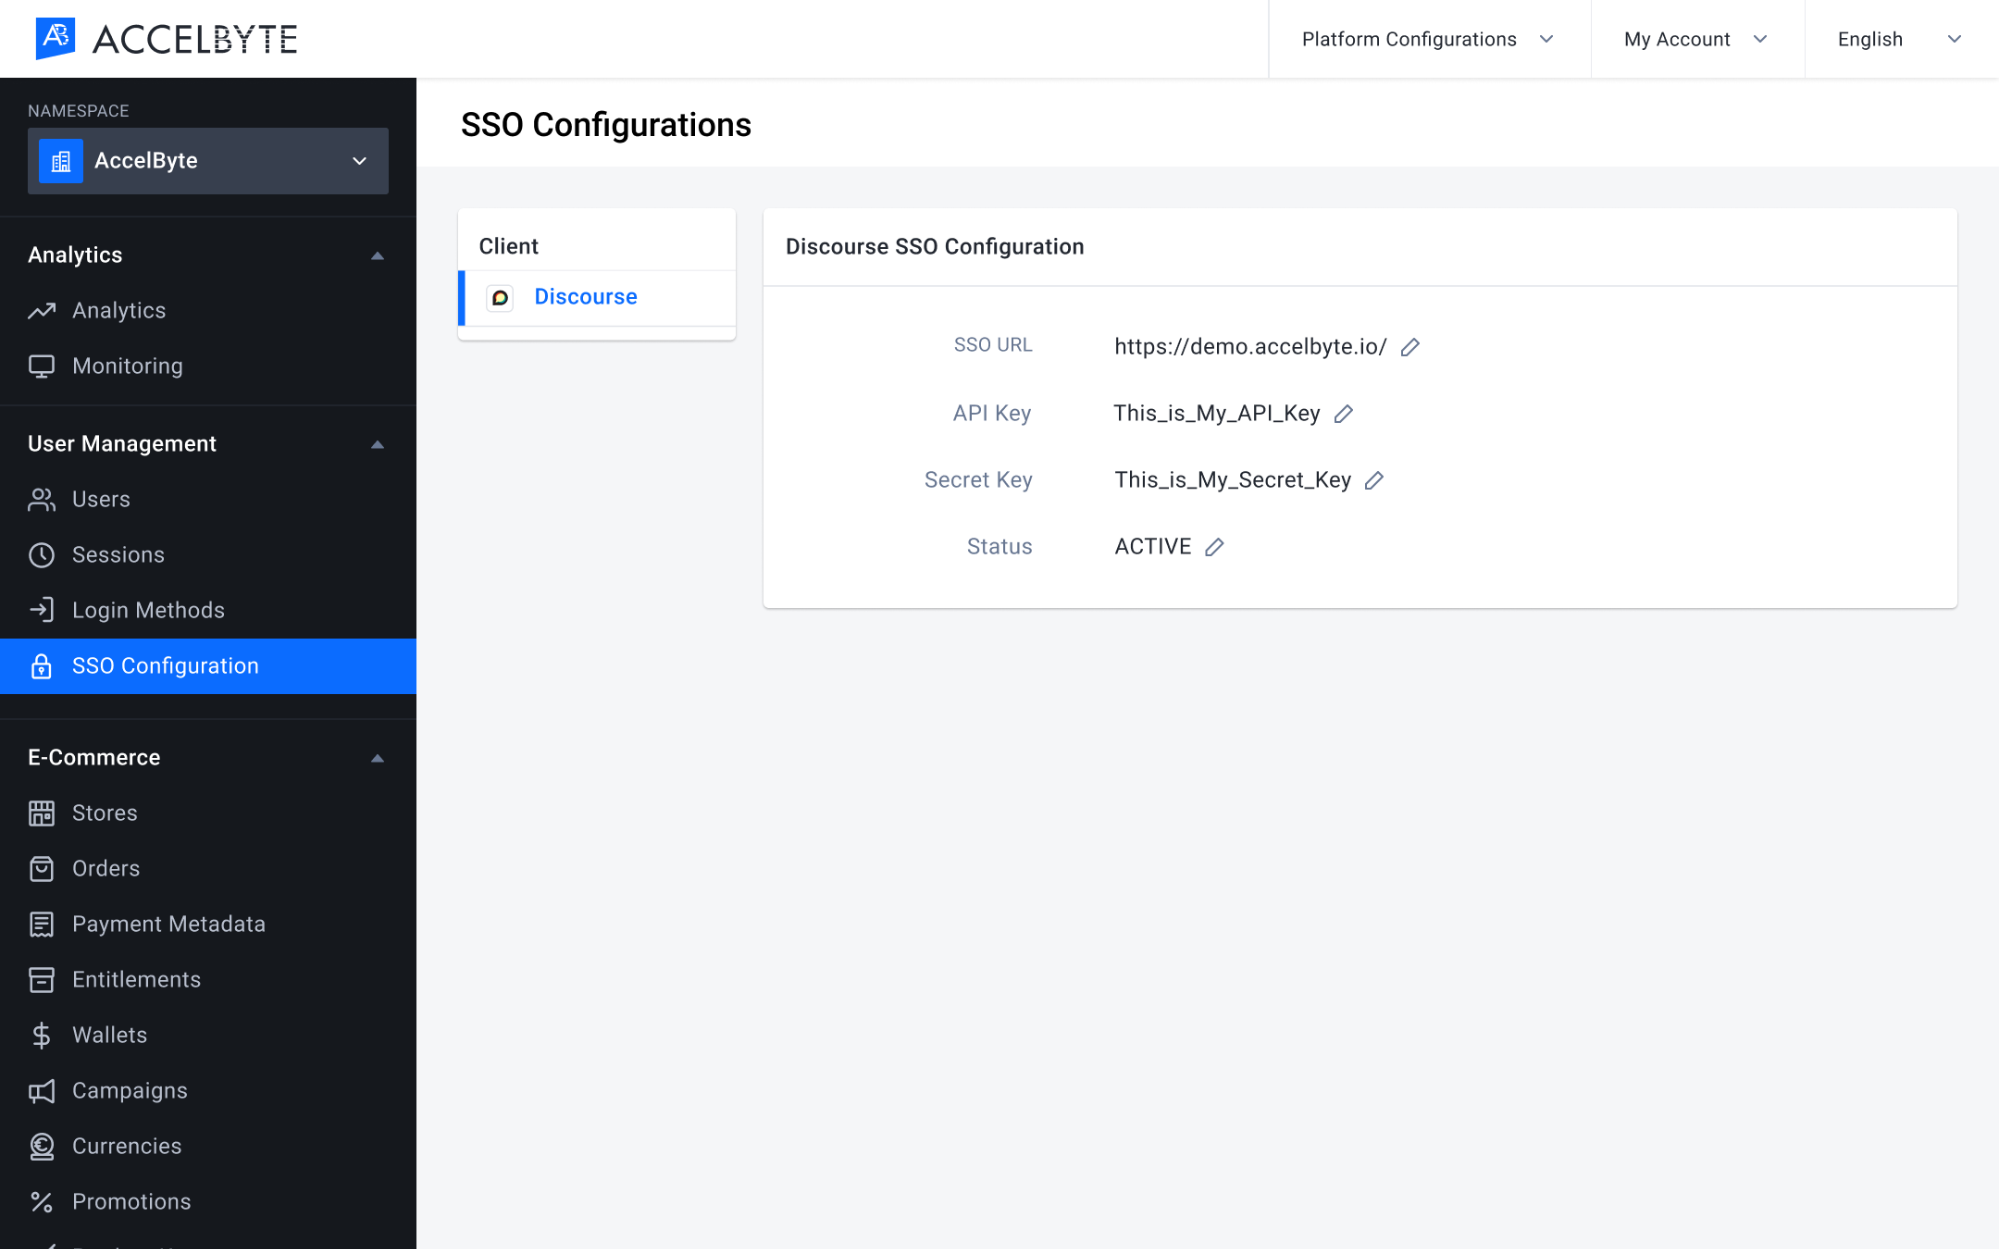
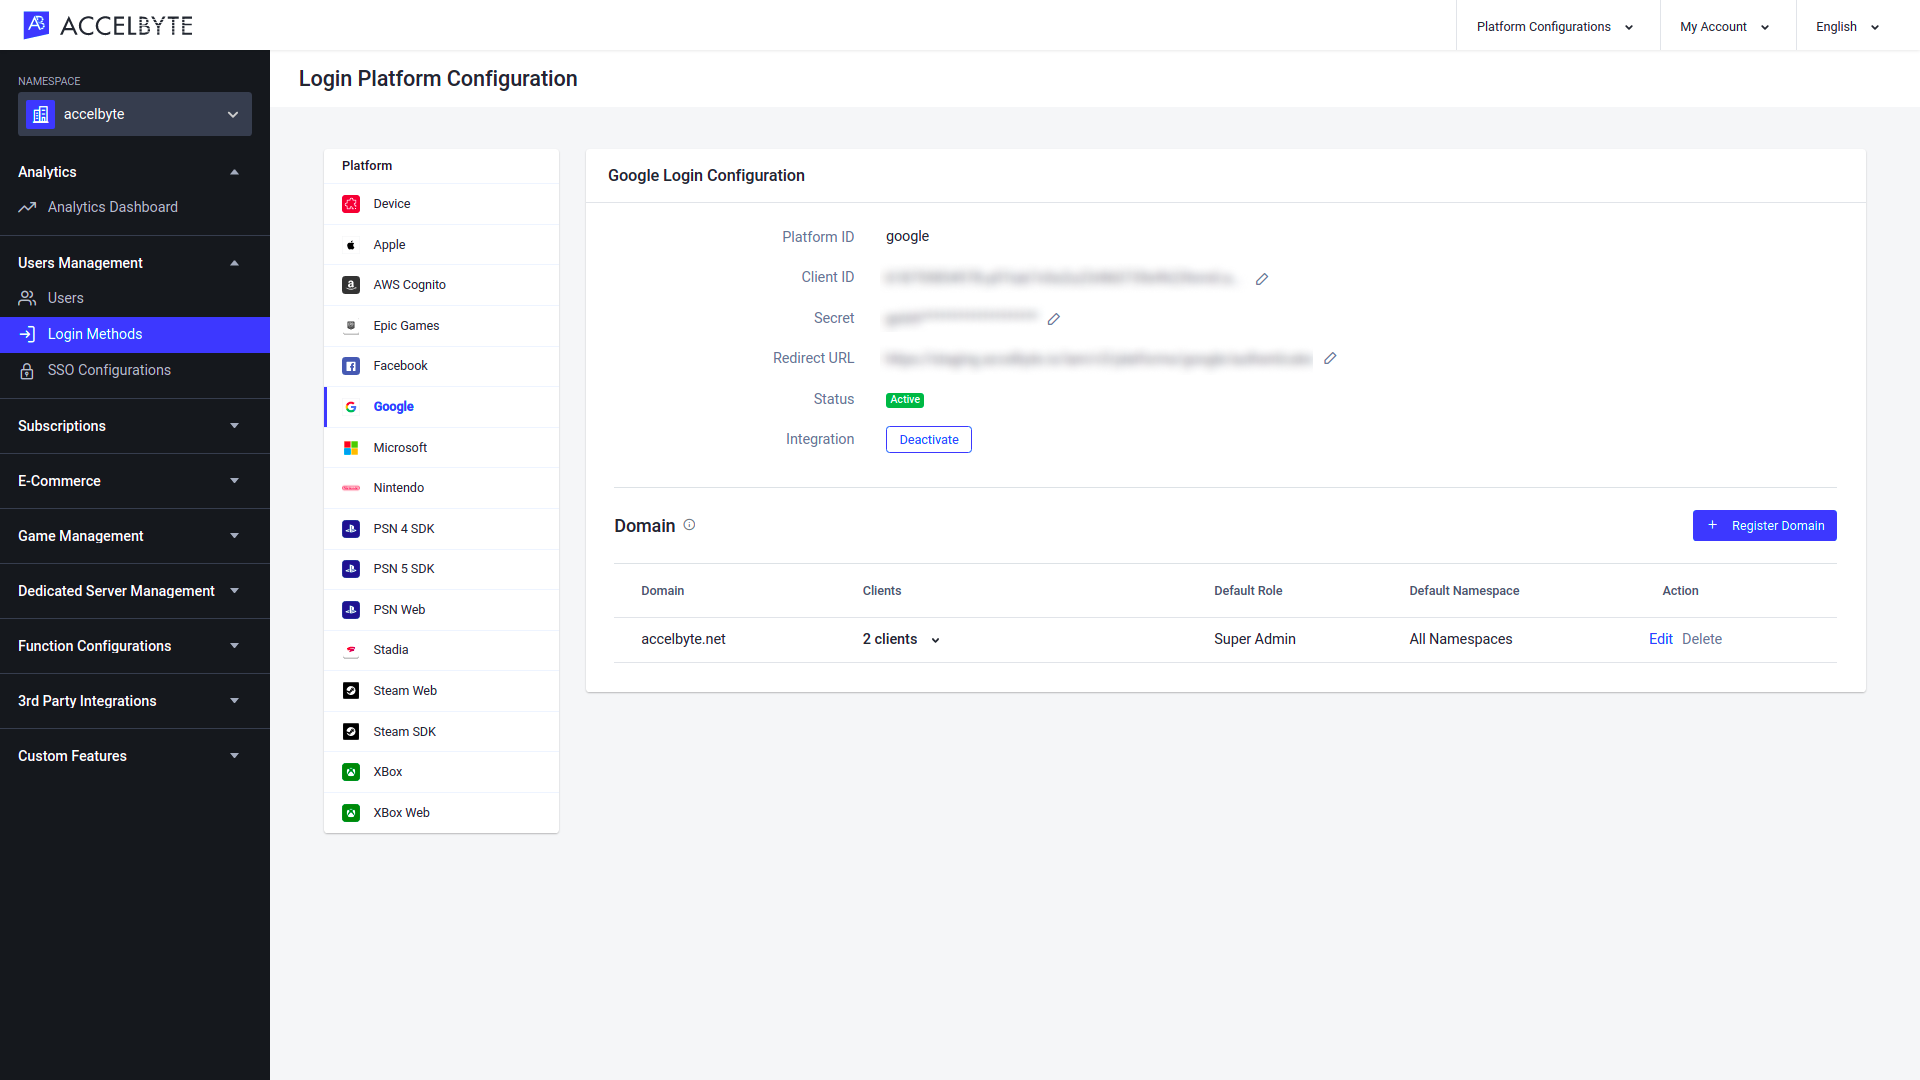
After creating the configuration, it will be accessible from the Discourse SSO Configuration panel on the SSO Configurations page.
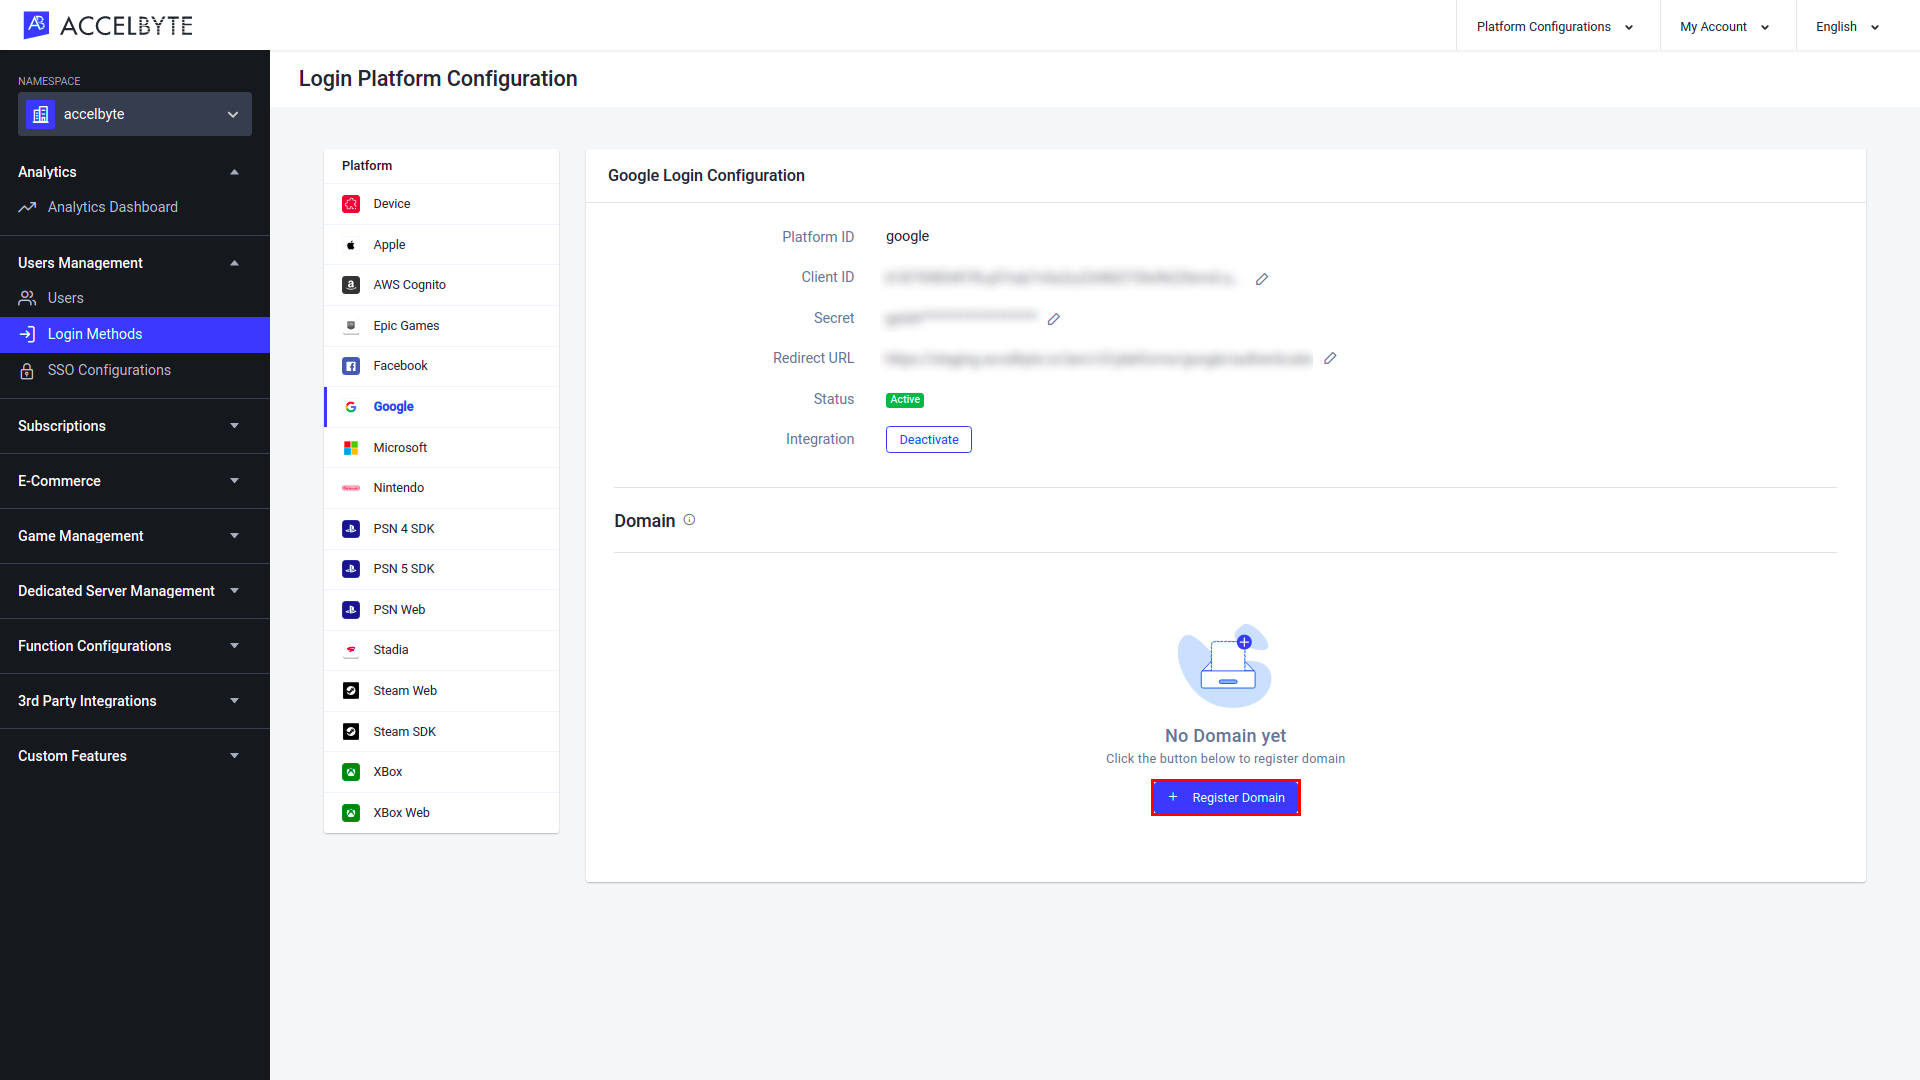
Registering a Google Domain
To enable SSO with Google credentials in the Admin Portal, you must first register the Google domain members of your institution will use to access the Admin Portal. You can also associate Roles and IAM Clients with a domain, allowing you to control what users under that domain can access. Multiple domains can be registered and configured independently.
NOTE
You can only register a Google domain from the publisher namespace.
In the publisher namespace of the Admin Portal, click Login Methods. On the Login Platform Configuration page, click Google, scroll to the Domain section, and click the Register Domain button.
The Register Domain form appears. Fill in the fields with the following information:
- Enter the target Google domain in the Domain Name field.
- Select any IAM Client you want users from that domain to be able to access from the Clients dropdown. You can choose more than one client.
- Select the default role for users from that domain from the Default Role dropdown.
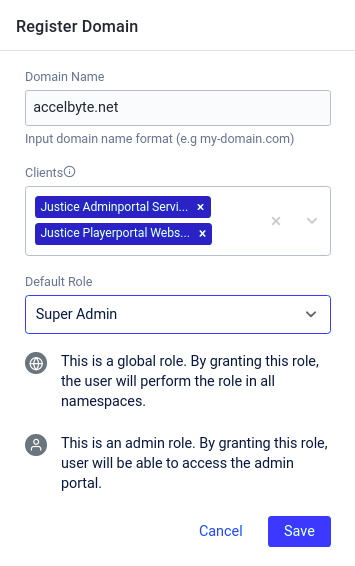
Once completed, click Save.
Implement Third-party Login Integration with the Client SDKs
Enable Login with Third-party Platform Credentials
For a player to log into your game or platform with third-party credentials, the game needs to pass the Auth token from the third-party platform whose credentials the player is using to the publisher platform.
- Unreal Engine
- Unity
bool b3rdPtPlatformLoginSuccessful1 = false;
EAccelBytePlatformType Your3rdPtPlatformType = EAccelBytePlatformType::Steam;
FString Your3rdPtPlatformAuthCode;
FRegistry::User.LoginWithOtherPlatform(Your3rdPtPlatformType, Your3rdPtPlatformAuthCode,
  FVoidHandler::CreateLambda([ & ]() {
    UE_LOG(LogTemp, Log, TEXT("Success"));
    b3rdPtPlatformLoginSuccessful1 = true;
  }),
  FErrorHandler::CreateLambda([](int32 ErrorCode,
    const FString & ErrorMessage) {
    UE_LOG(LogTemp, Fatal, TEXT("Error. Code: %d, Reason: %s"), ErrorCode, * ErrorMessage)
  }));
User user = AccelBytePlugin.GetUser();
PlatformType your3rdPtPlatformType = PlatformType.Steam;
String your3rdPtPlatformAuthCode;
user.LoginWithOtherPlatform(your3rdPtPlatformType, your3rdPtPlatformAuthCode, result => Debug.Log("Login successfully"));
Retrieve the Authentication Token
Device ID
The Device ID Auth token is whatever ID is retrieved by either Unity or Unreal Engine. To retrieve the Device ID Auth token, use the following function:
- Unreal Engine
- Unity
FString DeviceIdToken = FGenericPlatformMisc::GetDeviceId();
string deviceIdToken = SystemInfo.deviceUniqueIdentifier;
AWS
For Unity, you can get the Auth token by using the AWS SDK for .NET. For Unreal Engine you can use the AWS C++ SDK. Here is an example of how to get an AWS Cognito Auth token:
- Unreal Engine
- Unity
Aws::CognitoIdentityProvider::Model::InitiateAuthRequest initiateAuthRequest;
initiateAuthRequest.SetClientId(APP_CLIENT_ID);
initiateAuthRequest.SetAuthFlow(Aws::CognitoIdentityProvider::Model::AuthFlowType::USER_PASSWORD_AUTH);
map < string, string > authParameters {
  {
    "USERNAME",
    username
  }, {
    "PASSWORD",
    password
  }
};
initiateAuthRequest.SetAuthParameters(authParameters);
Aws::CognitoIdentityProvider::Model::InitiateAuthOutcome initiateAuthOutcome {
  s_AmazonCognitoClient - > InitiateAuth(initiateAuthRequest)
};
if (initiateAuthOutcome.IsSuccess()) {
  Aws::CognitoIdentityProvider::Model::InitiateAuthResult initiateAuthResult {
    initiateAuthOutcome.GetResult()
  };
  if (initiateAuthResult.GetChallengeName() == Aws::CognitoIdentityProvider::Model::ChallengeNameType::NOT_SET) {
    // for this code sample, this is what we expect, there should be no further challenges
    // there are more complex options, for example requiring the user to reset the password the first login
    // or using a more secure password transfer mechanism which will be covered in later examples
    Aws::CognitoIdentityProvider::Model::AuthenticationResultType authenticationResult = initiateAuthResult.GetAuthenticationResult();
    s_AccessToken = authenticationResult.GetAccessToken();
  }
}
AmazonCognitoIdentityProviderClient client = new AmazonCognitoIdentityProviderClient();
var authReq = new InitiateAuthRequest {
  ClientId = APP_CLIENT_ID,
    AuthFlow = AuthFlowType.USER_PASSWORD_AUTH
};
authReq.AuthParameters.Add("USERNAME", username);
authReq.AuthParameters.Add("PASSWORD", password);

InitiateAuthResponse authResp = client.InitiateAuth(authReq);

string accessToken = authResp.AuthenticationResult.AccessToken;
You can also get an Auth token by making a HTTP Request, as seen in the example below.
- Unreal Engine
- Unity
FHttpRequestPtr Request = FHttpModule::Get().CreateRequest();
Request - > SetURL(FString::Printf(TEXT("https://cognito-idp.%s.amazonaws.com/"), * AwsRegion));
Request - > SetVerb("POST");
Request - > SetHeader(TEXT("Content-Type"), "application/x-amz-json-1.1");
Request - > SetHeader(TEXT("Accept"), TEXT("/"));
Request - > SetHeader(TEXT("X-Amz-Target"), TEXT("AWSCognitoIdentityProviderService.InitiateAuth"));
Request - > SetContentAsString(
  FString::Printf(TEXT(R "({"
    AuthFlow ":"
    USER_PASSWORD_AUTH ","
    AuthParameters ": {"
    PASSWORD ": " % s ","
    USERNAME ": " % s "},"
    ClientId ": " % s "})"), * Password, * Username, * AwsClientId)
);
Request - > ProcessRequest();
var body =
  $ "{{\"AuthFlow\":\"USER_PASSWORD_AUTH\",\"AuthParameters\": {{\"PASSWORD\": \"{password}\",\"USERNAME\": \"{username}\"}},\"ClientId\": \"{awsClientId}\"}}";
UnityWebRequest request = new UnityWebRequest($"https://cognito-idp.{awsRegion}.amazonaws.com/", "POST");
request.SetRequestHeader("Content-Type", "application/x-amz-json-1.1");
request.uploadHandler = new UploadHandlerRaw(Encoding.UTF8.GetBytes(body));
request.SendWebRequest();
For more details about setting up platform authentication, refer to the AWS documentation.
Epic Online Service (EOS)
For Unity, you can get the Auth token for EOS by using the EOS SDK. For UE you can use the EOS C# SDK. Here are the functions to retrieve the EOS Auth token:
- Unreal Engine
- Unity
void LoginEpicGames() {
  EOS_Auth_Credentials Credentials = {
    0
  };
  Credentials.ApiVersion = EOS_AUTH_CREDENTIALS_API_LATEST;
  Credentials.Type = EOS_ELoginCredentialType::EOS_LCT_AccountPortal;

  EOS_Auth_LoginOptions LoginOptions = {
    0
  };
  LoginOptions.ApiVersion = EOS_AUTH_LOGIN_API_LATEST;
  LoginOptions.ScopeFlags = EOS_EAuthScopeFlags::EOS_AS_BasicProfile;
  LoginOptions.Credentials = & Credentials;

  EOS_Auth_Login(AuthHandle, & LoginOptions, NULL, OnLoginCallback);
}

void OnLoginCallback(const EOS_Auth_LoginCallbackInfo * Data) {
  if (Data - > ResultCode == EOS_EResult::EOS_Success) {
    EOS_Auth_Token * UserAuthToken;
    EOS_Auth_CopyUserAuthTokenOptions CopyTokenOptions = {
      0
    };
    CopyTokenOptions.ApiVersion = EOS_AUTH_COPYUSERAUTHTOKEN_API_LATEST;
    if (EOS_Auth_CopyUserAuthToken(AuthHandle, & CopyTokenOptions, Data - > LocalUserId, & UserAuthToken) == EOS_EResult::EOS_Success) {
      FString AuthToken = UserAuthToken - > AccessToken;
      EOS_Auth_Token_Release(UserAuthToken);
    }
  }
}
public void LoginEpic() {
  var loginOption = new LoginOptions() {
    Credentials = new Credentials() {
      Type = loginCredentialType,
        Id = loginCredId,
        Token = loginCredToken
    }
  };
  platformInterface.GetAuthInterface().Login(loginOption, null, LoginEpicCallback);
}

private void LoginEpicCallback(LoginCallbackInfo info) {
  Result result = info.ResultCode;
  if (result == Result.Success) {
    Debug.Log("[EOS SDK] Login Succeeded.");
    CopyUserAuthTokenOptions copyOpt = new CopyUserAuthTokenOptions();
    platformInterface.GetAuthInterface().CopyUserAuthToken(copyOpt, info.LocalUserId, out token);
    QueryUserData(info.LocalUserId);
    OnSuccessLogin?.Invoke();
  } else {
    Debug.Log("[EOS SDK] Login Failed. Result : " + result);
    OnFailedLogin?.Invoke();
  }
}
Nintendo
You can enable login with Nintendo credentials by using the Unreal Engine OSS by following the steps below.
Prerequisites
- Make sure you are a Nintendo Developer and have the Nintendo Dev Kit for deployment.
- You must have downloaded and set up the Nintendo Online Subsystem into your Unreal Engine environment.
Configurations
In BaseSwitchEngine.ini under Engine/Platforms/Switch/Config, set StartupAccountMode to Required.
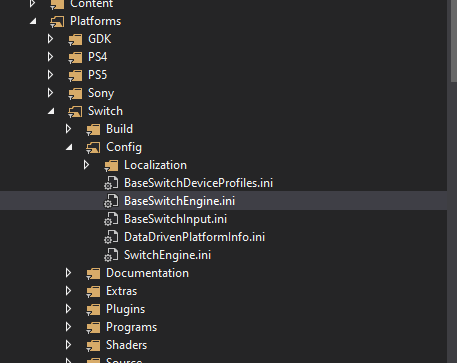
You can now call Nintendo login using the OSS by using IOnlineSubsystem::Get()->GetIdentityInterface()->Login().
Netflix
Use the following function to retrieve the Netflix GamerAccessToken:
- Unity
String GamerAccessToken = "your-netflix-gamer-access-token-value";
User user = AccelBytePlugin.GetUser();
user.LoginWithOtherPlatform(
    PlatformType.Netflix,
    GamerAccessToken ,
    result => {  result => Debug.Log("Login successfully"); });
PS4
IMPORTANT
This configuration can only be used for PS4 games, not PS4 Cross-Gen games. For PS4 Cross-Gen games, use PS5 as the platform.
For Unity, you can get the Auth code by using NpToolkit. For Unreal Engine, you can use OnlineSubsystemPS4 which is already included in Unreal Engine.
- Unreal Engine
- Unity
FString PS4AuthCode = IOnlineSubsystem::Get(PS4_SUBSYSTEM)->GetAuthToken(0);
string ps4AuthCode;
try
{
    Sony.NP.Auth.GetAuthCodeRequest request = new Sony.NP.Auth.GetAuthCodeRequest();

    // test values from SDK nptoolkit sample ... replace with your own project values
    Sony.NP.Auth.NpClientId clientId = new Sony.NP.Auth.NpClientId();
    clientId.Id = "";

    request.ClientId = clientId;
    request.Scope = "psn:s2s";

    Sony.NP.Auth.AuthCodeResponse response = new Sony.NP.Auth.AuthCodeResponse();

    int requestId = Sony.NP.Auth.GetAuthCode(request, response);
    OnScreenLog.Add("Get Auth Code Async : Request Id = " + requestId);
    if(!response.Locked){
        ps4AuthCode = response.AuthCode;
    }
}
catch (Sony.NP.NpToolkitException e)
{
    OnScreenLog.AddError("Exception : " + e.ExtendedMessage);
}
PS5
For PS5, you can get the Auth code by using the function below. For now, only Unreal Engine is supported.
- Unreal Engine
FString PS5AuthCode = IOnlineSubsystem::Get(PS5_SUBSYSTEM)->GetAuthToken(0);
Stadia
For Stadia, you can get the Auth code by requesting a user's JWT token, or you can use the Stadia Platform Support package. For now, only Unity is supported.
- Unity
GgpPlayerId playerId = StadiaNativeApis.GgpGetPrimaryPlayerId();

GgpStatus reqStatus;
GgpPlayerJwt playerJwt = StadiaNativeApis.GgpGetJwtForPlayer(playerId, 1000, new GgpJwtFields((ulong)GgpJwtFieldValues.kGgpJwtField_None)).GetResultBlocking<GgpPlayerJwt>(out reqStatus);
Steam
To get the Steam Auth ticket in Unity, use the tickets obtained from Steamworks.NET. For Unreal Engine, use the ticket obtained from Steamworks.
- Unreal Engine
- Unity
FString SteamAuthTicket = OnlineInterface->GetIdentityInterface()->GetAuthToken(0);
string steamAuthTicket;
if (SteamManager.Initialized) {
  var ticket = new byte[1024];
  uint ticketLength;
  HAuthTicket getSteamAuthTicket = SteamUser.GetAuthSessionTicket(ticket, ticket.Length, out ticketLength);
  Array.Resize(ref ticket, (int) ticketLength);
  var stringBuilder = new StringBuilder();

  foreach(byte getByte in ticket) {
    stringBuilder.AppendFormat("{0:x2}", getByte);
  }
  steamAuthTicket = stringBuilder.ToString();
} else {
  steamAuthTicket = null;
}
Twitch
For Twitch, you can get the Authentication Code using the function below.
- Unreal Engine
FString TwitchAuthCode = OnlineInterface->GetIdentityInterface()->GetAuthToken(0);
Xbox
For Xbox, you can get the Auth token by using the function below:
- Unreal Engine
- Unity
FString XSTSToken = IOnlineSubsystem::Get(LIVE_SUBSYSTEM)->GetAuthToken(0);
FString PlatformToken = FGenericPlatformHttp::UrlEncode(XSTSToken);
string loginXSTSEndpoint; // set your login XSTS Endpoint
var currentUser = Windows.Xbox.ApplicationModel.Core.CoreApplicationContext.CurrentUser;
var context = new XboxLiveContext(currentUser);

var result = currentUser.GetTokenAndSignatureAsync("GET", loginXSTSEndpoint, "");

while (result.Status != Windows.Foundation.AsyncStatus.Completed) {
  System.Threading.Thread.Sleep(1000);
}

var XSTSToken = result.GetResults().Token;
var PlatformToken = UnityWebRequest.EscapeURL(XSTSToken);
Upgrade a Headless Account Using the SDKs
Players can upgrade a headless account by linking the headless account to their email address and creating a password.
Upgrade an Account
Use this function to initiate an account upgrade:
- Unreal Engine
- Unity
FString Email = TEXT("testSDKsteam@game.test");
FString Password = TEXT("123SDKTest123");
FRegistry::User.Upgrade(
   Email,
   Password,
   THandler<FUserData>::CreateLambda([&](const FUserData& Result)
   {
       UE_LOG(LogTemp, Log, TEXT("    Success"));
   }),
   FErrorHandler::CreateLambda([&](int32 ErrorCode, const FString& ErrorMessage)
  {
      UE_LOG(LogTemp, Fatal, TEXT("    Error. Code: %d, Reason: %s"), ErrorCode, *ErrorMessage);
  }));
string email = "youremailaddress@example.com";
string password = "!1YourPassword1!";
User user = AccelBytePlugin.GetUser();
user.Upgrade(email, password, result => Debug.Log("Upgrade completed"));
Verify the Player After an Account Upgrade
Verifying the player after they upgrade their account is done in two steps. First, the game will send the verification code to the player's email. Then the verification code will be sent back to the IAM service for verification.
Send Verification Code to Email
Use this function to send the verification code to a player's email address.
- Unreal Engine
- Unity
FRegistry::User.SendVerificationCode(
  FVoidHandler::CreateLambda([&]()
  {
      UE_LOG(LogTemp, Log, TEXT("Verification code sent to email."));
  }),
  FErrorHandler::CreateLambda([](int32 ErrorCode, const FString& ErrorMessage)
  {
      UE_LOG(LogTemp, Fatal, TEXT("    Error. Code: %d, Reason: %s"), ErrorCode, *ErrorMessage);
  }));
User user = AccelBytePlugin.GetUser();
user.SendVerificationCode(result => Debug.Log("Verification code sent to email."))
Send Verification Code from Email to IAM Service
Use this function to send the verification code from the player's email back to the IAM Service.
- Unreal Engine
- Unity
FString VerificationCode = TEXT("123456789");
FRegistry::User.Verify(
   VerificationCode,
   FVoidHandler::CreateLambda([]()
   {
       UE_LOG(LogAccelByteUserTest, Log, TEXT("   Success"));
       bVerifyUserSuccessful = true;
   }),
   FErrorHandler::CreateLambda([](int32 ErrorCode, const FString& ErrorMessage)
   {
       UE_LOG(LogTemp, Fatal, TEXT("    Error. Code: %d, Reason: %s"), ErrorCode, *ErrorMessage);
   }));
string verificationCode = "123456789";
User user = AccelBytePlugin.GetUser();
user.Verify(verificationCode, result => Debug.Log("Verification completed."))
Related Concepts
- In addition to distributing your game on third-party platforms, you can build your own platform with our Player Portal and Launcher services.
- Learn more about managing accounts in the User Accounts documentation.
- In addition to login, AccelByte also offers Entitlement and In-App Purchase integration with several platforms.