E-commerce
Overview
AccelByte Cloud's E-commerce service allows you to manage your store, put games, in-game items, or add-ons up for sale, and sort these items into categories. E-commerce includes several features, such as:
- Item localization lets you display different names and descriptions of your items for sale in different countries.
- Item regional data allows items to have different currencies and prices for sale in different countries.
- Item bundling allows you to sell items in groups for a lower price than if those items were purchased separately.
- Store isolation allows for only one store to be published online at any time. In addition to having one published store, you can also have one draft store that you can make changes in before bringing them live in the published store. This process helps minimize the chance of new items causing issues in your published store.
- Store Cloning lets you create an exact copy of your store in its environment, for easy editing.
- Store Import/Export lets you import a store from or export a store to a different environment as a JSON file. If your store is working well in your dev environment, you can export it as a JSON file and import it to your production environment without having to recreate it.
- Image and Item Tags can be created and assigned to images or items to determine where those objects will appear. For example, you can create a banner tag and define where banner images are displayed, and every banner image will behave the same way on its own page. Item tags are used to select which games or items for sale are featured on the main page of your store. Up to six objects can be featured.
- Purchase limitations enable you to limit how many times a player can purchase a particular item.
Permissions
Permissions are used to grant access to specific resources within our services. Make sure your account has the following permissions before you attempt to manage e-commerce in the Admin Portal. For a full list of permissions that impact e-commerce, see the Platform/Commerce tab of the permissions reference.
| Usage | Resource | Action |
|---|---|---|
| Create a Store | ADMIN:NAMESPACE:{namespace}:STORE | Create |
| Create a Category | ADMIN:NAMESPACE:{namespace}:CATEGORY | Create |
| Create a KeyGroup | ADMIN:NAMESPACE:{namespace}:KEYGROUP | Create |
| Create an Item in Store | ADMIN:NAMESPACE:{namespace}:ITEM | Create |
Permissions work slightly differently depending on whether they are assigned to IAM Clients or Roles assigned to users. For more information, read the Authentication and Authorization documentation.
Manage E-commerce in the Admin Portal
Create a Store
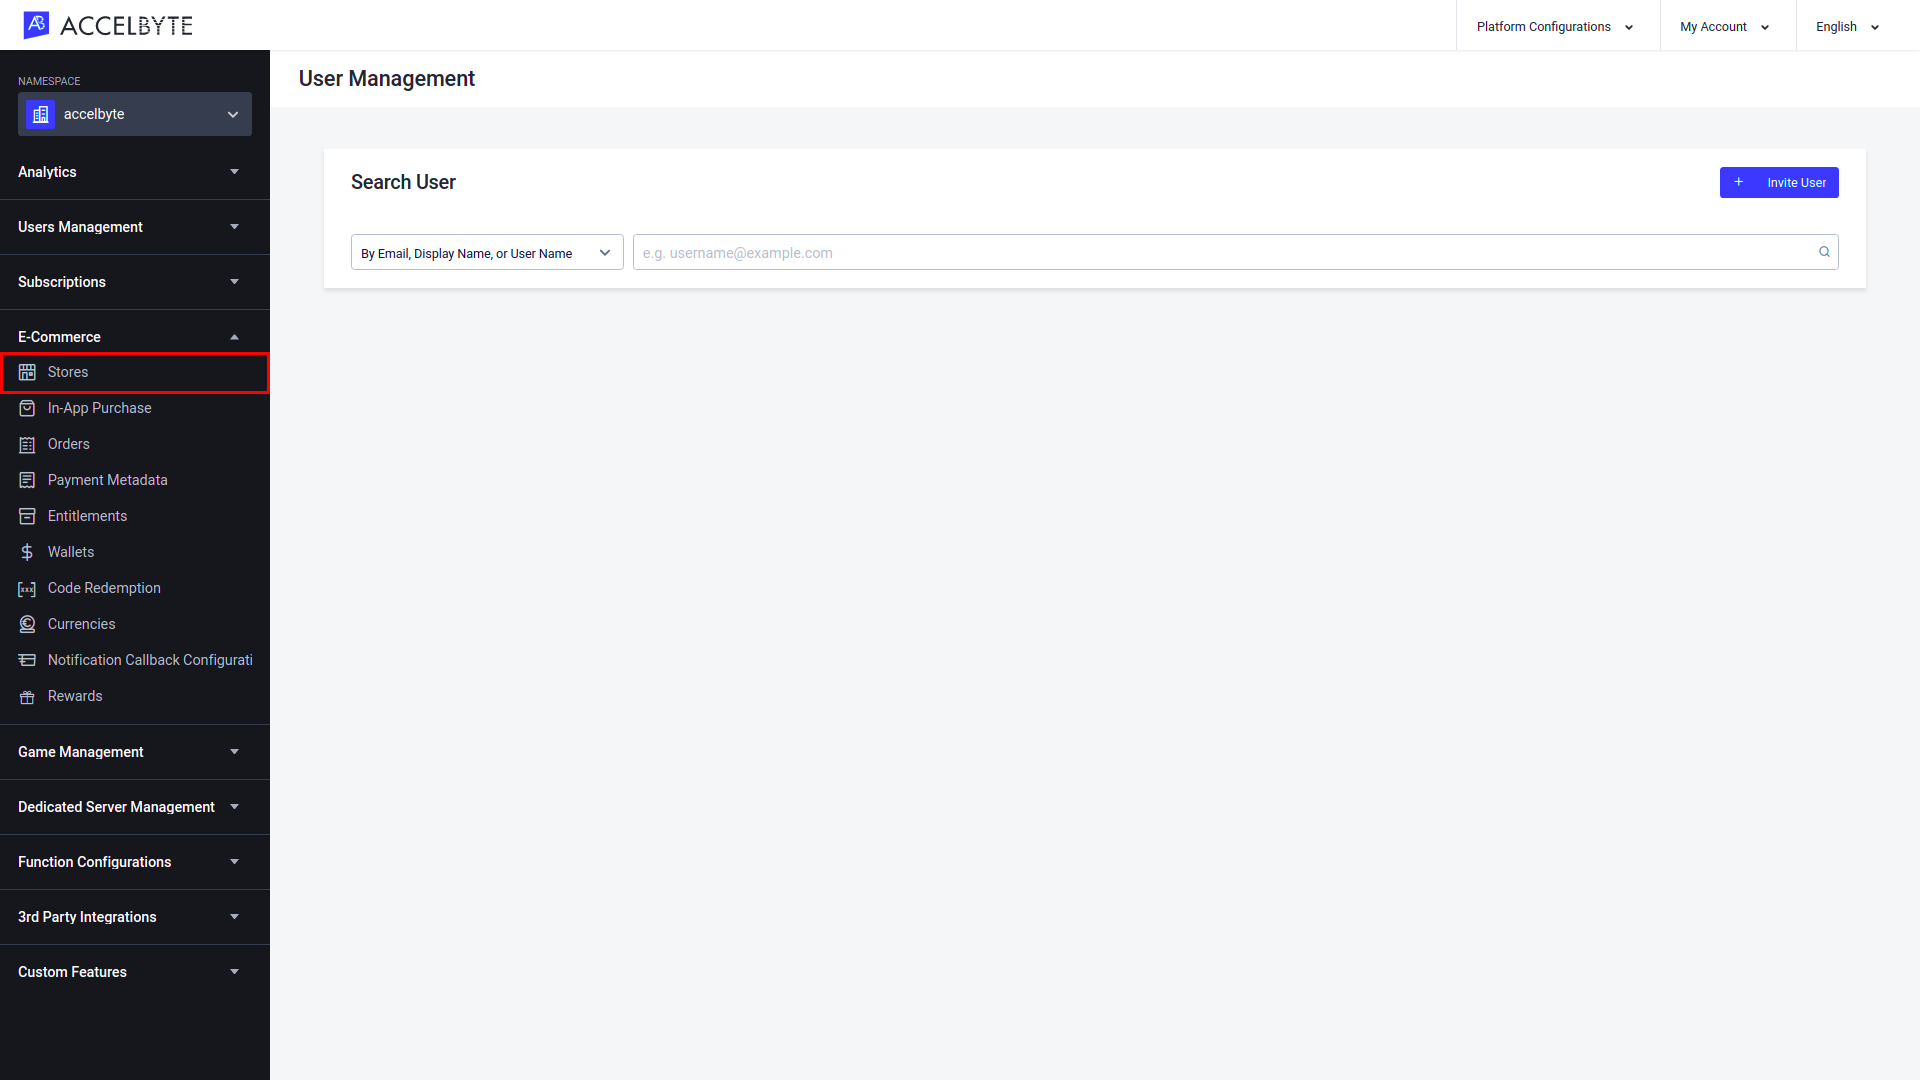
In the Admin Portal, go to the E-Commerce section and click the Stores menu.
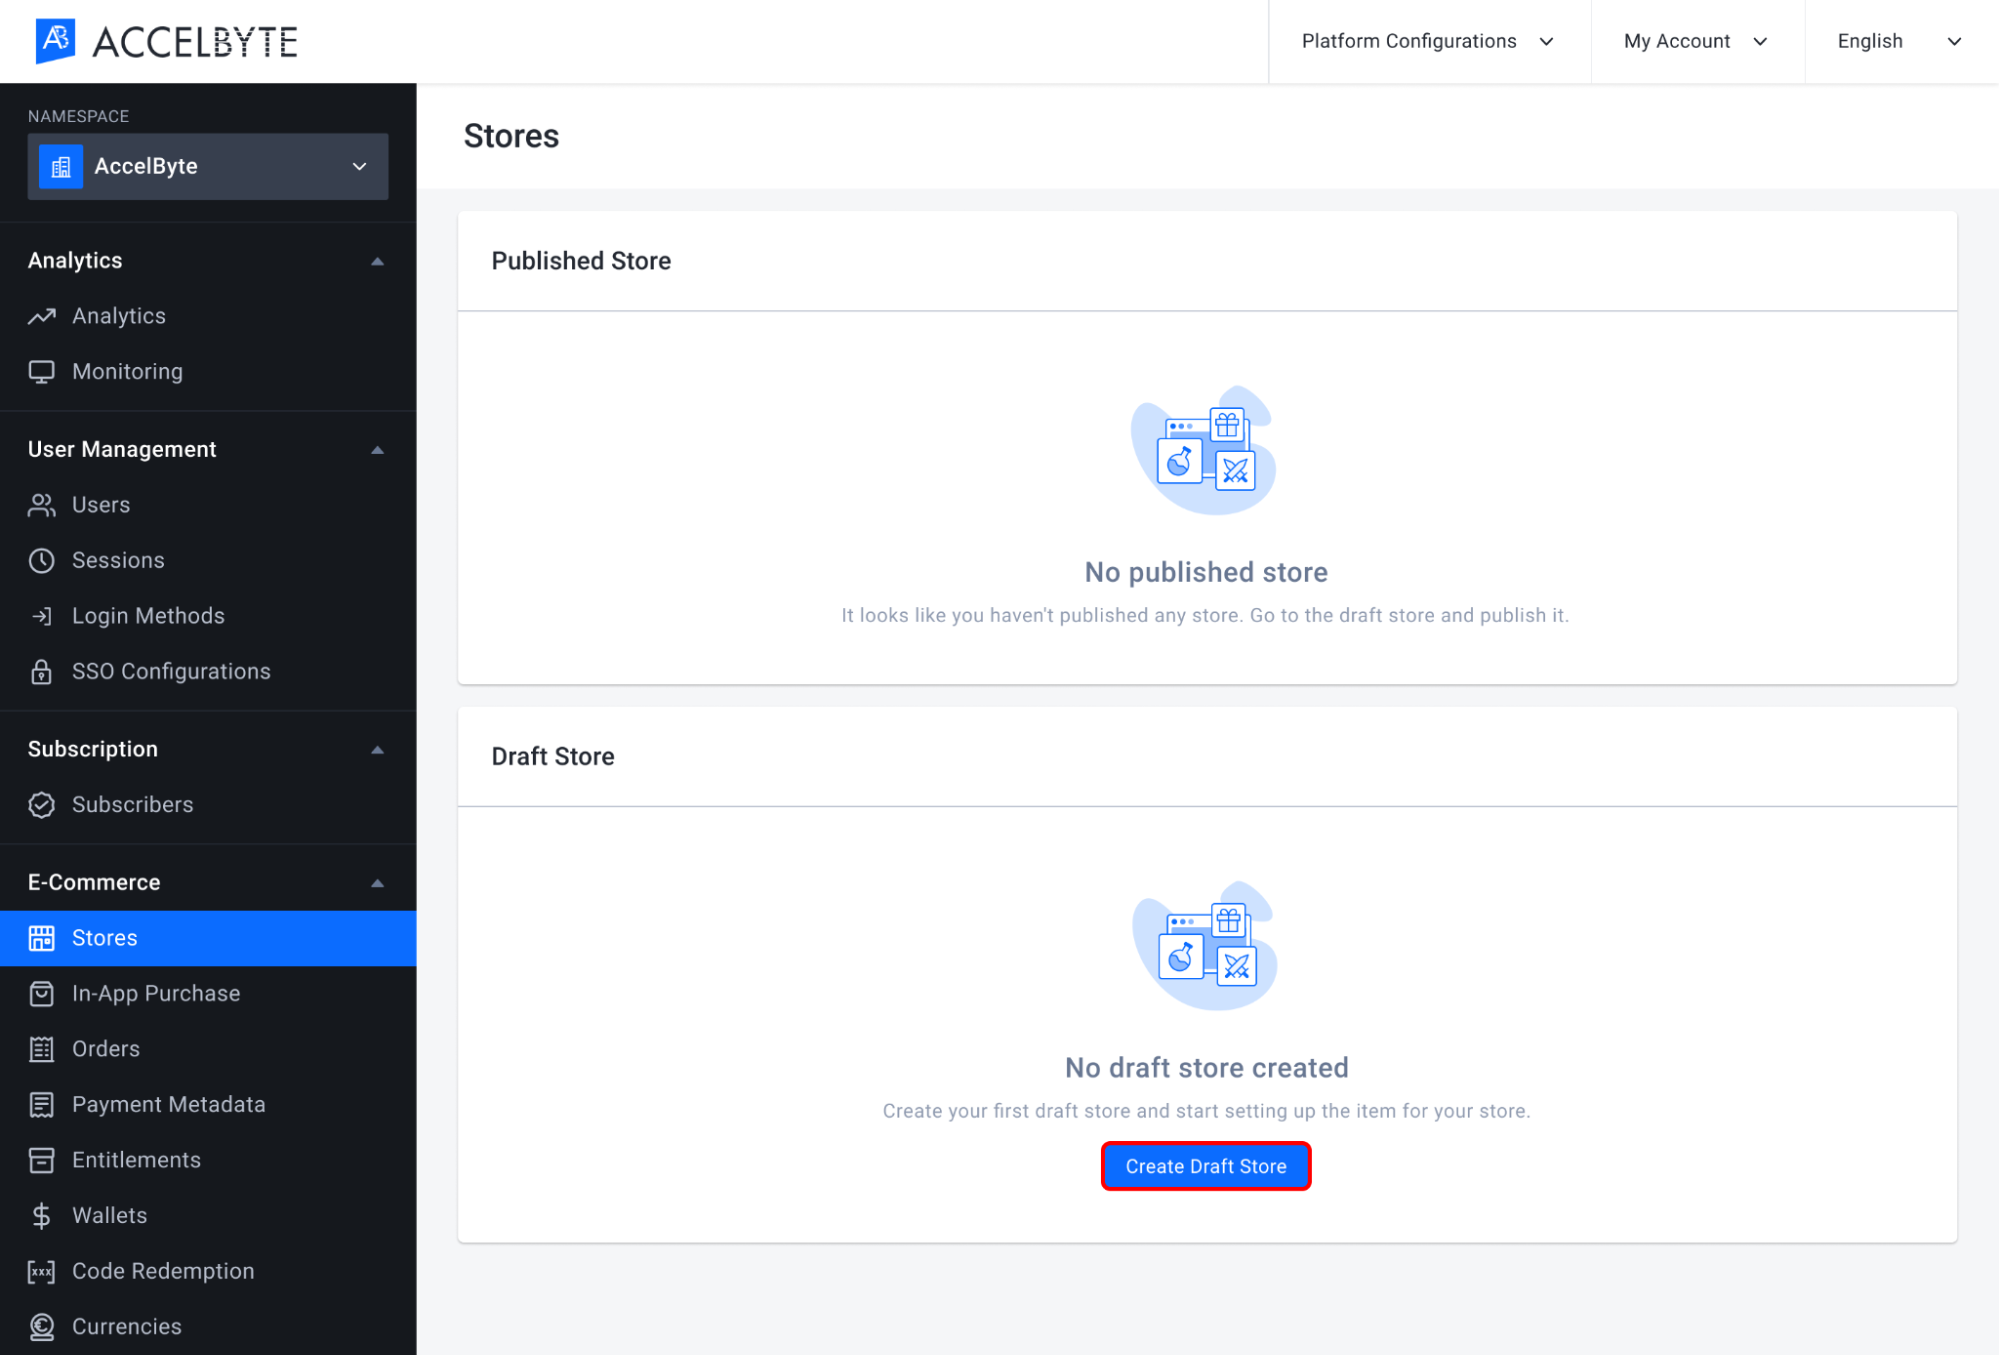
On the Stores page, go to the Draft Store section and click the Create Draft Store button.
NOTE
You can only have one draft store.
A form appears and you need to fill in the required information into the form below.
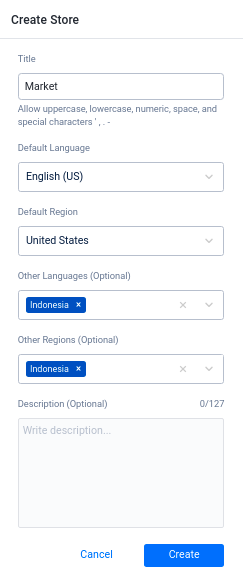
- Input your store Title. The store title will be visible in the Launcher and Player Portal as your store name.
- Select the Default Language.
- Select the Default Region.
- Select the Other Languages supported besides the default language, if desired.
- Select the Other Regions supported** **besides the default region, if desired.
- Input a Description for your store.
When you're done, click Create.
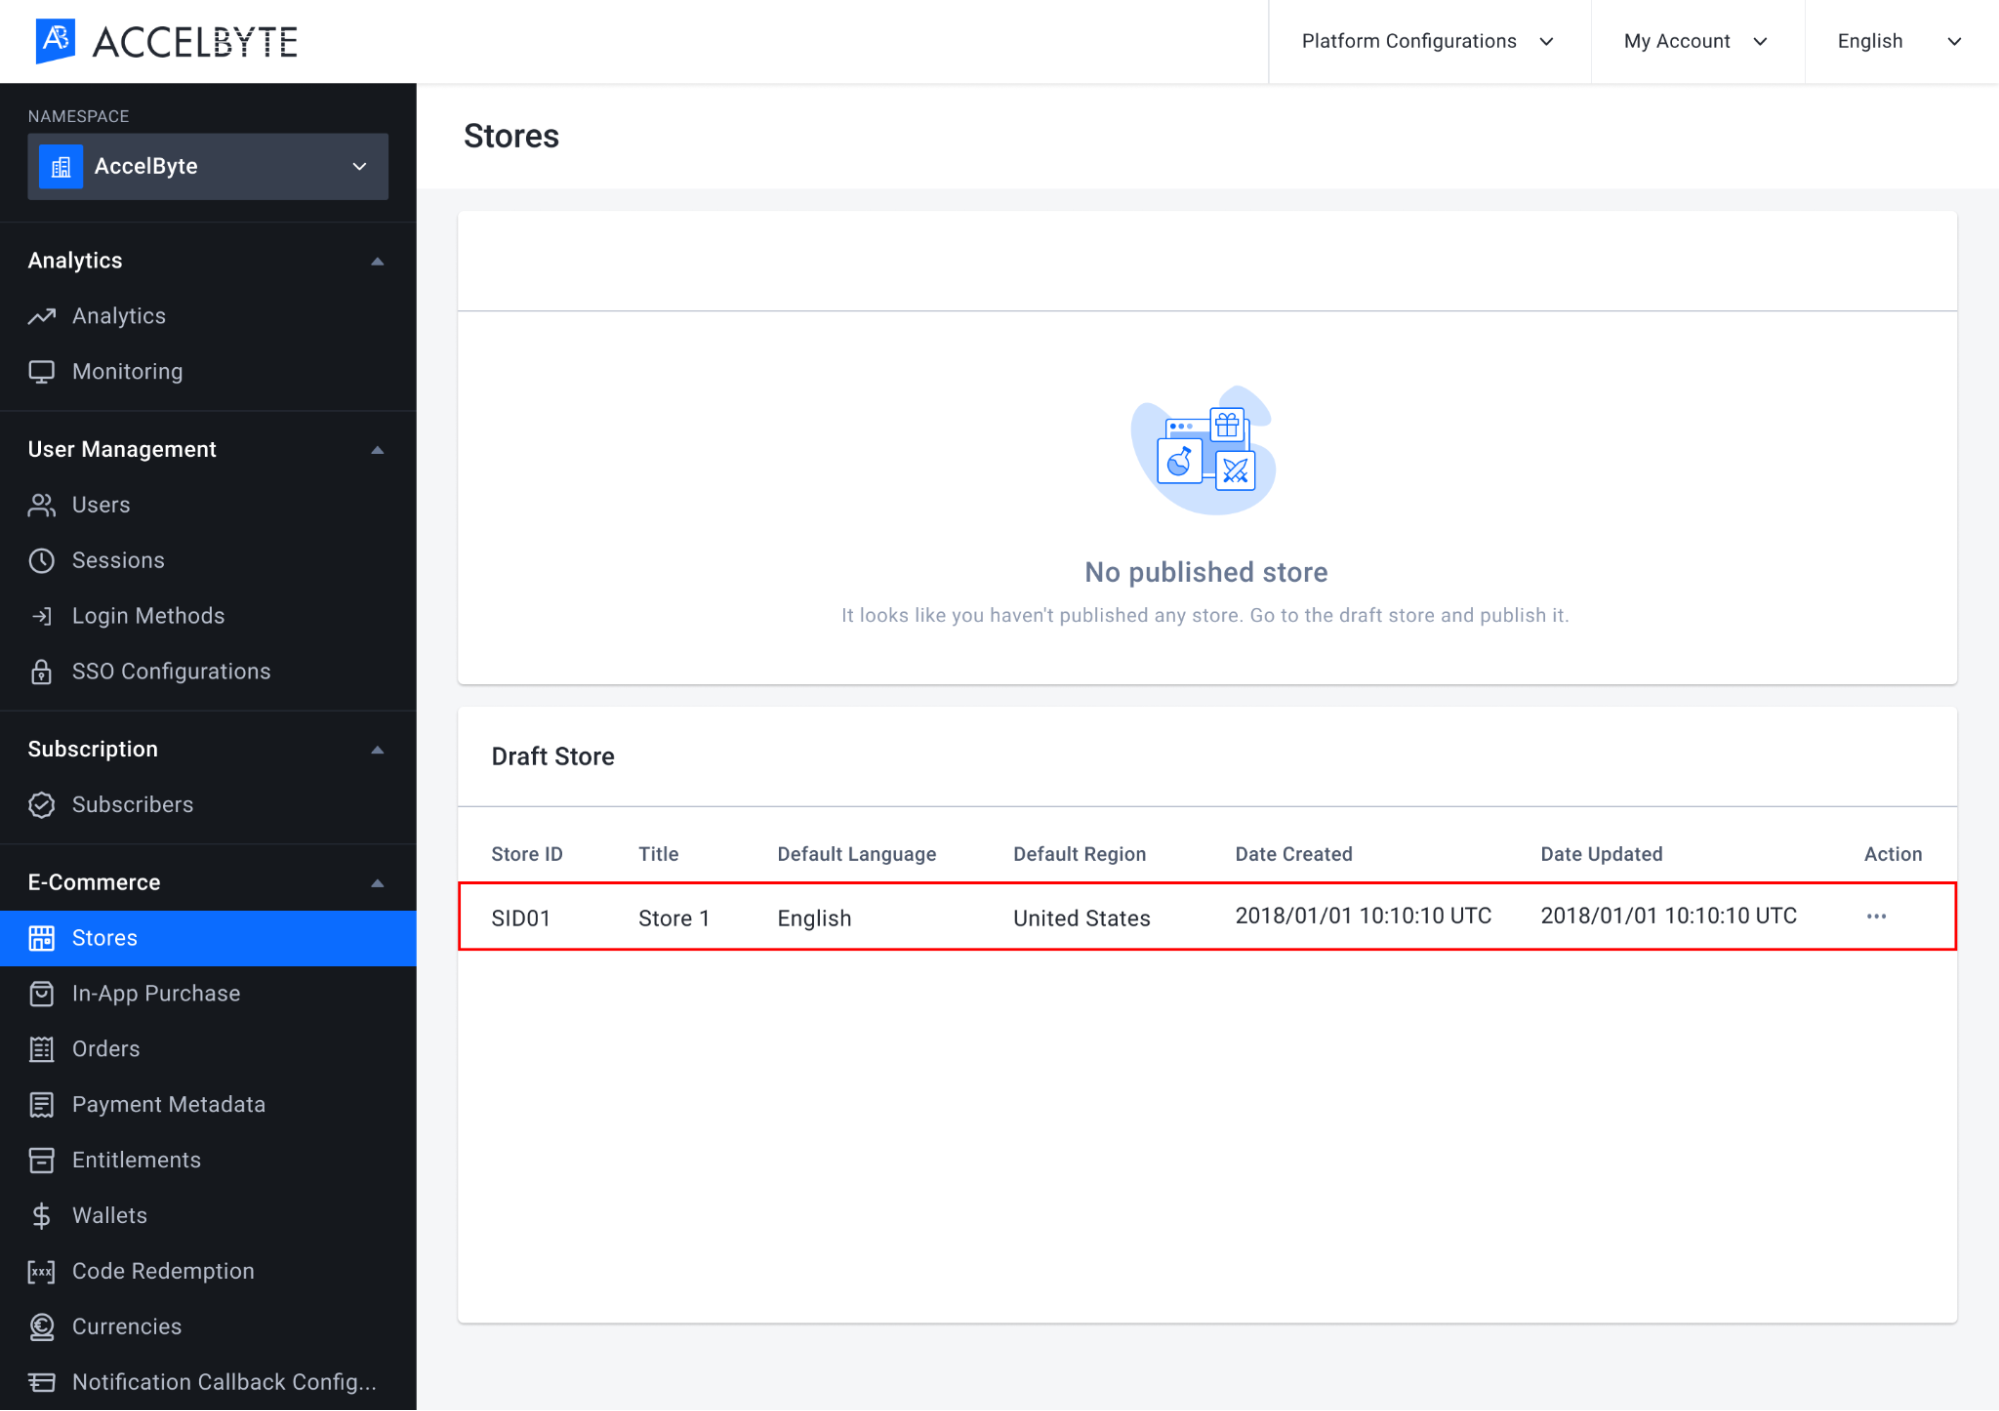
The draft store appears on the Stores page. The next thing you need to do is add item categories and items to your store.
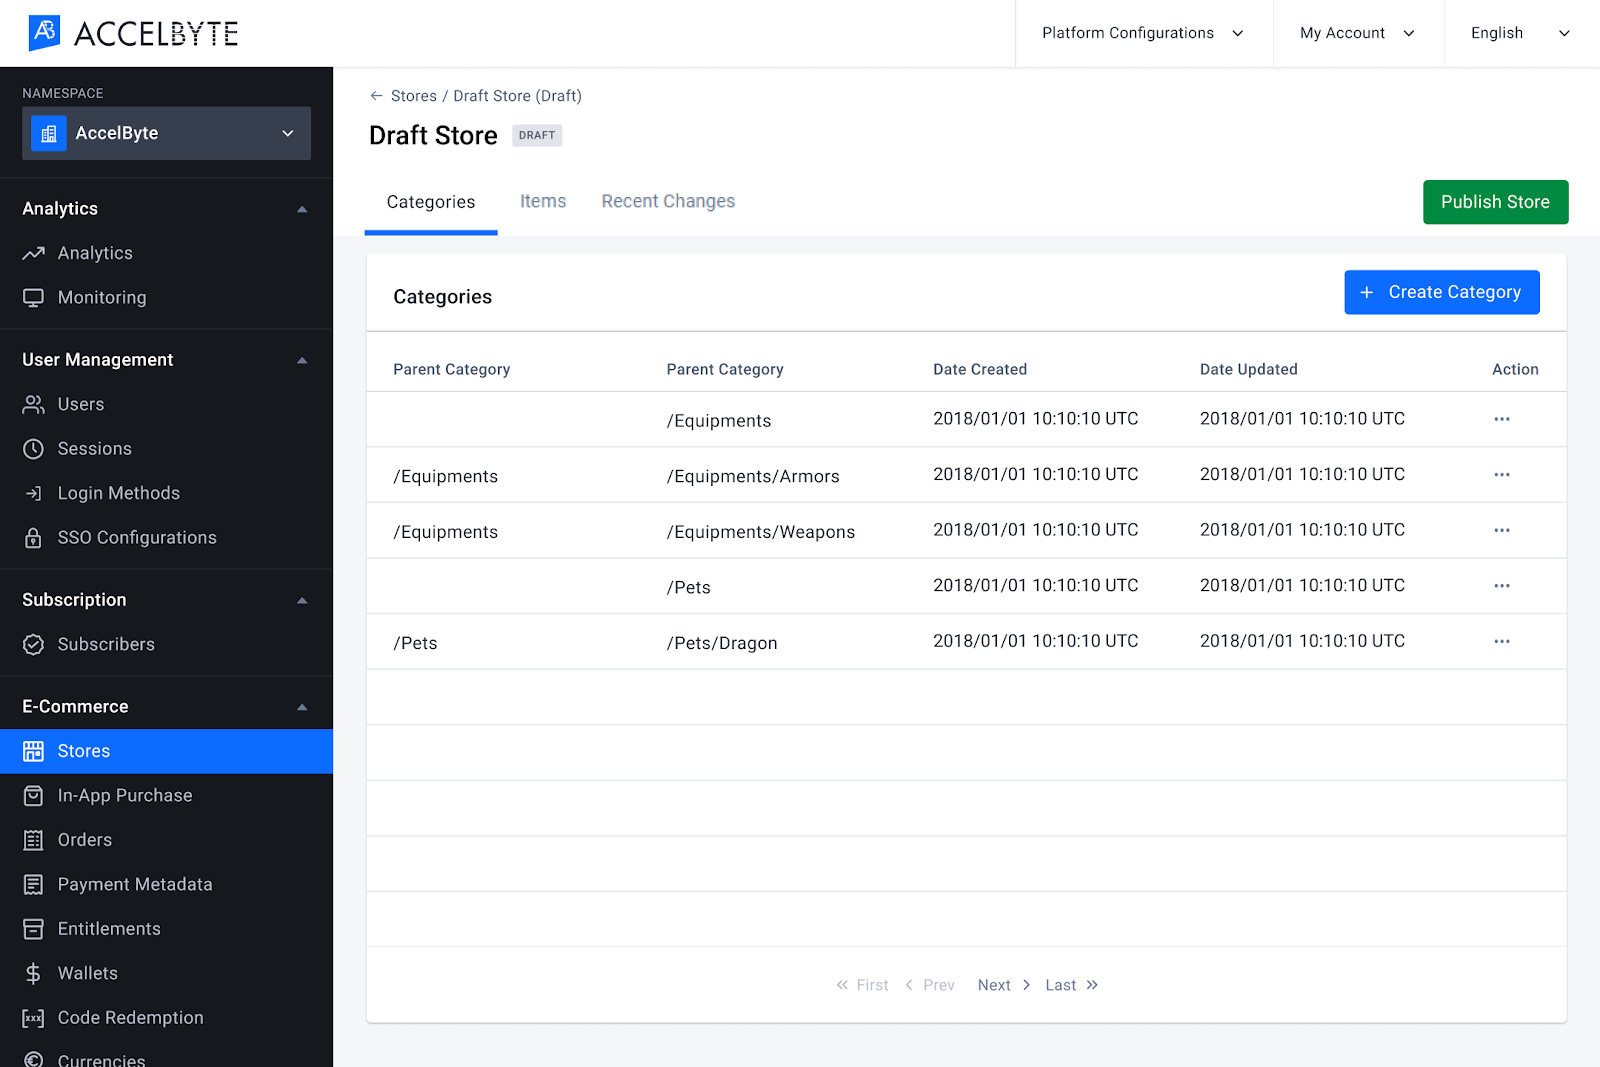
Create a Category
Creating a category is useful for you to organize the items from your store into groups.
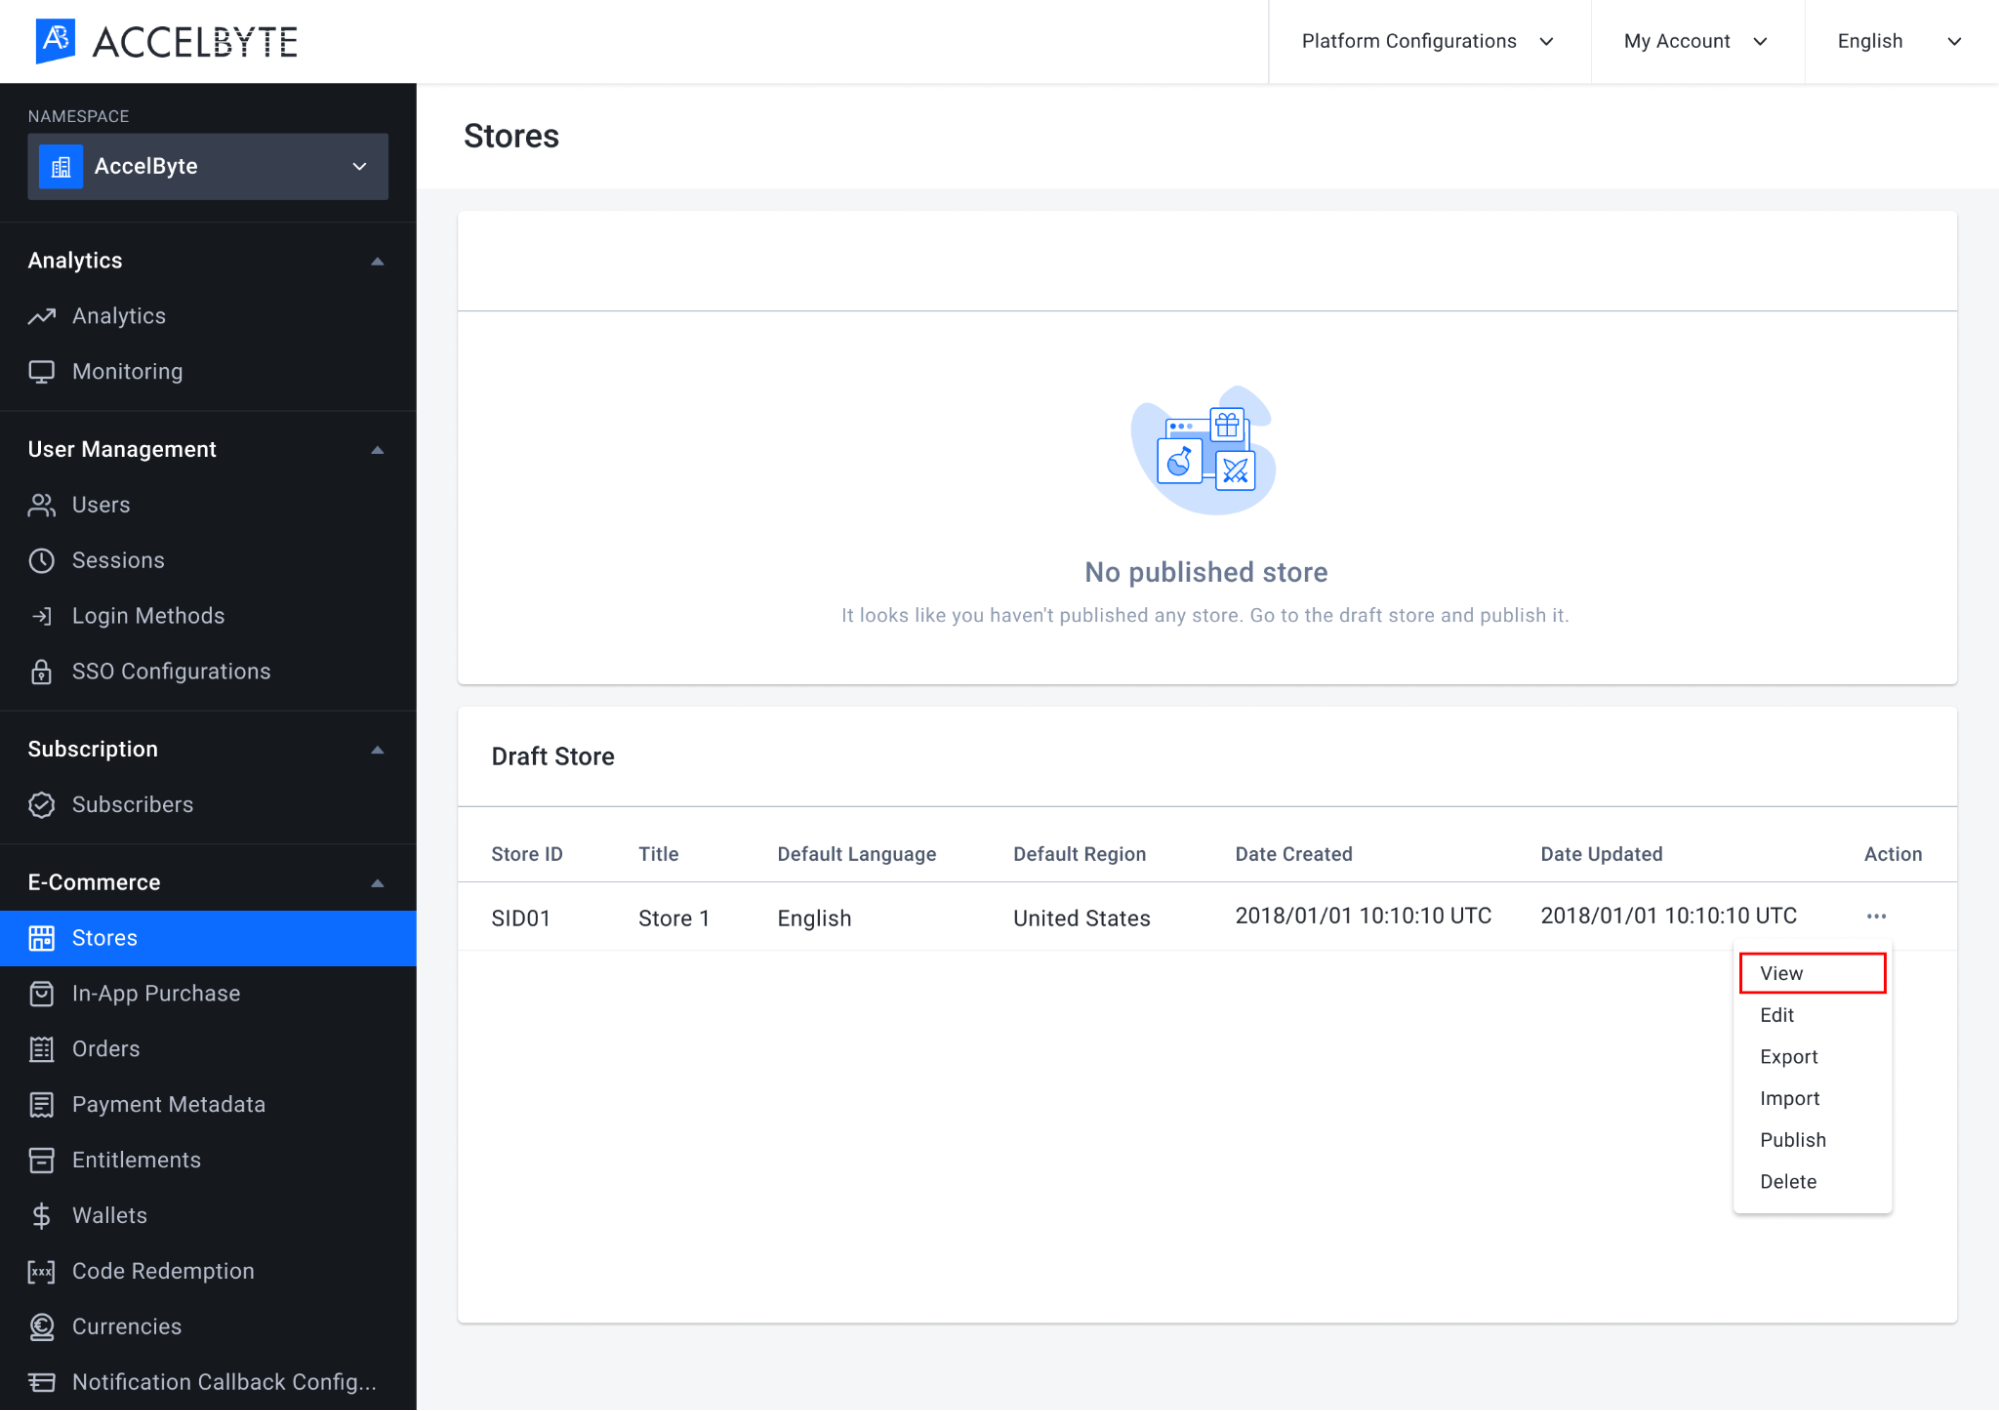
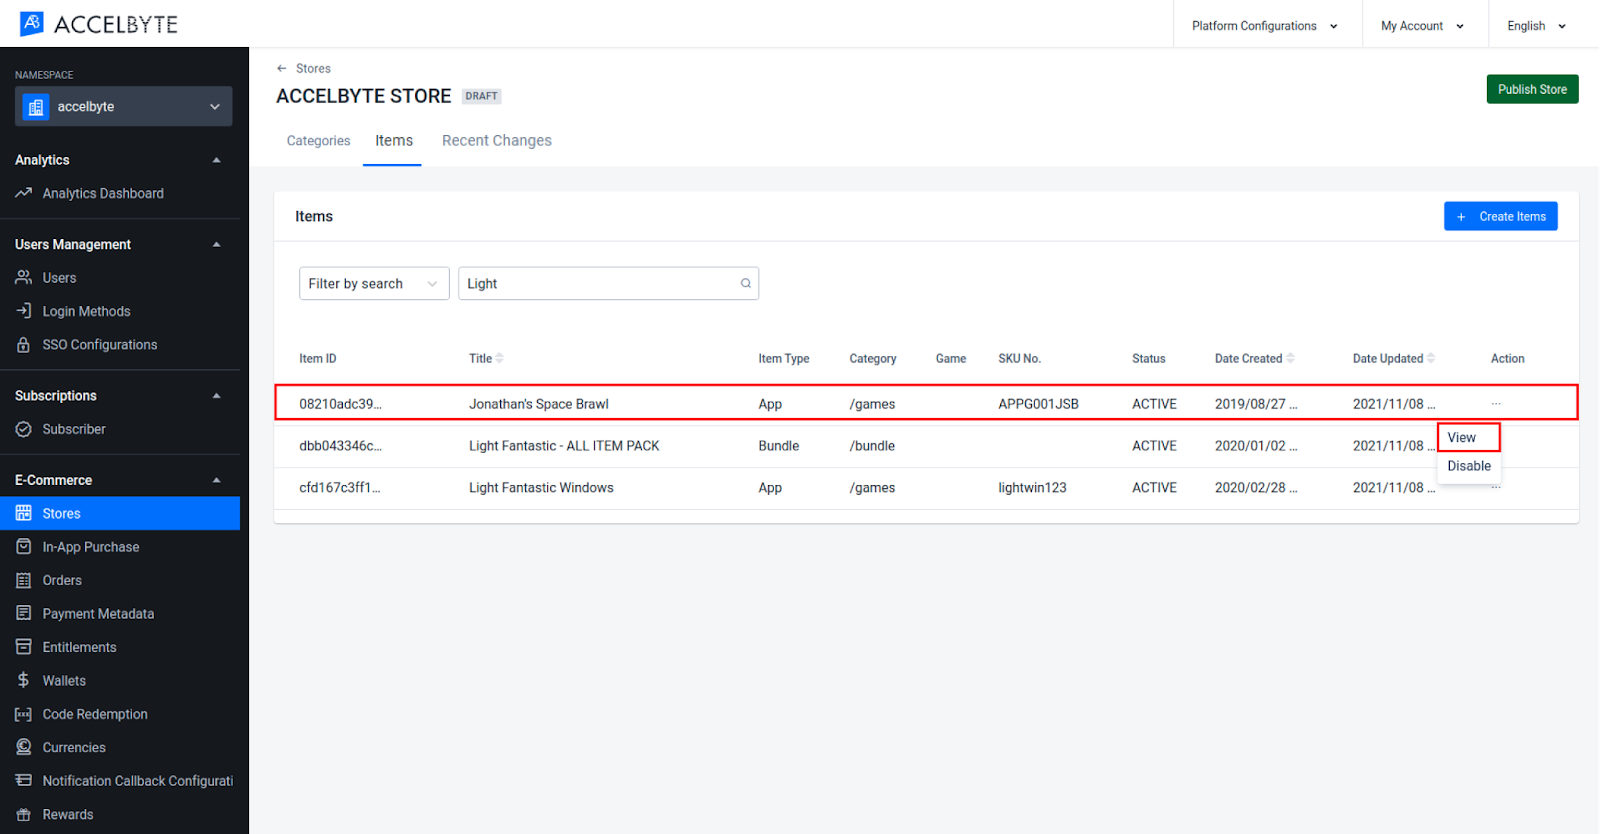
In the Draft Store, click the more button under the Action column and choose View to add categories.
In your Store, click the Create button, and the Create Category form will be displayed.
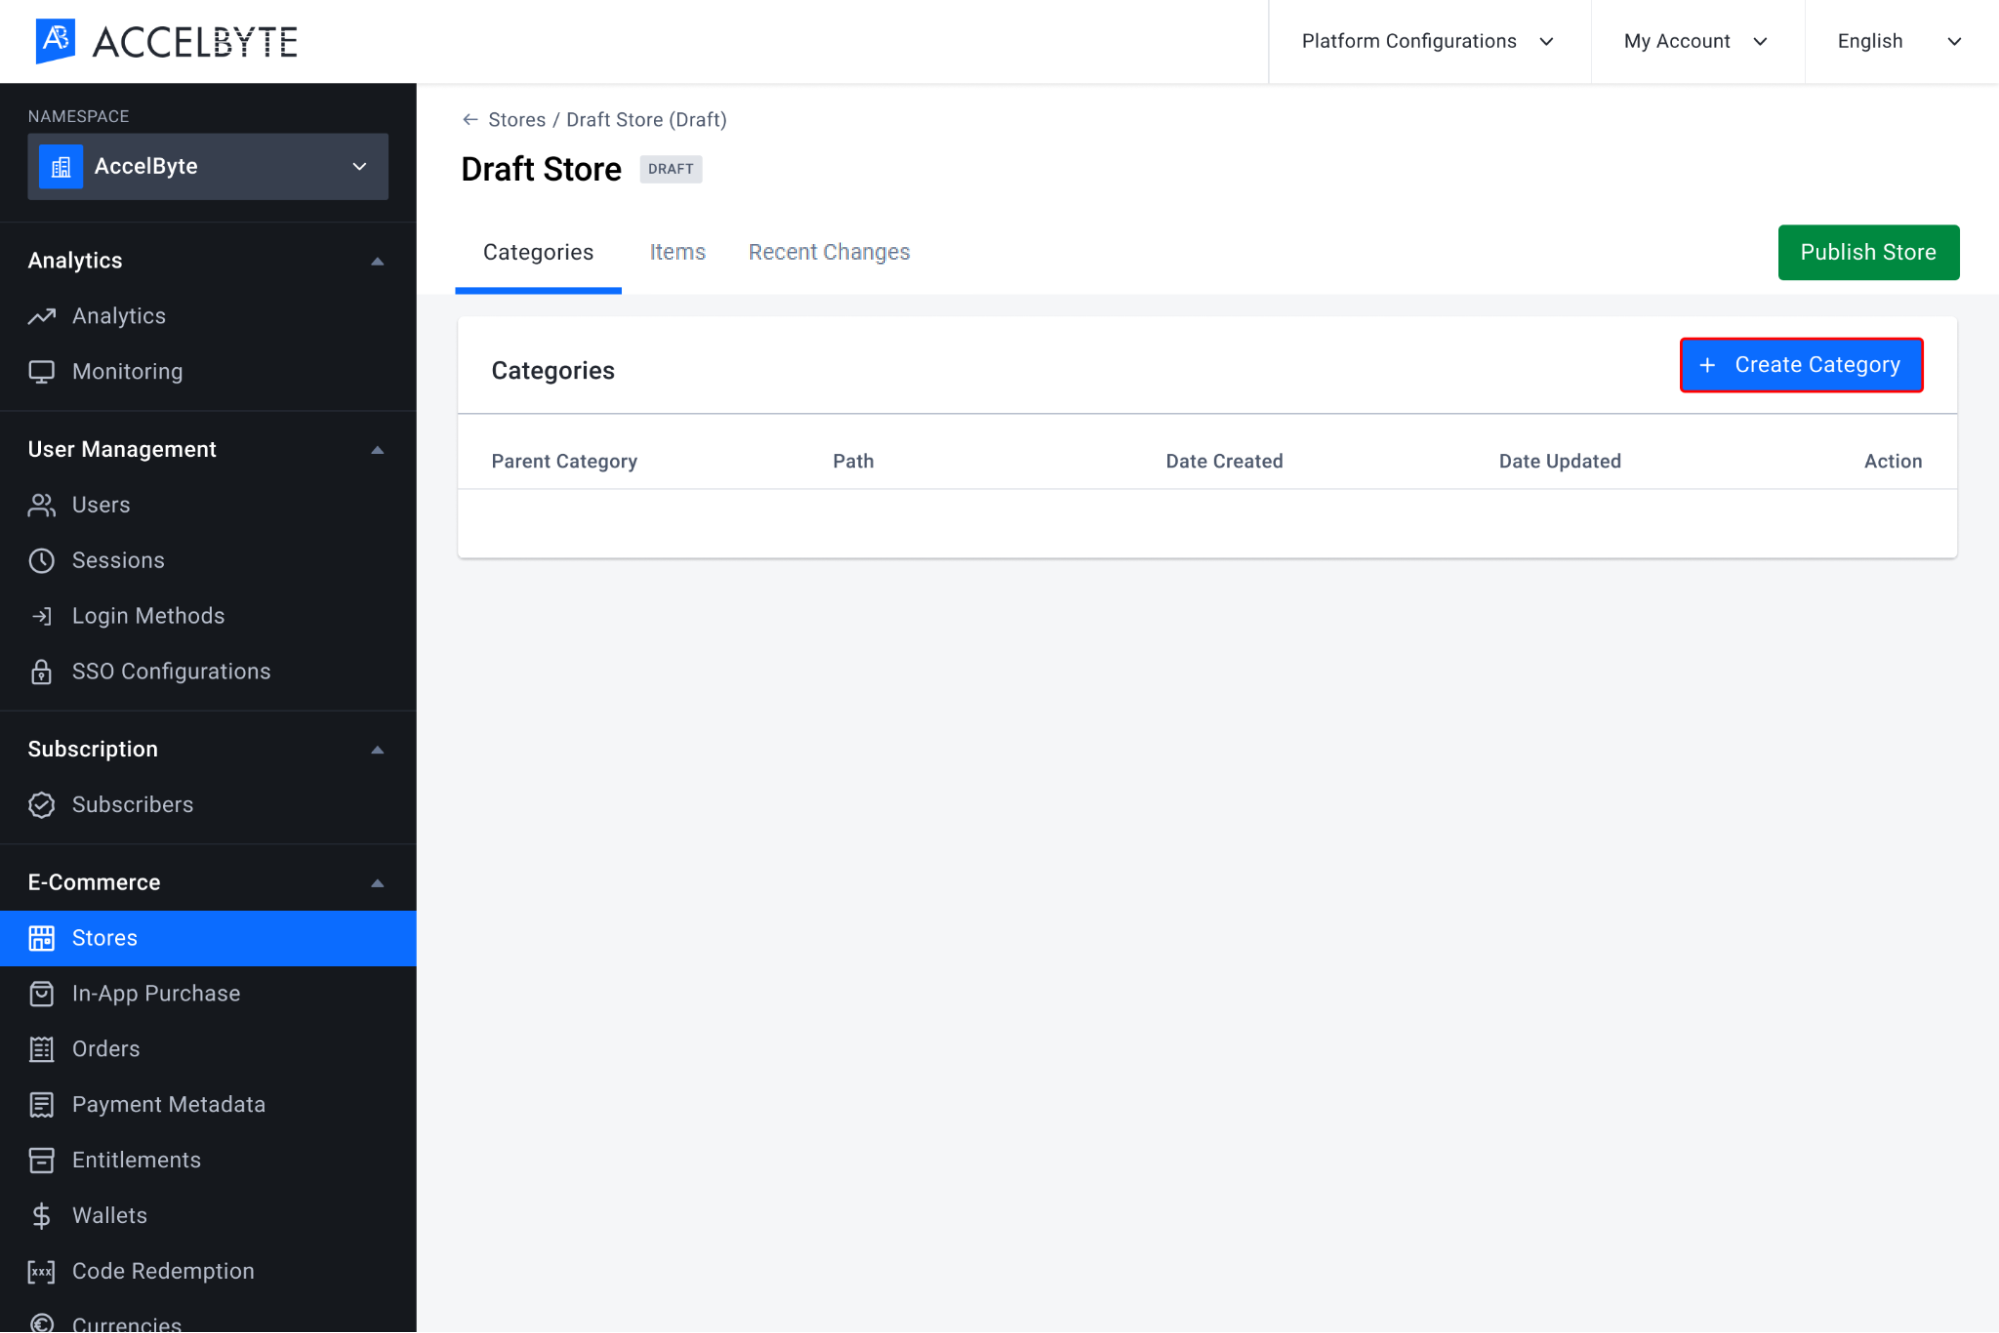
A form appears and you need to fill in the required information into the form below.
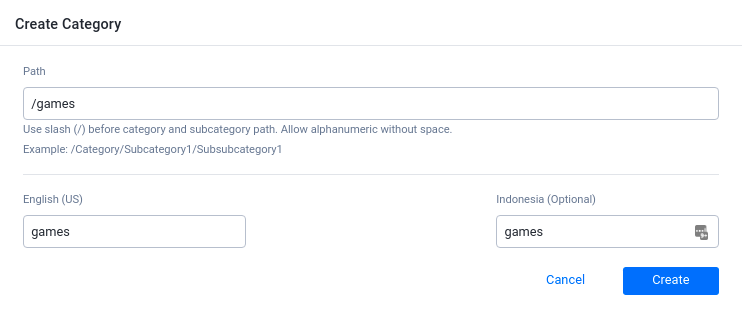
- You can add more paths to create sub-categories. For example, /items/game-items.
- Input the category name based on other languages and regions that have been registered.
- Here is an example of categories you can use:
- /games for games in your store.
- /coins for virtual currency.
- /items for all in-game items. You can also separate in-game categories for every game in the store using /items/gameappId.
When you're done, the new category will be added to the list.
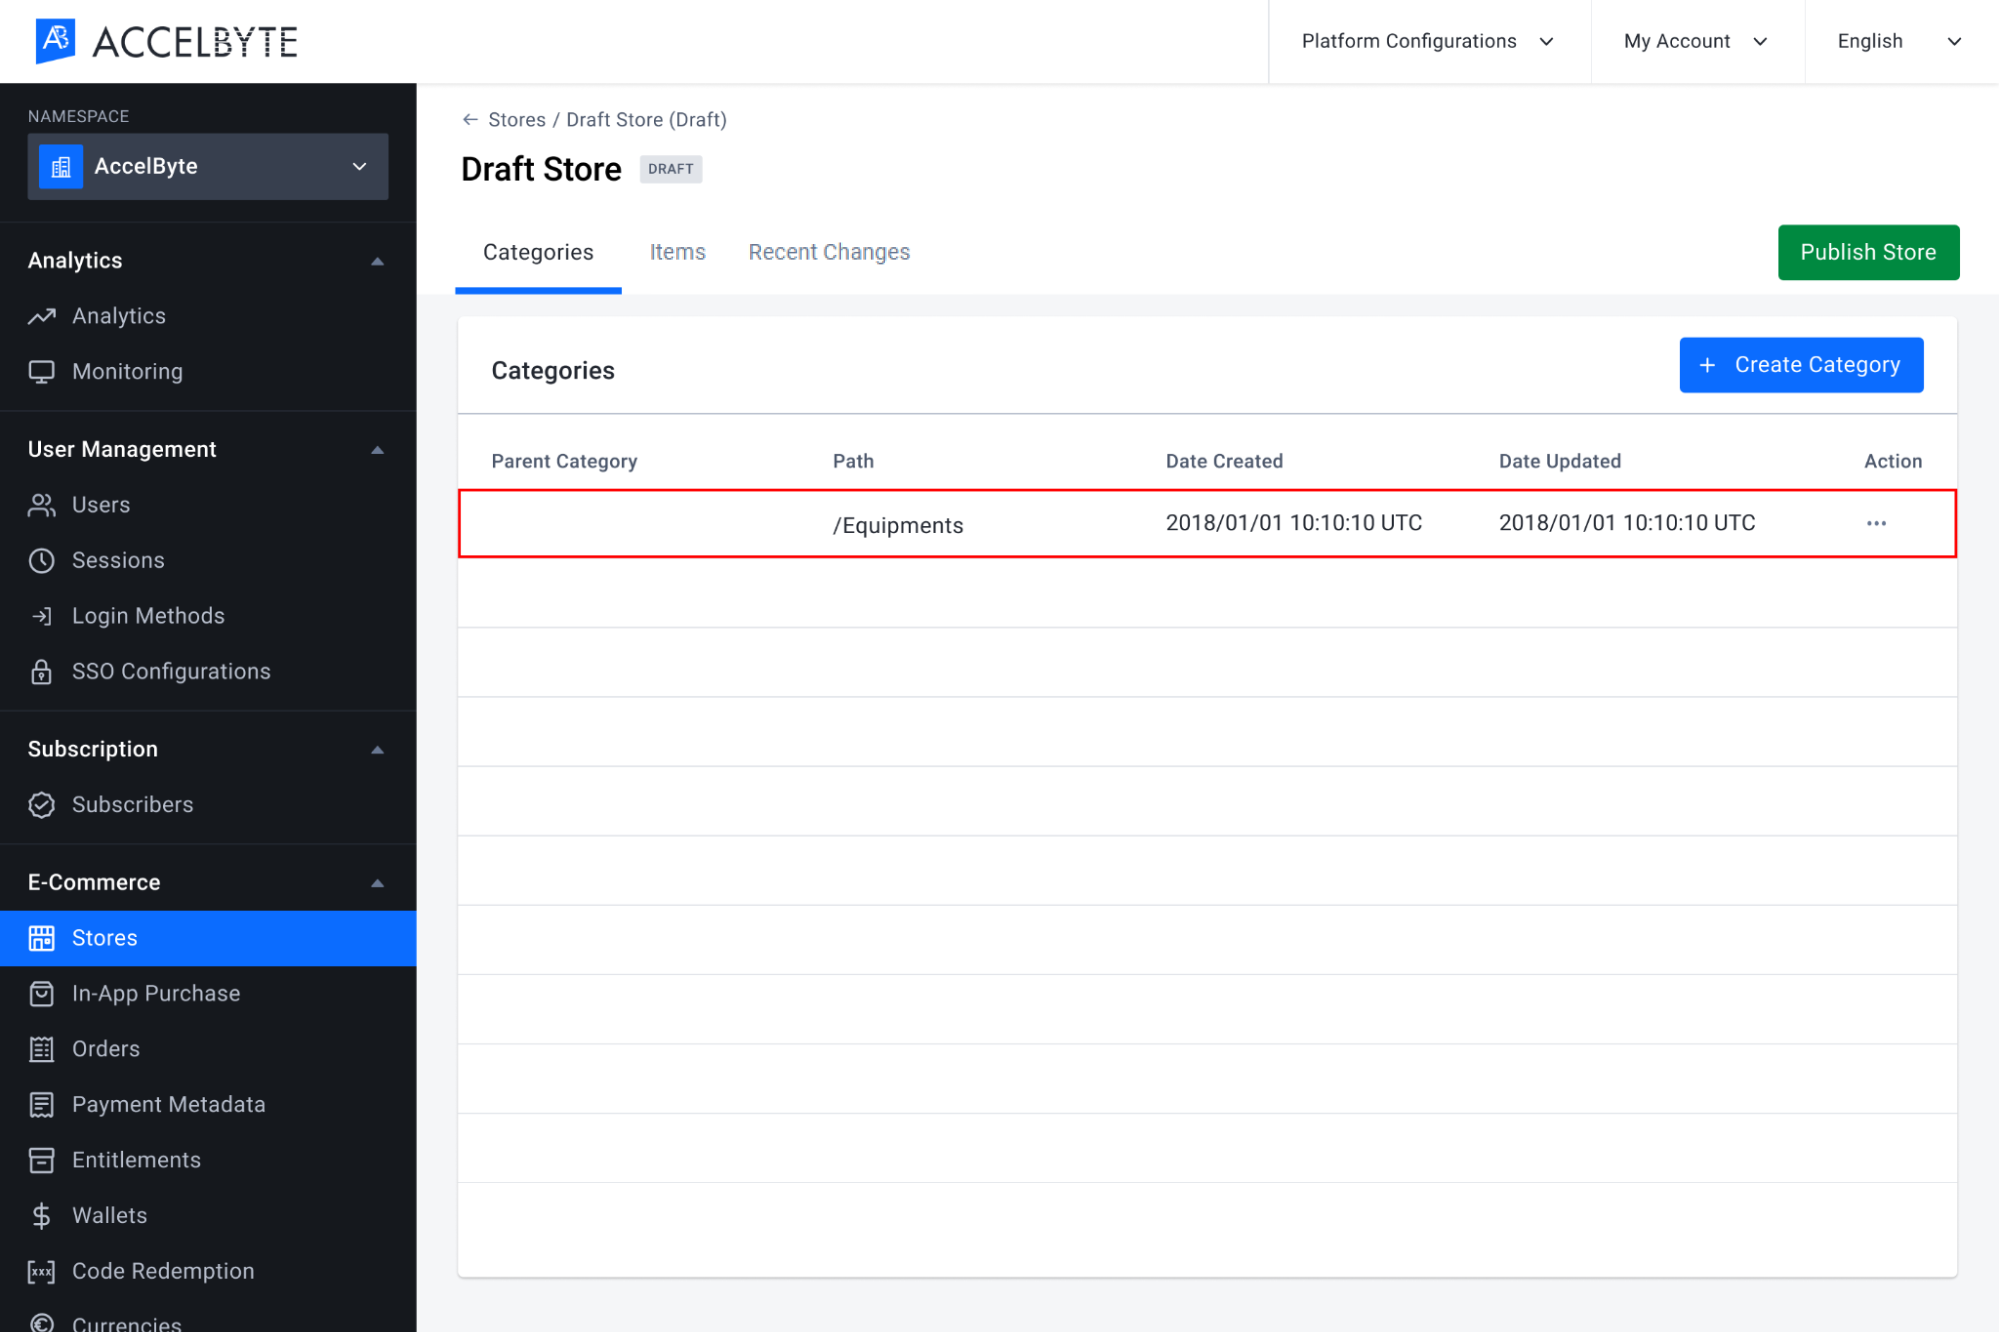
Note that the changes you made inside the store will not appear in the Player Portal until the store is published.
Create a KeyGroup
Creating a KeyGroup is useful if you need to add a Product Key that can be redeemed on the desired platform.
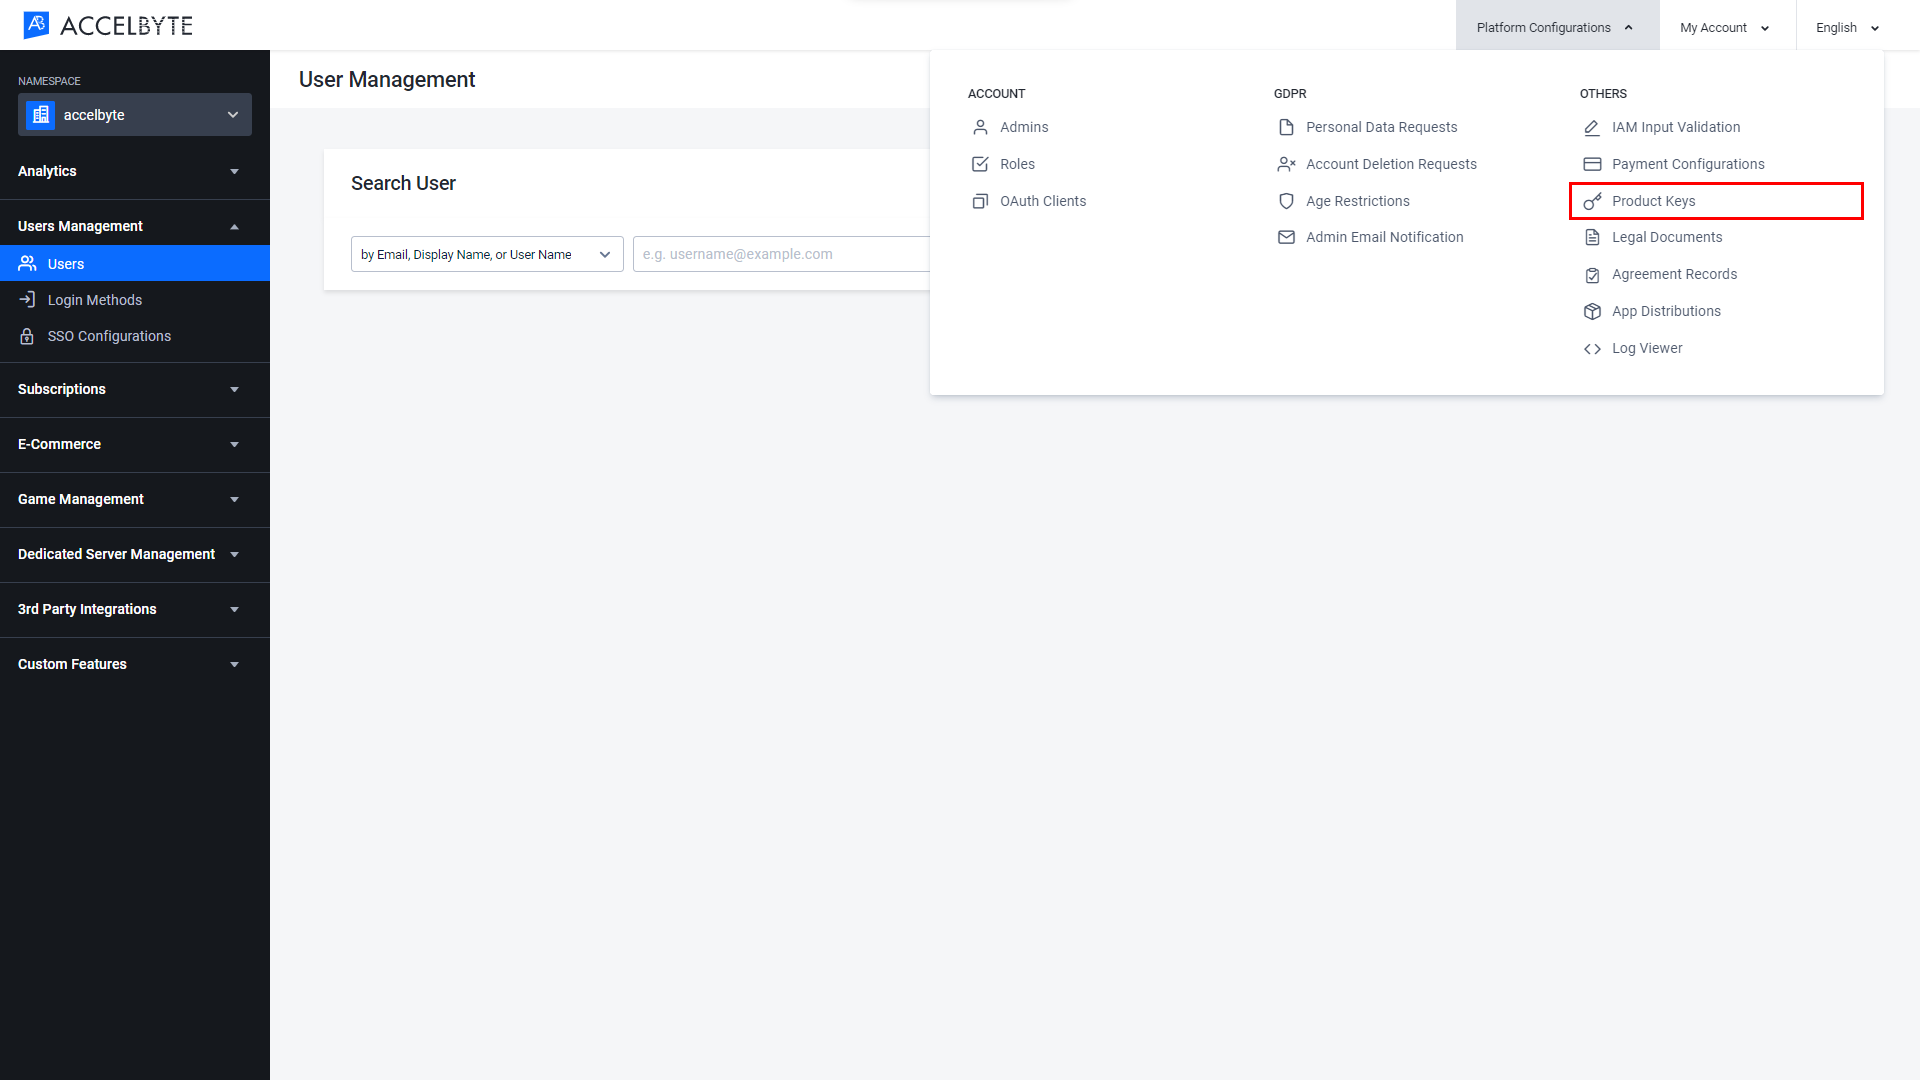
Go to Platform Configurations in the Admin Portal and click Product Keys.
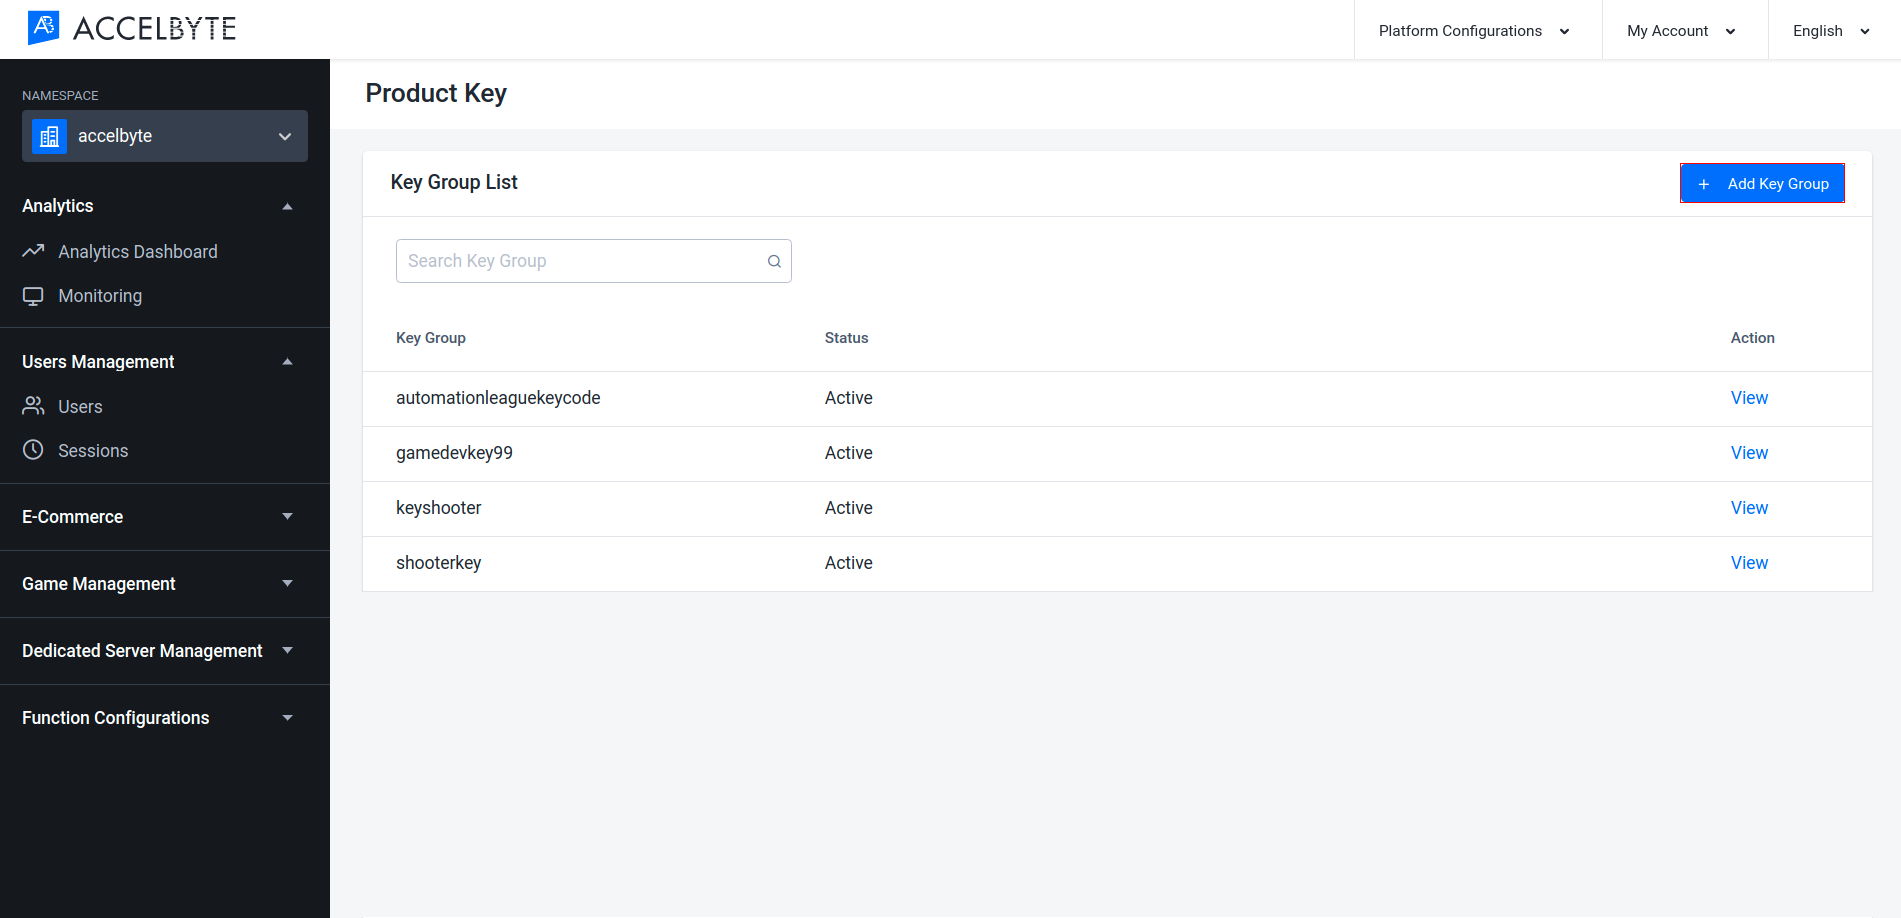
On the Product Key page, click the Add Key Group.
Fill in the required fields.
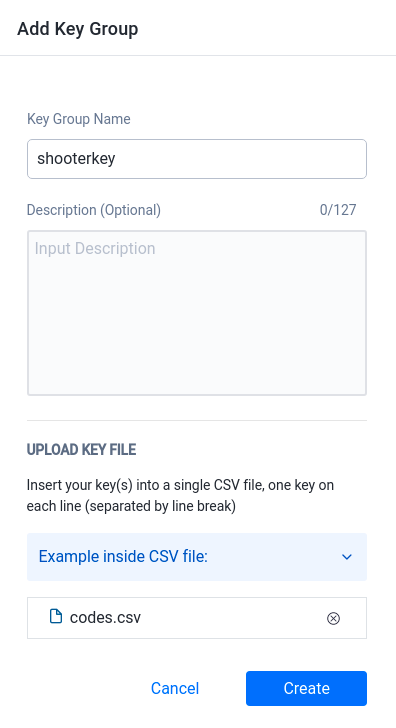
- Input the Key Group Name.
- Input a Description of the KeyGroup.
- Upload your Key file with the appropriate format.
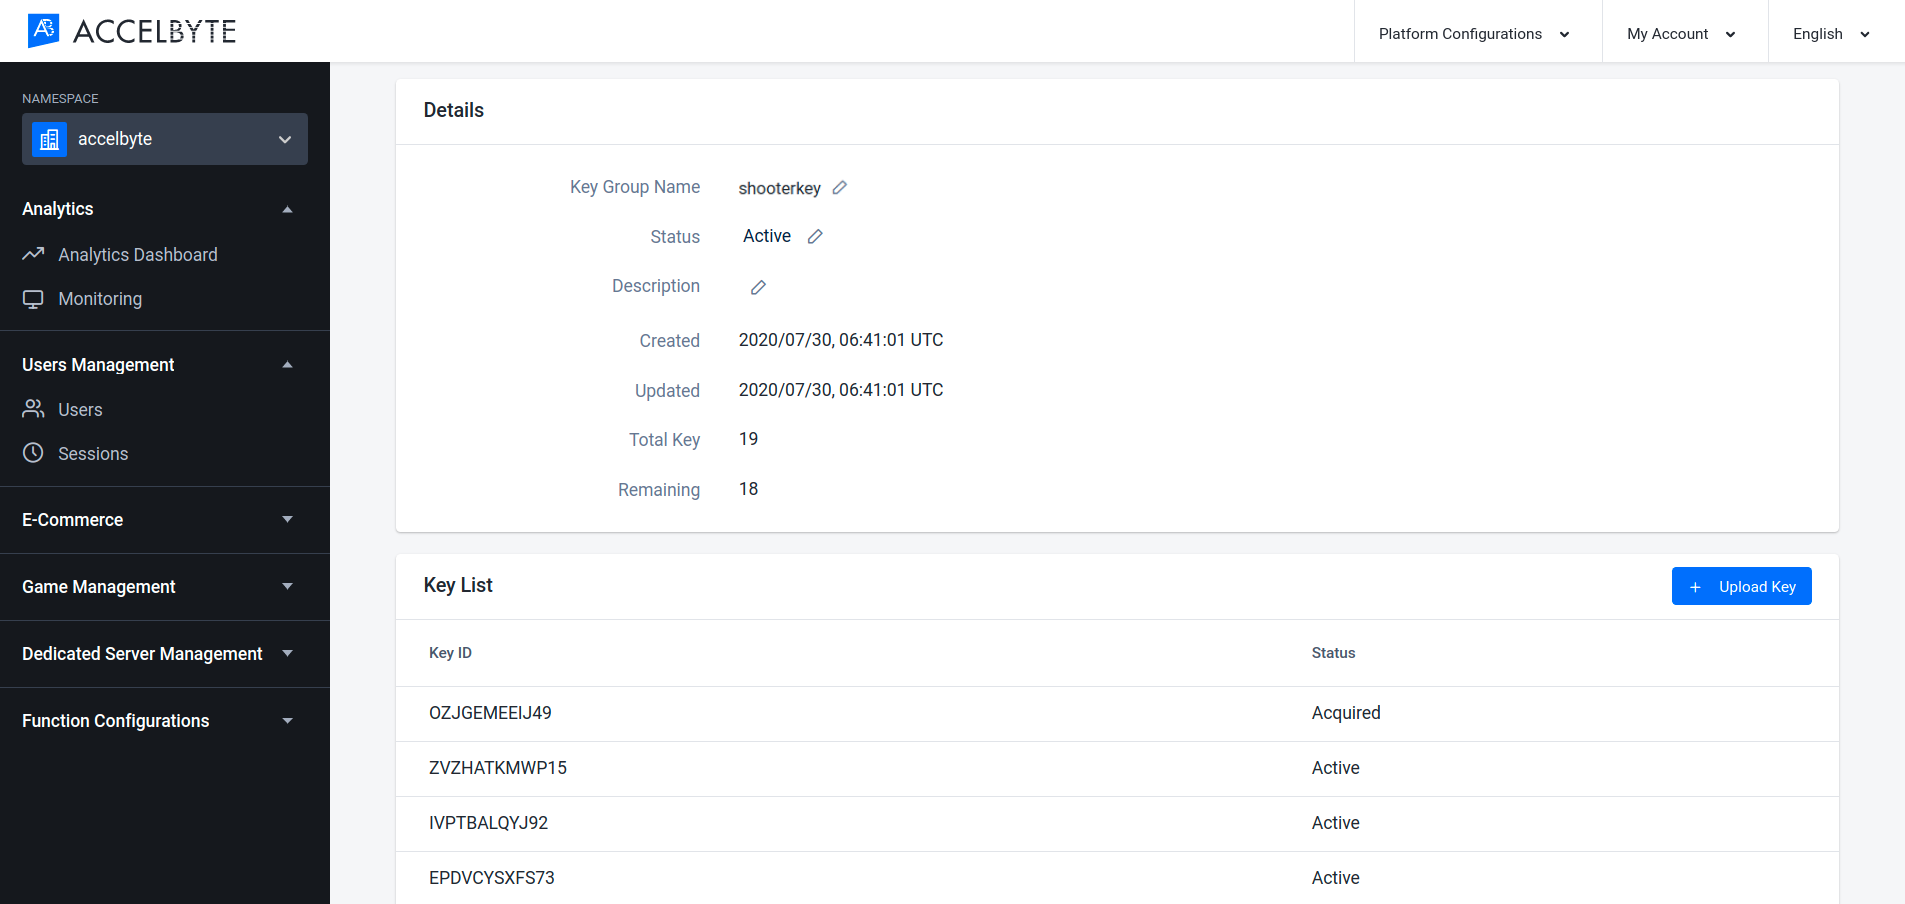
When you're done, the new KeyGroup will be added to the list.
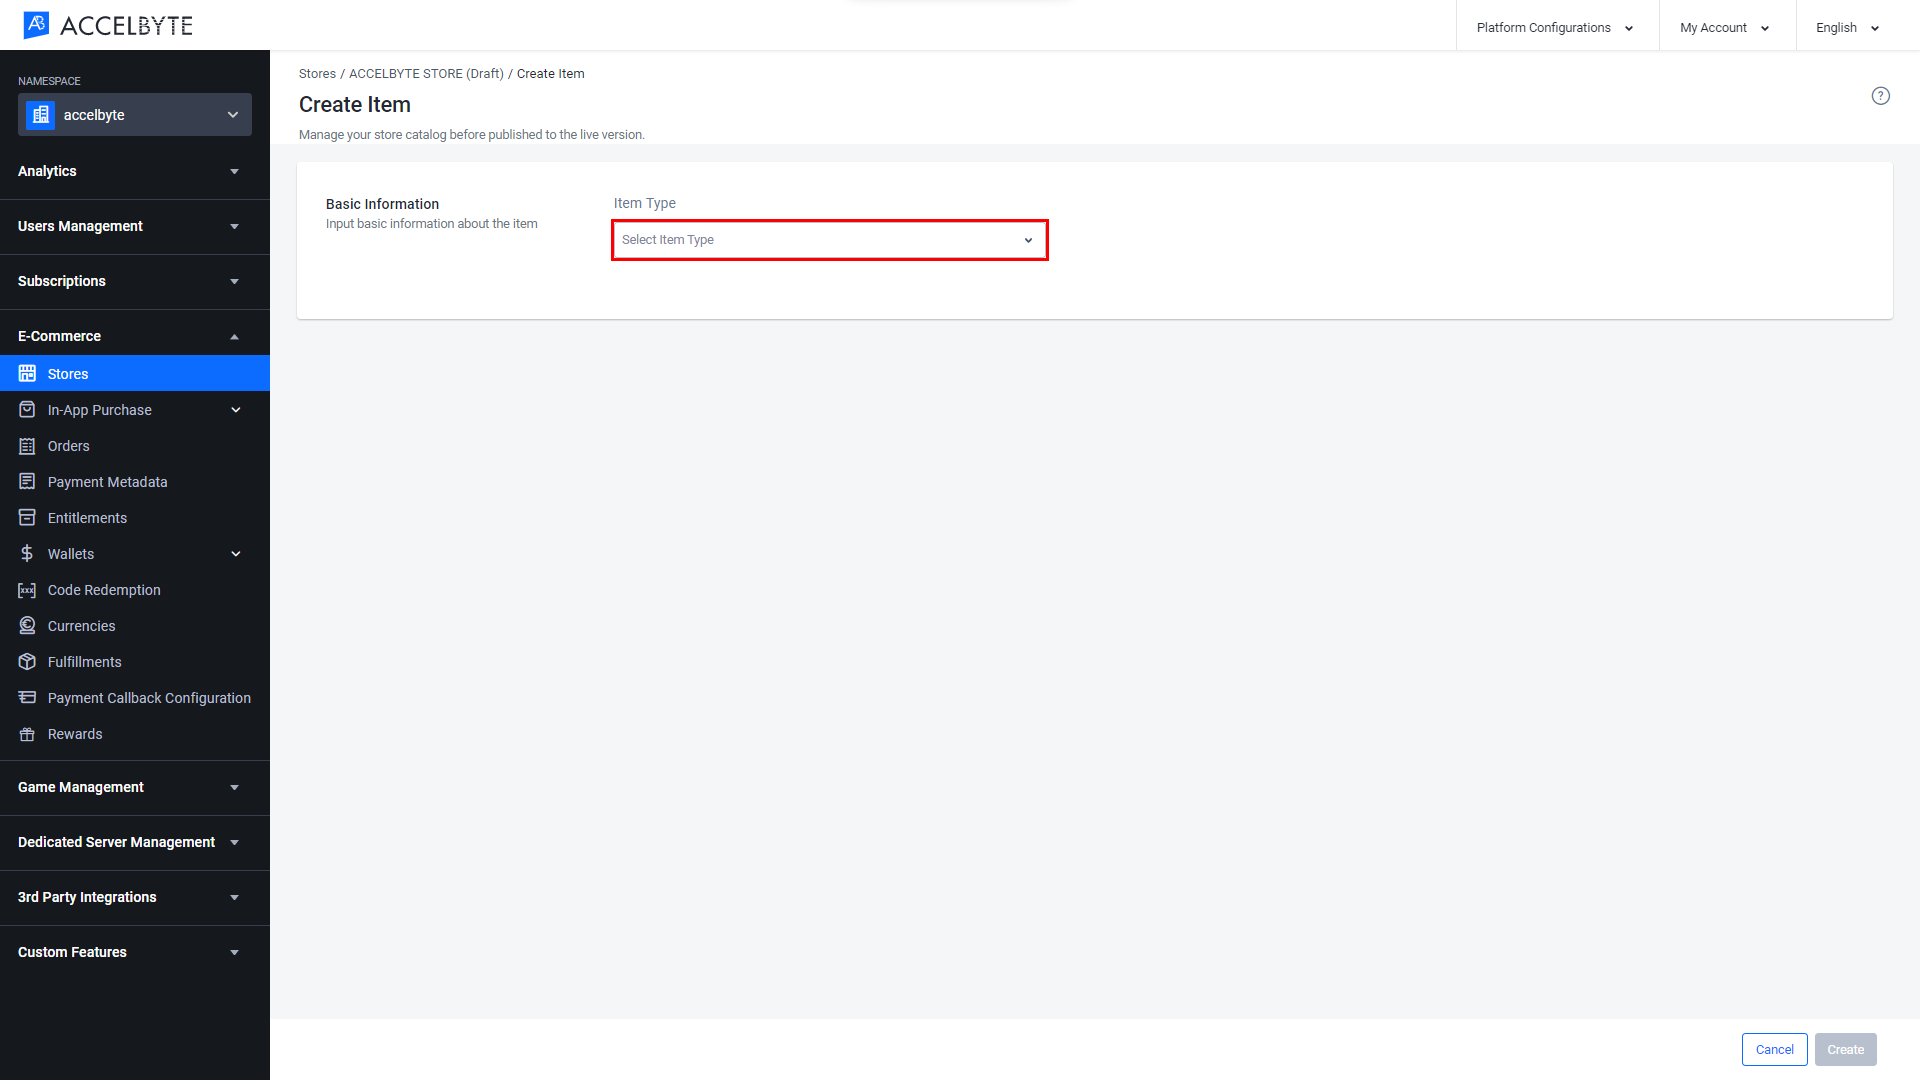
Create an Item in a Store
In your store page, go to the Items tab, click the Create Items button, and choose whether you want to create a new item or clone one from another namespace. In these steps, we will choose to Create a New Item.
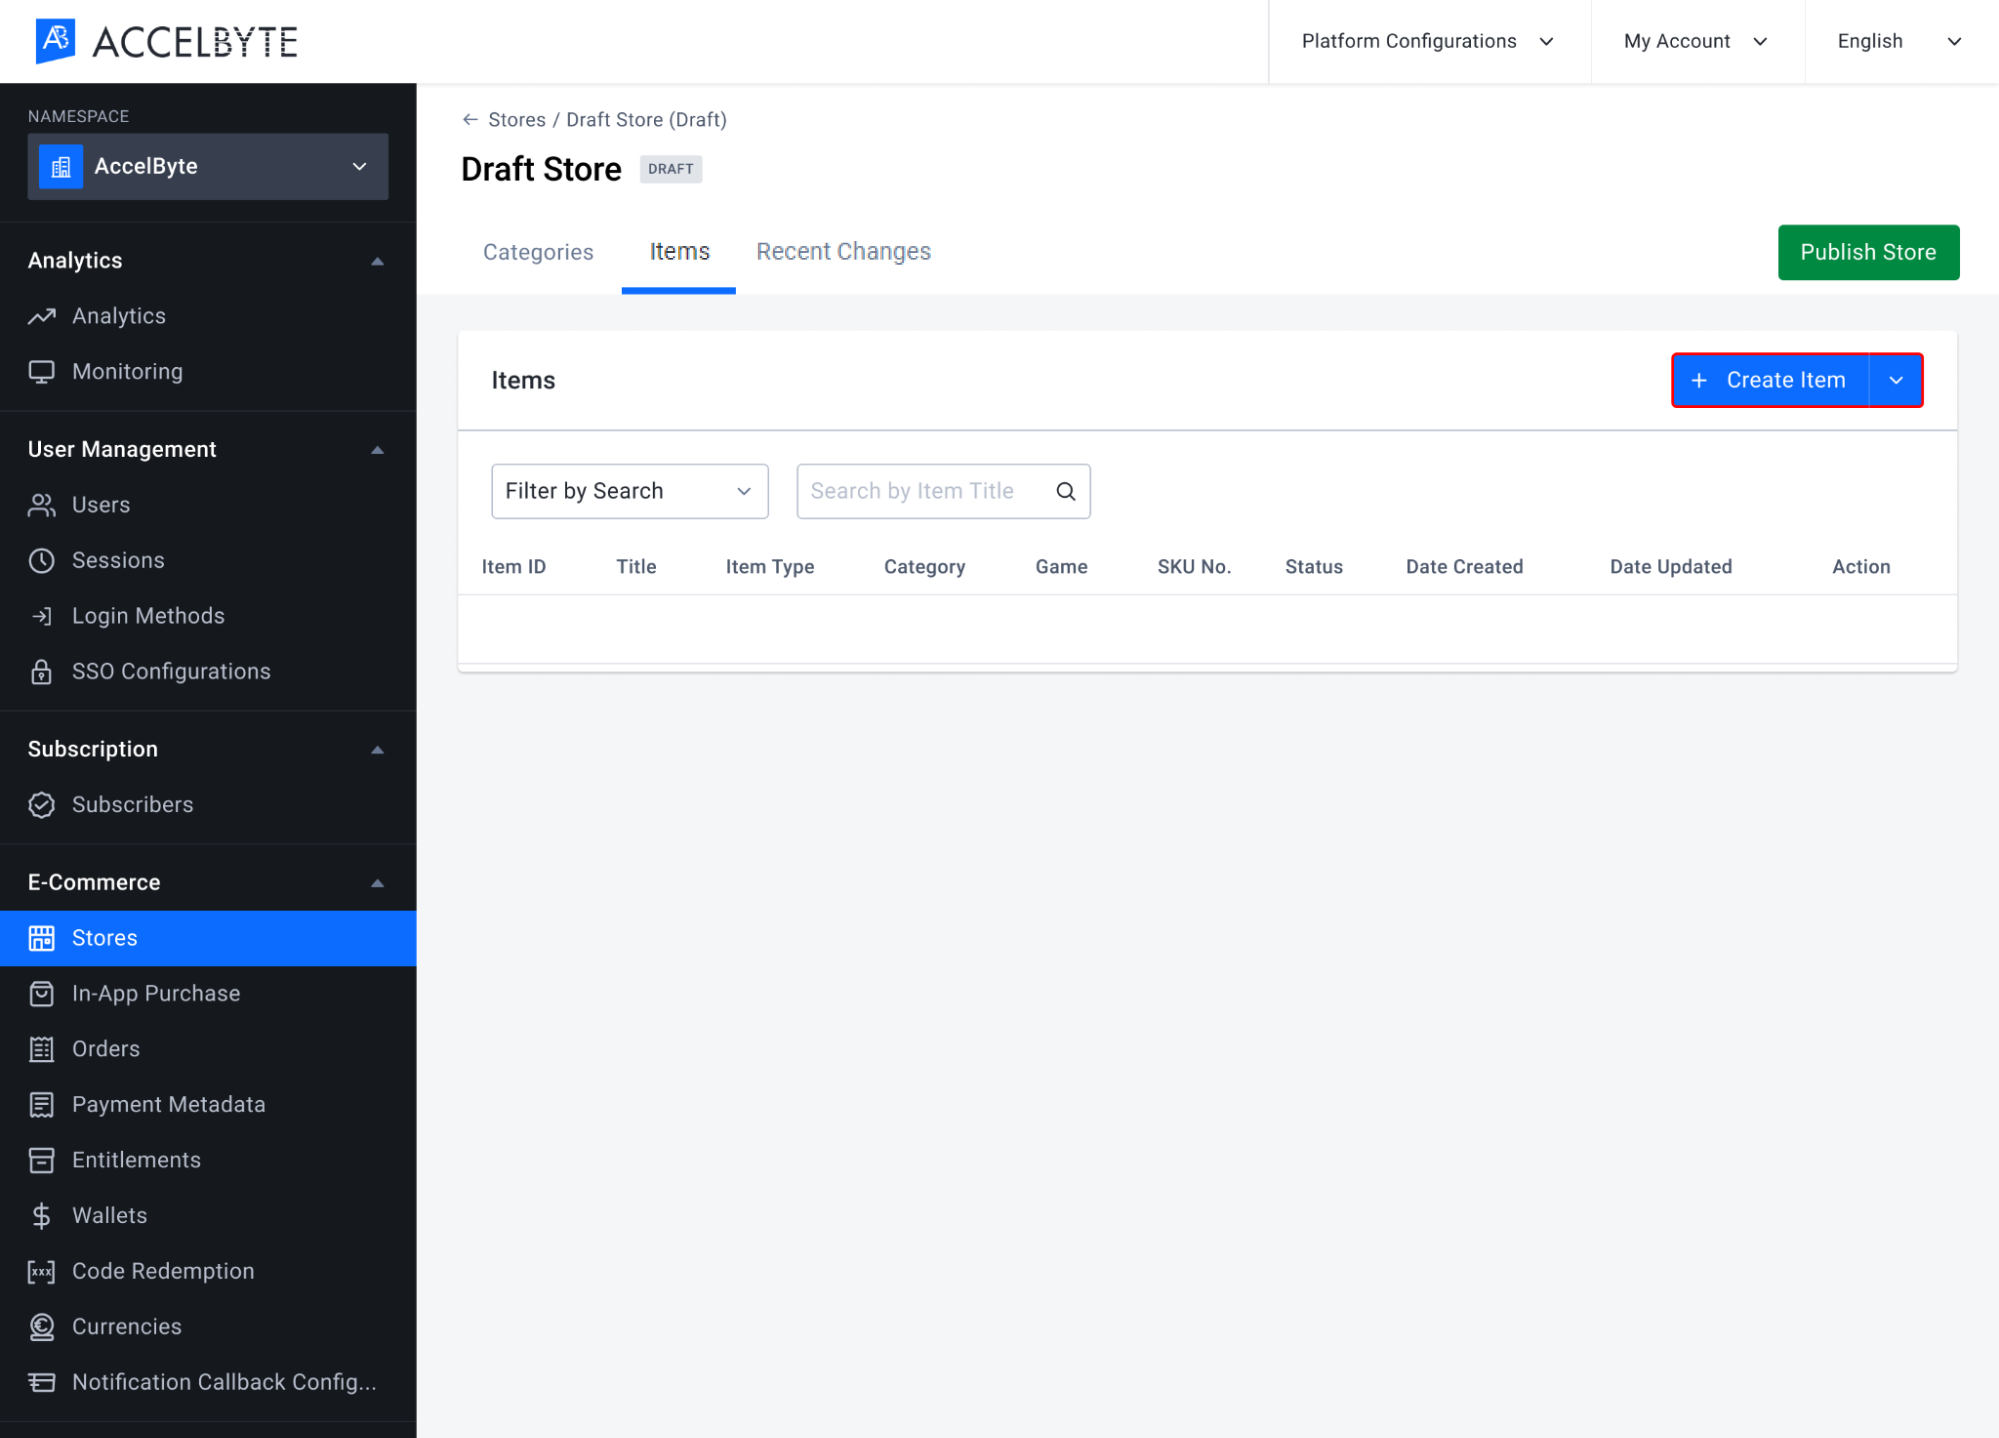
The Add Item form will appear. Choose the type of item you want to create in the Item Type field. Available item types include:
App: Used for application items like games, demos, DLC, or software. You can only create this type of item in a publisher namespace.
In-Game Item: A durable or consumable item used in game.
NOTE
Before creating In-game Items, make sure you have registered an App with the Game type in your store.
Bundle: A package containing one or more items from your store combined into a single purchasable item. You will need to have created at least two items before making a Bundle.
Coin: Credit that will be used to top up a player's virtual currency wallet.
Code: Used by players to redeem apps, in-game items, bundles, etc.
Subscription: Used to create a subscription package.
Media: Items such as music, exclusive art, etc.
Season: A limited-time-only event that uses Passes and Tiers to engage participating players. You can only create this type of item in a game namsepace. For more information, see the Season Pass documentation.
TIP
We highly recommend that you create any pass or tier items in a draft store so you don't have to take your store offline every time you wish to make edits. Pass and tier items do not have to be available in your published store in order for them to be usable in season events.
After choosing the item type, another field will appear for information based on the item type you chose. First, fill in the Basic Information field group:
Item Name: Input the name of the item.
Category: Assign the item to a category that you created earlier.
App Type: Choose the category.
App ID: The App ID is a unique identifier of alphanumeric characters that will be used to identify your game when you upload it using Build Util.
NOTE
You can't change the App ID after it has been defined.
Required Game: The game your bundle will be associated with.
Currency Code: The currency code for the coin.
KeyGroup: Select a keygroup that you created earlier.
Item: Choose Pass to create a pass item that allows players to participate in seasonal events. Passes can be made free or available for player purchase. Choose Tier to create a tier item that grants players access to rewards. You can give players the option to purchase tiers to access rewards they have not earned through participation in season events.
Fill the Store Configuration section:
SKU Number: Item's ID from the third-party platform that supports in-app purchases using an SKU Number. Fill this field if you want to map this item to a third-party platform. Below is a list of third-party platforms that support in-app purchases, and which values you need to enter into the SKU No. field:
Third-party Platform Value PSN Entitlement Label Xbox StoreID Twitch Reward ID Google productId Apple productId Stadia product_id Epic productId Target Namespace: The desired game namespace where the item will be sold.
Item Purchase Limit: Define the purchase limit of this item for your store. For example, if you set the item purchase limit to 100, this means that 100 units of that particular item will be available for purchase in your store. To make this value unlimited, input -1.
User Purchase Limit: Define the purchase limit of this item for each account. For example, if you set the user purchase limit of this item to 100, this means that 100 units of that particular item will be available for purchase in your store, for each account. To make this value unlimited, input -1.
Entitlement Type: If you want the item to be able to be used repeatedly, choose Durable. If your item is single-use, choose Consumable.
Follow these additional steps for Consumable items:
Input Item Use Count to define how many times the item can be used.
Set the Stack Entitlement value. Set to True if the item should be stackable. If not, set to False.
Display Order: Set the order of the item will be displayed in the Player Portal.
Visible in Store: Select True to make the item visible, or False to hide the item from your published store.
Purchasable in Store: Select True to make your item available for purchase, or False to make it unavailable for purchase.
tip
There are three scenarios you can apply to Visible in Store and Purchasable in Store fields:
- Select True for Visible in Store and True for Purchasable in Store settings for items that you want to be immediately available to purchase in the store.
- Select True for Visible in Store and False for Purchasable in Store if you want to give a preview of the item to players but the item will be available at a later time.
- Select False for Visible in Store and True for Purchasable in Store to save items as drafts which can be worked on later before being published to the store.
Third-party Store Integration: use this field if this item is also available on the third-party store.
Fill the Subscription Configuration section:
Billing Cycle: How often subscribing players will be billed. You can choose to charge the user either Weekly, Monthly, Quarterly, or Yearly.
Grace Period: Give players extra time to pay, in case of payment processing issues. The default setting is 7 days.
Free Trial: Toggle to Active to set the item available for trial.
Length: Enter the duration of the trial.
tip
There are three types of trials you can from:
- No Trial
If you choose not to offer a trial, make sure that Free Trial is Disabled
Leave the **Trial Price** field blank. - Paid Trial
If you choose not to offer a trial, make sure that Free Trial is Enabled.
Select how long you would like the trial to last in the Length dropdown menu under Trial Period.
Input the price of the trial in the Trial Price field. The trial price is usually lower than the normal price. - Free Trial
If you choose not to offer a trial, make sure that the Free Trial is Enabled.
Select how long you would like the trial to last in the Length dropdown menu under Trial Period.
Input the price of the trial in the Trial Price field with 0.
- No Trial
Fill the Pricing Configuration section:
- Currency Namespace: The source of your currency.
- Currency Code: The currency code sed to purchase the item.
- Price of the item: If you want to make an item free, set the price as 0. When you set a price in real currency, set the last two digits as decimals, i.e., if you have selected $ as your current symbol, 1.99 will set your item as $1.99 in your store.
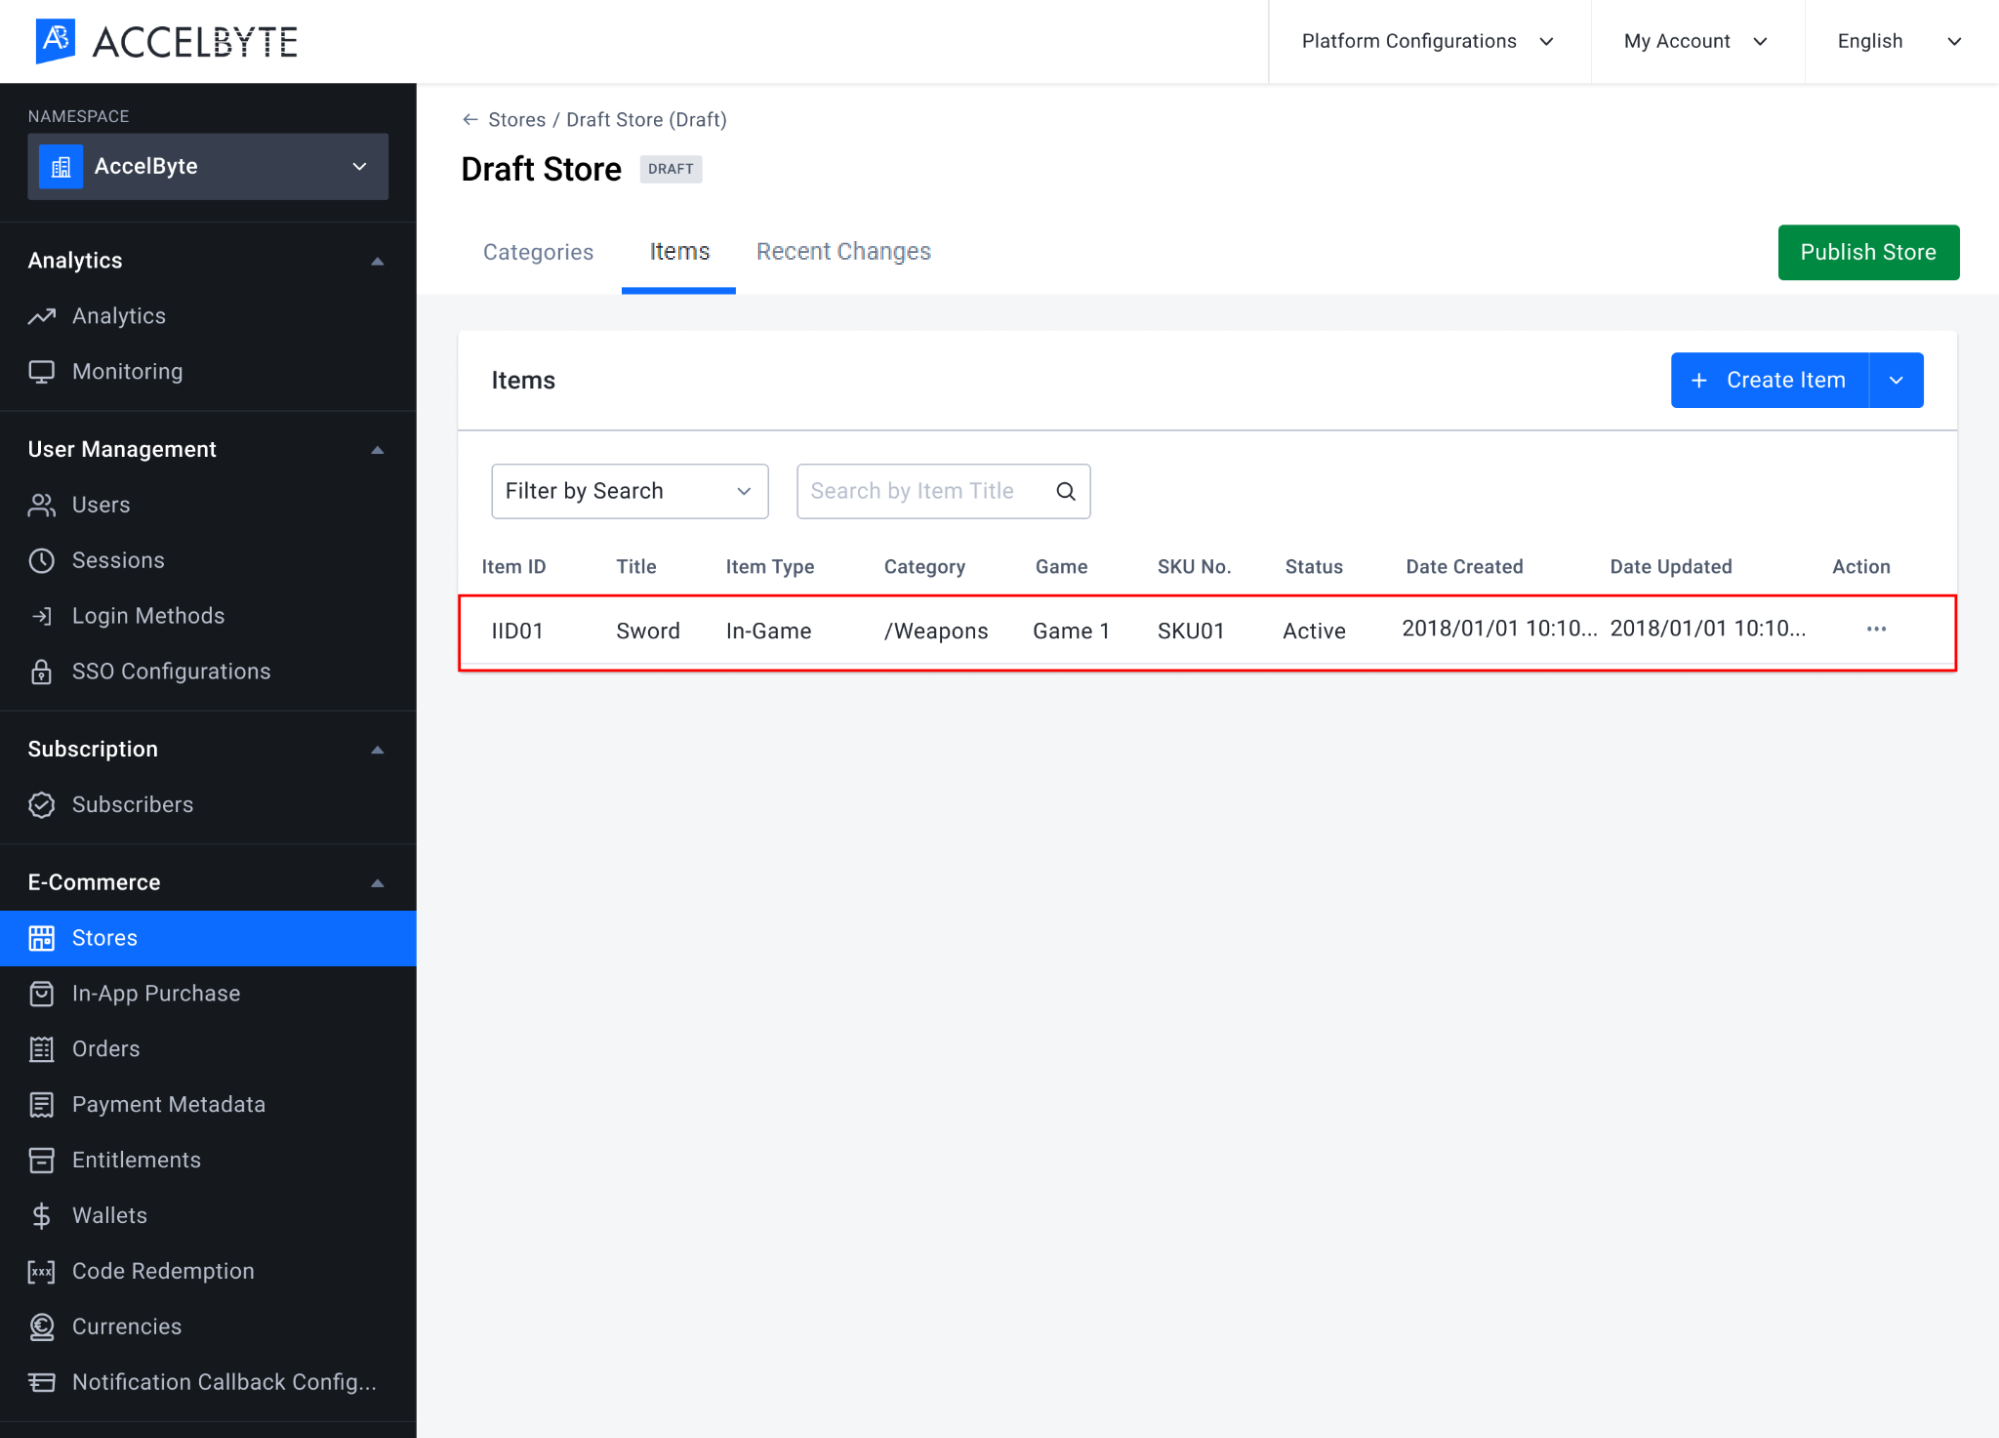
Once completed, click Add and your item will be added to your store's Item list.
Add Items to a Bundle
After you've created a bundle, you can add items to the bundle by following the steps below.
In the Admin Portal, go to your draft store and find the bundle you want to add items to. Open the bundle by clicking View in the bundle's Action menu.
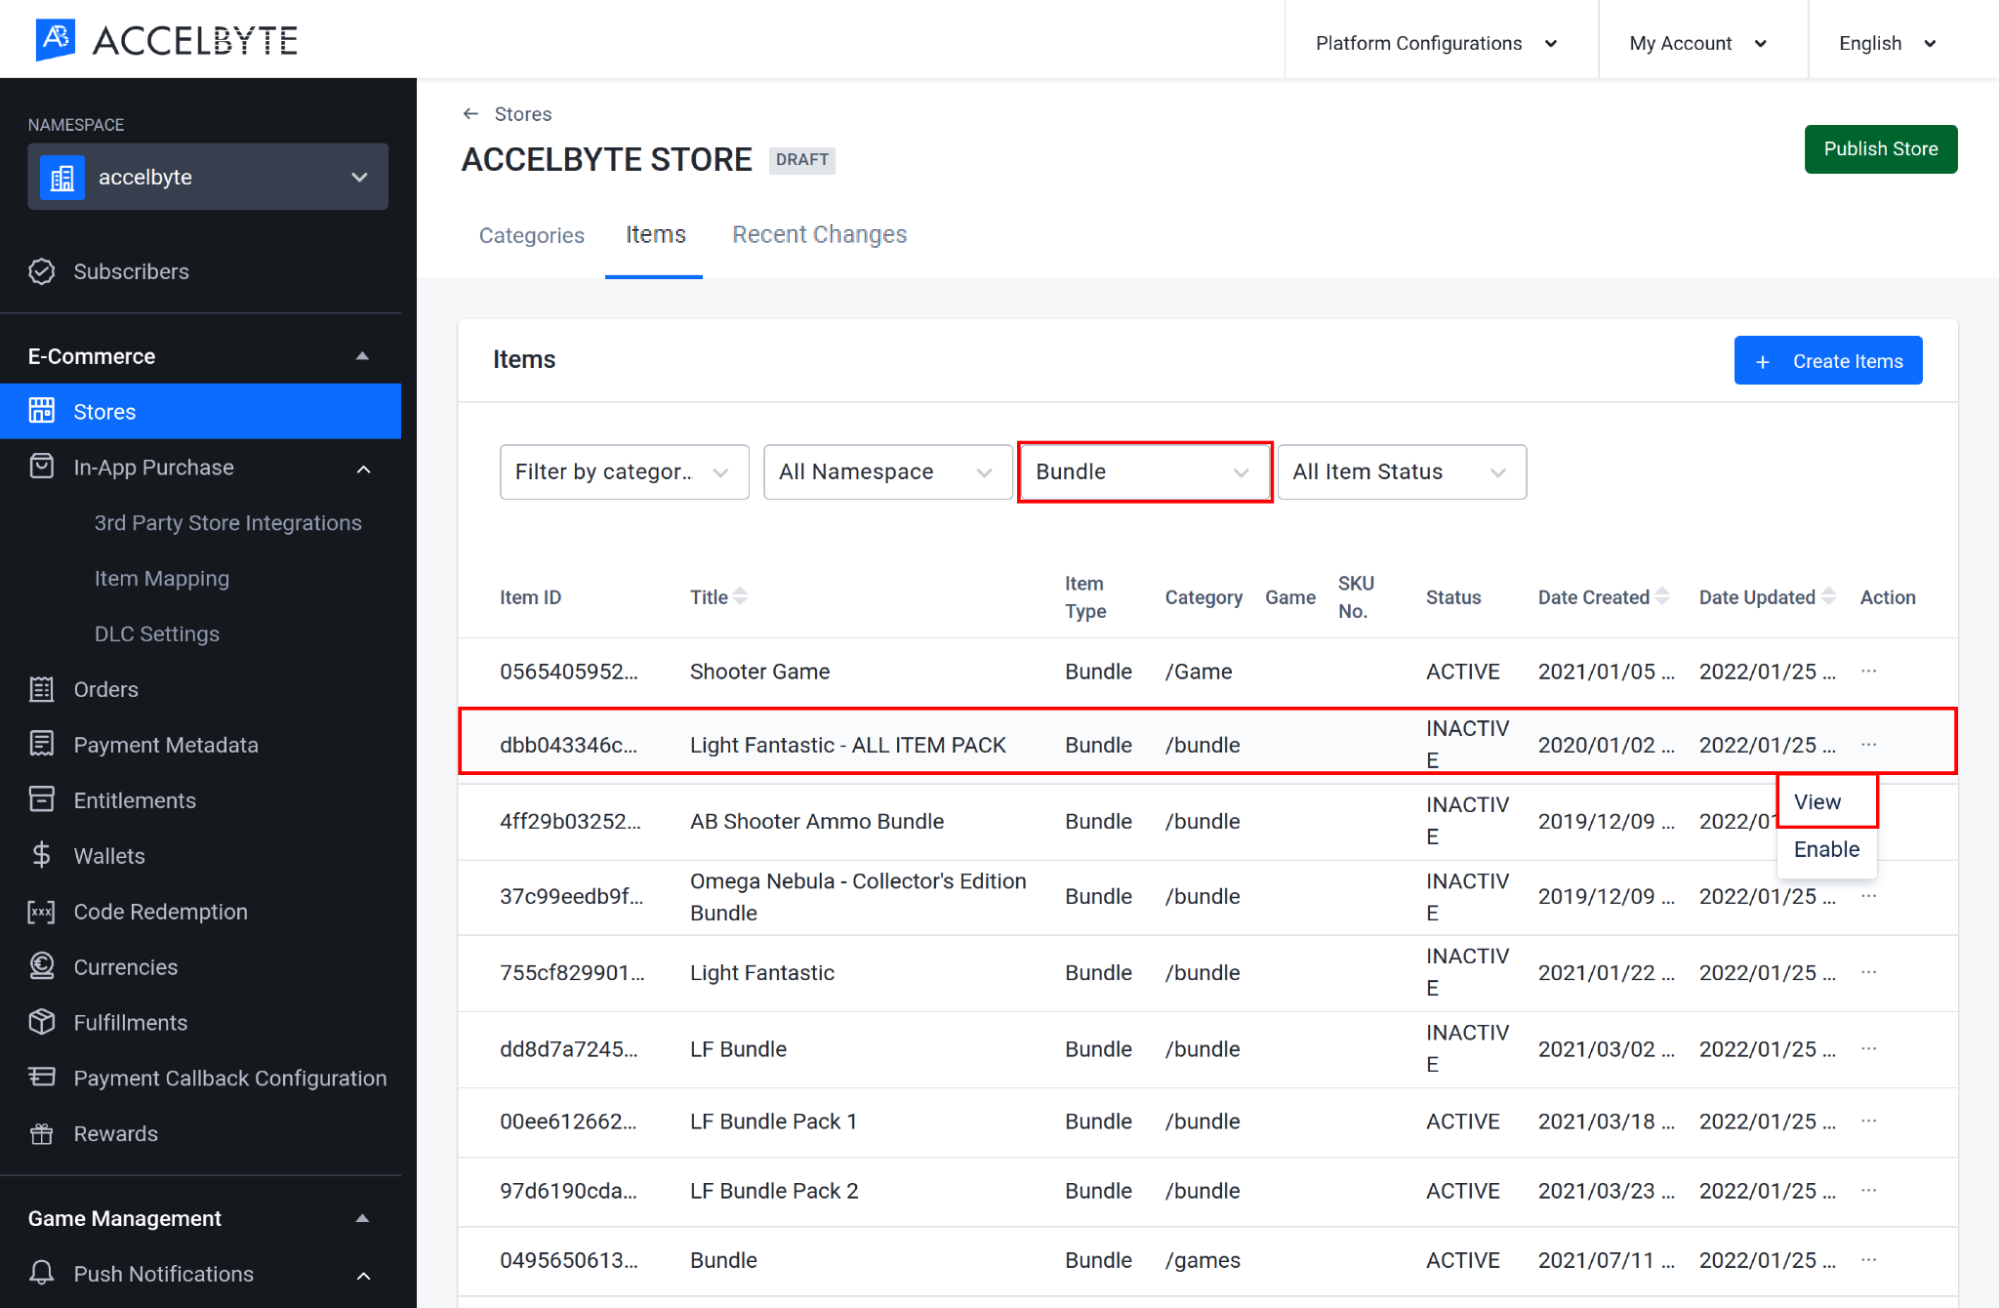
Here you can see detailed information about the bundle. Scroll down to the Bundle Items to see the list of items contained within that bundle. To add more items or edit them, click the Add/Edit Item button.
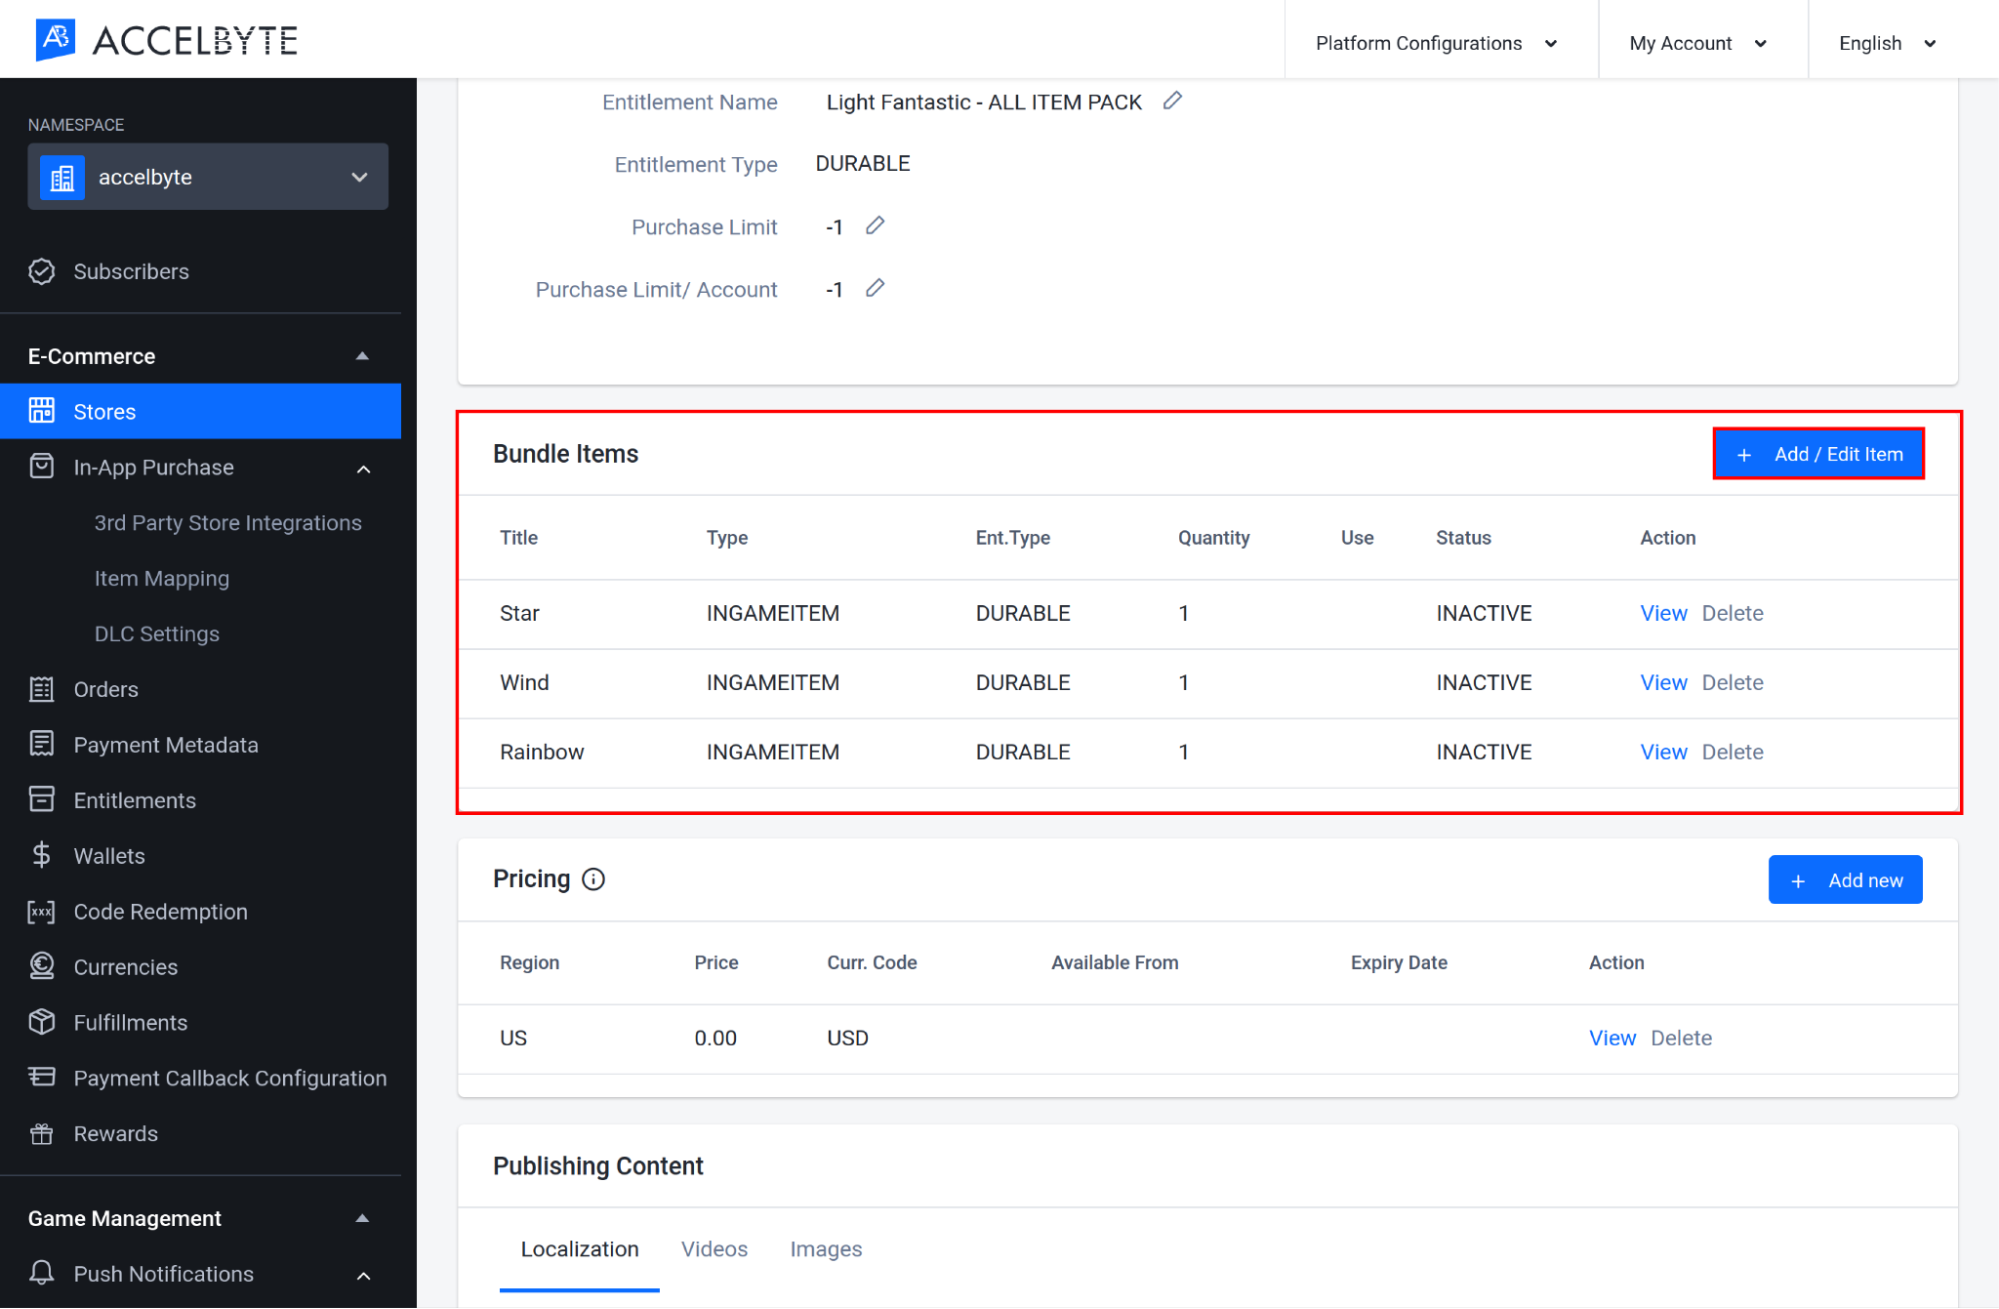
The Add/Edit Item form appears. Select the items you want to add to the bundle.
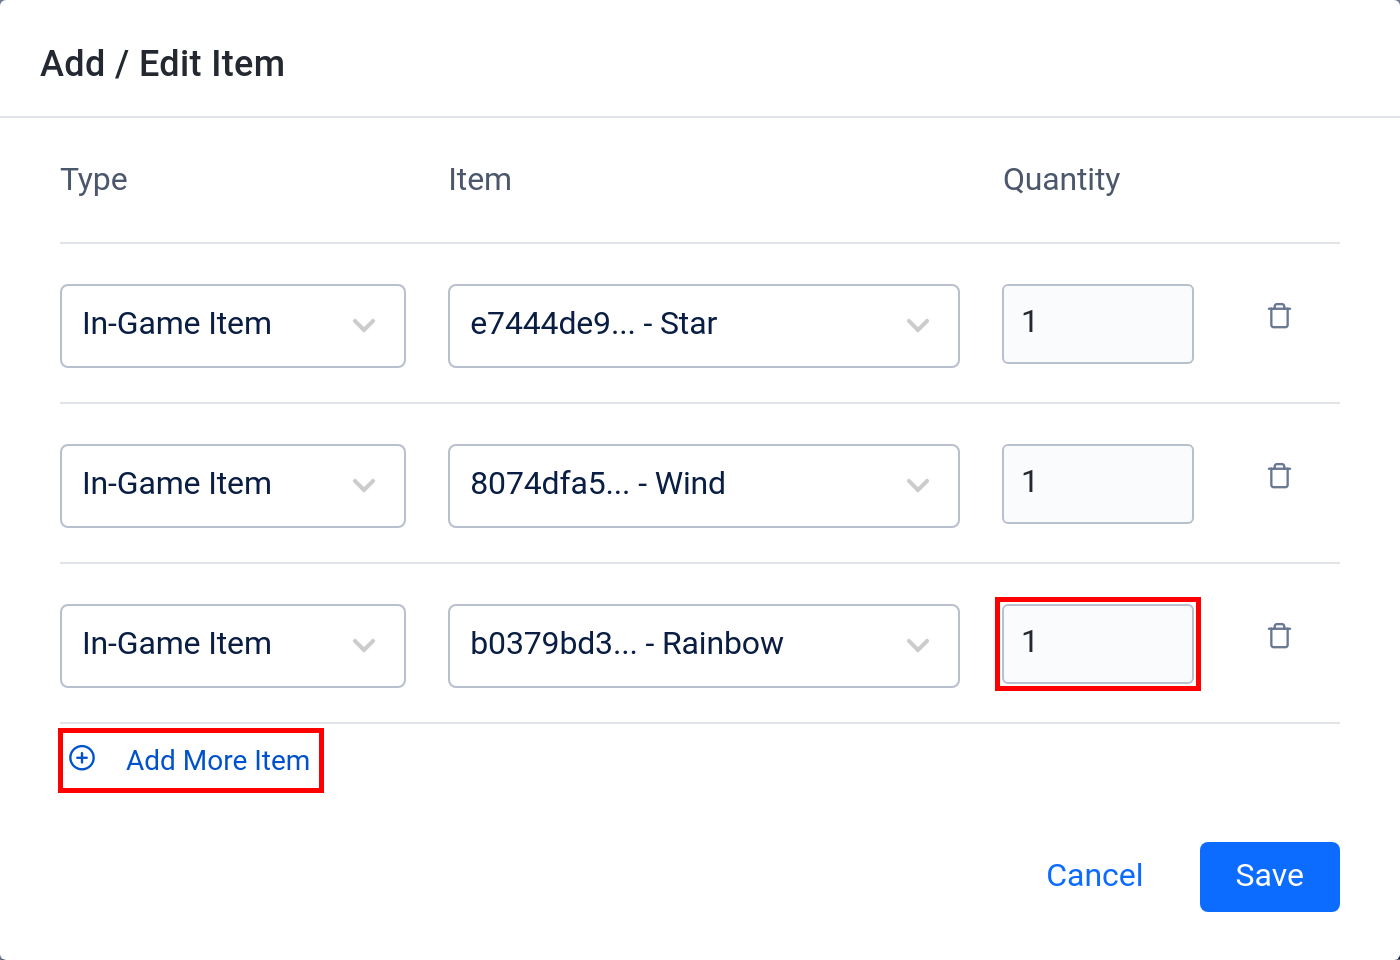
Select the item type of the item you want to add from the Type dropdown menu. The item types that can be added to bundles are In-Game Item, Coins, App from the publisher namespace only, and Season Pass and Season Tier in game namespaces only.
Select the item you want to add to the bundle from the Item dropdown menu. You can type the name of the item in the box to select it.
Enter the quantity of the item you want to add in the Quantity column. You can add multiples of in-game items or coin packs to a bundle, but you cannot add more than one of an App, Season Pass, or Season Tier item.
To add more items click Add More Item, then fill out the fields for the new item as seen above.
When you're done, click the Save button.
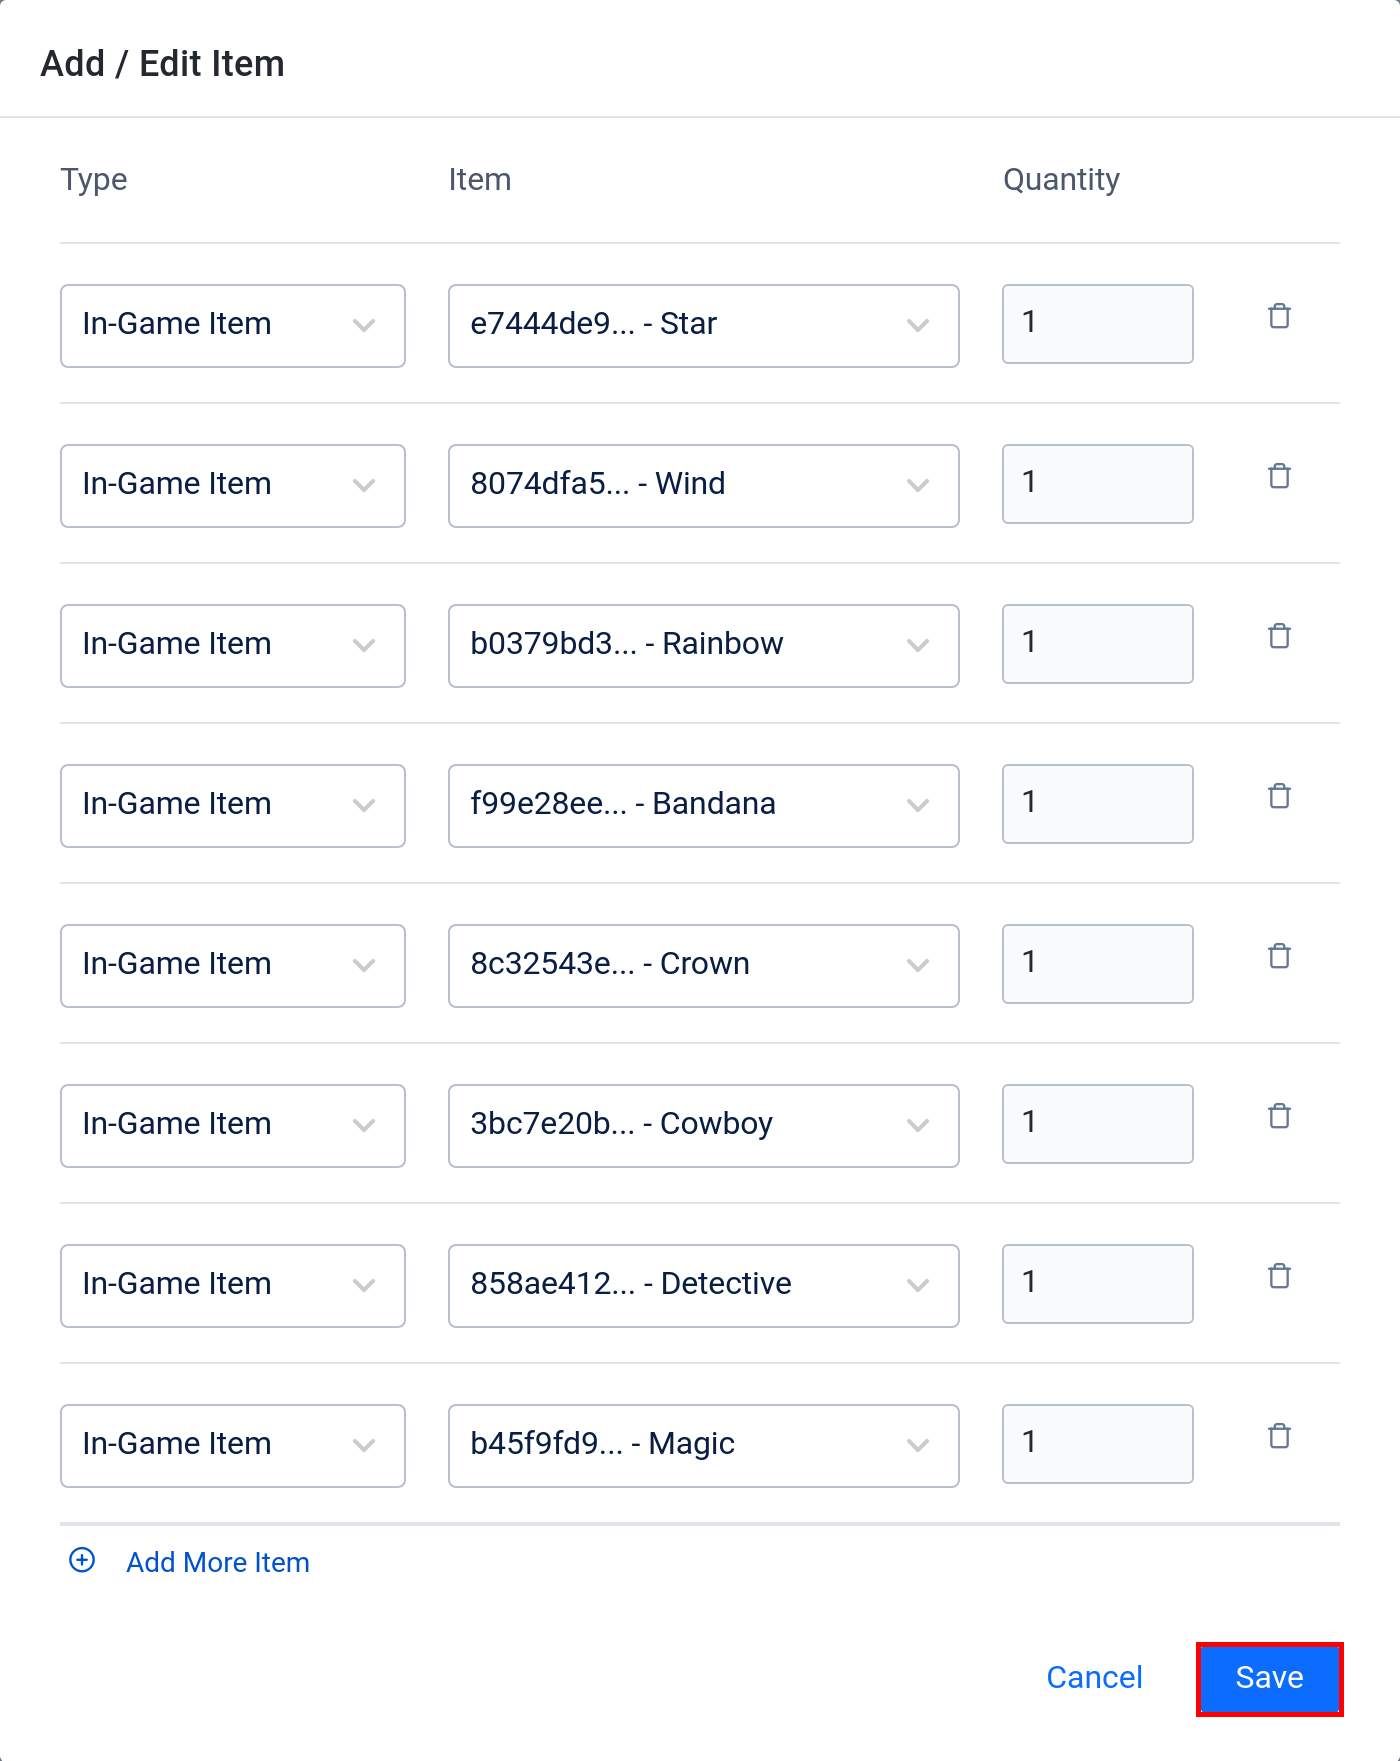
The items you added will appear in the Bundle Items section.
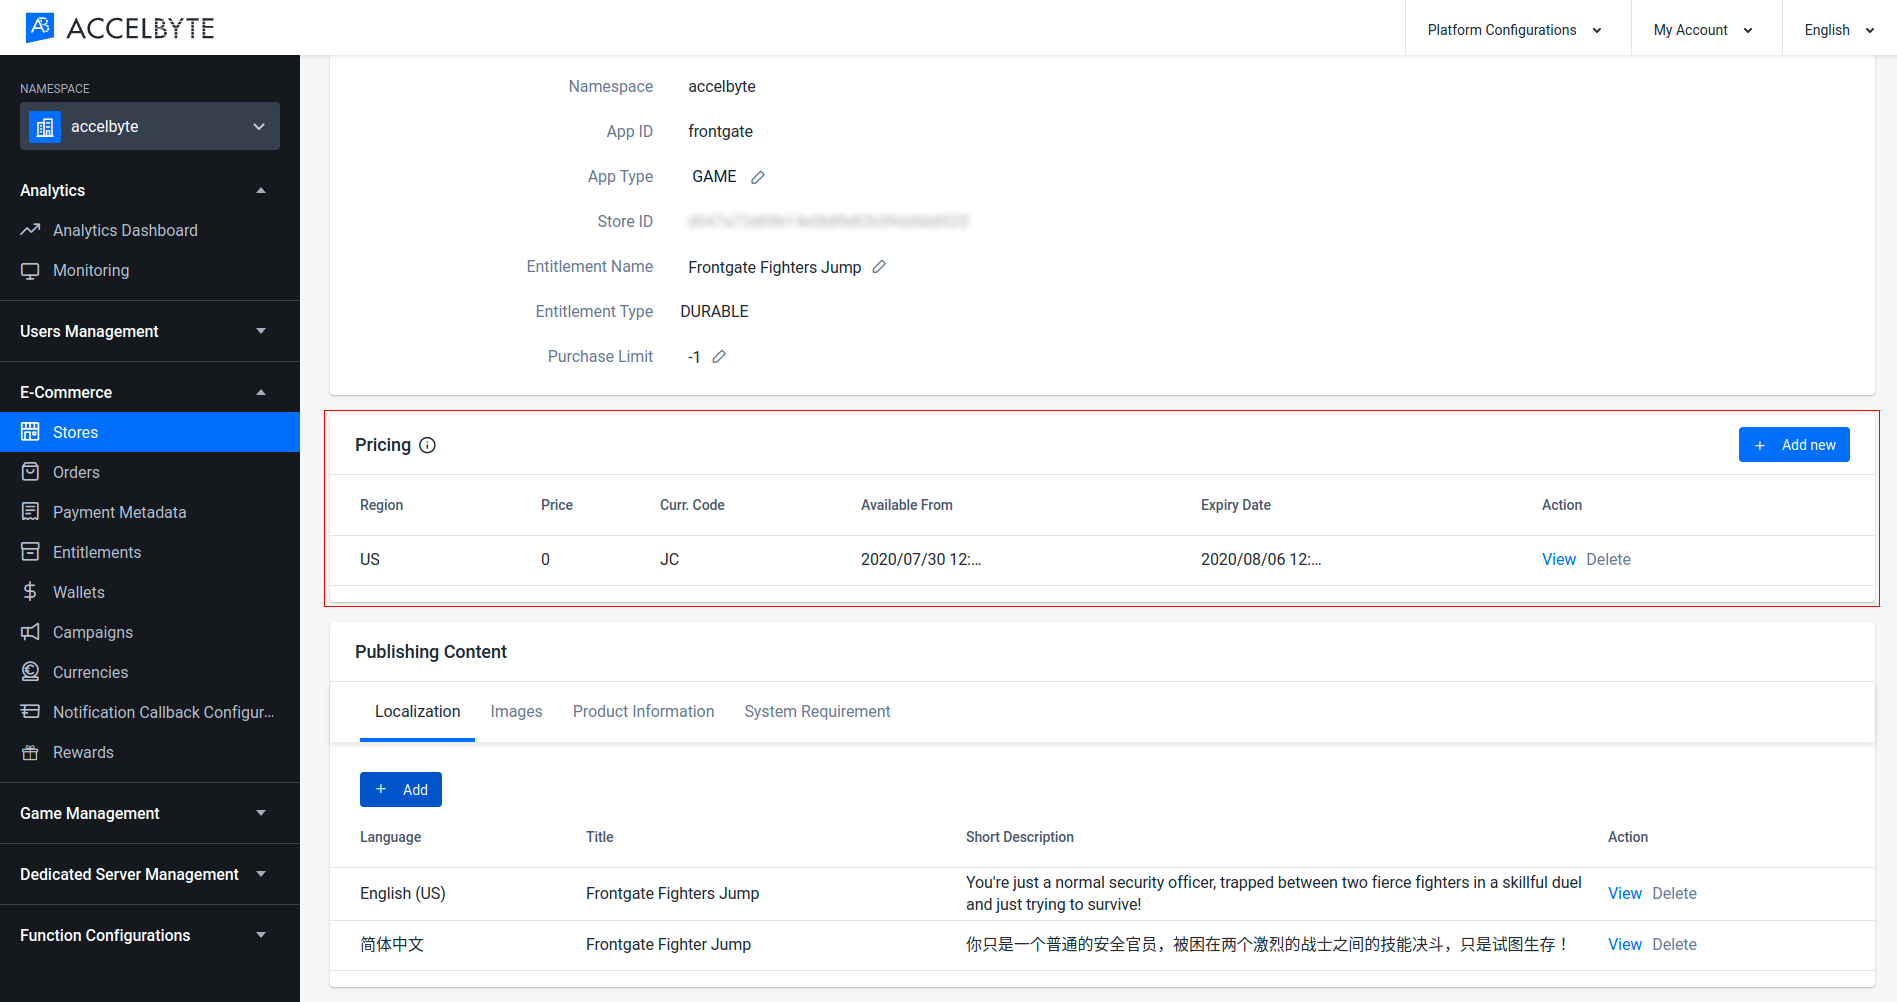
Add a Regional Price to an Item
By default, your item's price is set in the default country for your store. To add different prices for different regions, follow the steps below:
In the Admin Portal, go to your item details. In the Pricing panel, click Add New to add new pricing.

Input the following information into the Add Price window that appears:
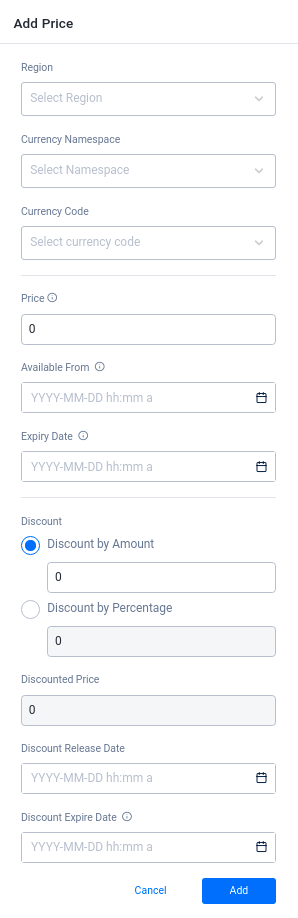
Select the Region where you want to set the regional price. If you can't find the desired region, you can edit the store to add the region to it.
Select the publisher namespace as the Currency Namespace.
Select the Currency Code from the list.
Input the Price of the item. If you are making a free item, set the price to 0. When you set a price for real currency, the last two digits are decimals.
If you want to set when the item will be available on the store, you can input the Available From field to make the item available from the desired date and time. Otherwise, the item will appear as soon as the store is published. You can also set when the item will be removed from the store on the Expiry Date field. If left empty, the item will never expire.
Set the Discount price if you want to give your item a discount. You can choose to add a discount by an amount or by a percentage.
You can also set the Discount Release Date and Discount Expire Date. Like the Available From and Expiry Date fields, these fields determine when your discount begins and ends.
When you're finished, click the Add button and the price will be updated.
Set Up the Publishing Content
Publishing content consists of the information and media used to show and describe your items, such as the item descriptions, images, and information about system specifications and requirements.
Go to the Publishing Content section. In the Localization section, click the View button to add a description of the item. You can input both a Short Description and Long Description. Each of the descriptions has their own function as you can see in the image below.
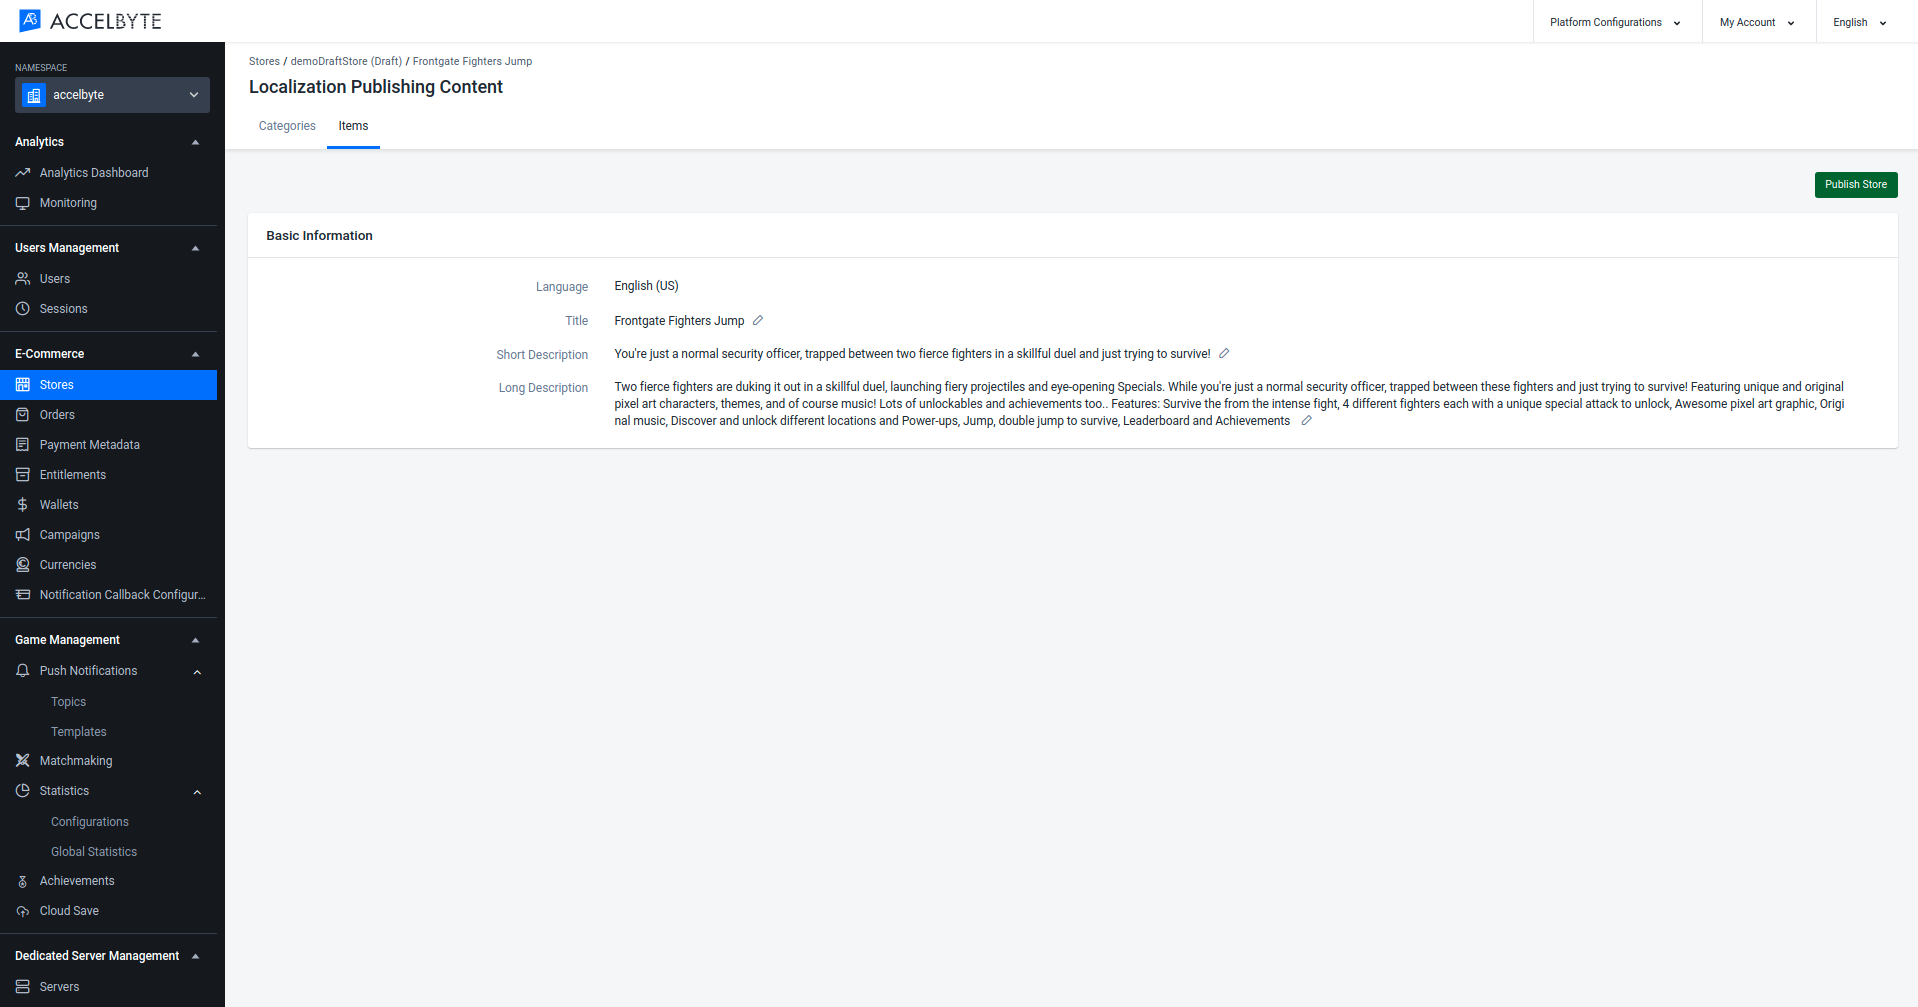
To add description in other languages, go back to the Localization section and click the Add button.

The Add Language Data form appears and you need to fill in the required fields.

- Select the Language of the description from the drop-down list
- Input the Title of the content
- Input the Short Description of the content
- Input the Long Description of the content. This is optional.
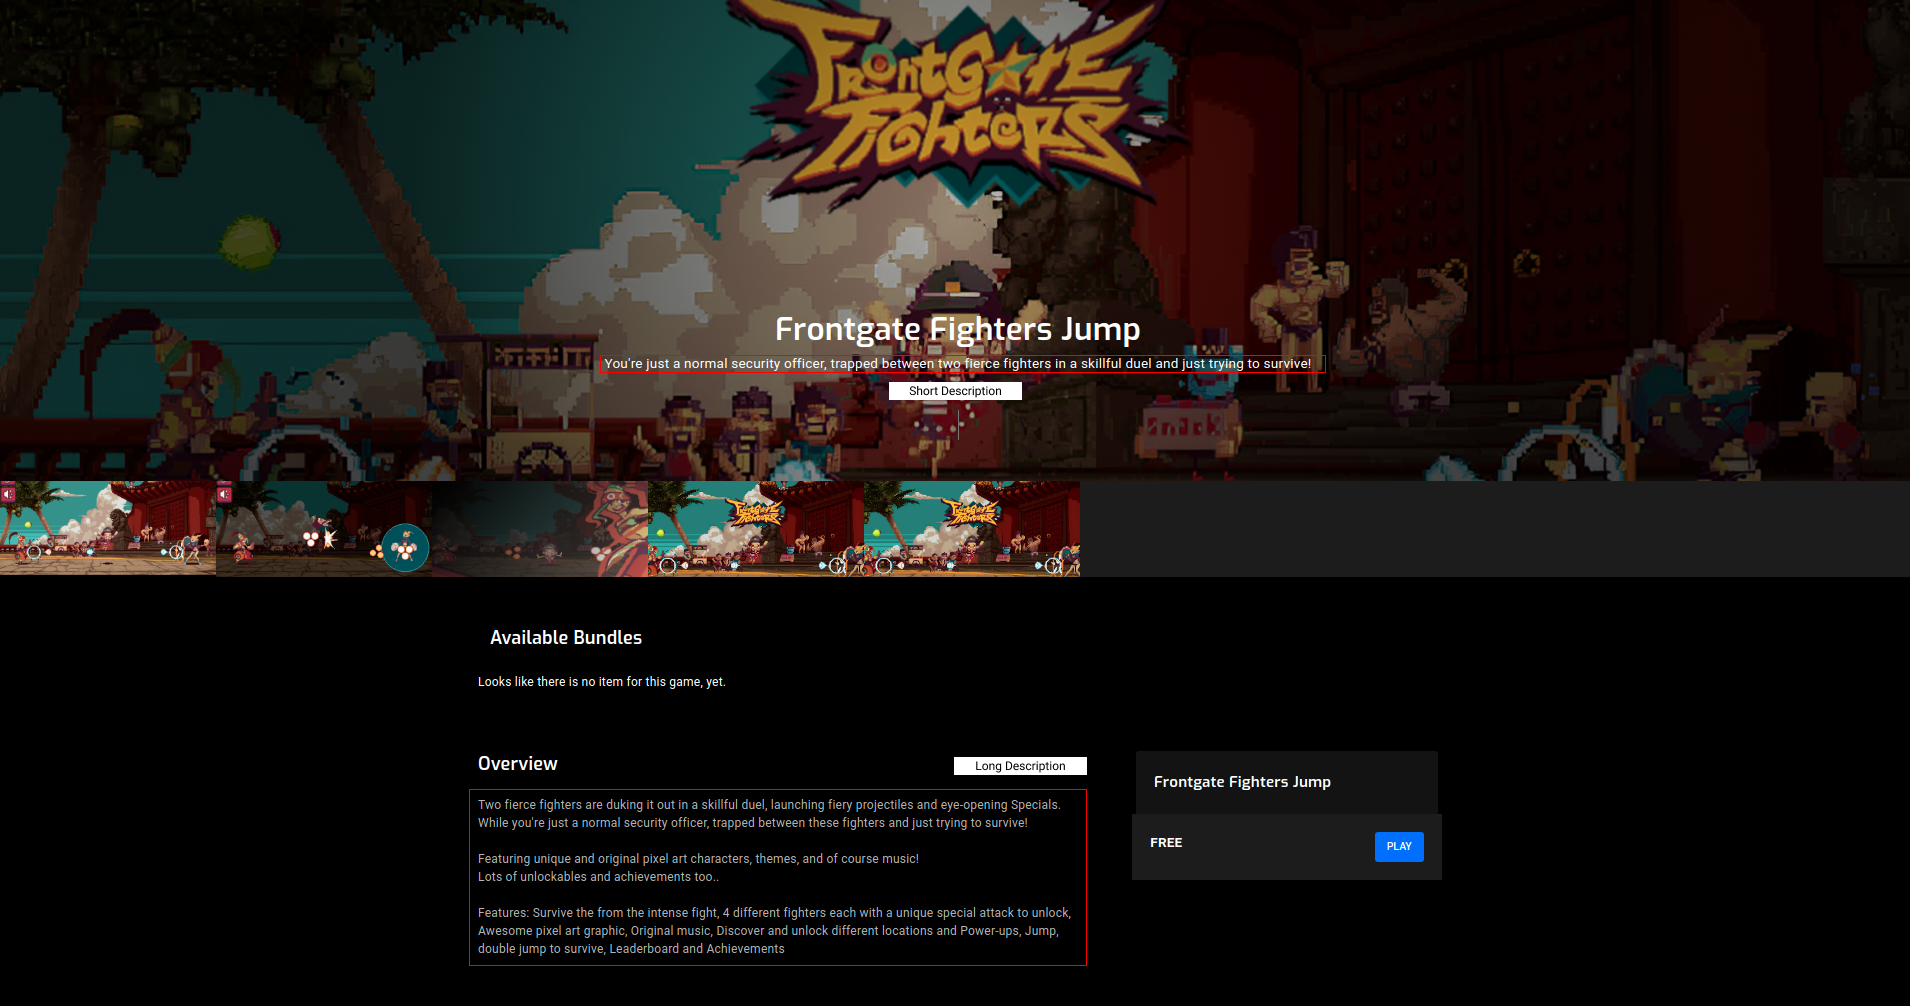
The description you added will appear on the product's detail page in the Player Portal when you select the relevant language.
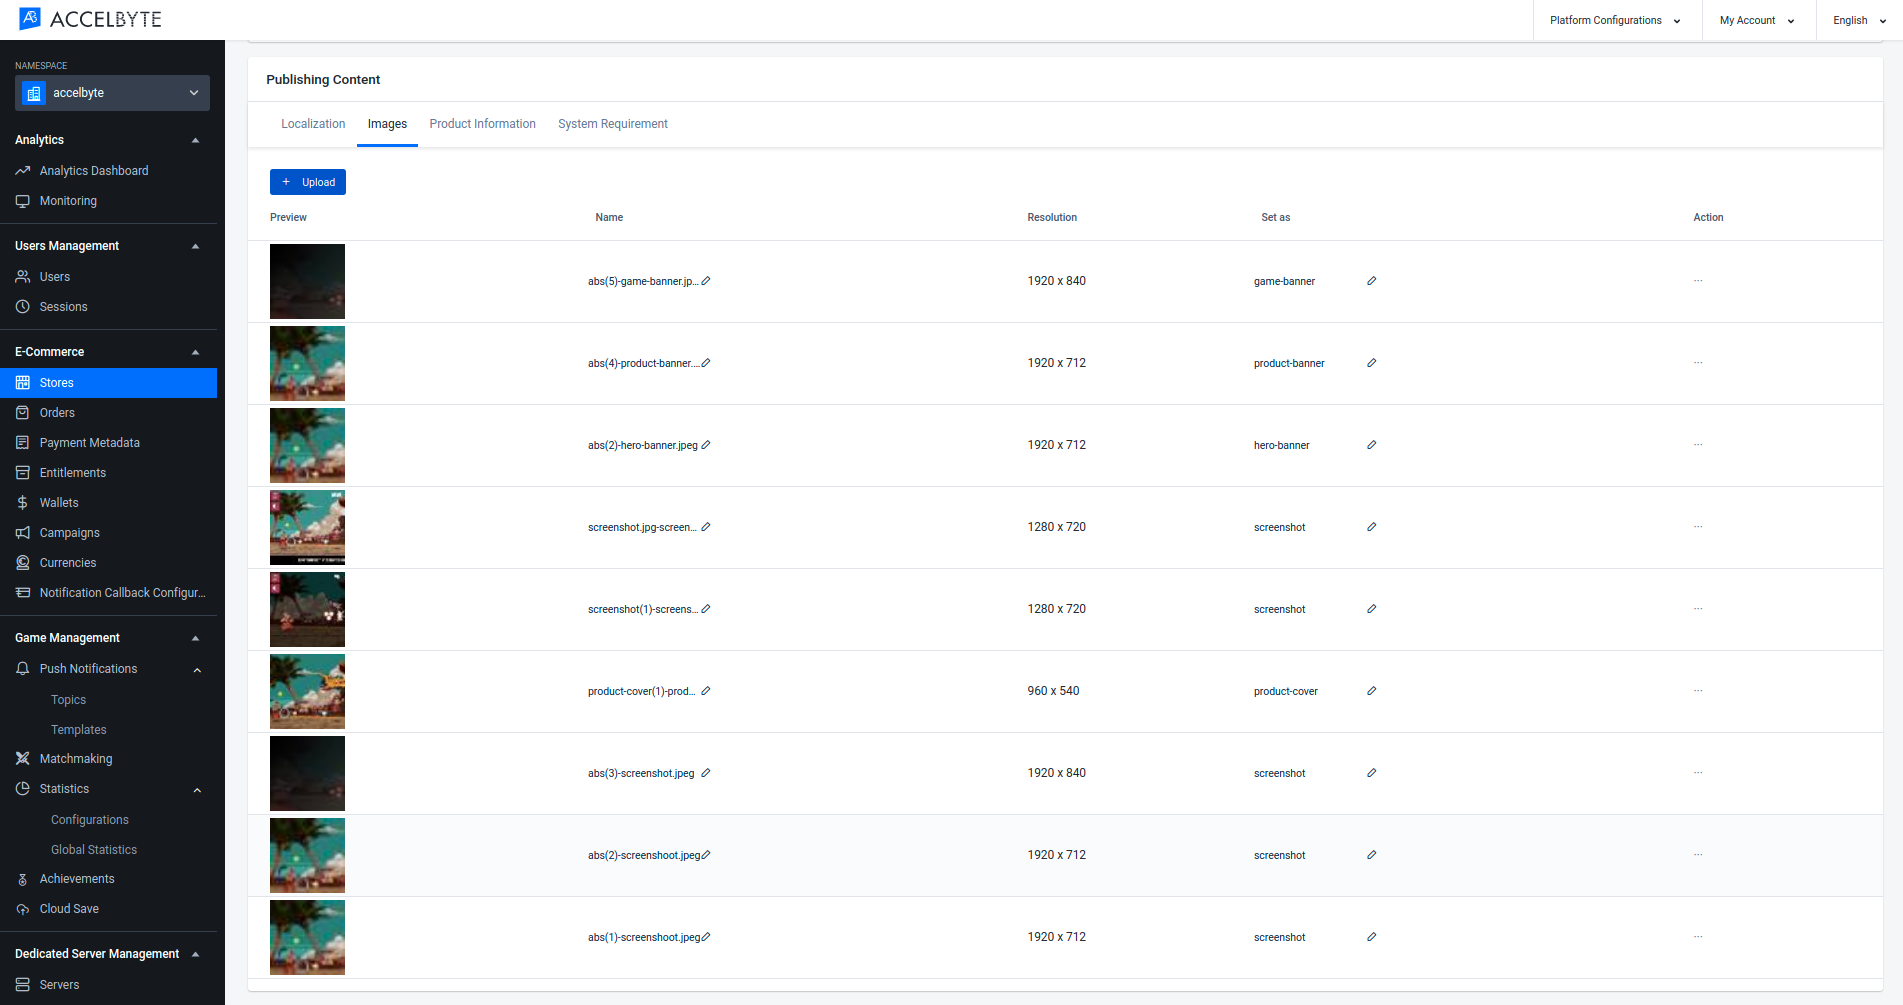
Configure Images in the Admin Portal
In the Publishing Content panel, select the Image tab.

Click the Upload button, then select the image you want to upload from your local directory. After the image is selected, you can use the image as you desire. For example, if you want to set the image as a product banner, you can fill the Set As field with product-banner.

See the table below for information about image setup in the Admin Portal. You can also configure images in Contentful.
UI/UX Module Location Tags Set Image as Tags Behavior Set Image as Behavior Recommended Image Size Hero Banner [Player Portal] Home Page- Slider Carousel banner Any product with Banner tags will be shown as the Product Banner and Hero Banner hero-banner Note: The image for the hero banner can also be set from Contentful 16:6 ratio with recommended width: 1920px Featured Item Thumbnail [Player Portal] Home Page- Product under the carousel featured Any product with the Featured tag will be shown on Featured Games product-cover The image will be used as the product thumbnail 4:3 ratio with recommended width: 800px Game Icon Launcher - Sidebar n/a n/a game-icon The image will be used as the icon for the game in Launcher 1:1 ratio with recommended resolution: 256 x 256px Game Logo Launcher- Game Logo n/a n/a game-logo The image will be used as the logo for the game in Launcher Recommended width 180px Game Download Cover Launcher - Game Download Pop Up Box n/a n/a game-download-cover The image will appear when the player is downloading the game in Launcher 300 x 100px Other unset This is an error that occurs when the image is unable to be saved. If this occurs, try to upload your image again. You can add as many images as you need. When you're done adding an image it will appear in the Publishing Content window, as seen below:
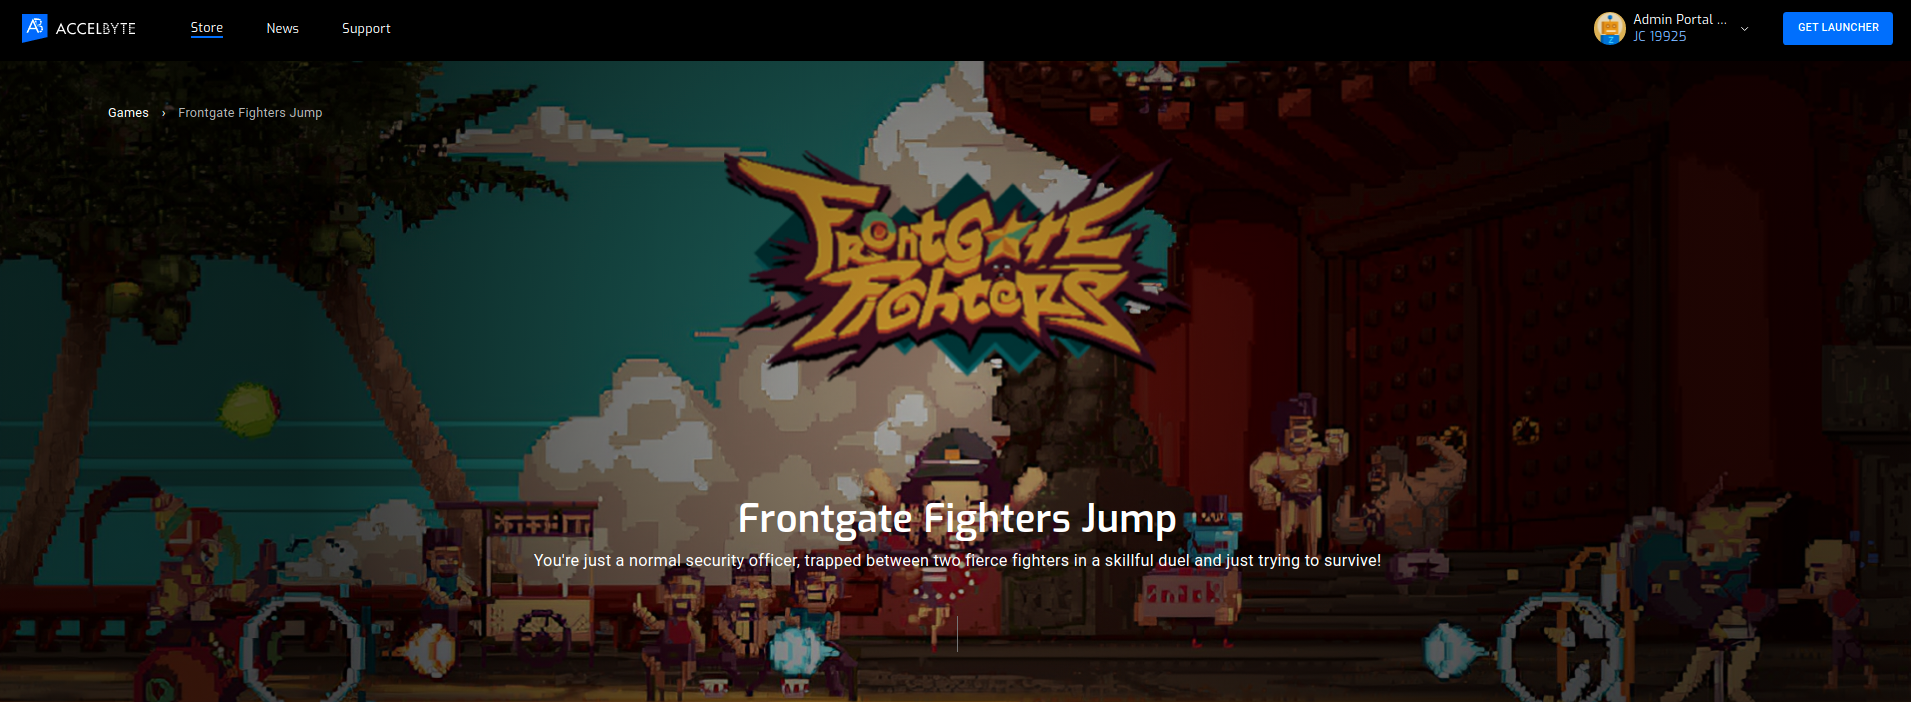
Here is an example of a hero banner in the Player Portal:
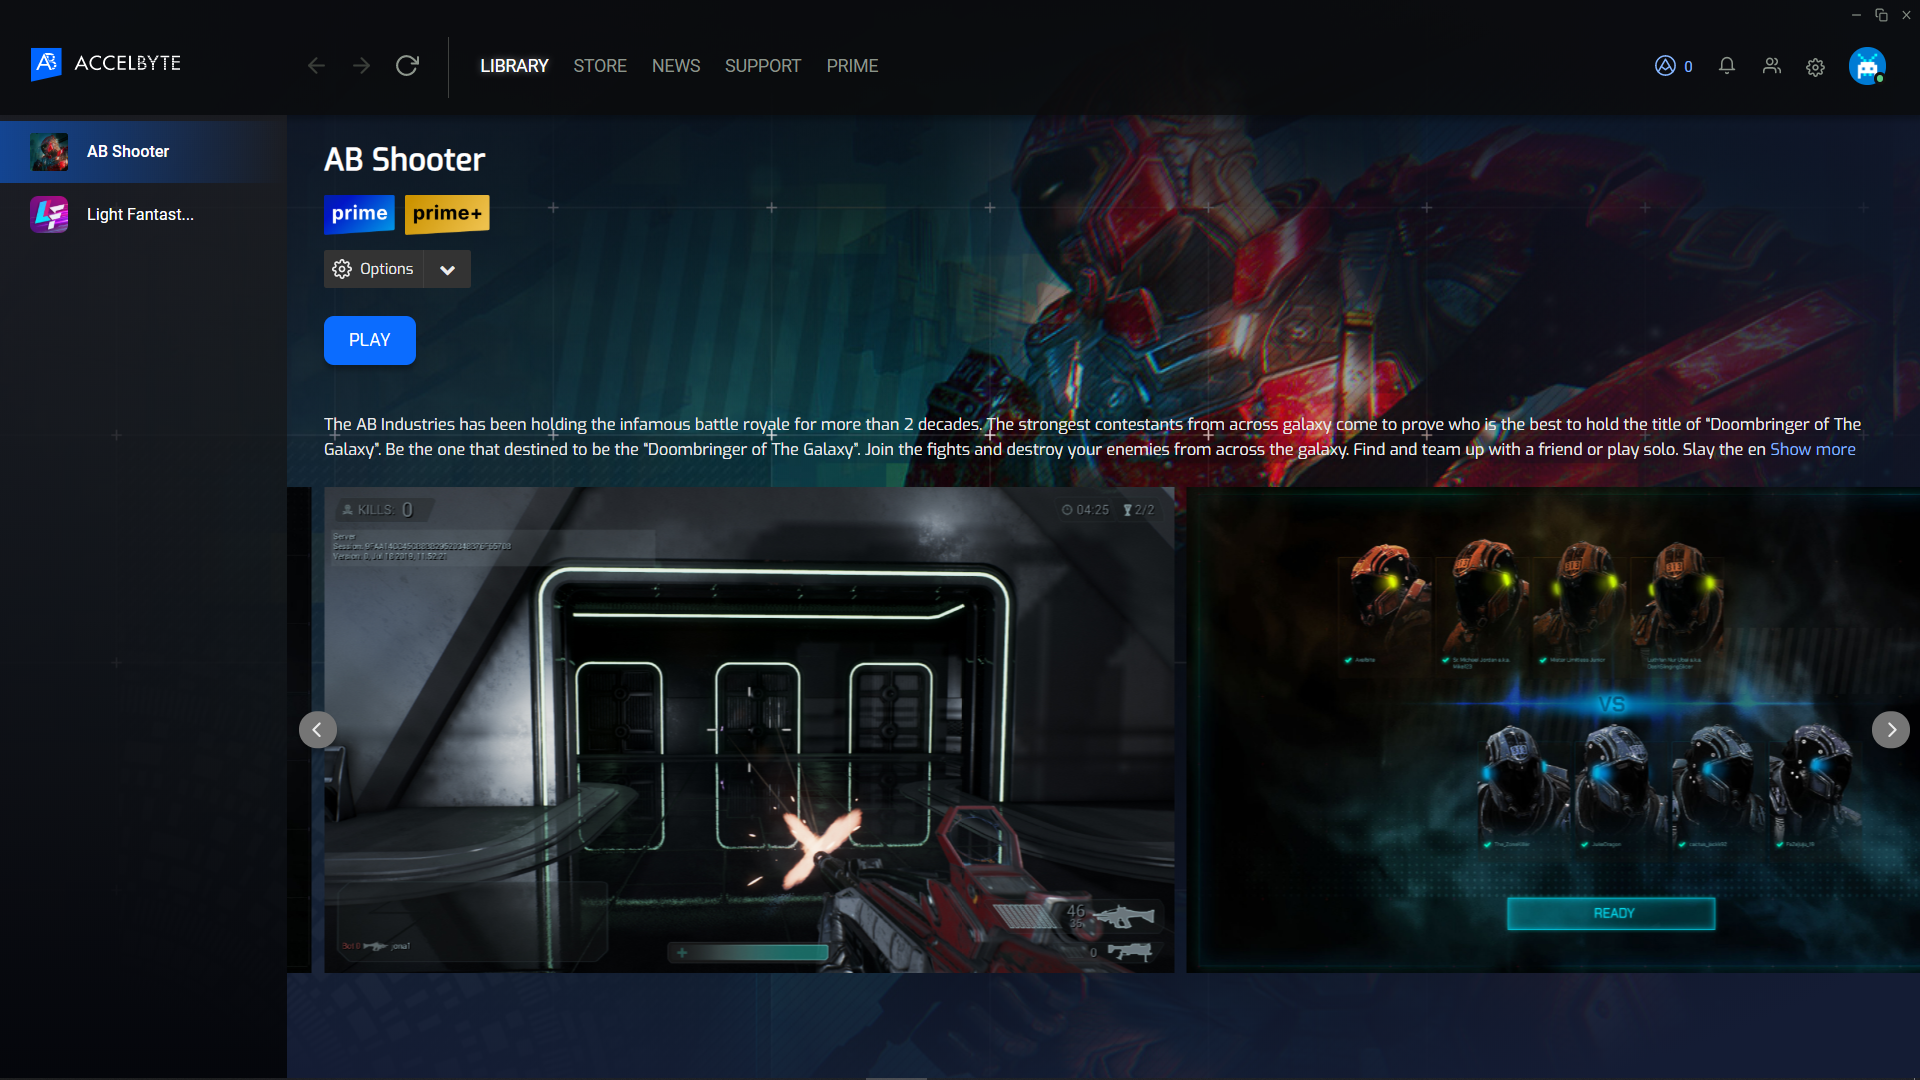
Here is an example of Game Logo, Game Icon, and Game Download Cover in the launcher.
Add Product Information
In the Publishing Content panel, select the Product Information tab.
Fill out the Product Information fields:
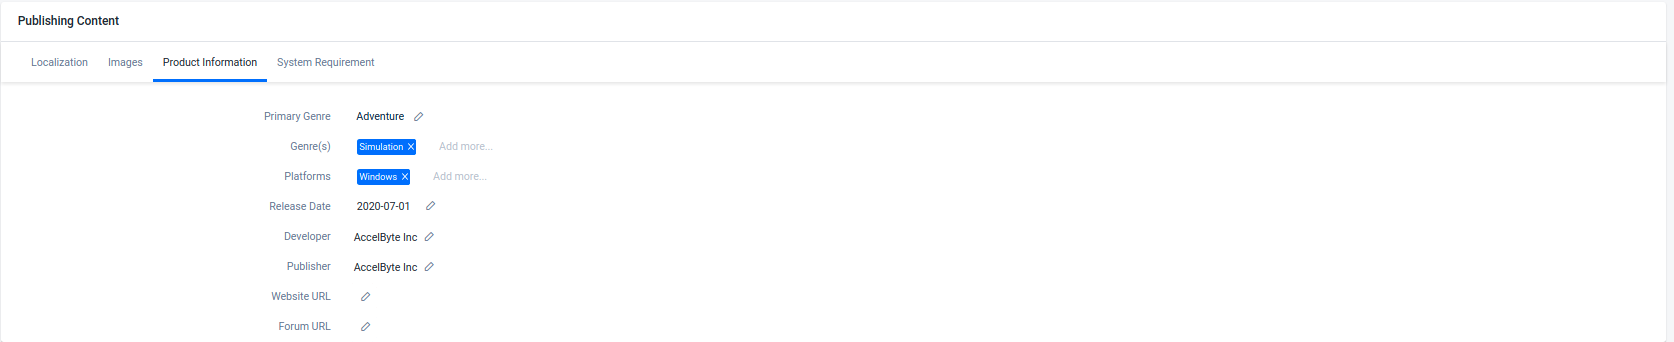
- Select the Primary Genre of your game.
- Select any additional genres in the Genre field, if desired. You can input more than one genre.
- Choose the Platforms supported by your game.
- Input the Release Date of your game.
- Input the Developer of your game.
- Input the Publisher of your game.
- Input the Website URL.
- Input the Forum URL.
Here's an example of product information listed in the Player Portal.

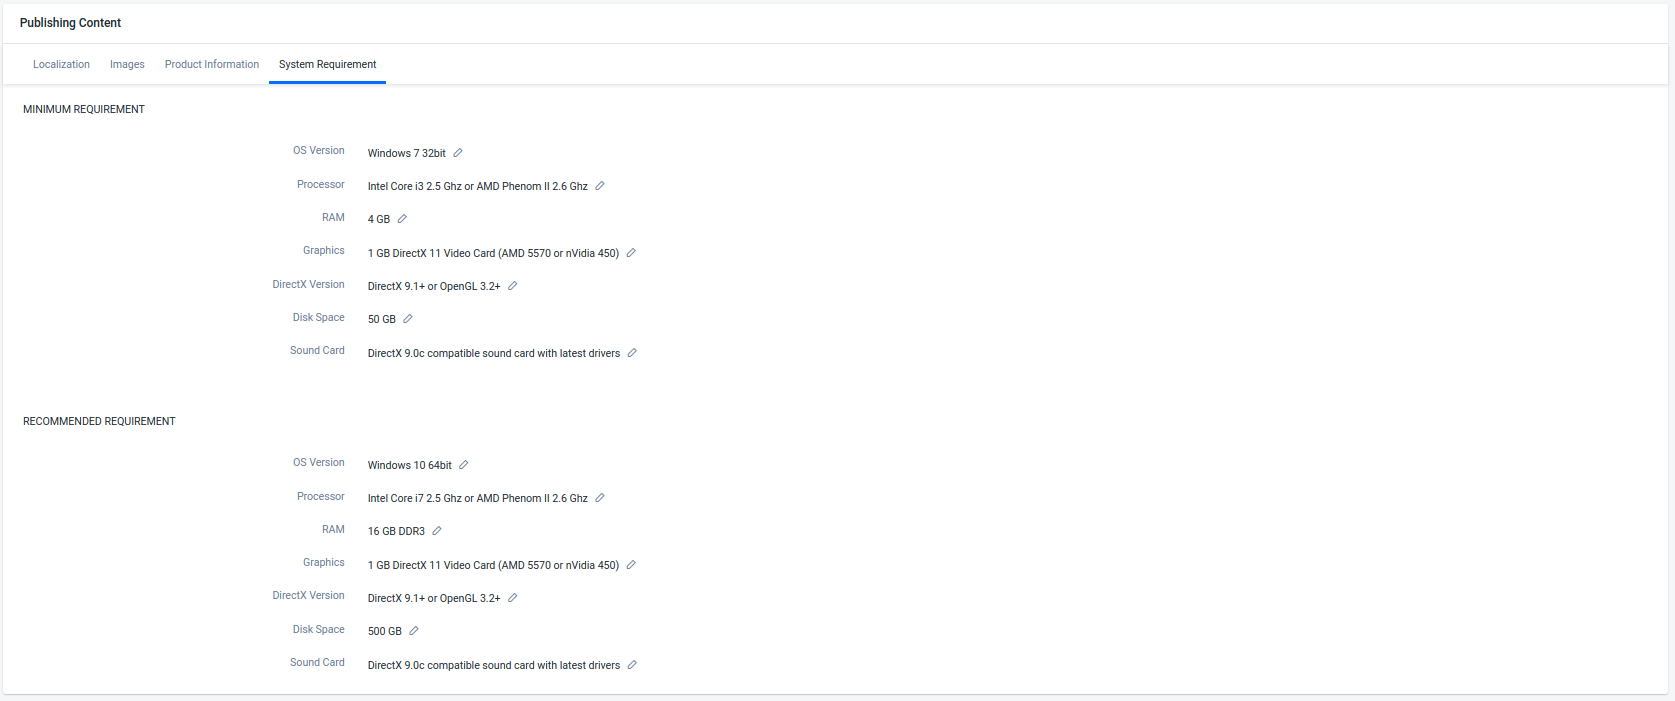
Add System Requirements
In the Publishing Content panel, select the System Requirement tab.
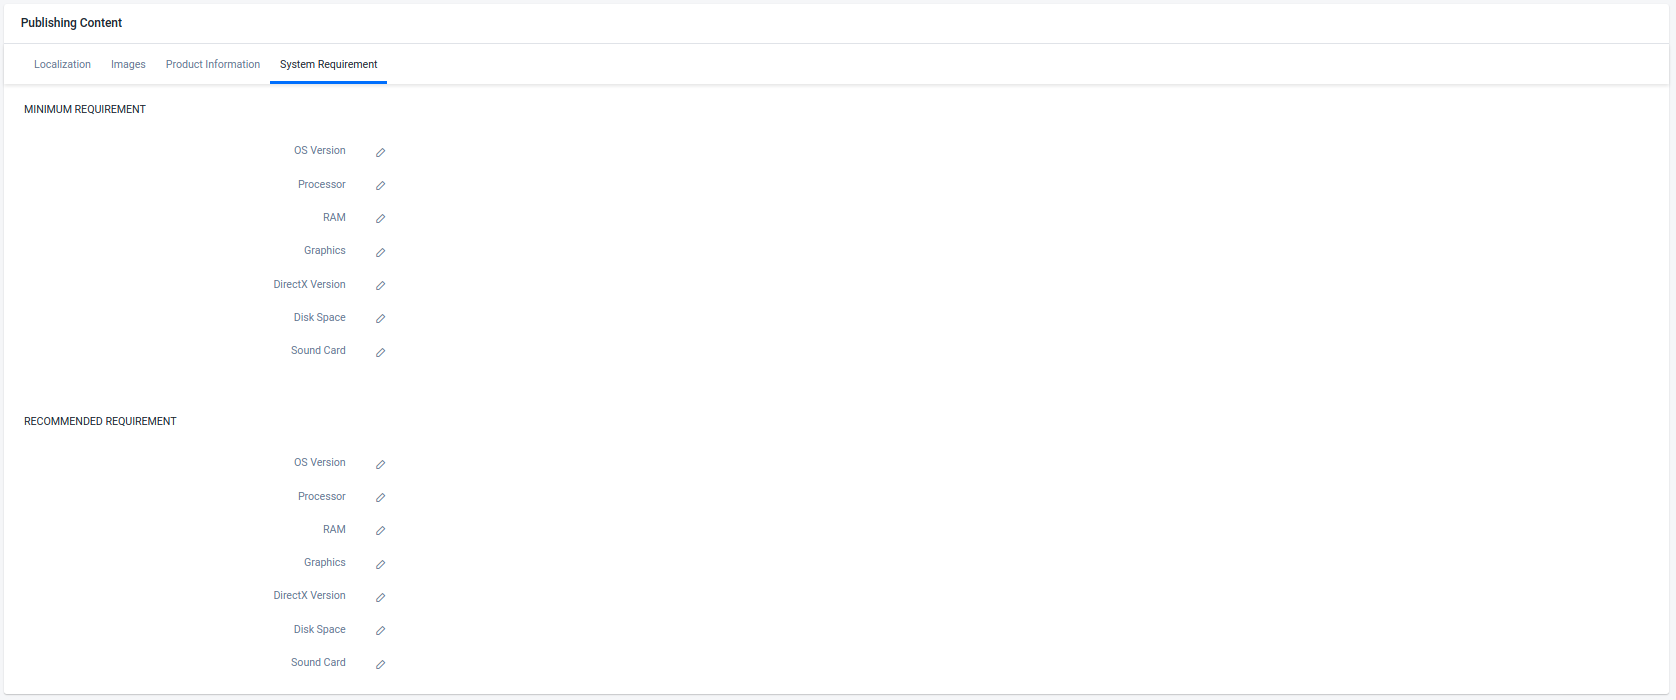
Fill out the Minimum Requirement fields.

- Input the minimum supported OS Version.
- Input the minimum supported Processor.
- Input the minimum supported amount of RAM.
- Input the minimum support Graphics card.
- Input the supported DirectX Version.
- Input the minimum required amount of Disk Space.
- Input the minimum supported Sound Card.
Fill out the Recommended Requirement fields.

- Input the recommended OS Version.
- Input the recommended Processor.
- Input the recommended amount of RAM.
- Input the recommended Graphics card.
- Input the recommended DirectX Version.
- Input the recommended amount of Disk Space.
- Input the recommended Sound Card.
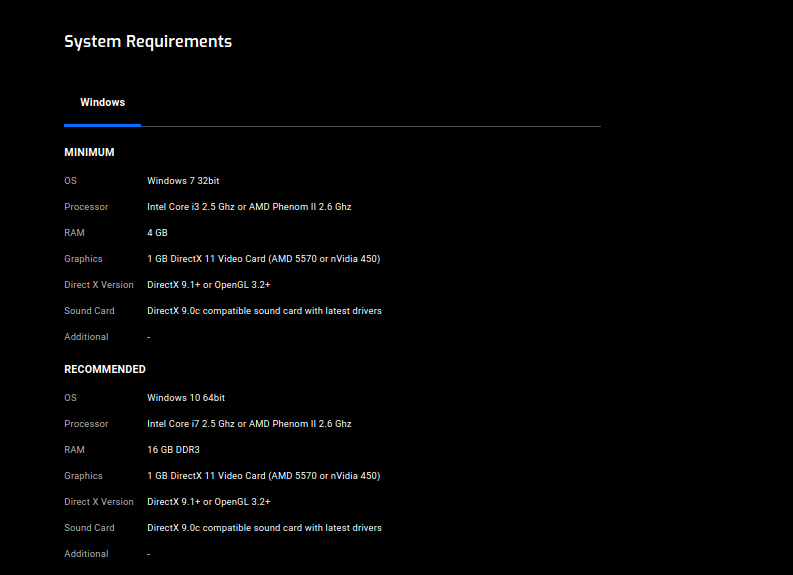
Here is an example of system requirements in the Player Portal.
Manage Subscription Content
TIP
See our Cloud Subscriptions documentation for more information on subscriptions and how to use them.
Add Subscription Content
You can add your games to the subscription plan by following the steps below. Make sure you've created a subscription plan and added a game to your store.
In the Admin Portal, go to your newly created Subscription Item and switch to the Subscription Contents tab. Then, click the Add New button to add an Item to the Subscription.
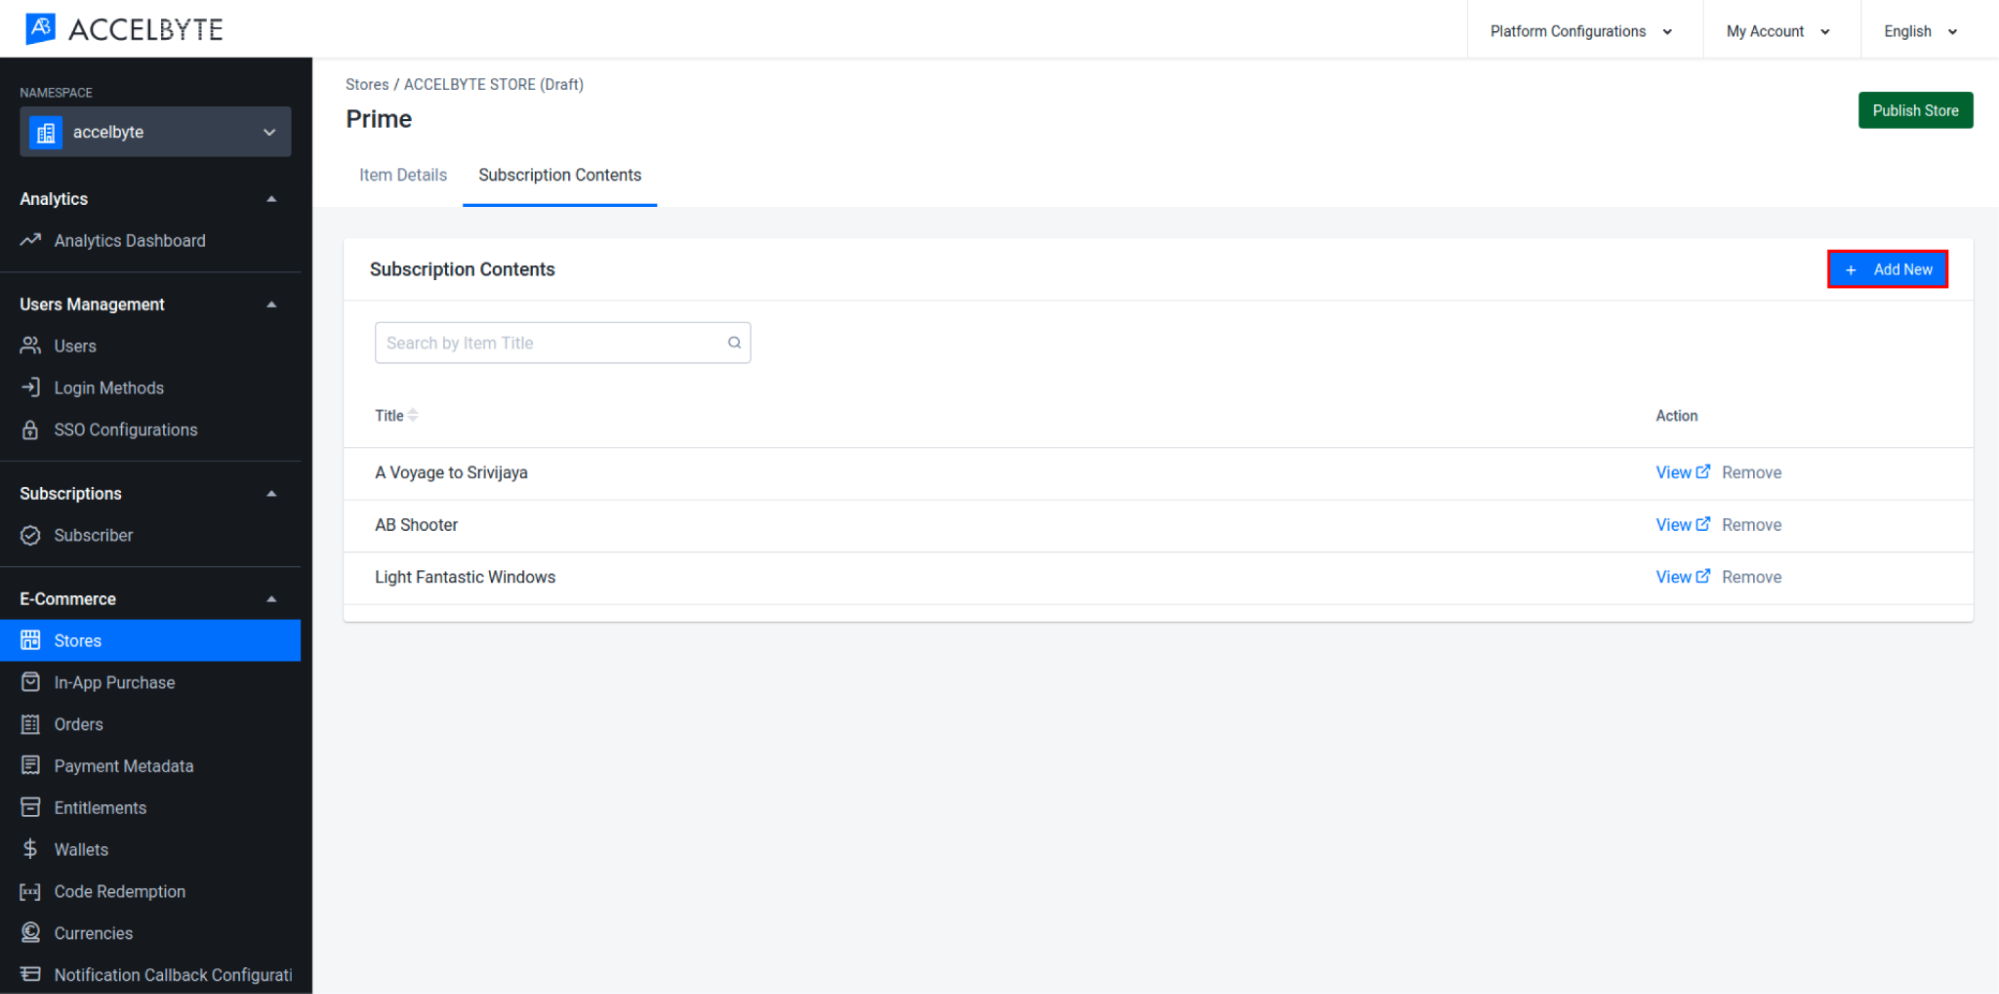
A modal appears. Here you can select the Item you want to add.

When you're done, click Add and the item will be added to the subscription content list.
You can also remove an item from the subscription plan, but be aware that this will make current players lose access to the item.

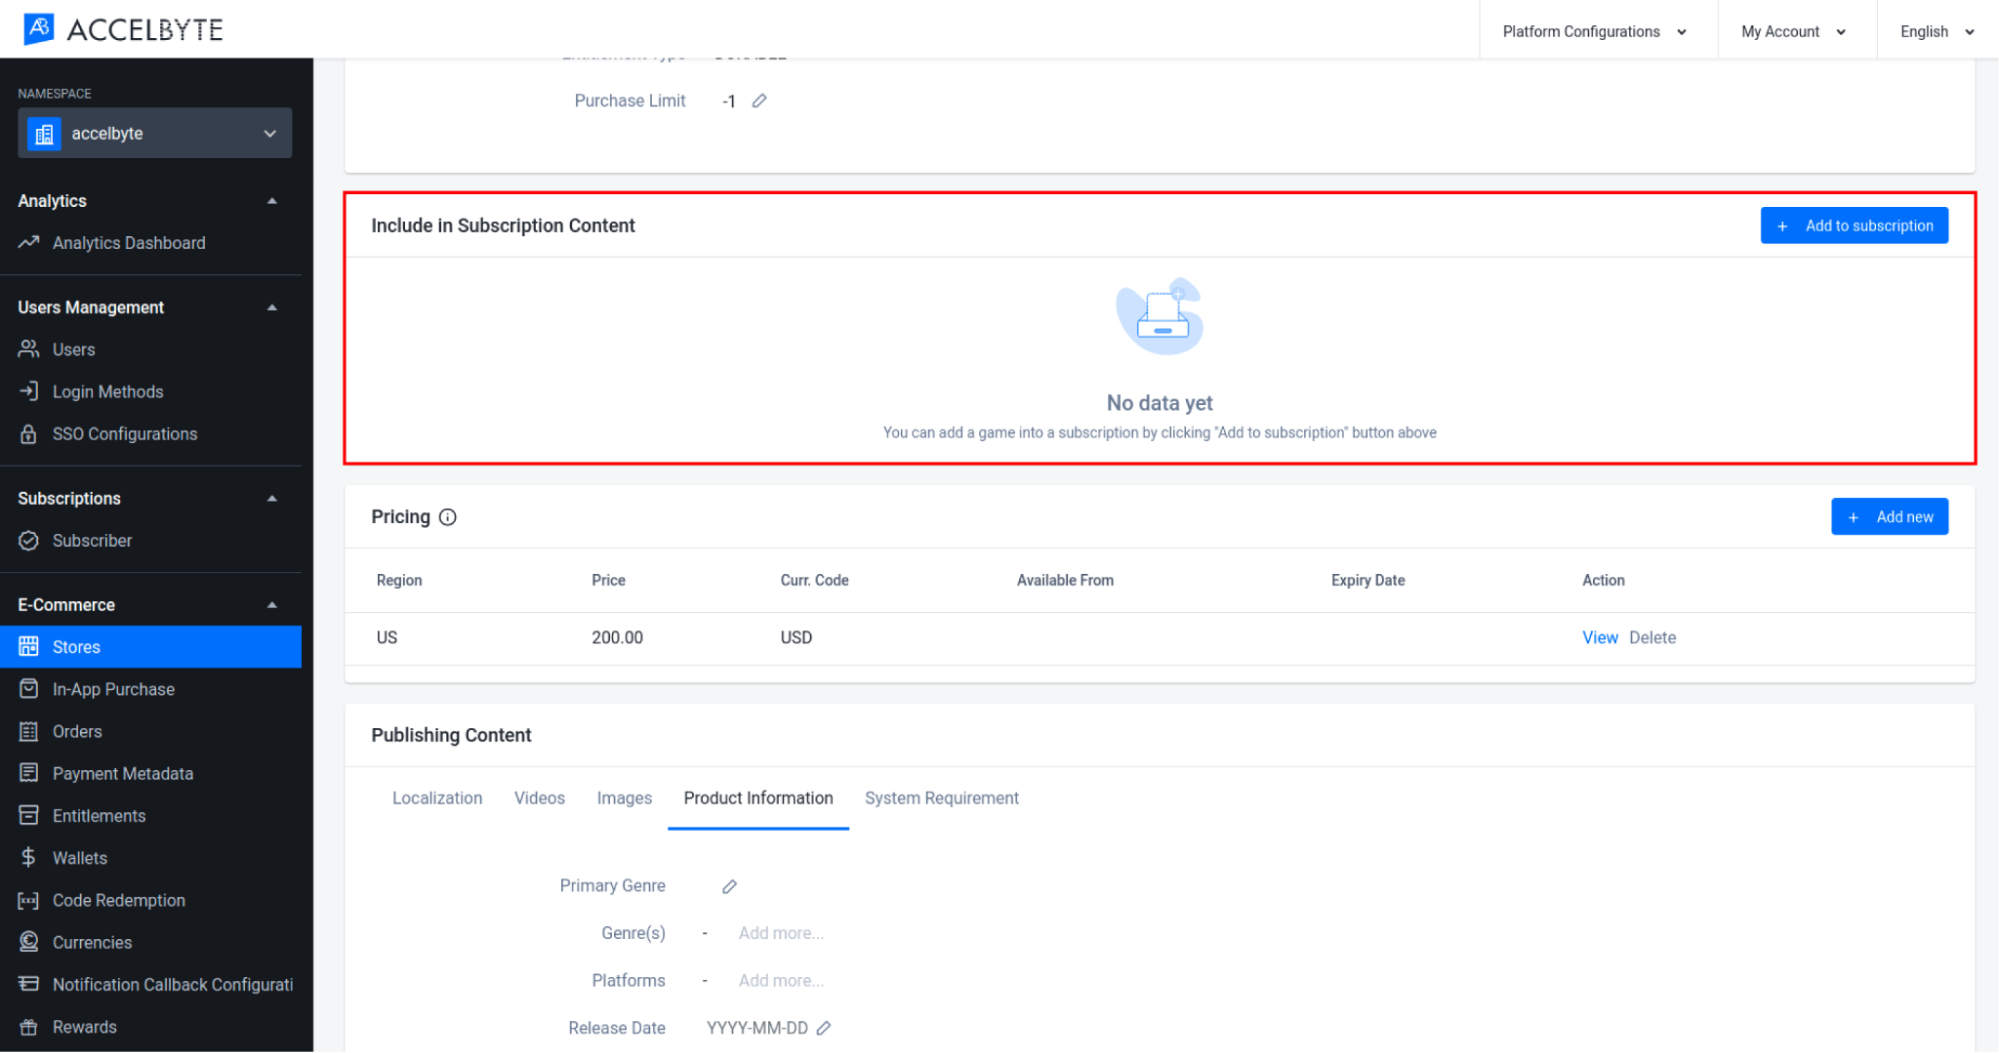
Add Item into Subscription Plan
Besides adding items in the Subscription Content, you can also add a game into Subscription Plan via item details. Make sure you have created a subscription item.
Choose the game from your store and click View to open the item details.
Go to Include in the Subscription Content section and click the Add to Subscription button.
A pop-up appears and you need to choose the subscription plan where you want to add the game to.

Once you've done, click Add and the game will be added to the chosen subscription plan.
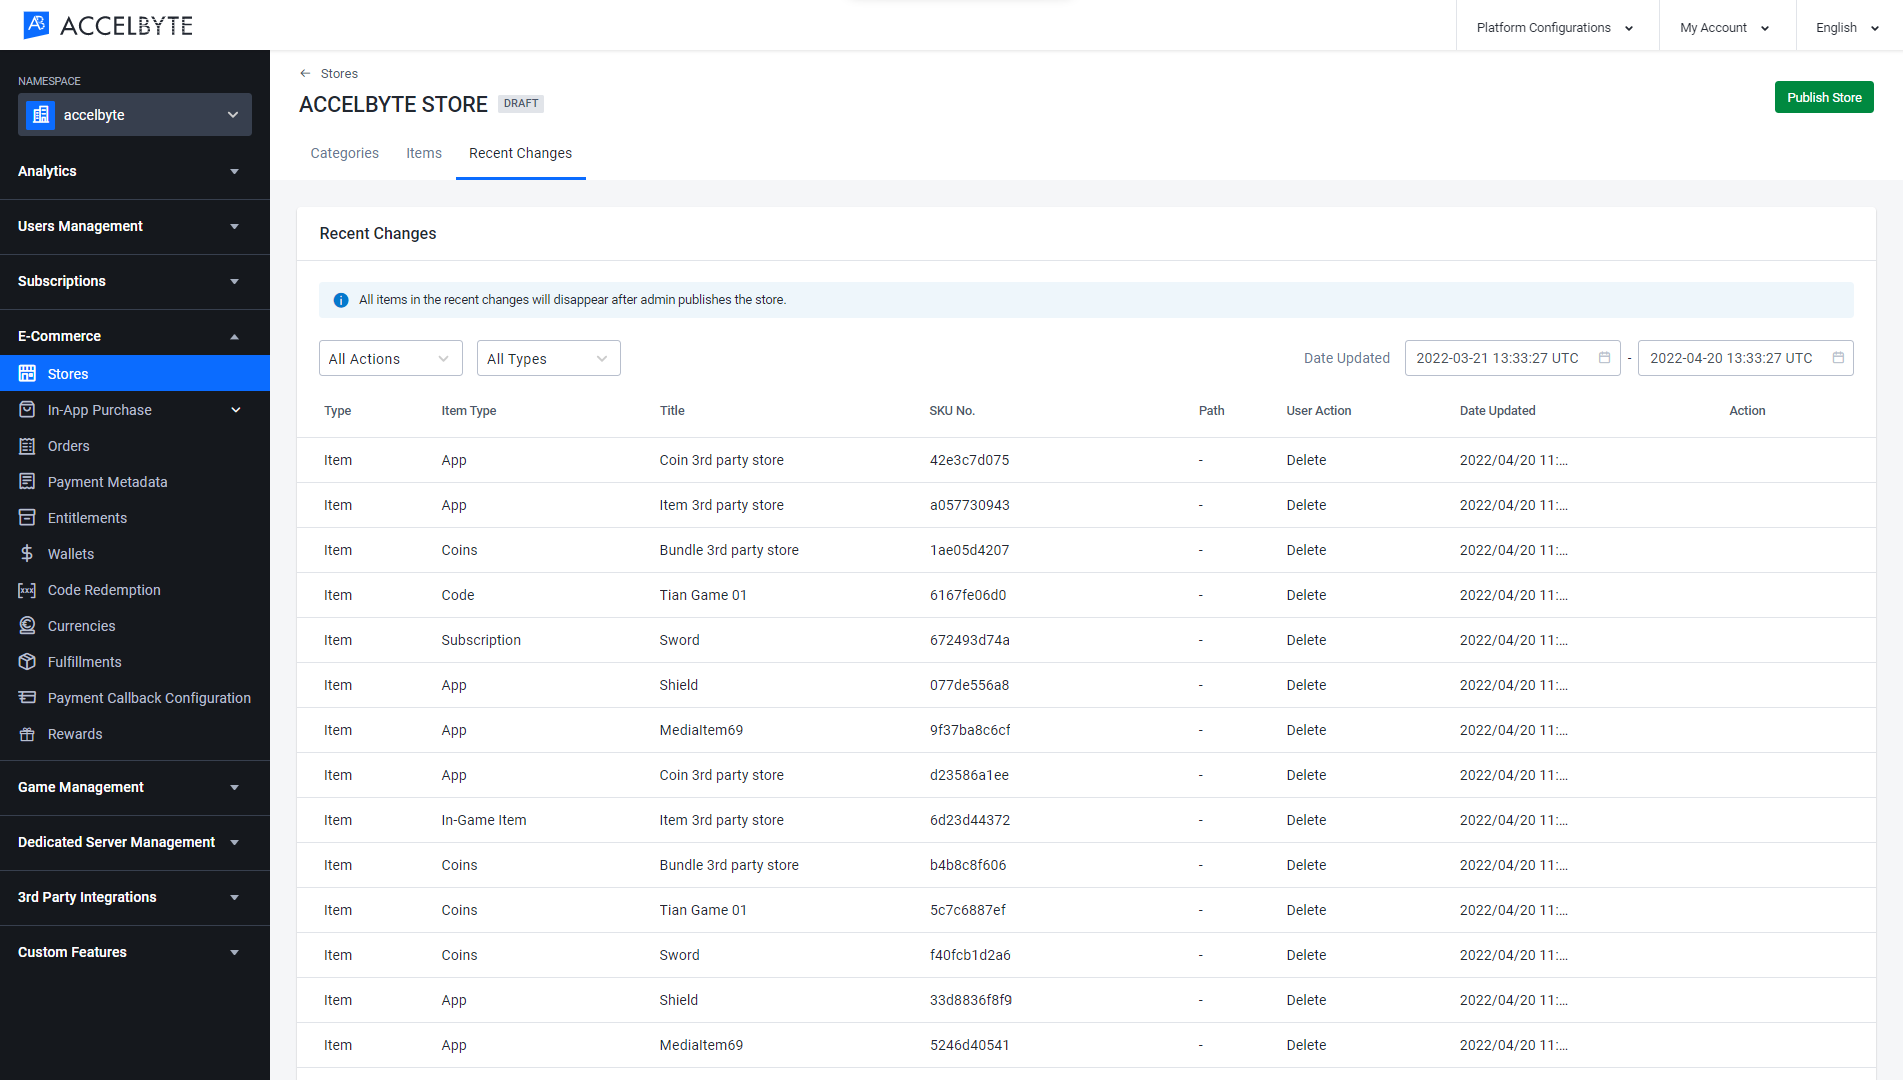
Recent Changes
To see your recent changes, open the Admin Portal, go to your draft store, and open the Recent Changes tab. In this tab, you can see all the changes made in your draft store before publishing. Every time your draft store is published, the changes list will be wiped, and then refreshed if any subsequent changes are made.
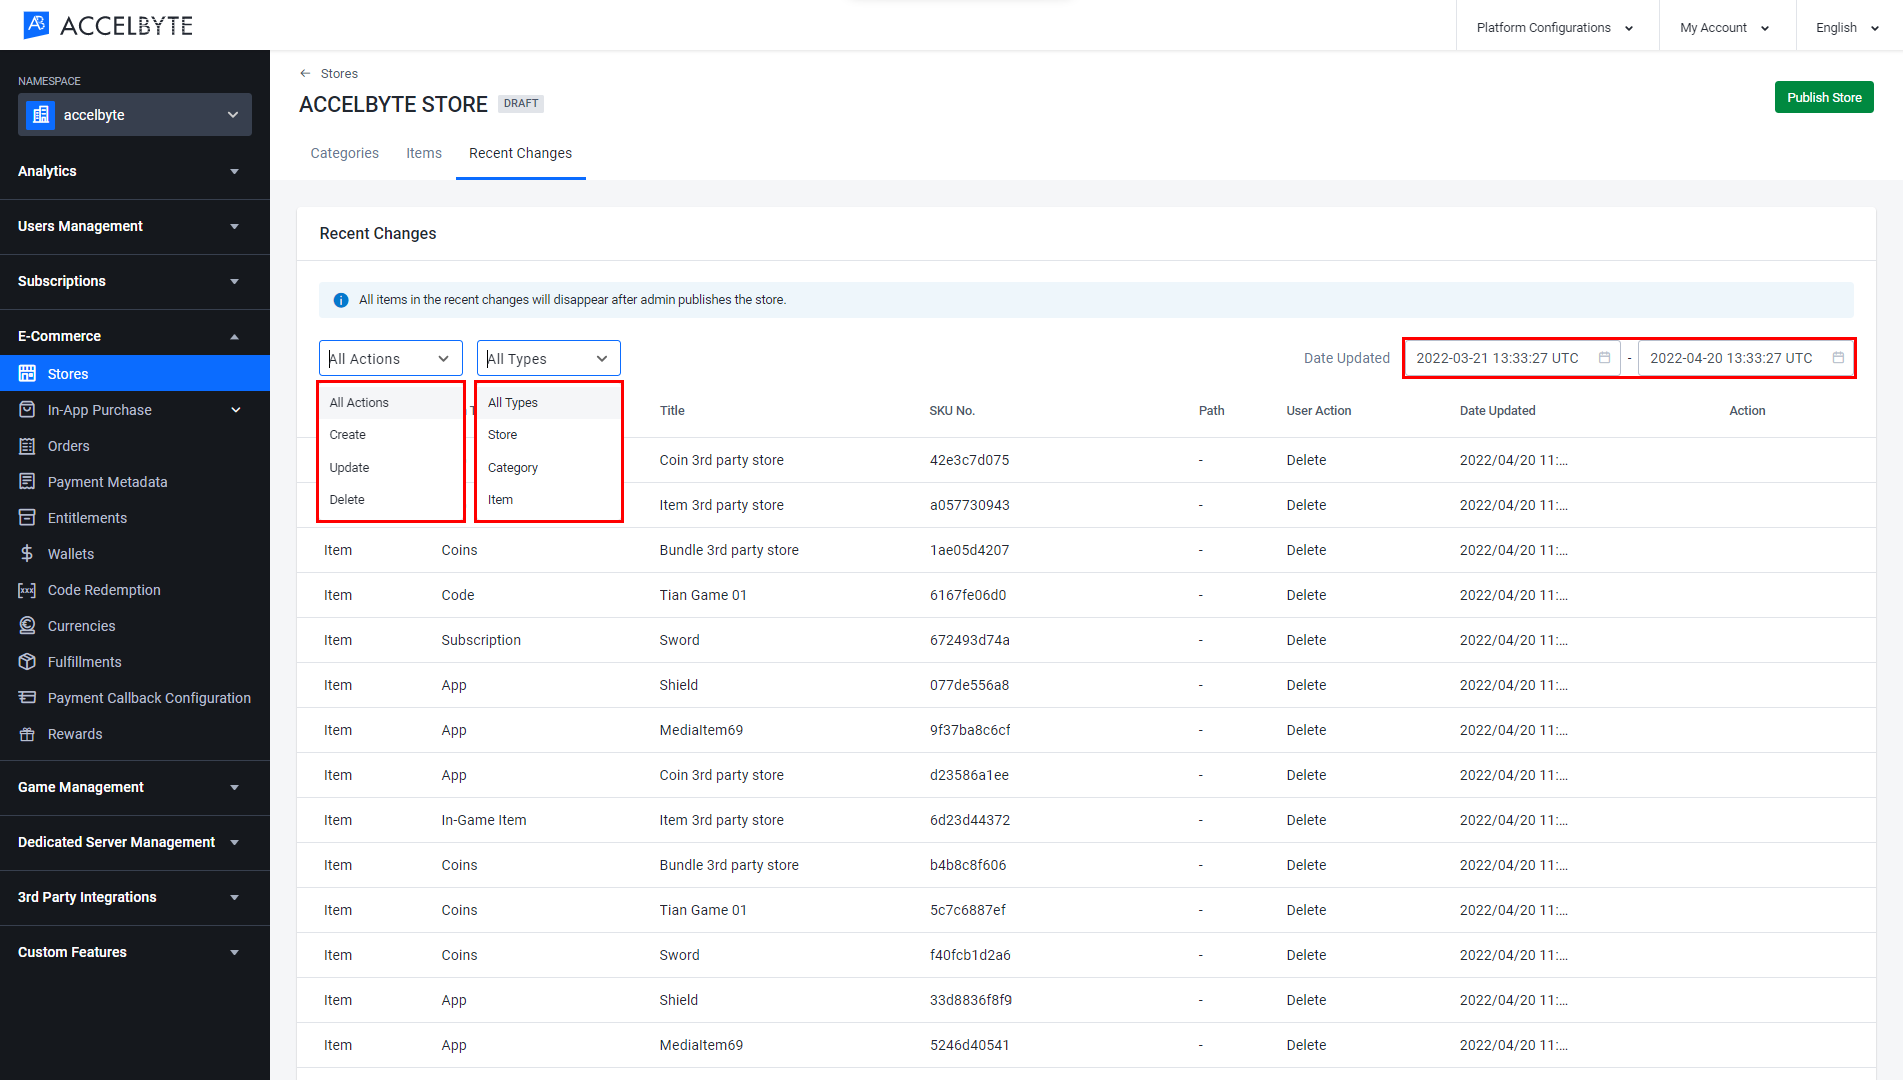
You can filter the Recent Changes list by:
- Action: list changes by All actions, or by Create, Update, or Delete actions.
- Type: list changes by All types, or by Store, Category, or Item.
- Date: the date filter can be set to a maximum range of one month.
Publish a Store
Select the Store you want to publish. Click the Action field then choose Publish.

Confirm that you are ready to publish your store by typing PUBLISH in the field. Your store is now published.
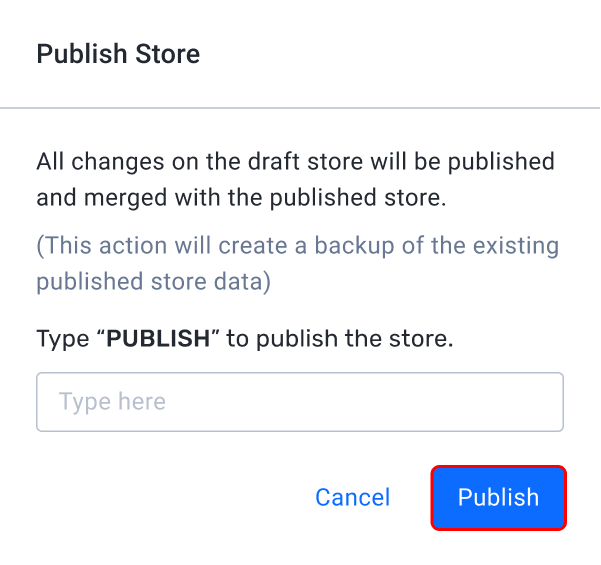
After you publish the draft store, the draft store will still exist as a draft. This will allow you to make further changes later without affecting the published store.

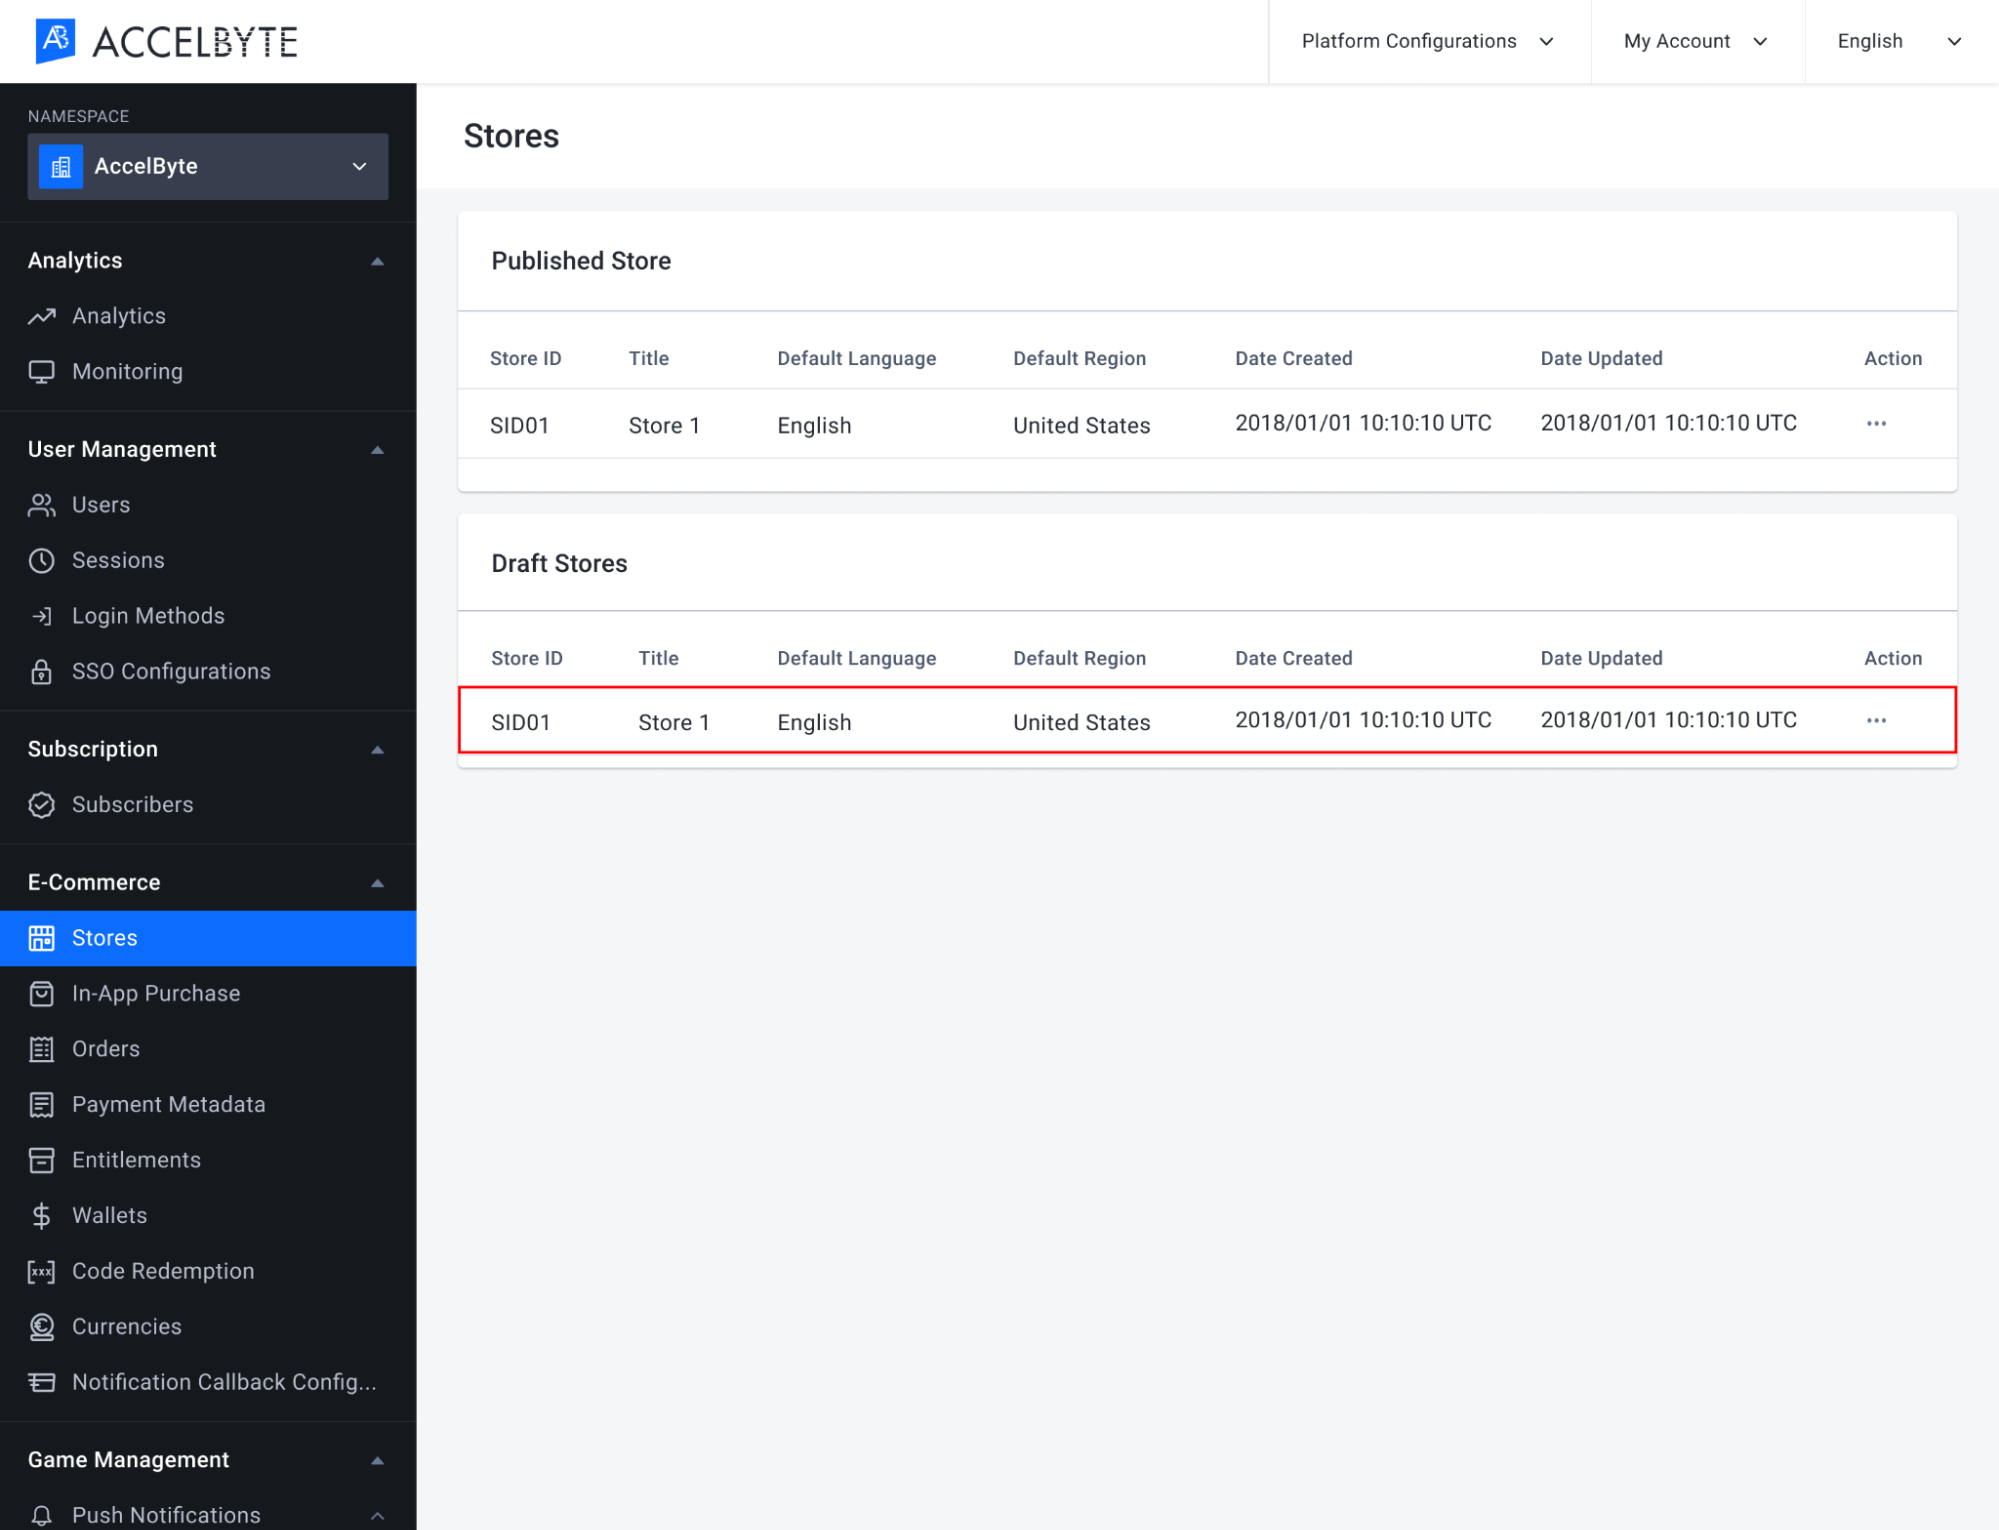
Clone a Store
You can clone the published store to be edited, by following the steps below.
Select the Store you want to clone. In the Action column, click Clone to Draft.
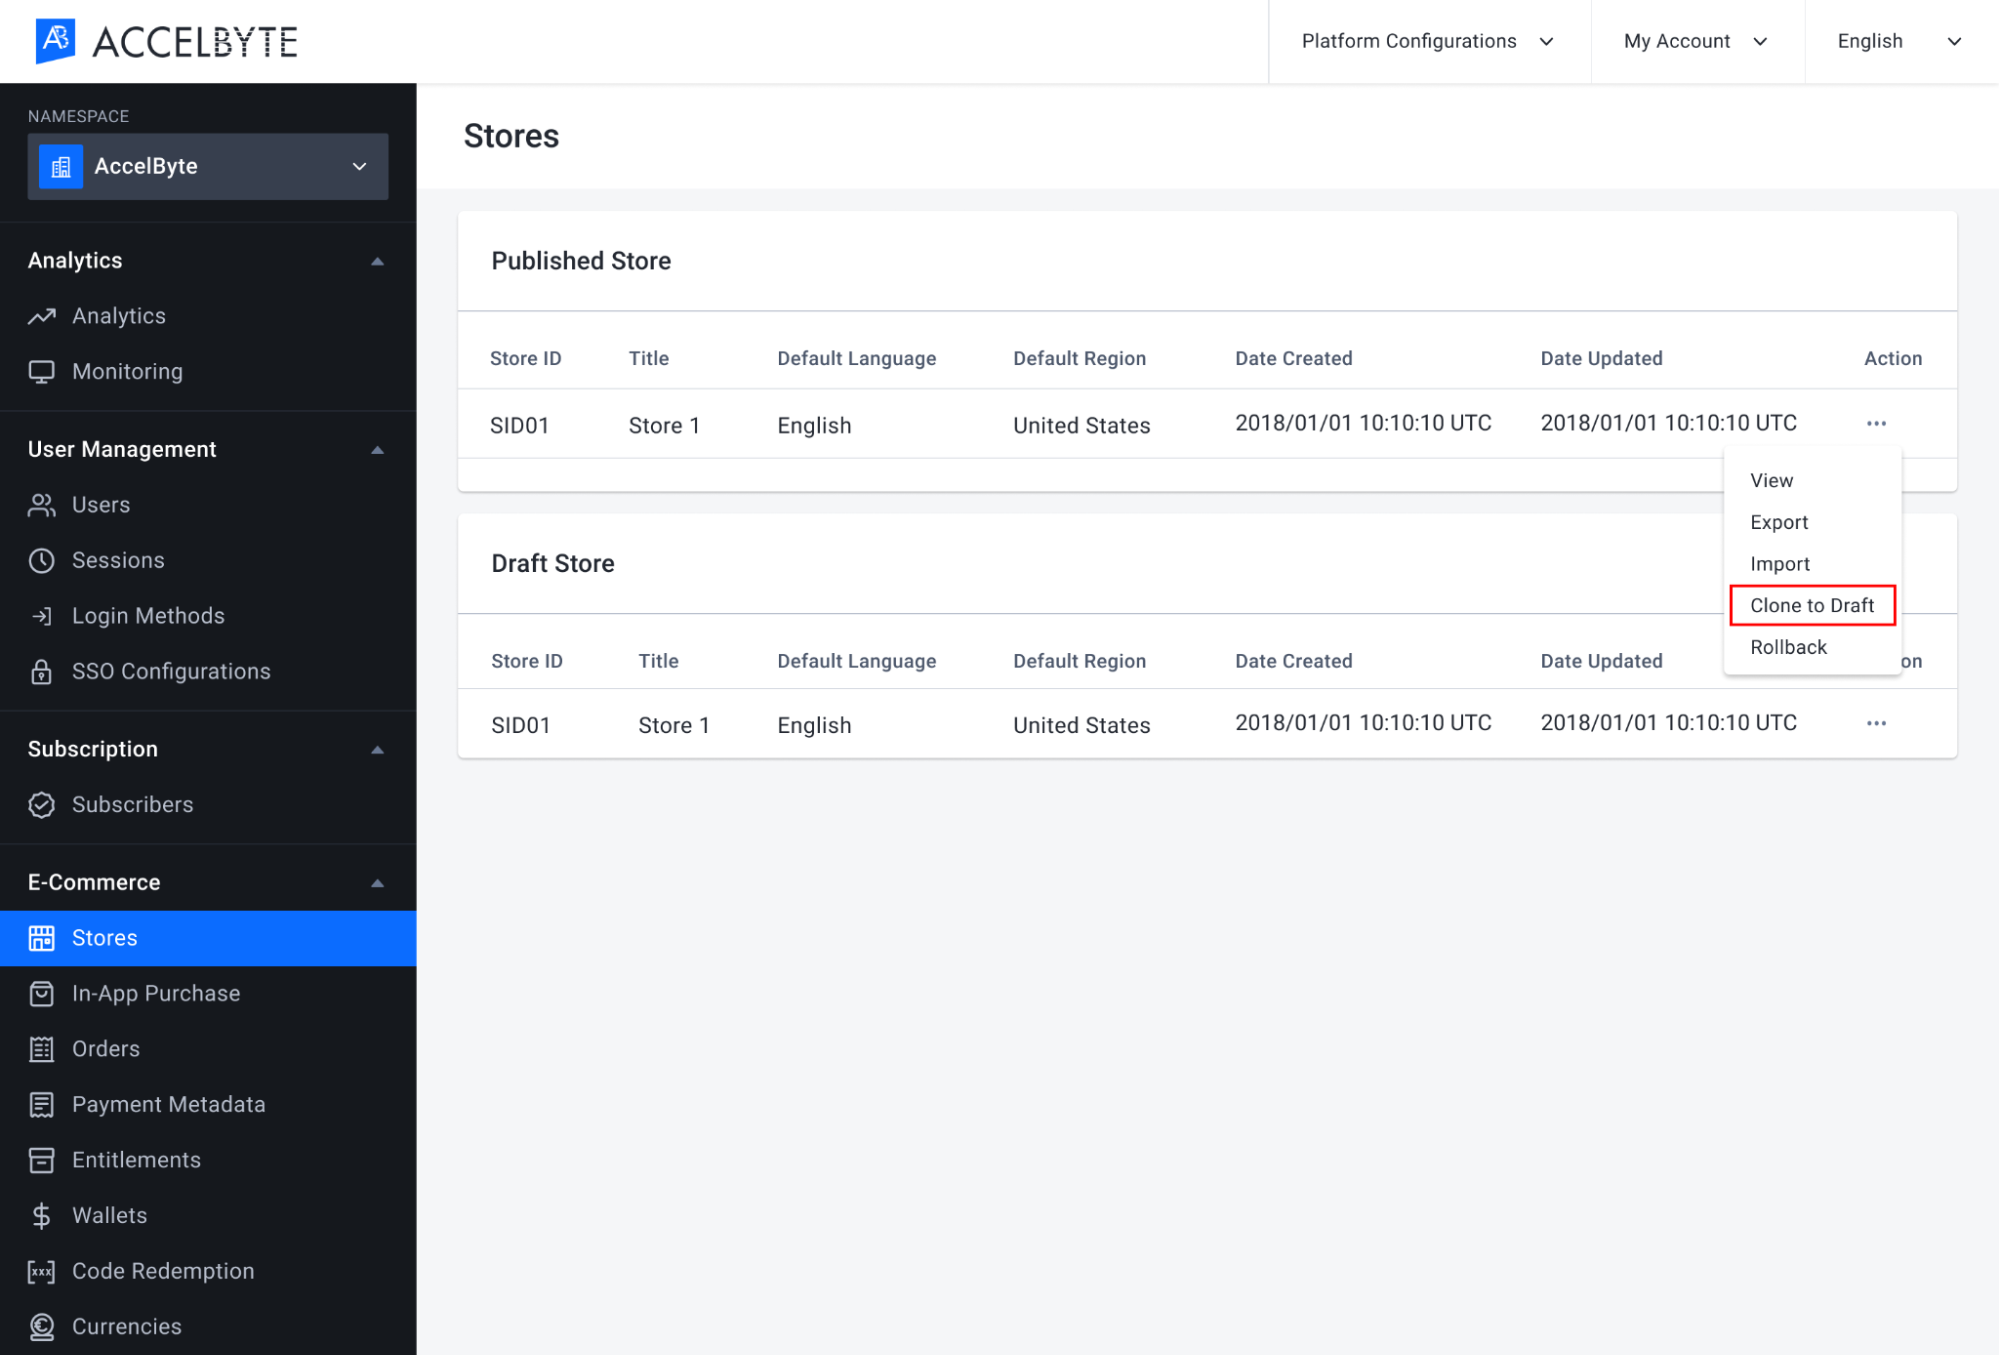
A form will appear and you need to select the Target Store from the list, then click Clone. The target store will receive the cloned data from the source store.

Here you can see the Target Store has been cloned to Draft Stores.
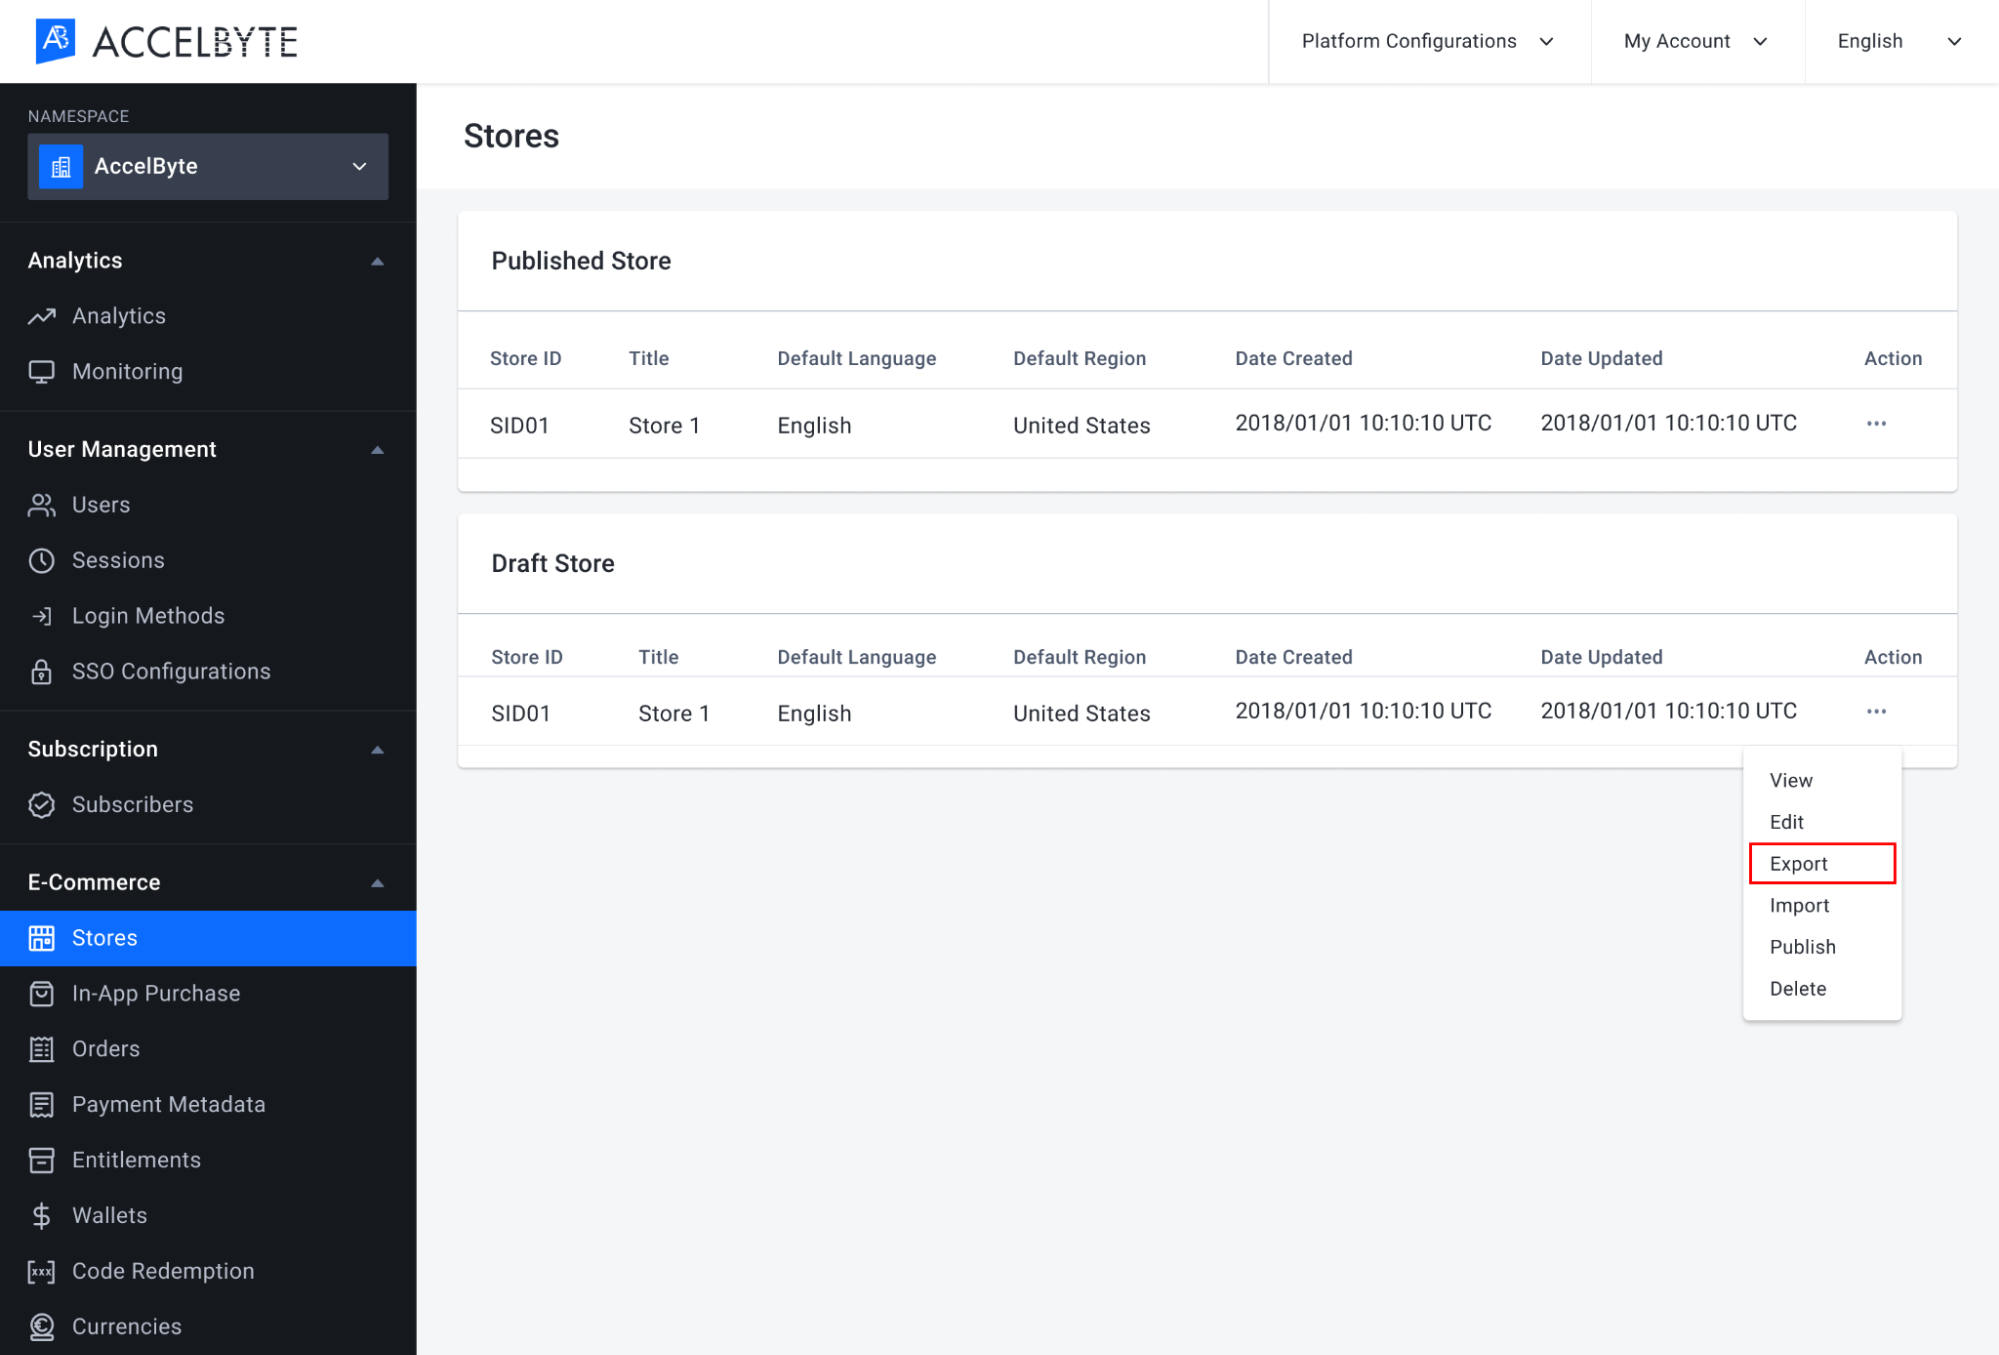
Export and Import a Store
As an administrator, you can also import or export a store to or from the Admin Portal, to be used by another administrator. Before you import a store, make sure you've performed the following actions:
- Make sure a target store exists. If it doesn't exist yet, you can create a new one.
- Make sure the default language and region between the imported store and the target store are the same.
Export a Store
In the Admin Portal, select the Store you want to export. Click the Action field then choose Export from the dropdown menu.
The store will be exported as a ZIP file, which when extracted will produce a JSON file containing your store data.
Import a Store
In the Admin Portal, select the Store you want to import store data into. Click the Action field then choose Import from the dropdown menu.

The Import Store modal appears. Click the Browse button to search for the store data you want to import.
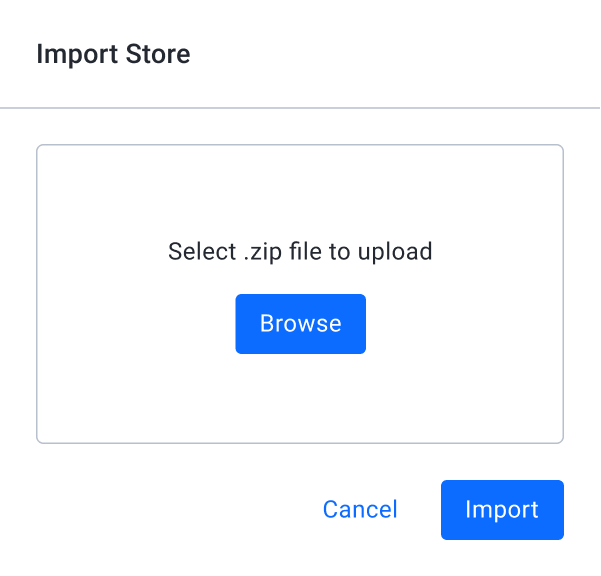
Select which store you want to upload from the directory. After the store has been uploaded, click the Import button.

The target store now contains the imported data.
Implement E-commerce with the Client SDKs
Store Category
The store category is useful to organize items from your store into groups.
Retrieve Store Root Categories
Retrieve root or top most level categories.
- Unreal Engine
- Unity
AccelByte::FRegistry::Category.GetRootCategories(
  /* specified language code */
  ,
  THandler < TArray < FAccelByteModelsCategoryInfo >> ::
  CreateLambda(
    [](TArray < FAccelByteModelsCategoryInfo > Result) {
      /* do something when succeeded */
    }),
  FErrorHandler::CreateLambda([](int32 ErrorCode, FString ErrorMessage) {
    /* do something when fails */
  })
);
string language = "en";
AccelBytePlugin.GetCategories().GetRootCategories(
  language,
  result => {
    if (result.IsError) {
      Debug.Log($"Failed to get root categories: {result.Error.Message}, code: {result.Error.Code}");
    } else {
      Debug.Log("Success to get root categories");
    }
  });
Retrieve Store Category
Retrieve information on a specified category.
- Unreal Engine
- Unity
AccelByte::FRegistry::Category.GetCategory(
  /* specified category path */
  ,
  /* specified language code */
  ,
  THandler < FAccelByteModelsCategoryInfo > ::
  CreateLambda(
    [](FAccelByteModelsCategoryInfo Result) {
      /* do something when succeeded */
    }),
  FErrorHandler::CreateLambda([](int32 ErrorCode, FString ErrorMessage) {
    /* do something when fails */
  })
);
string language = "en";
string categoryPath = "/equipment/weapon";
AccelBytePlugin.GetCategories().GetCategory(
  categoryPath,
  language,
  result => {
    if (result.IsError) {
      Debug.Log($ "Failed to get category: {result.Error.Message}, code: {result.Error.Code}");
    } else {
      Debug.Log("Success to get category");
    }
  });
Retrieve Store Child Categories
Retrieve a list of subcategories that is one level below a specified category.
- Unreal Engine
- Unity
AccelByte::FRegistry::Category.GetChildCategories(
  /* specified language code */
  ,
  /* specified category path */
  ,
  THandler < TArray < FAccelByteModelsCategoryInfo >> ::
  CreateLambda(
    [](TArray < FAccelByteModelsCategoryInfo > Result) {
      /* do something when succeeded */
    }),
  FErrorHandler::CreateLambda([](int32 ErrorCode, FString ErrorMessage) {
    /* do something when fails */
  })
);
string language = "en";
string categoryPath = "/equipment/weapon";
AccelBytePlugin.GetCategories().GetChildCategories(
  categoryPath,
  language,
  result => {
    if (result.IsError) {
      Debug.Log($ "Failed to get child categories: {result.Error.Message}, code: {result.Error.Code}");
    } else {
      Debug.Log("Success to get child categories");
    }
  });
Retrieve Store Descendant Categories
Retrieve a list of subcategories that are multiple levels below a specified category.
- Unreal Engine
- Unity
AccelByte::FRegistry::Category.GetDescendantCategories(
  /* specified language code */
  ,
  /* specified category path */
  ,
  THandler < TArray < FAccelByteModelsCategoryInfo >> ::
  CreateLambda(
    [](TArray < FAccelByteModelsCategoryInfo > Result) {
      /* do something when succeeded */
    }),
  FErrorHandler::CreateLambda([](int32 ErrorCode, FString ErrorMessage) {
    /* do something when fails */
  })
);
string language = "en";
string categoryPath = "/equipment/weapon";
AccelBytePlugin.GetCategories().GetDescendantCategories(
  categoryPath,
  language,
  result => {
    if (result.IsError) {
      Debug.Log($ "Failed to get descendant categories: {result.Error.Message}, code: {result.Error.Code}");
    } else {
      Debug.Log("Success to get descendant categories");
    }
  });
In-Game Item
The In-Game Item API can be called by using the API from SDK game client and the APIs can be used to get the related information about the In-Game Item like get item from specific id, get item from a specific criteria and search items from a specific keywords.
Get Item Info
Get item information from the published store by specifying the itemId parameter.
- Unreal Engine
- Unity
FString ItemId = FString(“<some_item_id>”);
FString Language = FString(“en”);
FString Region = FString(“US”);
AccelByte::FRegistry::Item.GetItemById(
ItemId,
Language,
Region,
THandler<FAccelByteModelsPopulatedItemInfo>::
CreateLambda([](FAccelByteModelsPopulatedItemInfo Result)
{
                        // Do something if GetItemById has been successful
}),
FErrorHandler::CreateLambda([](int32 ErrorCode, FString ErrorMessage)
{
// Do something if GetItemById has an error
})
);
string itemId = "MyItemId";
        string region = "US";
        string language = "en";

        AccelBytePlugin.GetItems().GetItemById(itemId, region, language, result =>
        {
            if (result.IsError)
            {
                // Do something if GetItemById has an error
                Debug.Log($"Error GetItemById, Error Code: {result.Error.Code} Error Message: {result.Error.Message}");
            }
            else
            {
                // Do something if GetItemById has been successful
            }
        });
Query Item by Criteria
Get a list of items from the published store that match specific criterias/filters. Available criterias are like the following:
- ItemType: Allow enumeration values from the EAccelByteItemType enum class in Unreal Engine and itemType enum class in Unity. There are 5 item types available which are: COINS, INGAME ITEM, BUNDLE, APP, CODE.
- AppType: Allow enumeration values from the EAccelByteAppType enum class in Unreal Engine and appType enum class in Unity. There are 5 item types available which are: GAME, SOFTWARE, DLC, DEMO.
- Region: Define item region. Using current store region settings when unspecified.
- Language: Define item language. Using current store language settings when unspecified.
- CategoryPath: An item category path. Example: “/equipment/weapon”.
- SortBy: Allow string values. There are 11 sorting types available which are: name, name:asc, name:desc, createdAt, createdAt:asc, createdAt:desc, updatedAt, updatedAt:asc,updatedAt:desc, displayOrder, displayOrder:asc, displayOrder:desc.
- Tags: Define item tags.
- Unreal Engine
- Unity
FAccelByteModelsItemCriteria ItemCriteria;
ItemCriteria.ItemType = EAccelByteItemType::COINS;
ItemCriteria.Region = “US”;
ItemCriteria.Languge = “en”;
Int32 Offset = 0;
Int32 Limit = 99;

AccelByte::FRegistry::Item.GetItemsByCriteria(
ItemCriteria,
Offset,
Limit,
THandler<FAccelByteModelsItemPagingSlicedResult>::
CreateLambda([](FAccelByteModelsItemPagingSlicedResult Result)
{
                        /* Do something when succeeded */
}),
FErrorHandler::CreateLambda([](int32 ErrorCode, FString ErrorMessage)
{
/* Do something when fails */
})
);
ItemCriteria itemCriteria = new ItemCriteria
        {
            region = "US",
            language = "en",
            itemType = ItemType.COINS
        };

        AccelBytePlugin.GetItems().GetItemsByCriteria(itemCriteria, result =>
        {
            if (result.IsError)
            {
                // Do something if GetItemsByCriteria has an error
                Debug.Log($"Error GetItemsByCriteria, Error Code: {result.Error.Code} Error Message: {result.Error.Message}");
            }
            else
            {
                // Do something if GetItemsByCriteria has been successful
            }
        });
Search Items
Search items from the published store by using keywords in the title, description, and long description. The function is language constrained, which requires a language code to properly function. If items don't exist in the specified region, default region items will be returned. When offset and limit value is less than 0, the default value will be used which are 0 for offset and 20 for limit
- Unreal Engine
FString LanguageCode = FString(“en”);
FString keywords = FString(“myItemKeywords”);
FString Offset = 0;
FString Limit - 99;
FString CountryCode = FString(“US”);
AccelByte::FRegistry::Item.SearchItem(
LanguageCode,
Keywords,
Offset,
Limit,
CountryCode,
THandler<FAccelByteModelsItemPagingSlicedResult>::
CreateLambda([](FAccelByteModelsItemPagingSlicedResult Result)
{
            /* do something when succeeded */
}),
FErrorHandler::CreateLambda([](int32 ErrorCode, FString ErrorMessage)
{
/* do something when fails */
})
);
Connect Custom Services to E-commerce using the Server SDKs
SDK Initialization
Before using the Store service from the Golang SDK, you will need to initialize the SDK by following the steps below:
- Create your OAuth Client and assign the necessary permissions to access the Store service.
- Log in as a Client using the SDK.
- Initialize the Store service using the following function:
storeService := &platform.StoreService{
    Client:          factory.NewPlatformClient(&repository.ConfigRepositoryImpl{}),
    TokenRepository: &repository.TokenRepositoryImpl{},
}
Once completed, you can use the Golang SDK to create, read, update, or delete Stores from your serverless app.
Python SDK Initialization
Before using the Store service from the Python SDK, you will need to initialize the SDK by following the steps below:
- Create your OAuth Client and assign the necessary permissions to access the Store service.
- Log in as a Client using the SDK.
Once completed, you can use the Python SDK to create, read, update, or delete Stores from your serverless app.
.NET (C#) SDK Initialization
Before using the Platform service, you will need to set some permissions. Use the following .NET namespaces:
using AccelByte.Sdk.Api.Platform.Model;
using AccelByte.Sdk.Api.Platform.Operation;
using AccelByte.Sdk.Api.Platform.Wrapper;
Java SDK Initialization
Before using the Platform service, you will need to set some permissions. Initialize the Store wrapper from the Platform service using the following code:
Store wStore = new Store(sdk);
Once completed, you can use the SDK to create, read, update, or delete stores.
Create a Store
Use the following function to create a store:
- Golang
- Python
- C#
- Java
created, err := storeService.CreateStore(input)
if err != nil {
  return err
}
return nil
from accelbyte_py_sdk.api.platform import create_store
from accelbyte_py_sdk.api.platform.models import StoreCreate

result, error = create_store(
   body=StoreCreate.create(
       title="<title>"
   )
)
if error:
   print(error)
Store wStore = new Store(sdk);

StoreCreate createStore = new StoreCreate()
{
    Title = "Lorem Ipsum",
    Description = "Lorem ipsum dolor sit amet, consectetur adipiscing elit.",
    DefaultLanguage = "en",
    DefaultRegion = "US",
    SupportedLanguages = new List<string>() { "en", "id" },
    SupportedRegions = new List<string>() { "US", "ID" }
};

StoreInfo? cStore = wStore.CreateStore(CreateStore.Builder
    .SetBody(createStore)
    .Build(sdk.Namespace));
StoreCreate createStore = StoreCreate.builder()
                                .title(storeTitle)
                                .description(storeDescription)
                                .defaultLanguage("en")
                                .defaultRegion("US")
                                .supportedLanguages(Arrays.asList(new String[] { "en", "id" }))
                                .supportedRegions(Arrays.asList(new String[] { "US", "ID" }))
                                .build();

StoreInfo cStore = wStore.createStore(CreateStore.builder()
                                .namespace(namespace)
                                .body(createStore)
                                .build());
Delete a Store
Use the following function to delete a store:
- Golang
- Python
- C#
- Java
err := storeService.DeleteStore(input)
if err != nil {
  return err
}

return nil
from accelbyte_py_sdk.api.platform import delete_store

result, error = delete_store(
   store_id="<store-id>"
)
if error:
   print(error)
Store wStore = new Store(sdk);

StoreInfo? dStore = wStore.DeleteStore(DeleteStore.Builder
    .Build(sdk.Namespace, "<store_id>"));
StoreInfo dStore = wStore.deleteStore(DeleteStore.builder()
                                .namespace(namespace)
                                .storeId(store_id)
                                .build());
Retrieve a Store
Use the following function to retrieve a store:
- Golang
- Python
- C#
- Java
ok, err := storeService.GetStore(input)
if err != nil {
  return err
}

return nil
from accelbyte_py_sdk.api.platform import get_store

result, error = get_store(
   store_id="<store-id>"
)
if error:
   print(error)
Store wStore = new Store(sdk);

StoreInfo? gStore = wStore.GetStore(GetStore.Builder
    .Build(sdk.Namespace, "<store_id>"));
StoreInfo gStore = wStore.getStore(GetStore.builder()
                                .namespace(namespace)
                                .storeId(store_id)
                                .build());
Update a Store
Use the following function to update a store:
- Golang
- Python
- C#
- Java
ok, err := storeService.UpdateStore(input)
if err != nil {
  return err
}

return nil
from accelbyte_py_sdk.api.platform import update_store
from accelbyte_py_sdk.api.platform.models import StoreUpdate

result, error = update_store(
   body=StoreUpdate.create(
       title="<title>"
   ),
   store_id="<store-id>"
)
if error:
   print(error)
Store wStore = new Store(sdk);

StoreUpdate updateStore = new StoreUpdate()
{
    Description = "Updated description."
};
StoreInfo? cStoreUpdate = wStore.UpdateStore(UpdateStore.Builder
    .SetBody(updateStore)
    .Build(sdk.Namespace, "<store_id>"));
StoreUpdate updateStore = StoreUpdate.builder()
                                .description(storeDescriptionUpdated)
                                .build();

StoreInfo cStoreUpdate = wStore.updateStore(UpdateStore.builder()
                                .namespace(namespace)
                                .storeId(storeId)
                                .body(updateStore)
                                .build());
Related Concepts
- Read about Orders to see how players can use your store once you've set it up.
- If you're interested in running a promotional code redemption, check out our Code Redemption page.
- See more information about the Rewards to see how the players can get the rewards that the item is from your store since you are already set up.
- In addition to publishing your own store, you can also integrate our services with e-commerce on third-party platforms. Check out our In-App Purchase Integration guide to learn more.